bora PKFI3 Operating And Installation Instructions
Pro surface induction cooktop
Hide thumbs
Also See for PKFI3:
- Installation instructions manual (44 pages) ,
- Operating instructions manual (56 pages)

Related Manuals for bora PKFI3


Summary of Contents for bora PKFI3
- Page 1 Operating and installation instructions PKFI3 BORA Pro surface induction cooktop PKFI3UMIMEN-101 1044848 - 36 www.bora.com...
-
Page 2: Table Of Contents
Timer function/automatic cut-off ........25 4.2.1 Display and symbols ............10 6.4.3 Automatic heat up function ..........26 4.2.2 How induction cooktops work (PKFI3, PKI3, PKIW3) ..11 Cleaning and maintenance Safety devices ..............12 4.3.1 Safety shut-down ............12 Cleaning agents .............28 4.3.2... -
Page 3: General Information
APAC Pty Ltd and BORA Lüftungstechnik GmbH – hereinafter Safety and warning instructions referred to as BORA – does not assume any liability for damage arising from disregard for or non-adherence to the documents The safety and warning instructions in this manual are included in the scope of delivery! emphasised with symbols and signal words. -
Page 4: Safety
Only use stove guards and covers that are BORA does not assume any liability for approved by the appliance manufacturer; damages caused by improper use or incorrect otherwise, there is a risk of accidents. -
Page 5: Safety Instructions For Installation
LS switch, fuses, automatic circuit appliances (particularly in the case of hard and breakers or contactor. sharp objects). Never use the appliances as work Contact BORA Service. or storage surfaces. Keep hard or sharp objects away from the WARNING! appliance surfaces. -
Page 6: Safety Instructions - Operation
Make sure that technical equipment is provided to enable all of the appliance’s poles to be disconnected from the mains with a contact opening width of at least 3 mm (LS switch and automatic circuit breakers, fuses, contactor). www.bora.com... -
Page 7: Safety Instructions - Cleaning And Maintenance
Special safety instructions for cooktop cleaning Unattended pans can boil over allowing hot liquids and maintenance to escape. Whenever possible, clean the cooktops after every Keep an eye on pans when cooking. use. Try not to let them boil over. www.bora.com... -
Page 8: Safety Instructions - Repairs, Servicing And Spare Parts
Work on electrical components must only be conducted by trained electrical personnel. Before disassembly, safely disconnect the appliance from the mains supply. www.bora.com... -
Page 9: Technical Data
Frequency 50/60 Hz 14,5 Power consumption 3.68 kW Fuse protection 1 x 16 A Fig. 3.2 PKFI3 appliance dimensions front view Dimensions (width x depth x height) 370 x 540 x 52 mm Weight (incl. accessories/packaging) 8.1 kg Cooktop Value Power levels 1–9, P Heat retention levels Front cooking zone (zone 1) 230 x 230 mm 2100 W... -
Page 10: Appliance Description
Fig. 4.2 Control knob operating elements The cooktops PKFI3 and PKI3 also have a 7-segment cooktop display for each cooking zone. Power levels and Knob ring operating functions respectively are shown directly on Touch surface the cooktop. -
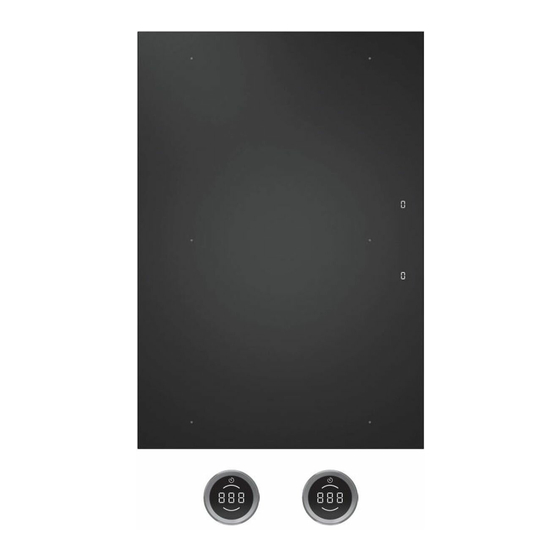
Page 11: How Induction Cooktops Work (Pkfi3, Pki3, Pkiw3)
Cookware with this symbol is suitable for induction cooktops. The cookware used for the induction cooktop must be made of metal, feature magnetic properties and possess an ample base. Fig. 4.5 Layout of cooktop PKFI3 and size of the cooking zones www.bora.com... -
Page 12: Safety Devices
Appliance description PKFI3: Suitable cookware is made of: Power levels Safety shut-down after hours:minutes stainless steel with a magnetisable base 8:24 enamelled steel cast iron 6:24 5:12 Appliance Cooking zone Minimum diameter 4:12 PKFI3 front 120 mm 3:18 rear 120 mm 2:12 Tab. -
Page 13: Childproofing Feature
Appliance description 4.3.4 Childproofing feature If a single cooktop is operated without a cooktop extractor, removal of the knob ring can prevent the appliance from being switched on accidentally or without permission. www.bora.com... -
Page 14: Installation
Make sure the delivery is complete and check it for damage. Minimum distance If there are any missing or damaged parts, please notify the BORA After Sales Service. Minimum clearance of 50 mm at the back from the worktop cut- Do not under any circumstances install parts which are out to the rear edge of the worktop. -
Page 15: Minimum Installation Dimensions (Standard Set-Up)
B O R A L Ü F T U N G S F I B E L 5.4.3 Worktop and kitchen units Create the worktop cut-out taking into account the specified cut-out dimensions. Make sure that the cut surfaces of the worktops are properly sealed. Comply with the instructions of the worktop manufacturer. www.bora.com... -
Page 16: Flush Installation
A in mm B in mm 1310 1338 1310 1681 1709 1681 Tab. 5.3 Cut-out dimensions of the appliance combinations in Tab. 5.2 Cut-out dimensions of the appliance combinations in the case of surface mounting the case of flush installation www.bora.com... -
Page 17: Installing The Control Knob In The Floor Unit Front Panel
Knob ring Wave spring In the case of steel fronts, wave springs must not be used. The corresponding installation steps are to be ≥70 ≥40 omitted. Fig. 5.11 Drilling pattern for 2 cooktops, 1 cooktop extractor and 2 sockets www.bora.com... -
Page 18: Installing The Cooktops
Installation 5.7.1 Installing the cooktop Inserting the cooktop (ports on the front) When installing cooktops PKFI3 and PKI3, pay attention to the position of the cooktop display (alternatively, the cooktop can be installed rotated by 180°). Fig. 5.14 Fitting the control knob Fig. -
Page 19: Installation Rotated By 180° (Alternative Installation Variation)
If installation is rotated by 180°, the ports for the control knobs and the automatic extractor function are at the rear of the cooktops. If installation is rotated by 180°, on cooktops PKFI3 and PKI3 the cooktop display is automatically rotated by 180°. -
Page 20: Establishing Contact Between The Cooktop Extractor And Cooktops
The power supply cable to be used (already pre-installed) must Rear cooking zone (zone 1) Front cooking zone (zone 2) comply with certain, appliance-specific requirements. Rear cooking zone control knob (zone 1) Front cooking zone control knob (zone 2) www.bora.com... -
Page 21: Basic Configuration
Affix the supplied nameplate to the back of these instructions. Provide the user with the accessories and all accompanying Detailed information on how to use the BORA documents, which are to be kept in a safe place. Professional 3.0 system can be found in the cooktop extractor’s operating instructions.. -
Page 22: Functions And Operation
Diagram of the touch commands Switching the appliances off Turn the knob ring anticlockwise to power level 0. Tap command diagram Long press diagram Any active additional functions will be deactivated and the appliance will be switched off. Extra-long press diagram www.bora.com... -
Page 23: Operating The Cooktops
Operating the cooktops 6.3.3 Cooktop power setting The full range of functions is only available for BORA Professional 3.0 system cooktops in combination with the corresponding cooktop extractors PKA3/PKA3AB and When the power setting is activated, maximum cooking zone PKAS3/PKAS3AB. -
Page 24: Pan Size Recognition
It also recognises cookware that is unsuitable or too small, If the bridging function is activated on cooktop PKFI3, the or if there is no cookware present. power setting cannot be used. Use of the power setting is The cooking zone does not work if... -
Page 25: Timer Function/Automatic Cut-Off
Increasing or reducing the active heat retention level Fig. 6.11 Increasing the active heat retention level Fig. 6.14 Activating cooking zone timers The timer is activated for the chosen cooking zone. The control knob display shows the time to be set beginning and the timer symbol www.bora.com... -
Page 26: Automatic Heat Up Function
The system automatically determines the heating time depending on the power level set. PKFI3 Fig. 6.16 Turning the knob ring anticlockwise Power level (continuous cooking... - Page 27 Time lapsed When the heat up time has lapsed, the previously set continuous cooking level will be activated. An acoustic signal is heard. The heat up symbol will no longer be displayed www.bora.com...
-
Page 28: Cleaning And Maintenance
Never use a cooktop as a work or storage surface. Do not push or pull cookware over the cooktop. Always lift pots and pans. Keep the cooktop clean. Remove any dirt immediately. Only use suitable cookware on the appliance (see the Appliance description chapter). www.bora.com... -
Page 29: Cleaning The Control Knobs
7.4.2 Cleaning the touch surface and the knob housing Remove the knob ring. Clean the touch surface and the knob housing with a soft, damp cloth. Dry the touch surface and the knob housing carefully. Place the knob ring on the knob housing. www.bora.com... -
Page 30: Troubleshooting
Tab. 8.1 Resolving a fault Acknowledge the error by tapping the control knob. In all other cases, contact the BORA Service Team (see „10 Warranty, technical service, spare parts, accessories“) and enter the error number displayed and the appliance type. www.bora.com... -
Page 31: Decommissioning, Disassembly And Disposal
Never put your old appliance in domestic waste. Take the old appliance to a regional collection point for return and recycling electrical and electronic components and other materials. www.bora.com... -
Page 32: Warranty, Technical Service, Spare Parts, Accessories
BORA Service: BORA dealer and is valid for 2 years. By registering on www. bora.com/registration the end customer has the possibility of see reverse side of operating and assembly instructions extending the manufacturer’s warranty. -
Page 33: Notes
Notes 11 Notes www.bora.com... - Page 34 Notes www.bora.com...
- Page 35 Notes www.bora.com...
- Page 36 Bei der Erstellung dieser Bedienungs- und Montageanleitung wurde mit größter Sorgfalt gearbeitet. Dennoch kann es passieren, dass nachträgliche technische Änderungen noch nicht ergänzt bzw. entsprechende Inhalte noch nicht angepasst wurden. Wir bitten dies zu entschuldigen. Eine aktualisierte Version kann über das BORA Service Team angefordert werden. Druckfehler und Irrtümer vorbehalten. © BORA Vertriebs GmbH & Co KG Alle Rechte vorbehalten.
Need help?
Do you have a question about the PKFI3 and is the answer not in the manual?
Questions and answers