Table of Contents
Advertisement
Preface
We appreciate your business. Your sa
you with comprehensive technical sup
contact your local sales representative
for any help needed at the contact info
Contact us
No part of this document (including the
electronic version) may be reproduced or
transmitted in any form or by any means
without prior written permission from
FiberHome.
Information in this document is subject to
change without notice.
tisfaction is our goal. We will provide
pport and after-sales service. Please
e, service representative or distributor
ormation shown below.
Fiberhom
me Telecommunication Technologies
Co., Ltd.
.
Address:
No. 67, Guanggu Chuangye Jie,
Wuhan, H
Hubei, China
Zip code
: 430073
Tel: +6 03
3 7960 0860/0884 (for Malaysia)
+91
98 9985 5448 (for South Asia)
+593
3 4 501 4529 (for South America)
Fax: +86
27 8717 8521
Website:
http://www.fiberhomegroup.com
All rights
reserved
Advertisement
Table of Contents

Subscribe to Our Youtube Channel
Related Manuals for FiberHome AN6001-G16


Summary of Contents for FiberHome AN6001-G16
- Page 1 No part of this document (including the electronic version) may be reproduced or transmitted in any form or by any means without prior written permission from FiberHome. Information in this document is subject to change without notice. All rights reserved...
-
Page 2: Installation Procedure
Installation Procedure Operation procedure Reference information Start Page Safety Page 2 precautions Equipment Pages Installation Page 4 appearance and preparations structure Page 3 Installation tools Installing the Pages equipment in an indoor cabinet Pages Installing the equipment Mounting the Page 7 equipment on the wall Requirements for... -
Page 3: Safety Precautions
Safety Precautions Warning Laser Safety To prevent laser radiation from injuring eyes, do not look into the Laser class end face of the fiber or fiber connector directl ly with naked eyes. identifier Caution ESD Protection Do not touch any component or wires on the Do not touch any component or wires on the equipment or metal conductors in sockets ESD equipment or metal conductors in sockets. -
Page 4: Installation Tools
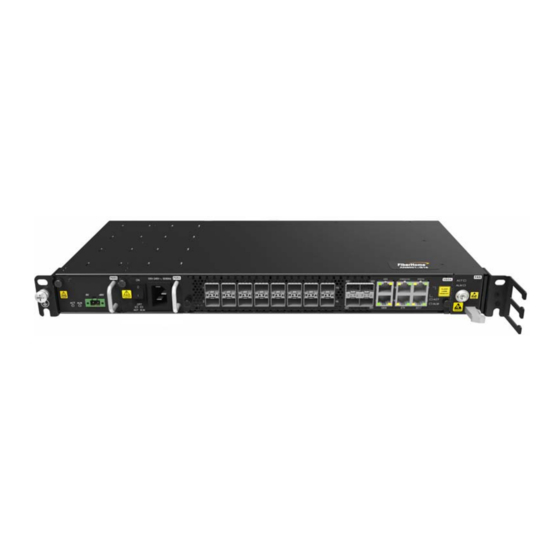
Installation Tools Marker pen Electric drill (including Ladder Vacuum cleaner the drilling bit) Claw hammer (insulated) Spirit level Knife Long tape Flat screwdriver Cross screwdriver Crimping pliers (insulated) (insulated) Hydraulic pliers Sharp nose pliers Wire clipper Diagonal pliers Wire stripper Torque wrench Combination wrench M6 to M12 socket wrench... - Page 5 Equipment Appearance and Struc cture Equipment Structure The figure below illustrates the components of the AN6001-G16. Here the AC-DC hybrid power supply scheme is used as an example. Description Function Mounting ear Secures the e equipment in the cabinet. ①...
-
Page 6: Installing Equipment
Installing Equipment Equipment Layout Rules for Arranging the Equipment Instruction The AN6001-G16 can be installed in a 19-inch cabin net (4102596 to 4102599) or a 21-inch cabinet (404000068 to 404000071 and 404000596 to 40400 00599). A cabinet can house three AN6001-G16s at mos ... - Page 7 Installing the Equipment in a 19-inch Cab binet Tool Cross Flat Marker pen Panel s crew Screw screwdriver screwdriver Component Fiber guide unit Fiber guide slot for a 19-inch cabinet (801000976) (806000069) Fiber guide slot for a 21-inch cabinet (801000932) Mounting the Equipment in a Cabinet The equipment can be mounted in a cabinet in three way ys as illustrated below: install the fiber guide unit...
- Page 8 Rear side of ≥30 Unit: mm the equipment Wall mounting ears ≥80 ≥80 AN6001-G16 Note he equipment room (1) Hex machine screw M8 x 60 hould be dry and Front side of (2) Spring washer ≥300...
- Page 9 Heat Dissipation Requirement The AN6001-G16 is designed with a heat dissip pation system based on air cooling, with the air forced into the equipment from the left and out of the equipment from the right. Enough space should be reserved on both sides of the equipm ment to allow air flow.
-
Page 10: Replacing A Module
Replacing a Module ESD protection gloves / Caution wrist strap When replacement of a module is required d onsite, check the module connector on the backplane be efore the replacement. Cross Captive If resistance is encountered when you are e plugging a screwdriver screw... - Page 11 Operation Rules for Plugging / Un plugging Optical Modules Plugging the Optical Module Hold the optical module, and plug it into the equipment along the EMI cage. Material Order number number Working wavelength Transmission distance Rate Material code of module part Unplugging the Optical Module Grab the pull-ring of the optical module with the Fiber puller...
- Page 12 (here the top access wiring mode is used as an example). The AN6001-G16 can use the following PD DPs. Please refer to Product Overview for the rules of choosing a PDP.
- Page 13 Connecting Protection Earth Grou und Cables 11.1 Connecting the Cabinet Protection Earth h Ground Cable Connected to the earth ground bar in the equipment room screw Cross Screw screwdriver 11.2 Connecting the Equipment Protection E Earth Ground Cable Floating nut screw Earth ground Equipment...
-
Page 14: Connecting Power Cables
Connecting Power Cables 12.1 Connecting External Power Cables Warning Make sure the external power supply is shu ut off before connecting the external power cables. Do not connect the power cables when they ar re powered. Make sure the DC power input is cut off, an nd identify the switches to be used. - Page 15 Instruction The following introduces how to connect the external pow wer cables when the PDP296B (3000068) is used. The protection earth ground cable for the PDP has been connected to the PE terminal before delivery of the PDP; users need only to connect the other end of the ca able to the earth ground point on the top of the cabinet.
- Page 16 Cord end terminal (0 V, black) 0V_A_1 to 0V_A_3 terminals (active) 0 V branch power ra ail output terminal 0V_B_1 to 0V_B_3 terminals (standby) Two-conductor Connected to the po ower input interface on the DC power module (PWRD) of the power plug AN6001-G16.
- Page 17 12.3 Connecting the AC Power Cable for the Equipment Warning The AC voltage is high. Make sure the AC C power supply is cut off before connecting the AC power cable to prevent electric shock. Make sure the power switch on the AC po ower card is placed in the OFF position before connecting the AC power cable.
-
Page 18: Connecting The Network Cable
Connecting the Network Cable Connected to the opposite end equipment Network cable Connection Equipment End (RJ-45) Opposite E End (RJ-45 / Bare Wire) Connected d to the uplink equipment, out-of-band network GE5, GE6, ETH, and 1PPS/TOD manageme ent system, time synchronization equipment, and so interfaces of the HSOA card Note 1 DC1-7 interface of the HSOA card... - Page 19 Rules for Binding Cables Rules for Binding Cables Illustration Keep the bound cables neat. The horizontal cables should be bound with proper and equal spacing between the cable ties. Do not join several cable ties to make a longer one and bind cables with it, which may reduce the binding force.
- Page 20 Select the right type of the optical fiber jumpe r according to the type of the optical interfaces on the local equipment and opposite end equipment. . The optical interfaces on the AN6001-G16 correspond to two types of optical fiber conne ectors: LC/PC and SC/PC.
- Page 21 14.2 Connecting the Internal Optical Fibers Connected to the remote ONU / IP network (Routing internal optical fibers via the fiber guide unit) (Routing internal optical fibers via the e fiber guide slot) (Routing internal optical fib bers directly) Connection Connector Equipment End Opposite End...
- Page 22 14.3 Arrangement after Layout After the connection of the optical fibers is completed, installers should bind the optical fibers between the cabinet entrance and fiber passage area with dedicated fiber b binding straps to secure them. Connect the optical fibers on the ODF side. Remove the temporary labels;...
-
Page 23: Post-Installation Inspection
15.2 Checking Before Power-on Caution The AN6001-G16 supports three power supp ply schemes: dual-AC power supply, dual-DC power supply, and AC-DC hybrid power supply. The e allowed DC voltage range is -40 V to – 57 V, and the allowed AC voltage range is 100 V to 240 V. -
Page 24: Do's And Don'ts
Dos and Don’ts Direct or indirect contact Promptly report any (through damp objects) with Do not install / operate the Do not connect or remove conditions that may lead to high voltage power supply equipment or lay cables the power cable while it is security problems.
Need help?
Do you have a question about the AN6001-G16 and is the answer not in the manual?
Questions and answers