Akerstroms SESAM 800 Operating Manual
Hide thumbs
Also See for SESAM 800:
- Manual (112 pages) ,
- Operating manual (28 pages) ,
- Operating manual (16 pages)
Table of Contents
Advertisement
Quick Links
Advertisement
Table of Contents

Subscribe to Our Youtube Channel
Related Manuals for Akerstroms SESAM 800


Summary of Contents for Akerstroms SESAM 800
- Page 1 OPERATING MANUAL SESAM 800 L15, M6, S6, S3, K3, RX DIN1 954446-000 EN -A1...
- Page 2 2 (20) Revision history Version Date Reason 2017-05-03 released manual 2019-08-21 Type label position added, replacing battery clarified S800 DIN1 Operating Manual (original instructions) Document-ID: 954446-000 EN Version: A1 Author: SH...
-
Page 3: Table Of Contents
3 (20) Table of Contents Introduction _________________________________________ 4 Scope _____________________________________________ 4 Service _____________________________________________ 4 Maintenance _________________________________________ 4 Technical Specifications _______________________________ 5 Description of the System _____________________________ 6 Receiver _________________________________________________6 Transmitters ______________________________________________6 Description of the Receiver ____________________________ 7 Installation of the Receiver _____________________________ 7 Placement of the Receiver ___________________________________8 Connections on the Receiver _________________________________8 Indicators on the Receiver _____________________________ 9... -
Page 4: Introduction
Introduction 4 (20) Introduction This manual only covers the installation of the Sesam radio remote door opening system. The Sesam System is not a complete door opening system: it provides only the set of outputs that are driven according to the actions performed by the operator of the transmitter. -
Page 5: Technical Specifications
Technical Specifications 5 (20) Technical Specifications System Specifications Operating frequency: 869,8 MHz Channel separation: 25 kHz Power output: < 5 mW Functional sensitivity: <= -107 dBm BER 10 Transmission principle: GMSK, TDMA Operating Temperature: -25°C - +55°C Storage Temperature: -40°C - +85°C Specifications DIN1 Power Supply 12-24 V AC/DC... -
Page 6: Description Of The System
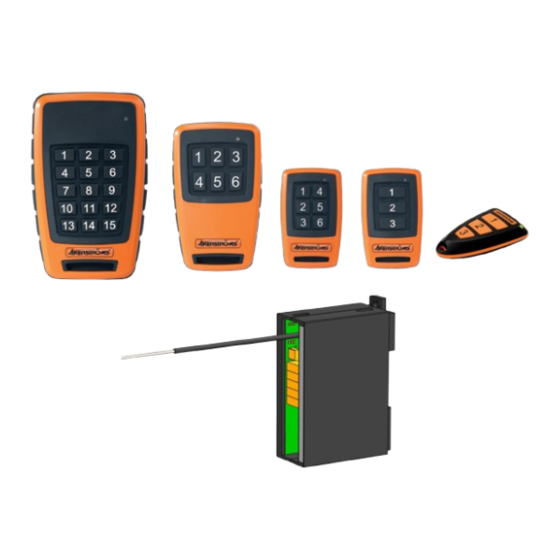
Description of the System 6 (20) Description of the System Receiver Sesam 800 RX DIN1: • 1 Single Pole Double Throw relay. • Memory capacity: up to 100 transmitters. • Designed for DIN rail. Transmitters This document covers five transmitter models: Keyring K3: •... -
Page 7: Description Of The Receiver
Description of the Receiver 7 (20) Description of the Receiver 1. LED indications LED 7 Learn LED 6 Status LED 5 Squelch REL1 2. External antenna 3. Learn/Erase button 4. Power connection ANT1 P1, P2 LED7 LED6 5. Connection to relay 1, LED5 P3, P4, P5 Figure 1. -
Page 8: Placement Of The Receiver
Installation of the Receiver 8 (20) Placement of the Receiver Select a location that is within the environmental limitations of the receiver and where it is difficult for unauthorized persons to obtain access to the receiver. If possible, mount the receiver with the cable glands facing downwards. SESAM RX DIN is to be mounted on a DIN rail. -
Page 9: Indicators On The Receiver
Indicators on the Receiver 9 (20) Indicators on the Receiver The Sesam 800 RX DIN1 model has three LED indicators that are displaying system information. The indications on the LEDs are as follows: LED7 - Learn Indicates if the transmitter is in Learn Mode. -
Page 10: Advanced Configuration
Configuration of the Receiver 10 (20) 10.2 Advanced Configuration REL1 This configuration allows the user to determine the function of the relay; mo- mentary or remaining function. Note that this setting is possible only with the first transmitter, the transmitter will be learned to the receiver at the same time. Alternative after all transmitters has been erased, see section 10.3. -
Page 11: Description Of The Transmitters
Yellow LED ON for 1 second followed by one GREEN flash. The Sesam 800 K3 3 button keyring transmitter 1. Status LED 2. Buttons 1-3 Figure 5. The Sesam 800 K3 transmitter indicator and buttons The Sesam 800 S6 6 button transmitter 1. Status LED 2. Buttons 1-6 Figure 6. The Sesam 800 S6 transmitter indicators and buttons S800 DIN1 Operating Manual (original instructions) - Page 12 Description of the Transmitters 12 (20) The Sesam 800 M6 6 button transmitter 1. Status LED 2. Buttons 1-6 Figure 8. The Sesam 800 M6 transmitter indicators and buttons The Sesam 800 L15 15 button transmitter 1. Status LED 2. Buttons 1-15 Figure 10. The Sesam 800 L15 transmitter indicators and buttons S800 DIN1 Operating Manual (original instructions)
-
Page 13: Replacing Batteries In The Transmitters
Replacing Batteries in the Transmitters 13 (20) Replacing Batteries in the Transmitters 12.1 Replacing Batteries in Sesam K3 If the Status LED on the transmitter indicates low battery, replace the batteries promptly. Before changing the batteries note that changing of batteries must take place in a clean environment free from static electricity. The batteries are changed as follows: Unscrew the 3 screws holding the enclosure together ( ) with screwdriver... -
Page 14: Replacing Batteries In The Sesam 800 S3/S6
Replacing Batteries in the Transmitters 14 (20) 12.2 Replacing Batteries in the Sesam 800 S3/S6 If the Status LED on the transmitter indicates low battery, replace the batteries promptly. Before changing the batteries note that changing of batteries must take place in a clean environment free from static electricity. The batteries are changed as follows: Open the battery cover by unscrewing the six screws on the backside of the transmitter enclosure with screwdriver PH00. -
Page 15: Replacing Batteries In Sesam 800 M6
Replacing Batteries in the Transmitters 15 (20) 12.3 Replacing Batteries in Sesam 800 M6 If the status indicator on the transmitter indicates low battery, replace the batter- ies promptly. Before changing the batteries note that changing of batteries must take place in a clean environment free from static electricity. The batteries are changed as follows: Open the battery cover by unscrewing the 6 screws on the backside of the transmitter cover with screwdriver PH2. -
Page 16: Replacing Batteries In The Sesam 800 L15
Replacing Batteries in the Transmitters 16 (20) 12.4 Replacing Batteries in the Sesam 800 L15 If the Status LED on the transmitter indicates low battery, replace the batteries promptly. Before changing the batteries note that changing of batteries must take place in a clean environment free from static electricity. The batteries are changed as follows: Open the battery cover by unscrewing the 6 screws on the backside of the transmitter housing with screwdriver PH2. -
Page 17: Error Codes For Receiver
Error Codes for Receiver 17 (20) Error Codes for Receiver Any of the error states below is displayed with ten quick flashes on the Status LED (LED6) regardless of fault. • Id already programmed • Memory full • Memory card mismatch during power- up •... - Page 18 18 (20) S800 DIN1 Operating Manual (original instructions) Document-ID: 954446-000 EN Version: A1 Author: SH...
- Page 19 19 (20) S800 DIN1 Operating Manual (original instructions) Document-ID: 954446-000 EN Version: A1 Author: SH...
- Page 20 Åkerströms Björbo AB Box 7, SE-785 21 Gagnef, Sweden street Björbovägen 143 SE-786 97 Björbo, Sweden Phone +46 241 250 00 Fax +46 241 232 99 E-mail sales@akerstroms.com www.akerstroms.com © Åkerströms Björbo AB, 2013...
Need help?
Do you have a question about the SESAM 800 and is the answer not in the manual?
Questions and answers