
Related Manuals for Lumens DC-W80


Summary of Contents for Lumens DC-W80
- Page 1 DC-W80 4K Document Camera User Manual - English [Important] To download the latest versions of the Quick Start Guide, multilingual user manual, software, driver, etc., please visit Lumens https://www.MyLumens.com/support...
-
Page 2: Table Of Contents
Machine Size ..................10 Installation and setup ............... 10 Connecting to a computer and use Lumens™ software (Wi-Fi mode)11 Connect to a projector, monitor or HDTV (HDMI mode) ....11 Connecting to a computer and use Lumens™ software (USB Mode)12 Installing Application Software ............ - Page 3 Chapter 8 Wi-Fi Connection Setting .............. 20 Network connection ................20 Log in to the web page ..............20 Web Page Menu Function Description ..........21 Chapter 9 Set DC-W80 as an AP ..............30 Connection Diagram ................. 30 Device Requirements ............... 30 Setting DC-W80................30 Chapter 10 DIP Switch Setting ...............
-
Page 4: Copyright Information
Inc. Copying, reproducing or transmitting this file is not allowed if a license is not provided by Lumens Digital Optics Inc. unless copying this file is for the purpose of backup after purchasing this product. In order to keep improving the product, Lumens Digital Optics Inc. hereby reserves the right to make changes to product specifications without prior notice. -
Page 5: Chapter 1 Safety Instructions
Please clean the dust on the power plug prior to usage. Do not insert the product’s power plug into a multiplug to prevent sparks or a fire. Do not block the slots and openings in the case of DC-W80 Document Camera. They provide ventilation and prevent the DC-W80 Document Camera from overheating. -
Page 6: Chapter 2 Package Contents
Chapter 2 Package Contents Quick Installation DC-W80 USB cable (USB 2.0) Guide English... -
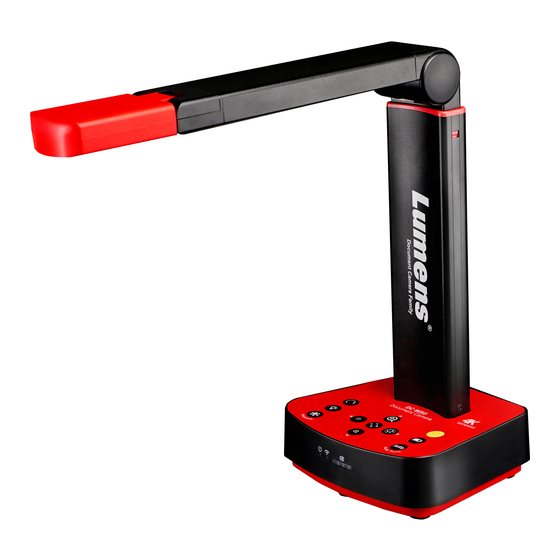
Page 7: Chapter 3 Product Overview
Chapter 3 Product Overview 3.1 Overview Lens/Lamp Control panel LED Indicator 3.2 Extension angle Support Arm < Caution > Please only operate in the extended angles as illustrated. Improper usage may damage the machine. English... -
Page 8: Notes For Operation
3.3 Notes for Operation <Note> When moving the device, do not grasp the front of the lens or the body. Please use both hands to hold the bottom of the device. Handling the device improperly may cause machine failure. 3.4 I/O functions Introduction Front View Back View NO. -
Page 9: Description Of Led Indicator
NO. Item Function Descriptions Lock hole of safety lock Kensington safety lock Press the button for initialization to reset to original Reset Button factory settings. Adjust the resolution setting. The default is 1920*1080/30 fps. DIP Switch Setting To switch the setting, please refer to Chapter 10 DIP Switch Setting Switch Modes: Wi-Fi / HDMI / USB... -
Page 10: Relative Position Of The Presenter And Document
3.6 Relative position of the presenter and document Projector Computer English... -
Page 11: Chapter 4 Installation And Connections
Chapter 4 Installation and Connections 4.1 Machine Size Length x Width x Height: Extended-306 x 140 x 373 mm Closed-137 x 140 x 270 mm Weight: 1.35 kg 4.2 Installation and setup Please set up the DIP switch setting first. Refer to Chapter 10 DIP Switch Setting. -
Page 12: Connecting To A Computer And Use Lumens™ Software (Wi-Fi Mode)11
4.3 Connecting to a computer and use Lumens™ software (Wi-Fi mode) Computer ※Please download the relevant software from Lumens website. For more information on the connection method, please refer to Chapter 8 Wi-Fi Connection Setting. 4.4 Connect to a projector, monitor or HDTV (HDMI mode) -
Page 13: Connecting To A Computer And Use Lumens™ Software (Usb Mode)12
Capture and record images. Annotate the image, highlight important details and save it. Support the full screen function. <Caution> Please download the relevant software from the Lumens website. For installation steps and software operation, please Ladibug™ 4K software user refer to the manual. -
Page 14: Chapter 5 Start Using
Chapter 5 Start Using 5.1 Direct Use (HDMI Mode) Projector Computer Charge for a recommended 10.5 hours prior to first-time operation. The device is fully charged when all the power bars are full and the green light is constant Place an object to be displayed under the camera. Turn on the power and adjust the operation mode according to the connection method. -
Page 15: Use With Ladibug (Wi-Fi Mode)
5.2 Use with Ladibug (Wi-Fi Mode) 5.2.1 Network Connection Switch DC-W80 to Wi-Fi mode, and Wi-Fi LED light turns blue. Open the Wi-Fi network list on the computer, and choose [DC-W80_5G_XXXXXX] (XXXXXX: last six digits of the MAC address). Enter the connection password (default password: 88889999) to enable the connection. - Page 16 ,and select a DC-W80 in the list after the search is completed. 3. Log in as an Admin or a Viewer. The default password for Admin is 9999. 4. After connecting to DC-W80 by clicking [Log In], you can start using it. English...
-
Page 17: Use With Ladibug (Usb Mode)
5.3 Use with Ladibug (USB Mode) 1. Switch to USB mode, and use a USB cable to connect DC-W80 and the computer. 2. Open Ladibug, click to open the [Search Window], and select [USB Document Camera]. 3. You can start using DC-W80. -
Page 18: Chapter 6 Introductions To Control Panel Buttons
Chapter 6 Introductions to Control Panel Buttons Icon Function Descriptions Turn on and off Short press: power on (under stand by) Press for 1 second: turn off (under power on) Press for 10 seconds: force to turn off Battery level check Automatically adjust the image to have the best brightness and focusing performance... -
Page 19: Chapter 7 Descriptions Of Major Functions
Chapter 7 Descriptions of Major Functions 7.1 I would like to automatically adjust the image to have the best brightness and focusing performance Press [Auto Tune] for the best brightness and focusing performance. 7.2 I would like to freeze the live image ... -
Page 20: I Would Like To Rotate The Image
7.6 I would like to rotate the image Press to rotate the image. (The sequence of switching is: 0°/ 90°/ 180°/ 270° /Vertical flip/Horizontal flip) 7.7 I would like to enlarge a part of the image 1. Press to activate the partial enlarged mode. 2. -
Page 21: Chapter 8 Wi-Fi Connection Setting
Chapter 8 Wi-Fi Connection Setting 8.1 Network connection 8.1.1 Switch to the Wi-Fi mode and the Wi-Fi LED indicator will be displayed in blue. 8.1.2 Open the wireless network list on the computer. 8.1.3 Select the [DC-W80_5G_XXXXXX ] (XXXXXX: last 6-digits of the MAC address) in the network list, and input the password for connection (default: 88889999) to start the connection. -
Page 22: Web Page Menu Function Description
8.3 Web Page Menu Function Description 8.3.1 Login Screen Item Function Descriptions User Login Enter user login account (default: admin) Account User Password Enter user password (default: 9999) Remember user Save user login account and password to the account and browser. - Page 23 8.3.2 Live Viewing Item Function Descriptions Preview window Display the screen currently captured by DC-W80 Automatic Image Automatically adjust the image to have the best Optimization brightness and focusing performance Freeze the Freeze the current image on the screen image...
- Page 24 8.3.3 Wi-Fi Setting (Access Point Mode) Item Function Descriptions Wi-Fi Mode Select Access Point or Client Mode Switch between 5G / 2.4G under Wi-Fi Access Wi-Fi 5G/2.4G Point mode Device Name Device name of wireless network Channel Select the channel based on different regions Security Wi-Fi encryption setting Password to connect to this Wi-Fi SSID...
- Page 25 8.3.4 Wi-Fi Setting (Client Mode) Item Function Descriptions Wi-Fi Mode Select Access Point or Client Mode Scan Scan nearby wireless network devices Disconnection Disconnect from current wireless network device Remove the selected wireless network device Remove from the list Click to show the following window. Enter the SSID and the password of the wireless device to be connected to perform the connection Connect to Other...
- Page 26 Show the degree of the Wi-Fi signal 8.3.5 System Information-Network Function Descriptions Display the current network setting information of this DC-W80. Click the [Modify] button, and it will jump to the Wi-Fi settings page, where you can make modifications. English...
- Page 27 8.3.6 System Information-Device Function Descriptions Display current device name of this DC-W80 and login settings. You can modify the device name, user name, and password. Click [Save] to store your change, or click [Cancel] to cancel the modified settings. English...
- Page 28 8.3.7 Streaming Parameter Item Function Descriptions Resolution Show or set the RTSP output resolution and fps Show or set the RTSP Bit rate (0 ~ 20000) Bitrate (kbps) Port Number Set the RTSP port (100 ~ 10000) Turn on/off RTSP audio Audio Setting Check to turn on/off RSTP audio RTSP URL...
- Page 29 8.3.8 Maintenance Item Function Descriptions Reset to the Select the reset button to resume the factory default value default setting as the web page setting Reboot Click the reboot button and reboot the device Error Code In the event of an error, an error code log will be established If an error code appears, the user may try to click Clean...
- Page 30 8.3.9 Maintenance-Upgrade Item Function Descriptions Current software Display the current software version of DC-W80 version Click Choose File to select the software file to be updated, and the selected file name will be Upgrade file path displayed after selection Start Update Click to start upgrade the software 8.3.10 About...
-
Page 31: Chapter 9 Set Dc-W80 As An Ap
Chapter 9 Set DC-W80 as an AP With this connection method, multiple DC-W80s can be controlled via the DC-W80 on the host side. 9.1 Connection Diagram DC-W80 (Client) DC-W80 DC-W80 (Client) (Host) Computer 9.2 Device Requirements More than two DC-W80s ... - Page 32 Click [Save] to apply the changes. 9.3.2 Setting Client DC-W80s a. Turn on client DC-W80s [Note] For initial setting, please turn on only one client DC-W80 at a time. b. Open the wireless network list, and connect to [DC-W80_5G_XXXXXX] (XXXXXX: last six digits of the MAC address).
- Page 33 Click to search for a DC-W80 that can be connected. After the search is complete, click on a DC-W80 in the list for connection and start the operation. e. To switch to another DC-W80, please open the [Search Window] again and click other DC-W80s.
-
Page 34: Chapter 10 Dip Switch Setting
Chapter 10 DIP Switch Setting 10.1 Description of DIP Function Descriptions DIP1 & DIP2 Output Resolution DIP3 OFF (Normal mode): 30/25 fps, applicable to general scene ON (High-speed mode): 60/50 fps, applicable to support rapidly changing scene (Only applicable to 1080P) DIP4 : 60Hz ON: 50Hz... -
Page 35: Chapter 11 Troubleshooting
Chapter 11 Troubleshooting This chapter describes problems you may encounter while using DC-W80. If you have questions, please refer to related chapters and follow all the suggested solutions. If the problem still occurred, please contact your distributor or the service center. -
Page 36: Information
Supplier's Declaration of Conformity 47 CFR § 2.1077 Compliance Information Manufacturer:Lumens Digital Optics Inc. Product Name:DC-W80 Model Number:4K Document Camera Responsible Party – U.S. Contact Information Supplier:Lumens Integration, Inc. 4116 Clipper Court, Fremont, CA 94538, United States e-mail :support@mylumens.com FCC Compliance Statement This device complies with Part 15 of the FCC Rules.
Need help?
Do you have a question about the DC-W80 and is the answer not in the manual?
Questions and answers