Table of Contents
Advertisement
Quick Links
■ 1.043-342.0
■ 1.043-381.0
■ 1.043-343.0
■ 1.043-380.0
9.8
01
-12
5.0
For technical assistance or for the dealer nearest you
visit our website at www.CudaUSA.com
Parts Washer
N
I O
N T
E D
O V
T E
P R
N D
A T
A P
T E
R !
E A
D A
E X
C U
T O
1 -Y
O
N LY
T S
Y T
R
E O
E N
N T
) PE
R G
K G
U S
R A
ER
T E
A R
(1 /2
W AT
D E
1 LB
O F
t
R W
R S)
vi si
B O
TS
nt s
G EN
5 LI
TE
L A
ge
or
E D
D ET
ER
S (1
et er
O N
d D
.c om
IT
M IX
A LL
ro ve
sa
3. 0
L IM
5- G
au
82
7- 51
AN
TY
pp
.c ud
9- 08
9. 80
RR
A A
w w
R WA
EA R
U D
8- 31
LA BO
1-Y
E OF
r C
:// w
ll 88
AY
S TO
US
Fo
ht tp
90 -D
ND
IVE
TS
ca
EX TE
EX CL
US
TE RG
EN
WI
TH
DA
DE
CU
2518
■ 1.043-344.0
■ 1.043-345.0
89156300-1
8.915-630.0
Advertisement
Table of Contents

Related Manuals for CUDA 1.043-342.0


Summary of Contents for CUDA 1.043-342.0
- Page 1 2518 Parts Washer ■ 1.043-342.0 ■ 1.043-343.0 ■ 1.043-344.0 ■ 1.043-380.0 ■ 1.043-345.0 ■ 1.043-381.0 1 -Y N LY ) PE (1 /2 W AT 1 LB R S) vi si nt s G EN 5 LI D ET S (1 et er .c om...
-
Page 3: Table Of Contents
Low Water Shut-off Automatic Water Fill 12-13 Detergent Concentration Preparing the Machine for Use Washing Parts Shutting Down the Machine seCtION 4 troubleshooting Overview 14-16 Troubleshooting the Electrical System Testing Individual Components 18-19 CUDA 2518 • 8.915-630.0 • Rev. 7/13... - Page 4 The model and serial numbers will be found on a decal attached to the parts washer. You should record both serial number and date of purchase and keep in a safe place for future reference. CUDA 2518 • 8.915-630.0 • Rev. 7/13...
-
Page 5: Owner Responsibility
3. The machine can only operate on the type of electri- cal power indicated on the electrical specifications tag. Operating the machine on any other power supply will permanently damage the motors. CUDA 2518 • 8.915-630.0 • Rev. 7/13... -
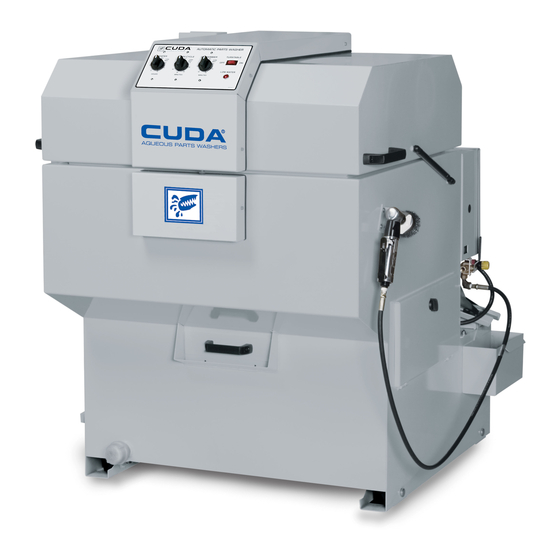
Page 6: Component Identifications
(Optional) S TO ht tp 90 -D TE ND EX CL TE RG Lid handle Power brush skimmer (Optional) assy. access Panel debris tray sump drain Collection Container detail brush assembly (Optional) 89156300-2 CUDA 2518 • 8.915-630.0 • Rev. 7/13... - Page 7 COMPONeNt IdeNtIFICatION - rear Control Panel steam Vent electrical Optional autofill assy. drive Motor assy. access Panel sump Pump Power Cord heating element/ thermostat assy. 89156300-3 Low Water shutoff CUDA 2518 • 8.915-630.0 • Rev. 7/13...
-
Page 8: Electrical Connections
75 to 90 psi. It is also recommended that an in-line moisture trap and an in-line lubricator be installed on the main air supply CUDA 2518 • 8.915-630.0 • Rev. 7/13... - Page 9 (160°-180°F) in ap- proximately one hour. When the machine stops (and after the wash water reaches operating temperature), it is ready for use. Re- fer to Operation for complete operating instructions. CUDA 2518 • 8.915-630.0 • Rev. 7/13...
-
Page 10: Main Operating Components
The switch is useful for washing large parts that would otherwise impede turntable rotation. LOW Water INdICatOr The low water indicator light illuminates if the wash solution in the sump is low. CUDA 2518 • 8.915-630.0 • Rev. 7/13... -
Page 11: Air Flow Valve
NOte: The detail brush is available as an option on the base model H O-2518. NOte: The power brush is a standard component on the model H 0-2518 Deluxe Edition. It is available as an option on the base model H 0-2518. CUDA 2518 • 8.915-630.0 • Rev. 7/13... -
Page 12: Oil Skimmer System
CLOsed, bottom switch Water Fill Valve (if installed) CLOsed, CLOsed, automatic Water Fill Valve (if OPeN, automatic Water Fill Valve (if heating element ON. installed) OPeN, heating element OFF. installed) OPeN, heating element OFF. CUDA 2518 • 8.915-630.0 • Rev. 7/13... -
Page 13: Detergent Concentration
• check the water level and add water to the sump tank if necessary; • heat the water to operating temperature; • add detergent if necessary; • verify that none of the spray nozzles are clogged; • clean the debris screen. CUDA 2518 • 8.915-630.0 • Rev. 7/13... -
Page 14: Overview
Thermostat is incorrectly installed Check the thermostat to ensure that it is sOLUtION correctly installed into the mounting bracket Is tOO hOt (See “Thermostat” Section). Failed thermostat Replace the thermostat (See “Thermostat” Section). CUDA 2518 • 8.915-630.0 • Rev. 7/13... - Page 15 OIL skIMMer dOes Blown fuse Check electrical panel for a blown fuse; NOt OPerate replace if necessary. PrOPerLY CUDA 2518 • 8.915-630.0 • Rev. 7/13...
- Page 16 10 to 12 scoops (20 to 24 cups) per 50 rUstING gallons of water, contains adequate rust inhibitors to prevent rust. Verify that you are using our deter- gents at the correct concentration. CUDA 2518 • 8.915-630.0 • Rev. 7/13...
-
Page 17: Troubleshooting The Electrical System
Blown; Replace the ∞ of Each Blown Fuse relay approximately 0 Ohms E l e c t r i c a l Pa n e l i s OK, Refer to Testing Individual Components CUDA 2518 • 8.915-630.0 • Rev. 7/13... -
Page 18: Testing Individual Components
Remove the switch from the control panel and discon- nect all wires. step 3: With the switch fully open (not depressed), test for continuity. If there is continuity the switch is no longer functional; replace the switch. CUDA 2518 • 8.915-630.0 • Rev. 7/13... - Page 19 If there is not continuity the thermostat is no longer functional; replace the thermostat. start Capacitor step 1: disconnect power to the machine. step 2: Remove the turntable motor cover (Two 5/16" screws, See Figure Below). start Capacitor screws CUDA 2518 • 8.915-630.0 • Rev. 7/13...
-
Page 20: Maintenance And Repair
Under typical operating conditions you can expect to remove the oil once each week. To remove oil from the cleaning solution, perform the following procedure: CUDA 2518 • 8.915-630.0 • Rev. 7/13... -
Page 21: Repairing The Machine
NOte: Take special care to ensure that the heating ele- ment is free of debris. A build up of debris around the element will decrease heating performance and may cause the element to overheat and fail. CUDA 2518 • 8.915-630.0 • Rev. 7/13... -
Page 22: Thermostat
Remove the turntable motor cover (Two 5/16" screws, element. See Figure On Next Page). step 5: Remove the tension springs between the motor and the rear wall of the wash chamber (See Figure On Next Page). CUDA 2518 • 8.915-630.0 • Rev. 7/13... -
Page 23: Timers And Switches On The Control Panel
Install the new motor. Installation is the reverse of removal. step 5: Pull the control panel away from the lid. From the rear of the panel remove the component you wish to replace. CUDA 2518 • 8.915-630.0 • Rev. 7/13... -
Page 24: Skimmer Motor
(See Figure Below). To remove the disk, disengage it from the center pin then slide it down. slide Cover toward rear to remove screws CUDA 2518 • 8.915-630.0 • Rev. 7/13... - Page 25 Remove the three screws from the skimmer motor Reassemble the skimmer and replace it on the machine. mounting plate to remove the motor from the skimmer Assembly is the reverse of removal. assembly (See Figure Below). CUDA 2518 • 8.915-630.0 • Rev. 7/13...
-
Page 26: Front Exploded View And Parts List
Y TO ) PE 2 KG 1 LB nt s X DE pr ov S TO r CU ht tp ://w ll 88 H EXC A DET angles Match 61,62,63 89156300-4 Field Installed CUDA 2518 • 8.915-630.0 • Rev. 7/13... - Page 27 Clamp, Tie Wrap Adhesive 3 ▲ Not Shown 8.716-547.0 Connector, 1/2 LT Straight Black 8.712-861.0 Edge Trim, Neoprene 24" 8.714-539.0 Label, Control Cuda 2518 8.713-357.0 Timer, 30 Min Spring Wound 8.712-855.0 Bolt, 3/4-16 x 1-1/2 CUDA 2518 • 8.915-630.0 • Rev. 7/13...
-
Page 28: Spray Arm Exploded View And Parts List
VIeW top & bottom side align Notch in rotate each Nozzle each spray Nozzle approximately 3° with the Center of from Center Line the turntable of Pipe CUDA 2518 • 8.915-630.0 • Rev. 7/13... - Page 29 U-Bolt, 5/16" x 1-1/2" Pipe Knurled Point 9.802-805.0 Washer, 5/16", Flat, 8.921-456.0 Manifold, Spray Pipe SAE, SS w/Swivel 9.802-777.0 Nut, 5/16", ESNA, NC,SS 8.706-193.0 Elbow, 1-1/2" GALV 90° 8.706-014.0 Nipple, 1-1/2" x 2" Long CUDA 2518 • 8.915-630.0 • Rev. 7/13...
-
Page 30: Rear Exploded View And Parts List
VIeW 89156300-5 CUDA 2518 • 8.915-630.0 • Rev. 7/13... - Page 31 Nut, Cage 10/32" RDH PL 8.913-741.0 Pump Spacer 8.913-749.0 Stop Lid Hinge ▲ Not Shown 9.802-802.0 Washer, 5/16" Flat SAE 9.802-773.0 Nut, 1/4" ESNA NC 9.804-223.0 Decal, Operator Instructions 1 8.706-327.0 Plug, 1.5" Pipe Galv CUDA 2518 • 8.915-630.0 • Rev. 7/13...
-
Page 32: Options Exploded View And Parts List
R WA EA R 8- 31 LA BO E OF :// w ll 88 S TO ht tp 90 -D EX TE EX CL TE RG auto Fill Option Power brush Option 89156300-6 CUDA 2518 • 8.915-630.0 • Rev. 7/13... - Page 33 ▲ Connector, Electrical 3 Pin 9.802-698.0 Screw, 10-32" x 1/2" BH, Female SOC, SS 8.713-768.0 ▲ Connector, Electrical Pin 9.804-567.0 Nut, 10/32", ESNA Male 8.915-637.0 Bracket, Power Brush ▲ Not Shown 8.718-568.0 Washer, 1/4" Flat SS Sealing CUDA 2518 • 8.915-630.0 • Rev. 7/13...
-
Page 34: Electrical Panels, Exploded Views And Parts Lists
208V 1 Phase eLeCtrICaL PaNeL - exPLOded VIeW From Control Panel to Control Panel Pump to turntable Motor to heater 11, 34 timer Option skimmer 12, 13 auto Fill Option CUDA 2518 • 8.915-630.0 • Rev. 7/13... - Page 35 Nut, 3/8 Flange, Whiz Loc 8.718-835.0 Nut, 5/8 Jam, ESNA NF 9.802-807.0 Washer, 3/8 SAE Flat 8.716-599.0 Terminal, Grounding Green w/yellow 8.716-402.0 Bridge, Fixed Enterlec 8.718-937.0 Screw, #8 x 3/4 Phillips Zinc Plated CUDA 2518 • 8.915-630.0 • Rev. 7/13...
- Page 36 230V 1 Phase eLeCtrICaL PaNeL - exPLOded VIeW From Control Panel to Control Panel Pump to turntable Motor to heater 11, 34 timer Option skimmer 12, 13 auto Fill Option CUDA 2518 • 8.915-630.0 • Rev. 7/13...
- Page 37 Nut, 3/8 Flange, Whiz Loc 8.718-835.0 Nut, 5/8 Jam, ESNA NF 9.802-807.0 Washer, 3/8 SAE Flat 8.716-599.0 Terminal, Grounding Green w/yellow 8.716-402.0 Bridge, Fixed Enterlec 8.718-937.0 Screw, #8 x 3/4 Phillips Zinc Plated CUDA 2518 • 8.915-630.0 • Rev. 7/13...
- Page 38 208V 3 Phase eLeCtrICaL PaNeL - exPLOded VIeW From Control Panel to Control Panel Pump to turntable Motor to heater timer Option skimmer auto Fill Option CUDA 2518 • 8.915-630.0 • Rev. 7/13...
- Page 39 9.802-457.0 Din Rail 35mm 7.625" 9.802-448.0 Conduit, Water Tight, Flex 1/2" 24" 9.803-832.0 Conduit, Water Tight, Flex 3/4" 21" 9.802-448.0 Conduit, Water Tight, Flex 1/2" 14" 9.802-448.0 Conduit, Water Tight, Flex 1/2" 26" CUDA 2518 • 8.915-630.0 • Rev. 7/13...
- Page 40 230V 3 Phase eLeCtrICaL PaNeL - exPLOded VIeW From Control Panel to Control Panel Pump to turntable Motor to heater timer Option skimmer auto Fill Option CUDA 2518 • 8.915-630.0 • Rev. 7/13...
- Page 41 9.802-457.0 Din Rail 35mm 7.625" 9.802-448.0 Conduit, Water Tight, Flex 1/2" 24" 9.803-832.0 Conduit, Water Tight, Flex 3/4" 21" 9.802-448.0 Conduit, Water Tight, Flex 1/2" 14" 9.802-448.0 Conduit, Water Tight, Flex 1/2" 26" CUDA 2518 • 8.915-630.0 • Rev. 7/13...
- Page 42 460V 3 Phase eLeCtrICaL PaNeL - exPLOded VIeW From Control Panel to Control Panel Pump to turntable Motor to heater timer Option skimmer auto Fill Option CUDA 2518 • 8.915-630.0 • Rev. 7/13...
- Page 43 Bridge, Fixed Enterlec 9.800-040.0 Label, Ground Symbol 9.802-448.0 Conduit, Water Tight, Flex 1/2" 24" 9.803-832.0 Conduit, Water Tight, Flex 3/4" 21" 9.802-448.0 Conduit, Water Tight, Flex 1/2" 9.802-448.0 Conduit, Water Tight, Flex 1/2" 26" CUDA 2518 • 8.915-630.0 • Rev. 7/13...
- Page 44 575V 3 Phase eLeCtrICaL PaNeL - exPLOded VIeW From Control Panel to Control Panel Pump to turntable Motor to heater timer Option skimmer auto Fill Option CUDA 2518 • 8.915-630.0 • Rev. 7/13...
- Page 45 Nut, Cage, 10/32" 9.802-448.0 Conduit, Water Tight, Flex 1/2" 24" 9.802-448.0 Conduit, Water Tight, Flex 1/2" 21" 9.802-448.0 Conduit, Water Tight, Flex 1/2" 14" 9.802-448.0 Conduit, Water Tight, Flex 1/2" 26" 8.941-095.0 Box, Electrical CUDA 2518 • 8.915-630.0 • Rev. 7/13...
-
Page 46: Filtration With Sump Sweep Exploded View And Parts List
FILtratION WIth sUMP sWeeP exPLOded VIeW 45° Nozzle drill two 7/16" Orientation dia. holes. Locate bracket on Cabinet as shown and Mark drill Point through slots. 1/2" 89156300-7 CUDA 2518 • 8.915-630.0 • Rev. 7/13... - Page 47 Elbow, 1-1/2" Female Black, 90° 8.712-945.0 Cap, Pipe, 1-1/2" NPT, Blk 8.712-775.0 Nozzle, 50°, #4 8.705-945.0 Bag, Filter 8 x 30, 100 Micron 8.749-190.0 Hose, 1-1/2" AG 200 36" 8.749-190.0 Hose, 1-1/2" AG 200 31" CUDA 2518 • 8.915-630.0 • Rev. 7/13...
-
Page 48: Factory Installed Filtration Exploded View And Parts List
FaCtOrY INstaLLed FILtratION exPLOded VIeW drill two 7/16" diameter holes. Locate bracket on Cabinet as shown and Mark drill Point through slots 1/2" 89156300-8 CUDA 2518 • 8.915-630.0 • Rev. 7/13... - Page 49 Screw, 3/8" x 1-1/4" Whiz Loc 9.802-781.0 Nut, 3/8" Flange, Whiz Loc NC (703108) 8.718-987.0 Washer, Rubber Bonded 3/8" Stainless 8.705-945.0 Bag, Filter 8 x 30, 100 Micron 9.804-359.0 Hose, 1-1/2 AG 200 34" CUDA 2518 • 8.915-630.0 • Rev. 7/13...
-
Page 50: Oil Skimmer Exploded View And Parts List
Nut, 10/32 ESNA 9.804-097.0 Disc, Skimmer SS 9.804-621.0 Gasket, Skimmer 9.802-791.0 Nut, Cage, 10/32" x 16 Ga 4 8.718-968.0 Washer #10 Flat Zinc PLT 9.802-514.0 Strain Relief, STRT, LQ Tite 1 9.802-525.0 Locknut, 1/2" CUDA 2518 • 8.915-630.0 • Rev. 7/13... - Page 51 CUDA does not authorize any other party, including authorized Distributors, to make any representation or promise on behalf of CUDA, or to modify the terms, conditions, or limitations in any way. It is the buyer’s responsibility to ensure that the installation and use of CUDA products conforms to local codes.
- Page 52 Form #8.915-630.0 • Revised 7/13 • Printed in U.S.A.
Need help?
Do you have a question about the 1.043-342.0 and is the answer not in the manual?
Questions and answers