Table of Contents
Advertisement
Quick Links
H2O-2412 Series
Operator's Manual
WARNING:
This product can expose you to chemicals
State of California to cause cancer and birth defects or other
reproductive harm.
For more information about this regulation:
which are known
to the
www.P65Warnings.ca.gov
Automatic Parts Washer
MODELS:
For the Cuda Dealer nearest you,
consult our web page at
www.CudaUSA.com
8.914-384.0-V
Top-Load
1.043-356.0
1.043-379.0
1.043-357.0
1.043-536.0
1.043-537.0
1.043-538.0
01/05/18
Advertisement
Table of Contents

Related Manuals for CUDA 1.043-356.0


Summary of Contents for CUDA 1.043-356.0
- Page 1 MODELS: 1.043-356.0 1.043-379.0 1.043-357.0 1.043-536.0 1.043-537.0 1.043-538.0 For the Cuda Dealer nearest you, consult our web page at WARNING: www.CudaUSA.com This product can expose you to chemicals which are known to the State of California to cause cancer and birth defects or other reproductive harm.
-
Page 2: Machine Data Label
Machine Data Label Cuda 2412 Operator’s Manual 8.914-384.0 - V... -
Page 3: Table Of Contents
208V, 230V Electrical Panel ....36 Cuda 2412 Front ......40 Operations Cuda 2412 Rear . -
Page 4: How To Use This Manual
KIT INSTRUCTIONS which came with the kit. It contains replacement parts numbers needed for ordering future parts. NOTE: The manual part number is located on the lower right corner of the front cover. Cuda 2412 Operator’s Manual 8.914-384.0 - V... -
Page 5: Safety
When ordering parts, please specify model and serial number. Use only identical replacement parts. This machine is to be used only by trained operators. Cuda 2412 Operator’s Manual 8.914-384.0 - V... -
Page 6: General Safety Information
8. Use caution when lifting items in and out of parts pourraient survenir. basket to prevent back injuries. KEEP WATER SPRAY AWAY FROM 2.All installations must comply ELECTRICAL WIRING. with local codes. Contact your Cuda 2412 Operator’s Manual 8.914-384.0 - V... - Page 7 16. After the machine stops, wait 10 seconds before opening the lid or door. This automatic parts washer is designed to operate safely and efficiently. Before you begin to install and use the machine, please familiarize yourself with the major components. Cuda 2412 Operator’s Manual 8.914-384.0 - V...
-
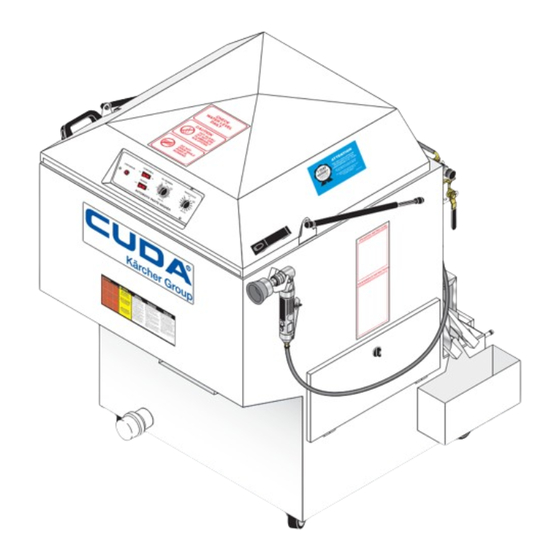
Page 8: Operations
Operations Component Identification - Front View Lid Support Strut Control Panel Handle Autofill (Optional) Power Brush (Optional) Detail Brush (Optional) Sump Drain Access Panel Debris Screen Cuda 2412 Operator’s Manual 8.914-384.0 - V... -
Page 9: Component Identification - Rear View
Operations Component Identification - Rear View H I G I N G Air Flow Valve & Flow Regulator (Optional) Water Inlet (Optional) Skimmer Heating Element & Thermostat Pump Cuda 2412 Operator’s Manual 8.914-384.0 - V... -
Page 10: Installation
NOTE: The machine is designed for portability, and some maintenance tasks require that you move the machine. DO NOT make a permanent connection from your shop water supply to the machine. Cuda 2412 Operator’s Manual 8.914-384.0 - V... -
Page 11: Step 4: Fill The Machine With Water And Add Detergent
5. While the sump water is heating, add the appro- priate quantity of factory approved detergent to the wash chamber. We recommend mixing the detergent with warm water in a separate bucket/ Cuda 2412 Operator’s Manual 8.914-384.0 - V... -
Page 12: Operations
The heating system is thermostatically set at the motor if the lid is raised during operation. factory to reach a high temperature of 180 °F (Excludes 120V Version 1.043-356.0). The temperature is adjust- able using the thermostat (See Thermostat). NOTE: The machines contain an internal power relay... -
Page 13: Turntable Assembly
Throttle Lever Lock Holding Bracket Throttle Lever NOTE: The power brush is available as an option on this machine. For ordering information, contact your dealer or call customer service. Cuda 2412 Operator’s Manual 8.914-384.0 - V... -
Page 14: Using The Power Brush
WARNING: Hot, high-pressured cleaning solution could cause serious injury. Always wear rubber gloves and approved eye protection when handling hot cleaning solution. Flow Regulator Skimmer Collection Container Detail Tank Wall Brush Cuda 2412 Operator’s Manual 8.914-384.0 - V... -
Page 15: Water Level
The figure above describes the operation of the automatic water fill system. Magnet Aligned w/Upper Switch Cuda 2412 Operator’s Manual 8.914-384.0 - V... -
Page 16: Detergents And Additives
• heat the water to operating temperature • add detergent if necessary (see Detergents and Additives); • verify that none of the spray nozzles are clogged; and • clean the debris screen. Cuda 2412 Operator’s Manual 8.914-384.0 - V... -
Page 17: Using The Oil Skimmer System
Tip: While extracting oil from the cleaning solution, oil will flow off the wiper blades in a fine continuous stream. Water will flow off the blades in droplets. Once droplets begin to flow off the wiper blades, stop the skimmer motor. Cuda 2412 Operator’s Manual 8.914-384.0 - V... -
Page 18: Shutting Down The Machine
For periods of extended shut-down (weekends and holidays, for example), dis- connect power to the machine. • If your machine is equipped with an optional programmable heater timer, periodically verify the settings to prevent inadvertent unattended operation. Cuda 2412 Operator’s Manual 8.914-384.0 - V... -
Page 19: Maintenance
TOP & BOTTOM NOZZLES SIDE NOZZLES 3° Turntable Rotate Each Nozzle Align The Notch In Approximately 3° Each Spray Nozzle From The Center Line With The Center Of Of The Pipe The Turntable Cuda 2412 Operator’s Manual 8.914-384.0 - V... -
Page 20: Cleaning Out The Sump
1-1/2" socket and breaker bar reverse of removal. • sealing tape or compound • medium phillips-head screwdriver Replacement Procedure 1. Disconnect power to the machine. 2. Drain the wash solution from the sump. Cuda 2412 Operator’s Manual 8.914-384.0 - V... -
Page 21: Thermostat
6. Ensure thermostat is set to 180°F. • 5/16" wrench or socket • 1/2" wrench or deep socket • small phillips-head screwdriver • small flat-head screwdriver Replacement Procedure 1. Disconnect power to the machine. 2. Close the lid. Cuda 2412 Operator’s Manual 8.914-384.0 - V... -
Page 22: Cleaning And Aligning The Spray Nozzles
4. Clamp the hub against the top spray arm with a pair of locking pliers, then use a spring scale on the end of the torque arm to measure the torque setting. 4. Raise the lid. Cuda 2412 Operator’s Manual 8.914-384.0 - V... - Page 23 6. Remove the four turntable mounting screws. 7. Close the lid. 8. Disconnect the power leads from the motor, then remove the motor from the lid. Power Leads 9. Install the new motor. Installation is the reverse of removal. Cuda 2412 Operator’s Manual 8.914-384.0 - V...
-
Page 24: Troubleshooting
Tighten Loose Power Grey Terminal Blocks Connections for Loose Connections Loose E l e c t r i c a l Pa n e l i s OK, Refer to Testing Individual Components Cuda 2412 Operator’s Manual 8.914-384.0 - V... -
Page 25: Testing Individual Components
If there is continuity the thermostat is no longer functional; replace the thermostat. 6. Allow the thermostat to cool to room temperature, then test for continuity. If there is not continuity the thermostat is no longer functional; replace the thermostat. Cuda 2412 Operator’s Manual 8.914-384.0 - V... - Page 26 Use a water softener and/or change your sump water WHITE POWDER dissolved solids) more frequently. ON PARTS Large parts can dry before solutions runs off, leaving Turn heat down to approximately 140°. powdery residue Cuda 2412 Operator’s Manual 8.914-384.0 - V...
- Page 27 ID tag. Contact a licensed electrician to test the pump; Pump is failed replace if necessary. MACHINE RUSTING Steam condensing on inside of a Leave lid open during idle periods. INTERIOR Check soap concentration. Cuda 2412 Operator’s Manual 8.914-384.0 - V...
- Page 28 Notes Cuda 2412 Operator’s Manual 8.914-384.0 - V...
-
Page 29: Parts
Parts Parts 1.043-356.0, 1.043-379.0, 1.043-357.0, 1.043-536.0, 1.043-537.0, 1.043-538.0 CUDA H2O-2412 Cuda 2412 Operator’s Manual 8.914-384.0 - V... -
Page 30: Oil Skimmer
Oil Skimmer Cuda 2412 Operator’s Manual 8.914-384.0 - V... - Page 31 8.719-068.0 PIN, ROLL 1/8" X 1" STEEL 9.804-137.0 GASKET, SKIMMER BASE 9.802-802.0 WASHER, 1/4 FLAT 8.913-732.0 OIL SKIMMER, SMALL 8.922-839.0 WLMT, OIL SKIMMER, SMALL, SS 8.718-568.0 WASHER, 1/4" SEALING 9.804-567.0 NUT, 10/32 ESNA Cuda 2412 Operator’s Manual 8.914-384.0 - V...
-
Page 32: Electrical Panel
115V Electrical Panel 15, 30 17, 20 Timer Option Oil Skimmer Auto Fill Option Cuda 2412 Operator’s Manual 8.914-384.0 - V... - Page 33 9.718-980.0 WASHER, 5/16" FLAT, SAE 9.802-805.0 WASHER, 5/16" FLAT, SAE, SS 9.804-203.0 HANDLE, DOOR/STRAINER 9.802-793.0 NUT, CAGE, 1/4" X 16 GA 9.802-700.0 BOLT, 1/4" X 3/4", NC HH 9.802-802.0 WASHER, 1/4", FLAT, SAE Cuda 2412 Operator’s Manual 8.914-384.0 - V...
- Page 34 9.804-238.0 317D X .625 OD, .047" THK 8.718-810.0 SCREW, 10-32" X 1/2" WHIZ LOC FLANGE 8.718-813.0 SCREW, 10-32 X 1/2" BH SOC,SS 8.718-568.0 WASHER, 1/4" FLAT SS SEALING RUB 9.802-105.0 PLUG, 7/8" HOLE Cuda 2412 Operator’s Manual 8.914-384.0 - V...
- Page 35 SCREW 6/32" X 3/8" RND 8.753-351.0 12" CHANNEL 1" W/COVER 9.807-513.0 LABEL, CUDA APPROVED DETERGENTS 8.716-400.0 END COVER BLUE 8.713-768.0 CONNECTOR, ELECTRICAL PIN MALE 8.713-731.0 CONNECTOR, ELECTRICAL PIN MALE 8.756-586.0 KNOB, TIMER, SPRING WOUND Cuda 2412 Operator’s Manual 8.914-384.0 - V...
-
Page 36: 208V, 230V Electrical Panel
208V, 230V Electrical Panel 17, 20 Timer Option Oil Skimmer Auto Fill Option Cuda 2412 Operator’s Manual 8.914-384.0 - V... - Page 37 BALL STUD 5/16"-18 UNC 10 MM 2A STUD 8.713-287.0 FUSE, 12 AMP 9.802-518.0 STRAIN RELIEF, LT, STR, 3/4" NPT .49-.71D 8.713-246.0 SCREW, 5/16"-18 X 1" SKT HD 9.804-203.0 HANDLE, DOOR/STRAINER 9.802-793.0 NUT, CAGE, 1/4" X 16 GA Cuda 2412 Operator’s Manual 8.914-384.0 - V...
- Page 38 SCREW, 10-32" X 1/2" WHIZ LOC FLANGE 8.718-813.0 SCREW, 10-32" X 1/2" BH SOC, SS 8.718-568.0 WASHER, 1/4" FLAT SS SEALING RUB 9.802-105.0 PLUG, 7/8" HOLE 8.756-488.0 TIMER, 30 MIN, SPRING WOUND 9.802-525.0 LOCKNUT, 1/2" 8463 Cuda 2412 Operator’s Manual 8.914-384.0 - V...
- Page 39 FUSE, 25 AMP 8.713-731.0 CONNECTOR, ELECL, 6-PIN FEM 9.802-784.0 SCREW, 6/32" X 3/8" 8.716-400.0 END COVER, BLUE, ENTRELEC 9.802-515.0 STRAIN RELIEF, STRT, LQ TITE 9.807-513.0 LABEL, CUDA APPROVED DETERGENTS 8.756-586.0 KNOB, TIMER, SPRING WOUND Cuda 2412 Operator’s Manual 8.914-384.0 - V...
-
Page 40: Cuda 2412 Front
Cuda 2412 Front Nozzle Alignment TOP & SIDE BOTTOM Turntable Approx. 3° Align with from center the center of line of pipe turntable 43,44,45 9. 80 1- 12 5. 0 Stainless Steel Option Only Cuda 2412 Operator’s Manual 8.914-384.0 - V... - Page 41 SPRAY PIPE 1" X 10", SS 8.913-706.0 ASSY., UPPER SPRAY BAR 9.923-020.0 WLMT, UPPER SPRAY BAR, SS 8.913-724.0 TURNTABLE ASSY 9.923-014.0 WLMT, TURNTABLE, SS 9.804-259.0 THRUST BEARING 8.904-660.0 DECAL, KEEP HANDS CLEAR WHEN CLOSING LID Cuda 2412 Operator’s Manual 8.914-384.0 - V...
- Page 42 SCREW, 10/32 X 1/2, BH SOC, SS 8.718-568.0 WASHER, SEALING 9.804-567.0 NUT, 10/32 ESNA 8.718-980.0 WASHER, 5/16" FLAT 8.731-254.0 PARTS BASKET, SMALL 8 X 8 X 4 NOT SHOWN 8.725-296.0 WASHER, BULLET HINGE 8MM PIN BRASS Cuda 2412 Operator’s Manual 8.914-384.0 - V...
- Page 43 8.754-346.0 ELBOW, 1", 150WP, PL SS 8.706-191.0 ELBOW, 1" X 3/4", 90°, GALV 9.807-513.0 LABEL, CUDA APPROVED DETERGENTS (STAINLESS STEEL 8.754-353.0 BUSHING, 1" X 3/4" SS OPTION ONLY) 8.900-587.0 LABEL, APW WARNING/OPS INST Cuda 2412 Operator’s Manual 8.914-384.0 - V...
-
Page 44: Cuda 2412 Rear
Brush Option I N G 2, 3, 4 See Oil Skimmer Assy Auto-Fill Option * E P D 89143840-17 * WARNING: If connnection is made to a potable water supply, Protect against backflow Cuda 2412 Operator’s Manual 8.914-384.0 - V... - Page 45 WASHER, 3/8" SAE FLAT 9.802-779.0 NUT, 3/8" ESNA, NC 9.802-793.0 NUT, CAGE 1-4" X 16 GA 9.804-374.0 DECAL, KEEP DRY 8.712-896.0 SCOOP, DETERGENT, WHITE 16 OZ. NOT SHOWN 8.921-274.0 SPACER, BRAKE LINK, 800 Cuda 2412 Operator’s Manual 8.914-384.0 - V...
-
Page 46: Auto Fill, Detail Brush & Power Brush Options
Auto Fill, Detail Brush & Power Brush Options To Sump Chamber Plug (Item 35) Installed Here When Power Brush is Not Supplied Cuda 2412 Operator’s Manual 8.914-384.0 - V... - Page 47 CLAMP, HOSE, UNI .62-.75 ST 8.712-810.0 REGULATOR -AIR 1/4" NPT 9.804-091.0 BRUSH -POLYFLOW (FLO-THRU) 8.712-815.0 CLIP -DETAIL BRUSH 8.712-838.0 PIPE -BALL VALVE 1/4" 3-WAY 9.802-254.0 24" HOSE, 1/4", PUSH-ON, FUEL LINE/FT 8.706-161.0 ELBOW, 1/4", STREET, 90° GALV Cuda 2412 Operator’s Manual 8.914-384.0 - V...
- Page 48 DETAIL PUMP 9.802-103.0 BUSHING, SNAP, 5/8" 8.711-785.0 18.5" HOSE, 3/8" PUSH-ON, /FT 8.718-568.0 WASHER, 1/4" FLAT SS SEALING RUB 8.706-328.0 PLUG, PIPE 1/4" NPT GALV. 8.718-810.0 SCREW, 10/32" X 1/2" WHIZ LOC FLANGE Cuda 2412 Operator’s Manual 8.914-384.0 - V...
- Page 49 9.802-146.0 SWIVEL, 1/2" MP X 3/4" GHF W/STRAINER 9.802-423.0 48" CORD, SERVICE, SEO, 16/3, /FT COLEMAN 8.713-768.0 S CONNECTOR, ELECTRICAL PIN MALE NOT SHOWN 8.713-656.0 S CONNECTOR, ELECTRICAL 3 PIN FEMALE NOT SHOWN Cuda 2412 Operator’s Manual 8.914-384.0 - V...
-
Page 50: Filter Option 8.725-269.0
A ss bl ed tain s com follo tria, Fran ents from ania zil, ntri Taiw , Chi Italy , Jap e of D FO ilan tes, land R IND Viet ico, R US Cuda 2412 Operator’s Manual 8.914-384.0 - V... - Page 51 BRACKET, FILTER 2412 8.724-083.0 BOLT, TRI-ROUND, HEX ZINC, 5/16-18 X 3/4 9.802-700.0 BOLT, 1/4" X 3/4", NC 9.802-802.0 WASHER, 1/4", FLAT 8.718-568.0 WASHER, 1/4", SEALING 9.802-773.0 NUT, 1/4" ESNA 8.904-658.0 DECAL, CAUTION FILTER PRESSURE Cuda 2412 Operator’s Manual 8.914-384.0 - V...
- Page 52 8.914-384.0 • Printed in U.S.A.
Need help?
Do you have a question about the 1.043-356.0 and is the answer not in the manual?
Questions and answers