
Related Manuals for Flashforge Inventor


Summary of Contents for Flashforge Inventor
- Page 1 Inventor 发明家 SZ14-ZN/EN-A06 This guide is only applicable to FLASHFORGE Inventor 3D printer 本指南仅适用于闪铸科技发明家3D打印机...
- Page 2 1. Open the carton and take out lid on top of the 2. Take the power cable out. Remove two top foam printer. On the lid, there is one quick start, one sheets. after-sales service, one SD card, one leveling card and two build tapes.
- Page 3 7. Open the paper box on the top of the printer, 8. Remove bubble bag outside the extruder, put there is an extruder, two side panels and an extruder on the extruder mounting base. extruder's accessory kit inside. Take the Notice: The extruder should be put as is shown extruder and the paper box out, notice that (extruder fan should towards the front of the...
- Page 4 13. Take out filament first and then remove foam. 14. Notice: Do not miss either filament spool 15. Finally press build plate slowly to printer holder on two pieces of foam. bottom. 16. Inventor unboxing completed. Suggest keeping packing materials well for follow-up storage and shipping.
- Page 5 Tool Bag Tool Bag Contents: Graver / Tweezer / Scraper / Accessories box ( contents: Thumb screw / PTFE tubes*2 / M3x16 Bolt / Nut ) / Tool bag ( contents: Allen wrenches*2 / Phillips screwdriver / Unclogging pin tool / Wrench / Grease) Extruder’s Accessory Kit Contents: M3x8 Bolts*2 / M3x6 Bolts / Turbofan baffle...
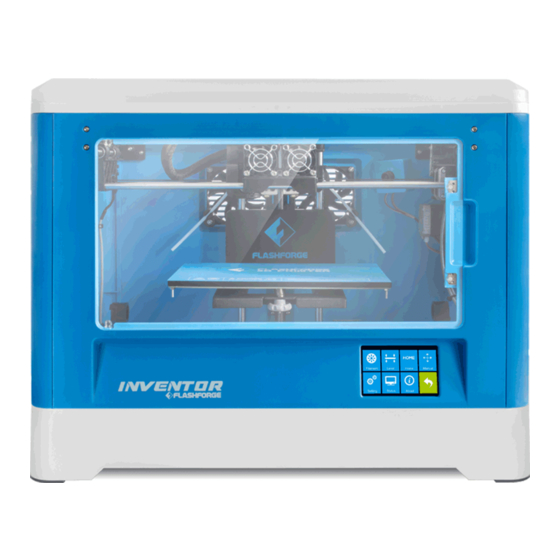
- Page 6 Getting to know Your Inventor 5. Build Plate 8. Thumb Screw 19. USB Cable Input...
- Page 9 into...
- Page 10 Install Filament 1. Take out PLA filament, remove vacuum packing and put it beside the left fixed seat of the build plate. For putting filament through guide tube easily, please install filament in a proper way. Left side Filament Filament Guide tube Guide tube Correct...
- Page 11 Left side Right side 4. Take out filament spool holder. As is shown above, put spool holder through round hole, and insert it into fixed seat. Rotate the spool holder 90° to fix it. Attention: Lock filament on the left side, rotate spool holder anticlockwise 90° Lock filament on the right side, rotate spool holder clockwise 90°...
- Page 12 Leveling 1. Take power cable out and plug it into power 2. Plug the other end of power cable into socket, input on the right side of the printer. turn on the power switch. How to change language Password lock Disable Follow steps above if you need to do language setting.
- Page 13 Berfore leveling, let's learn the funciton of thumb screw. How to use the thumb screw Build plate goes up Rotate thumb screw clockwise Build plate goes down Rotate thumb screw anticlockwise Please adjust the front thumb screw under Platform when stop. Filament Level Home...
- Page 14 Attention: Leveling would affect print effect directly, if print result is unsatisfactory, please do leveling again. Start the adjustment process with the right nozzle, then use the distance between the right nozzle and build plate as a reference. 6. Take leveling card out, on the basis of right side extruder, put leveling card between right nozzle and build plate.
-
Page 15: Filament Loading
Filament Loading Filament Level Home Manual Print Preheat Setting Status About 1. Tap [Tools]. 2. Tap [Filament]. Load Left Unload Left L Extruder ℃ / 230℃ Load Right Cancel Unload Right 3. Tap [Load Left]. 4. Extruder starts to heats. Loading begins, push filament vertically into extruder, and press [Done] when you see filament come out of extruder... -
Page 16: First Print
First Print 1. Ensure that the build plate has been leveled before printing. 2. Ensure that the filament has been loaded in an appropriate approach. 3. Load the filament for a while to extrude all the melted filament you printed last time out of the extruder. -
Page 17: Unloading Filament
Please follow steps below if you need to unload filament in Unloading Filament daily use. Filament Level Home Manual Print Preheat Setting Status About 1. Tap [Tools]. 2. Tap [Filament]. Load Left Unload Left L Extruder ℃ / 230℃ Load Right Cancel Unload Right 3. - Page 18 Withdraw Filament Press here 6. Then pull out vertically quickly and release spring presser. Tap [Finish], go back. Tap return arrow to go back to home screen.
- Page 19 1. 打开纸箱取出顶部的打印机顶罩。顶罩上放 有一本快速启动指南、一份售后服务卡、一 张SD卡、一张调平卡片和两张平台贴纸。 3. 从纸箱中取出打印机。 4. 在箱子底部还有USB线和工具袋。 5. 撕开打印机底部的胶带,去除包裹打印机 6. 取出打印机顶部的泡沫。 的气泡袋。...
- Page 20 7. 打开打印机顶部的纸盒,纸盒中装有喷头、 8. 去除包裹喷头的气泡袋,将喷头放置在安装 两块机身侧窗盖板和一个喷头安装包。取出 喷头的中塑件上。注意,喷头的摆放位置应 喷头并取出喷头纸盒,注意连接喷头的束线 当如图所示(喷头扇热风扇应当朝向打印机 管较短,不要让喷头悬挂在空中。 前方)。 9. 剪断X轴两侧的扎带,一共三根。 10. 取出logo板背后的泡沫块。 11. 双手托住打印平台两侧,缓缓抬起打印平台, 以便于取出打印平台下方的耗材。注意不要 让打印平台与喷嘴相碰。...
- Page 21 12. 打开前门,取出纸板。 13. 先取出打印耗材,然后取出下方的泡沫。 14. 注意,在两块泡沫上各有一个丝盘轴, 15. 最后缓缓将打印平台下压至打印机底部。 请勿遗漏。 16. 发明家开箱完成。建议保存好这些包装 材料,以便于后续的存放或运输。...
- Page 22 工具袋 平台贴纸 x 2 工具袋内含: 刻刀 / 镊子 / 铲刀 / 零件盒(内含:一颗调平螺母、 两根聚四氟管、一颗M3*16螺丝和一颗螺母) 工具包(内含:两把内六角扳手、一把十字螺丝刀、 一根通针、 一把扳手和一袋润滑脂) 喷头安装包内含: M3*8规格螺丝两颗 / M3*6规格螺丝一颗 / 导风嘴部件...
- Page 23 部件介绍...
- Page 24 袋...
- Page 25 1. 如上图所示,使用M2.5内六角扳手拆下固定涡轮风扇的两颗螺丝。 2. 从喷头安装包中取出导风嘴部件。如下图所示,将导风嘴部件装入涡轮风扇。...
- Page 27 3. 安装耗材 1. 取出PLA耗材,去除真空包装后放入打印平台左侧的丝盘轴固定座旁。 安装左侧耗材 安装右侧耗材 2. 将PLA耗材丝盘安装在打印机左侧,然后将 3. 让耗材从导丝管穿出。 耗材穿入导丝管。...
- Page 28 4. 取出丝盘轴,如下图所示,将丝盘轴穿过耗材丝盘中间的圆孔后插入丝盘轴固定座。 将丝盘轴旋转90度将其锁定。 注意:锁定左侧耗材时,请将丝盘轴逆时针旋转90度; 锁定右侧耗材时,请将丝盘轴顺时针旋转90度。 喷头进丝孔 按下压板 5. 按下左喷头一侧的压板,将从导丝管另一头穿出的耗材垂直插入喷头进丝孔中, 直到耗材无法继续插入。...
- Page 29 1. 取出电源线,插入打印机右侧的电源接口中。 2. 将电源线的另一头插入电源插座。按下电源线 接口旁边的电源开关开机。 Tools Password lock Disable 梦想家在出厂时默认操作语言为英文,请根据以上步骤切换至中文:在触摸屏上依次点击 [Tools]、[Setting]、[Language]、[简体中文]。语言设置完成后,点击返回键返回上一界面 密码锁 恢复出厂 语 言 关 设置 换 丝 调 平 回 零 手动调节 背部风扇 风扇开 WIFI 不使能 丝盘检测 带 轮 打开 设 置 状态查看 关 于 3. 语言设置完成后,点击返回键返回上一界面。...
- Page 30 在调平开始前,让我们先了解一下调平螺母的作用。 打印平台上升 打印平台下降 运动停止后,请调节底板下前方的螺母 换 丝 调 平 回 零 手动调节 下一步 设 置 状态查看 关 于 4. 点击[调平]开始调平程序。 5. 喷头开始向第一个调平点移动,运动停止后 开始调平操作。...
- Page 31 注意:调平效果会直接影响到打印效果,如果打印效果不理想,请再次对平台进行调平。 6. 取出调平卡片,以右侧喷嘴为基准,将调平卡片放入右喷嘴与打印平台之间。一手调节 调平螺母,一手来回滑动调平卡片感受摩擦力。 若卡片可以轻松抽动则表示喷嘴与平台的间距过大,需要顺时针旋转下方的调平螺母来 缩小平台与喷嘴的间距。 若抽动卡片时阻力较大,表示喷嘴与平台的间距过小,需要逆时针旋转下方的调平螺母 来增大平台与喷嘴的间距。 若抽动卡片时感到有轻微的摩擦感,表明此时喷嘴与平台的间距比较合适,可以停止调节。 7. 第一个点调平完成后,按[下一步],喷头会移动到第二个调平点上方。采用同样的方法对该 点进行调节。以此类推,当三个调平点都调平完成后(三个调平螺母上方),调平完成, 点击[完成]结束调平程序,按返回键返回首界面。 8. 将打印平台缓慢地压回打印机底部。...
- Page 32 换 丝 调 平 回 零 手动调节 设 置 状态查看 关 于 1. 点击[工具]。 2. 点击[换丝]。 左喷头进丝 正在加热... 左喷头退丝 左喷头 ℃ / 230℃ 右喷头进丝 取消 右喷头退丝 3. 点击[左喷头进丝]。 4. 喷头开始加热。 开始进丝,请将丝料垂直插入,看到喷头有丝料挤出 时请点击[完成] 100% 左喷头 ℃ / 230℃ 完成 5. 喷头加热到预定温度后开始进丝,看到喷嘴开始出丝时请勿立即停止进丝,直到耗材均匀出丝 为止。点击[完成]返回上一界面,然后点击返回键返回首界面。...
- Page 33 1. 打印开始前请确保打印机已经完成调平; 2. 打印开始前确保耗材安装正确,没有打结或卡住; 3. 喷头内可能残留有少量耗材,请进丝一段时 间,确保上一次打印的耗材已经全部挤出; 4. 使用ABS耗材打印时,请装上顶罩,关闭前门; 使用PLA耗材打印时,请移除顶罩,打开前门; 打印开始前请将喷头耗材清理干净; 6. 不可在长时间无人看守的情况下使用3D打印机; 1. 取出SD卡,将SD卡插入打印机右侧的SD卡 插槽中。 2. 在触摸屏上点击[打印]。 3. 点击[SD卡]。 User Guide 说明书 40mmCUBE-L-PLA FlashPrint 切片软件 40mmCUBE-R-PLA Happy3D Software软件安装包 Hillbert_Cube-PLA Test File测试文件 4. 点击[Test File测试文件]。 5. 选择[40mmCUBE-L-PLA]测试模型。 注意:请确认PLA耗材是否已正确安装在左 喷头。 40mmCUBE-L-PLA 40mmCUBE-L-PLA Print Time: 1:02 0:00...
- Page 34 退丝操作 在日常使用中,如果需要更换耗材,建议按下列步骤操作。 换 丝 调 平 回 零 手动调节 设 置 状态查看 关 于 1. 点击[工具]。 2. 点击[换丝]。 左喷头进丝 正在加热... 左喷头退丝 左喷头 ℃ / 230℃ 右喷头进丝 取消 右喷头退丝 3. 按左喷头退丝为例,点击[左喷头退丝]。 4. 喷头开始加热。 向下按压耗材3秒 开始退丝,按下压板 同时按压丝料3秒后垂直拔出 按下压板 100% 左喷头 230℃ / 230℃ 完成...
- Page 35 拔出耗材 按下压板 6. 快速垂直拔出。点击[完成]返回上一级, 点击返回键返回首界面。...
- Page 36 电话: 4008866023 官方网站:www.sz3dp.com 地址:浙江省金华市仙源路518号...
Need help?
Do you have a question about the Inventor and is the answer not in the manual?
Questions and answers