
Subscribe to Our Youtube Channel
Related Manuals for Clarke METALWORKER CHDBG900


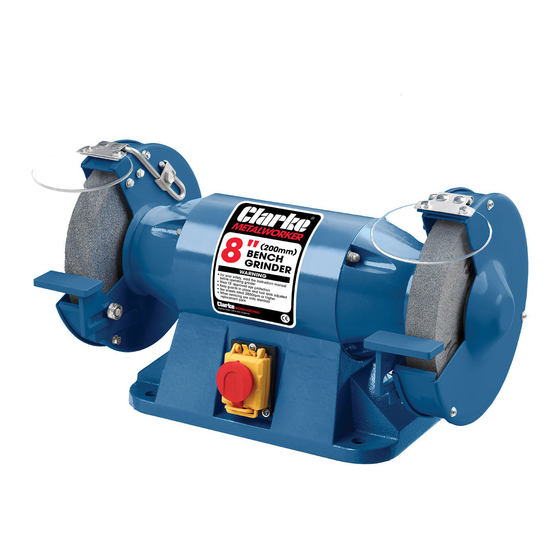
Summary of Contents for Clarke METALWORKER CHDBG900
- Page 1 8”(200mm) BENCH GRINDER MODEL NO: CHDBG900 PART NO: 6500540 OPERATION & MAINTENANCE INSTRUCTIONS ORIGINAL INSTRUCTIONS GC0320 - ISS 1...
-
Page 2: Environmental Recycling Policy
INTRODUCTION Thank you for purchasing this CLARKE 8”(200mm) Bench Grinder. Before attempting to use this product, please read this manual thoroughly and follow the instructions carefully. In doing so you will ensure the safety of yourself and that of others around you, and you can look forward to your purchase giving you long and satisfactory service. -
Page 3: Specifications
SPECIFICATIONS Model number CHDBG900 Part number 6500540 Dimensions (D x W x H) 498 x 250 x 300 mm Weight 26.3 kg Rated voltage 230V~ 50 Hz Rated input wattage 900W No load speed 2850 RPM (+/- 5%) IP rating IP40 Wheel shaft diameter 16 mm... -
Page 4: Electrical Safety
2) ELECTRICAL SAFETY 1. Power tool plugs must match the outlet. Never modify the plug in any way. Do not use adapter plugs with earthed (grounded) power tools. Unmodified plugs and matching outlets will reduce the risk of electric shock. 2. -
Page 5: Bench Grinder Safety Warnings
3. Disconnect the plug from the power source before changing accessories, or storing power tools. Such preventive safety measures reduce the risk of starting the power tool accidentally. 4. Store idle tools out of the reach of children and do not allow persons unfamiliar with the power tool or these instructions to operate it. -
Page 6: Safety Symbols
9. ALWAYS check for damaged parts. Before further use of the tool, a guard or other part that is damaged should be carefully checked to determine if it would operate properly and perform its intended function. Check for misalignment or binding of moving parts, breakage of parts and any other condition that may affect the tool's operation. -
Page 7: Electrical Connections
ELECTRICAL CONNECTIONS WARNING: READ THESE ELECTRICAL SAFETY INSTRUCTIONS THOROUGHLY BEFORE CONNECTING THE PRODUCT TO THE MAINS SUPPLY. Connect the mains lead to a standard, 230 Volt (50Hz) electrical supply through an approved BS 1363 plug or a suitably fused isolator switch. If the plug has to be changed because it is not suitable for your socket, or because of damage, it must be removed and a replacement fitted, following the wiring instructions shown below. -
Page 8: Carton Contents
CARTON CONTENTS The following items should be supplied in the carton. if any parts are missing or damaged, please contact the CLARKE dealer where you purchased the bench grinder. 1 x Bench grinder assembly 2 x Eye shields and holders (1 with magnifying lens) -
Page 9: Before Use
BEFORE USE MOUNTING THE GRINDER ONTO A WORKBENCH NOTE: We highly recommend that you bolt this bench grinder securely to a workbench to gain maximum stability. 1. Using the base of the bench grinder as a template, mark the bench through the holes in the casting. -
Page 10: Installing The Eye Shields
INSTALLING THE EYE SHIELDS 1. Attach each eye shield arm to the bench grinder using the clamp, flat washer and bolt supplied. 2. Repeat with the right eye shielld. NOTE: Adjust the eye shields to an appropriate distance from the tool rests avoiding interference during operation. -
Page 11: Dressing The Grinding Wheel
The grinding wheel may need dressing occasionally. Only dress the wheel with a proper dressing tool, whilst wearing safety goggles or glasses. If in doubt seek professional advice. Dressing tools are available from your CLARKE Dealer. Grinding wheel dresser model no ET125;- part no 1700225... - Page 12 • After mounting, the wheel should be test run for a reasonable time (approximately 1 minute) to demonstrate true running. CONSUMABLES Replacement grinding wheels are available from your CLARKE dealer as follows: REPLACEMENT FINE 200 mm GRINDING WHEEL 6500550 REPLACEMENT MEDIUM 200mm GRINDING WHEEL...
-
Page 13: Declaration Of Conformity
DECLARATION OF CONFORMITY Parts & Service: 020 8988 7400 / E-mail: Parts@clarkeinternational.com or Service@clarkeinternational.com... -
Page 14: Parts Diagram
PARTS DIAGRAM Parts & Service: 020 8988 7400 / E-mail: Parts@clarkeinternational.com or Service@clarkeinternational.com... -
Page 15: Part List
PART LIST Screw M5 x 16 Housing (LH) Bottom Foot Motor Shaft Cable Clamp Stator Earthing Point Shaft Bearing 6205 Washer 4mm Housing (RH) Washer 5mm Domed Nut M6 Screw M5 x 10 Power Cable Gland Mounting Plate Washer 6mm Cable Sheathing Power Cable with Plug Capacitor Clamp...
Need help?
Do you have a question about the METALWORKER CHDBG900 and is the answer not in the manual?
Questions and answers