Table of Contents
Advertisement
USER MANUAL
ALUMINIUM HEATER
WITH SMART APP CONTROL
EAH2000W
Thank you for choosing electriQ
Please read this user manual before using this heater and keep it safe for future
reference.
Visit our page www.electriQ.co.uk for our entire range of Intelligent Electricals
THIS PRODUCT IS ONLY SUITABLE FOR WELL INSULATED SPACES OR
OCCASIONAL USE
Advertisement
Table of Contents

Related Manuals for ElectrIQ EAH2000W


Summary of Contents for ElectrIQ EAH2000W
- Page 1 Thank you for choosing electriQ Please read this user manual before using this heater and keep it safe for future reference. Visit our page www.electriQ.co.uk for our entire range of Intelligent Electricals THIS PRODUCT IS ONLY SUITABLE FOR WELL INSULATED SPACES OR OCCASIONAL USE...
-
Page 2: Table Of Contents
CONTENTS SAFETY INSTRUCTIONS SETTING THE UNIT UP PRODUCT OVERVIEW CONTROL PANEL DISPLAY QUICK USE GUIDE SETTING THE DAY AND TIME OPERATION WEEKLY TIMER SETTING UP THE APP USING THE APP CLEANING AND MAINTENANCE TROUBLESHOOTING TECHNICAL SPECIFICATIONS SUPPORT PRODUCT FICHE Page 2 of 24... -
Page 3: Safety Instructions
SAFETY INSTRUCTIONS IMPORTANT Carefully read the instructions before operating the unit This appliance is for indoor use only. Rating: This unit must be only connected to a 220-240 V / 50 Hz earthed outlet. Installation must be in accordance with regulations of the country where the unit is used. - Page 4 restrict airflow, as this may present a fire risk. The heater must not be located immediately below a socket outlet. Always ensure the unit is secure before operation. Do not use on unstable or uneven surfaces and if wall-mounted, it must be securely attached to a suitable wall.
-
Page 5: Setting The Unit Up
SETTING THE UNIT UP FOR USE The appliance can be wall-mounted using the supplied mounting brackets, or alternatively can be set up as a portable heater using the supplied legs and castors. It is important that the unit is only operated if it is wall-mounted or has the castors fitted. WALL MOUNTING Please note: ... -
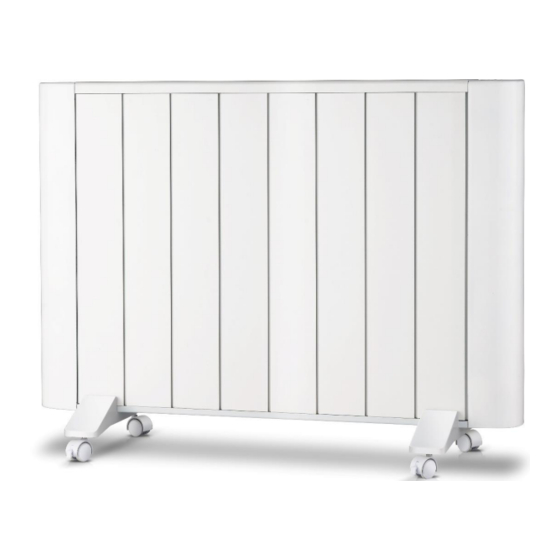
Page 6: Product Overview
PRODUCT OVERVIEW Air Outlet Control Panel Castors Power Switch CONTROL PANEL STANDBY Button Button DOWN Button TIMER PROGRAM Button Button Page 6 of 24... -
Page 7: Display
DISPLAY Heating High Heat Chile Lock indicator Mode indicator Temperature Display Preset Time Indicator Low Heat Mode WiFi Indicator Day Indicator Anti-Frost Mode Power Indicator High Heat Mode* Heating Mode for Low Heat Mode* each hour* * For 7 day timer Timer Time* Indicator*... -
Page 8: Operation
OPERATION TURNING ON AND OFF The Standby button can be pressed to enter and exit standby mode. If the unit is not to be used for a while, we would advise for it to be turned off using the switch on the back and unplugged. CHANGING THE DESIRED ROOM TEMPERATURE The desired room temperature can be adjusted in both High heat and Low Heat modes, using the UP and DOWN buttons. -
Page 9: Weekly Timer
WEEKLY TIMER TURNING THE WEEKLY TIMER ON AND OFF Hold the TIMER button for 3 seconds to activate or deactivate the timer. The timer icon will be illuminated when the timer is activated. CHOOSING BETWEEN THE TIMER PRESETS There are 4 timer presets built into the machine: P0 – P3. The presets specify in which mode the unit operates throughout the day, changing the appliance between High Heat and Low Heat options. - Page 10 PROGRAMMING THE CUSTOMISABLE PRESET (P0) 1. With the timer set to P0 mode, press the TIMER button. 2. Use the UP and DOWN buttons to select the day which you want to adjust. 3. Press the TIMER button to confirm the day selected. The bottom of the display will show how the unit is currently programmed to work throughout that day.
-
Page 11: Setting Up The App
CONNECTING THE APPLIANCE TO WIFI DOWNLOAD THE APP TO YOUR PHONE Download the ”TUYA SMART” app, from your chosen app store, using the QR codes below, or by searching for the app in your chosen store. Android Page 11 of 24... - Page 12 MODES AVAILABLE FOR SETUP The heater has two different setup modes, Quick Connection and AP (Access Point). The quick connection is a quick and simple way to set the unit up. The AP connection uses a direct local Wi-Fi connection between your phone and the heater to upload the network details.
- Page 13 REGISTER THE APP 1. Press on the register button Read the Privacy policy and 3. Enter your email address or at the bottom of the screen. press the Agree Button. phone number and press continue to register. 4. A verification code will be sent 5.
- Page 14 SETTING UP YOUR HOME WITHIN THE APP TUYA is designed so it can work with a large number of compatible smart devices within your home. It can also be set up to work with multiple devices within different houses as such during the setup process, the app requires that different areas are created and named to allow easy management of all your devices.
- Page 15 CONNECTING USING THE QUICK CONNECTION METHOD Before initiating the connection, make sure the unit is in standby mode (Power switch ON, but unit turned off), with the WiFi indicator flashing twice per second. If not follow the instructions for changing the connection mode. Also ensure your phone is connected to the Wi-Fi network.
- Page 16 CONNECTING USING APP MODE ALTERNATIVE METHOD Before initiating the connection, make sure the unit is in standby mode, with the WiFi Light Indicator flashing once per second. If not follow the instructions for changing the Wi-Fi connection mode. Also ensure your phone is connected to the Wi-Fi network. (We advise turning mobile data off during setup) 1.
-
Page 17: Using The App
CONTROLLING YOUR APPLIANCE THROUGH THE APP THE HOME SCREEN Each device has its own entry on the home screen to allow the user to either quickly turn the unit on or off, or to enter the device screen to make other changes. Voice Control: Press to Add Device: Add a device give verbal instructions for... - Page 18 DEVICE SCREEN The device screen is the main control screen for the heater, providing access to the controls to amend the functions and settings. Edit Name: Use to change Device Name Back: Returns to the Home the name of the heater Screen Current Mode: Shows the mode the heater is currently...
- Page 19 SMART SCENES Smart Scenes is a powerful tool providing the option to customize the operation of the air heater based both on conditions within the room and outside influences. This gives the user the option of specifying much more intelligent actions. These are split into two categories Scene and Automation. SCENE Scene allows for a one touch button to be added to the Home Screen.
- Page 20 AUTOMATION Automation allows an automatic action to be set up for the device. This can be triggered by the Time, and a range of other influences, depending what other TUYA enabled devices you have on the network. 3. Press on the + at the top of 2.
- Page 21 PROFILE TAB The profile tab gives you the option to edit both your detail, and use the added features of the unit. HOME MANAGEMENT Home Management proves options for managing your TUYA account, giving options such as adding a home, adding and removing rooms, and sharing devices with family.
-
Page 22: Cleaning And Maintenance
If the above solutions do not resolve the problem please contact the service centre. DECLARATION OF CONFORMITY Hereby, electriQ declares that this heater is compliant with Directive 2014/53/EU. The full text of the EU declaration of conformity is available at the following internet address: https://www.electriQ.co.uk/content/declaration-of-conformity... -
Page 23: Technical Specifications
Product dimensions 850x260x580 Net weight (Kg) 10.5 electriQ UK SUPPORT www.electriQ.co.uk/support Please, for your own convenience, make these simple checks before calling the service line. If the unit still fails to operate call: 0871 620 1057 or complete the online form 1. -
Page 24: Product Fiche
Contact electriQ, Unit J6, Lowfields Business Park, Lowfields Way, Elland, Details West Yorkshire, HX5 9DA Page 24 of 24...
Need help?
Do you have a question about the EAH2000W and is the answer not in the manual?
Questions and answers