Table of Contents
Advertisement
Advertisement
Table of Contents

Related Manuals for Leica Rugby 840


Summary of Contents for Leica Rugby 840
- Page 1 Leica Rugby 840 User Manual Version 1.0 English...
- Page 2 Leica Geosystems authorised service workshop. Type: _______________ Serial No.: _______________ Validity of this This manual applies to the Rugby 840 lasers. Differences between the models are manual marked and described. Available Name Description/Format documentation ...
- Page 3 Service Description myProducts Simply add all Leica Geosystems products that you and your company own. View detailed information on your products, buy additional options or Customer Care Packages (CCPs), update your products with the latest software and keep up-to-date with the latest documentation.
-
Page 4: Table Of Contents
Turning on and off the Rugby Automatic Mode Manual Mode Elevation Alert (H.I.) Function Receiver Rod Eye 180, Digital RF Receiver (used with the Rugby 840) Menu Pairing the Rod Eye 180 with the Rugby 840 Applications Setting Forms Checking Grades... - Page 5 Troubleshooting Care and Transport 10.1 Transport 10.2 Storage 10.3 Cleaning and Drying Technical Data 11.1 Conformity to National Regulations 11.2 General Technical Data of the Laser 11.2.1 RC400 Remote Control Lifetime Manufacturer’s Warranty Accessories Index Rugby 840, Table of Contents...
-
Page 6: Safety Directions
Important paragraphs which must be adhered to in practice as they enable the product to be used in a technically correct and efficient manner. Rugby 840, Safety Directions... -
Page 7: Definition Of Use
Manufacturer of Leica Geosystems AG, CH-9435 Heerbrugg, hereinafter referred to as the product Leica Geosystems, is responsible for supplying the product, including the user manual and original accessories, in a safe condition. Person responsible The person responsible for the product has the following duties: for the product •... -
Page 8: Hazards Of Use
When transporting or shipping batteries, the person in charge of the product must ensure that the applicable national and international rules and regulations are observed. Before transportation or shipping contact your local passenger or freight transport company. Rugby 840, Safety Directions... - Page 9 • Using the product after incorrect attempts were made to carry out repairs Precautions: Do not open the product. Only Leica Geosystems authorised service workshops are entitled to repair these products. If the product is improperly disposed of, the following can happen: WARNING •...
-
Page 10: Laser Classification
635 nm ± 10 nm From a safety perspective, class 2 laser products are not inherently safe for the eyes. CAUTION Precautions: 1) Avoid staring into the beam. 2) Avoid pointing the beam at other people. Rugby 840, Safety Directions... -
Page 11: Electromagnetic Compatibility Emc
WARNING Although the product meets the strict regulations and standards which are in force in this respect, Leica Geosystems cannot completely exclude the possibility that other equipment may be disturbed. There is a risk that disturbances may be caused in other equipment if the product is... -
Page 12: Fcc Statement, Applicable In U
Precautions: Although the product meets the strict regulations and standards which are in force in this respect, Leica Geosystems cannot completely exclude the possibility that other equipment can be disturbed or that humans or animals can be affected. • Do not operate the product with radio or digital cellular phone devices in the vicinity of filling stations or chemical installations, or in other areas where an explosion hazard exists. - Page 13 This device complies with part 15 of the FCC Rules. Operation is subject to the following two conditions: (1) This device may not cause harmful interference, and (2) this device must accept any interference received, including interference that may cause undesired operation. 004789_001 Rugby 840, Safety Directions...
-
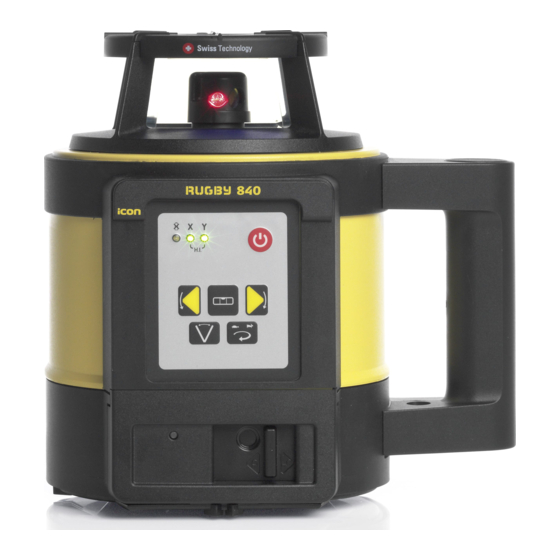
Page 14: Description Of The System
Description of the System System Components General description The Rugby 840 is a laser tool for general construction and levelling applications such as • Setting forms • Checking grades • Controlling depths for excavations If set up within the self-levelling range, the Rugby automatically levels to create an accurate horizontal or vertical plane of laser light. -
Page 15: Rugby Laser Components
Li-Ion battery pack or Alkaline battery pack d) RC400 Remote Control e) 2x AA-cell battery f) User Manual/CD g) Second receiver (can be purchased separately) h) 4 x D-cell battery (for alkaline versions only) i) Charger (for Li-Ion versions only) Rugby 840, Description of the System... -
Page 16: Setup
• Always check the tripod or laser trailer before attaching the Rugby. Make sure all screws, bolts and nuts are tight. • If a tripod has chains, they should be slightly loose to allow for thermal expansion during the day. • Secure the tripod on extremely windy days. Rugby 840, Description of the System... -
Page 17: Rc400 Remote Control
The sending LED flashes to indicate that the remote is sending a signal to the Rugby. The remote control is powered by a 2x AA batteries. replacement is the same as for the Rod Eye receivers. Rugby 840, Description of the System... -
Page 18: Pairing The Rugby 840 With The Rc400 Remote Control
Description Turn off the Rugby 840. Press and hold the Power button on the Rugby 840 for 5 seconds to turn on the Rugby 840 in pairing mode. The Rugby 840 beeps five times. Press and hold the Head Speed button and the Scan Mode button on the RC400. -
Page 19: Operation
Manual Mode. Scanning Press to change the width of the scanning beam - 10° • 45° • 90° Head Speed Press to change the speed of the head rotation - 0 • 2 • 5 rps Rugby 840, Operation... -
Page 20: Led Indicators
X-axis and Y-axis Indi- green the axis is level. cator LEDs flashing green the axis is levelling. the axis is in Manual Mode. both flashing an H.I. Alert is indicated. Rugby 840, Operation... -
Page 21: Turning On And Off The Rugby
• The X-axis LED is red. • The Y-axis continues to self-level and the Y-axis LED flashes green until level. When the X-axis is in Manual Mode, the X-axis can be sloped upwards or downwards as illustrated. 004797_001 Rugby 840, Operation... - Page 22 When both the X-axis and Y-axis are in Manual Mode, the Y-axis can be sloped using the Left and Right Arrow buttons. 004799_001 When using the RC400 Remote Control, each of the axes can be sloped inde- pendently. Rugby 840, Operation...
-
Page 23: Elevation Alert (H.i.) Function
The Elevation Alert function can be disabled or enabled by pressing the following the Elevation Alert button combination: function • With the Rugby turned on, press and hold the Left and Right Arrow buttons. • Press the Automatic/Manual Mode button. The Rugby beeps once to indicate the change. Rugby 840, Operation... -
Page 24: Receiver
Receiver Description The Rugby 840 is sold with the Rod Eye 180 Digital RF Receiver. Using the Rugby 840 together with the Rod Eye 180 enables the user to perform special functions such as automatic slope catching and monitoring, as well alignment of the vertical plane for batter boards and facade applications. -
Page 25: Menu
Pairing the Rod Eye 180 with the Rugby 840 Pairing step-by-step The Rugby 840 and the Rod Eye 180 include radio devices that allow the user to automatically match an existing grade. When purchased together, the Rugby 840 and Rod Eye 180 have been paired together at the factory. -
Page 26: Applications
Set the rod with the attached receiver on top of the form. Adjust the height of the form until the on-grade position is again indicated. Continue to additional positions until the forms are levelled to the rotating plane of the Rugby. Rugby 840, Applications... -
Page 27: Checking Grades
Set the rod with the attached receiver on top of the excavation or concrete pour to check for correct elevation. Variances can be read in precise measurements with the digital receiver. • 7a: Position is too high. • 7b: Position is too low. • 7c: Position is on grade. Rugby 840, Applications... -
Page 28: Manual Grades
Use the Up and Down Arrow buttons on the Rugby to move the laser beam up and down until the on-grade (centre-line) position is indicated on the receiver • the centre bar • the green flashing LED • a solid audio tone • the digital display Rugby 840, Applications... -
Page 29: Applications - Rugby 840 And The Rod Eye 180 Digital Rf Receiver
004803_001 Step Description Set up the Rugby 840 at the base of a slope with the X-axis pointing in the direction of the slope. At the base of the slope, adjust the height of the receiver on the rod until the on-grade (centre-line) position is indicated on the receiver by: •... -
Page 30: Smart Target Lock (Slope Lock/Monitoring)
004804_001 Step Description Set up the Rugby 840 at the base of a slope with the X-axis pointing in the direction of the slope. At the base of the slope, adjust the height of the Rod Eye 180 Digital Receiver... -
Page 31: Dual Receiver Setups
To slope catch and lock the X-axis: Press X plus Laser Man for 5 seconds. To slope catch the Y axis: Press Y plus Laser Man for 1.5 seconds. 1.5 s To slope catch and lock the Y-axis: Press Y plus Laser Man for 5 seconds. Rugby 840, Applications... -
Page 32: Batter Boards
5.4.4 Batter Boards Description The Rugby 840 and the Rod Eye 180 Digital Receiver create a vertical plane of laser light that acts as a virtual string line for batter board setups. Setup Laser setup 004805_001 Step Description Mount the Rugby to the clamp and then the clamp to the batter board. - Page 33 Use the Smart Target function of the receiver to automatically align and then monitor the laser beam. Press the Laser Man button on the receiver for 5 seconds to start the alignment and slope catching and lock/monitoring process. The receiver will display YSL, then LOC when the process is complete. Rugby 840, Applications...
-
Page 34: Facades
5.4.5 Facades Description The Rugby 840 and the Rod Eye 180 Digital Receiver create a vertical plane of laser light that is aligned to the building and acts as a constant reference for facade installations. Setup Mounting the facade adapter brackets... - Page 35 • Use the Smart Target function of the receiver to automatically align the vertical rotating plane to the receiver. Press the Laser man button on the receiver for 1.5 seconds to start the alignment process. The receiver will display XSC. Rugby 840, Applications...
-
Page 36: Suspended Ceilings
The receiver will display YSL, then LOC when the process is complete. 5.4.6 Suspended Ceilings Description The Rugby 840 can also be used for suspended ceiling installations. Mounting the laser 004811_001 Step Description Attach the Rugby to the wall mount bracket. - Page 37 (1). The scanning beam can be rotated using the clockwise and counter clockwise buttons on the remote (2). The scanning beam can be moved quickly in 90° incre- ments using the Scan 90° button (3). 004812_001 Rugby 840, Applications...
-
Page 38: Layout
5.4.7 Layout Description In the laying down position the Rugby 840 can be used for laying out wall positions, squaring, transferring points and more. Layout The Rugby 840 projects two laser beams at a 90° angle to each other. 004813_001... - Page 39 • Vertical plumb • Layout of floors • Squaring of angles • Setting cabinets • Chair rails and wainscoting • Alignment of wall and floor tiles • Trim carpentry • Setting sprinkler head heights • Sloped ceilings Rugby 840, Applications...
-
Page 40: Batteries
Batteries Description The Rugby 840 can be purchased with alkaline batteries or a rechargeable Li-Ion battery pack. The following information is appropriate only to the model you have purchased. Operating Principles Charging / first-time • The battery must be charged prior to using it for the first time because it is deliv- ered with an energy content as low as possible. - Page 41 Remove the batteries from the battery compartment. To insert the batteries: Insert the batteries into the battery compartment. Close the cover of the battery compartment and slide the locking mecha- nism to the left centre position until it locks into position. Rugby 840, Batteries...
- Page 42 The correct polarity is displayed on the battery holder. Close the cover of the battery compartment and slide the locking mecha- nism to the left until it locks into position. Rugby 840, Batteries...
-
Page 43: Accuracy Adjustment
30 m (100 ft) Y— 004826_001 Align the second axis of the Rugby by rotating it 90° so that this axis is square to the wall. Allow the Rugby to self-level completely. Mark the position of the beam. Rugby 840, Accuracy Adjustment... -
Page 44: Adjusting The Level Accuracy
• The X-axis and the Y-axis LEDs flash alternately three times. • The Y-axis LED flashes three times, then flashes slowly until level. When the Rugby is level, the Y-axis LED is on, but does not flash. • The X-axis LED is off. Rugby 840, Accuracy Adjustment... - Page 45 Adjustment Mode. The X-axis LED and Y-axis LED flash alternately three times, then the Rugby shuts off. Pressing the Power button at any time while in Adjustment Mode will exit the mode without saving changes. Rugby 840, Accuracy Adjustment...
-
Page 46: Automatic Field Calibration
Description Pair the receiver to the laser (if not already done). Refer to "4.3 Pairing the Rod Eye 180 with the Rugby 840" for more information. Mount the laser on a flat, level surface or tripod. Turn on the laser and align the X-axis toward the receiver position. - Page 47 Flashing X-axis is Wait until the reverse levelling of the X-axis is meas- ured. Green on Red on X-axis is Y-axis not Rotate laser 90° until complete aligned the Y-axis LED is flashing red. Rugby 840, Automatic Field Calibration...
- Page 48 If the calibration process was successful, the X and Y LEDs will flash alternately three times, the beeper will sound and the Rugby will then turn off. If the Rugby does not complete the procedure as noted above, the procedure has failed and must be repeated. Rugby 840, Automatic Field Calibration...
-
Page 49: Troubleshooting
This could be a result of heat from direct sunlight. Shade the Rugby from the sun. After two minutes in the alert condition, the unit will shut off automatically. Rugby 840, Troubleshooting... - Page 50 The batteries of the receiver are Change the receiver batteries. low. The Rugby cannot The Rugby 840 and the receiver Pair the Rugby 840 and the communicate with have not been paired and receiver. Refer to "2.5.1 the RC400 Remote...
- Page 51 Rugby off. the user. Press and hold both the Auto- matic/Manual Mode button and the power button for five seconds to enable or disable the function. The Rugby will beep once to indicate the change. Rugby 840, Troubleshooting...
-
Page 52: Care And Transport
Always carry the product in its transport container and secure it. Shipping When transporting the product by rail, air or sea, always use the complete original Leica Geosystems packaging, transport container and cardboard box, or its equivalent, to protect against shock and vibration. Shipping, transport... - Page 53 Do not repack until everything is completely dry. Always close the transport container when using in the field. Cables and plugs Keep plugs clean and dry. Blow away any dirt lodged in the plugs of the connecting cables. Rugby 840, Care and Transport...
-
Page 54: Technical Data
• FCC Part 15 (applicable in US) national regulations • Hereby, Leica Geosystems AG, declares that the product Rugby 840 is in compliance with the essential requirements and other relevant provisions of Directive 1999/5/EC and other applicable European Directives. The declaration of conformity may be consulted at http://www.leica-geosystems.com/ce. - Page 55 Laser Dimensions 240.5 mm (9.47") 196 mm (7.72") 004818_001 Weight Rugby 840 weight with battery: 3 kg/6.6 lbs. Internal battery Type Operating times* at 20°C Lithium-Ion (Li-Ion Pack) 50 h Alkaline (four D-cells) 40 h *Operating times are dependent upon environmental conditions.
-
Page 56: Rc400 Remote Control
11.2.1 RC400 Remote Control Operating range Operating range (diameter): 200 m/650 ft Batteries Batteries: Alkaline Two AA-cells Battery life (typical usage) 70 hours Remote Control 59 mm (2.32") 25.8 mm (1.02") Dimensions 004819_001 Rugby 840, Technical Data... -
Page 57: Lifetime Manufacturer's Warranty
Two Year Knockdown Warranty In addition to the lifetime manufacturer's warranty and the five year no cost period for normal repairs, the internal self-levelling system of the Rugby 840 is covered regardless of failure. Should any accident or knockdown occur within the warranty period, all repairs to the internal self-levelling assembly will be covered under the knockdown warranty policy. -
Page 58: Accessories
A100, Li-Ion battery charger to complete the Li-Ion battery solution. A200 - Wall Mount Bracket (790421) The A200 wall mount bracket mounts the Rugby 840 securely to the ceiling grid for suspended ceiling installations. A210 - Ceiling Grid Target (732791) The A210 ceiling grid target attached magnetically to the ceiling grid for suspended ceilings installations. - Page 59 A100 A150 A170 A130 A140 A800 A200 A280 A210 A220 004820_001 Rugby 840, Accessories...
-
Page 60: Index
Automatic Field Calibration ........ 46 Laser Automatic Mode ..........21 Classification ..........10 Dimensions ............55 Laser Classification Batter Boards Rugby 840 ............10 Setup ............. 32 LED Indicators ............20 Batteries Level Accuracy Charging, first-time use ........40 Adjust .............44 Operation, Discharging ........40 Check .............43... - Page 61 Instrument on tripod ........16 Specifications, environmental Instrument ............. 55 Temperature Laser Operating ..........55 Storage ............ 55 Temperature, charging internal battery ....40 Troubleshooting ..........50 User Manual Validity of ............2 Warranty ............57 Weight Instrument ............. 55 Rugby 840, Index...
- Page 62 Ask your local Leica Geosystems dealer/sales representative for more information about our TQM program. 799863-1.0.1en Original text Published in Switzerland © 2013 Leica Geosystems AG, Heerbrugg, Switzerland Leica Geosystems AG Heinrich-Wild-Strasse CH-9435 Heerbrugg Switzerland Phone +41 71 727 31 31...
Need help?
Do you have a question about the Rugby 840 and is the answer not in the manual?
Questions and answers