Table of Contents
Advertisement
Available languages
Available languages
Quick Links
H-7174
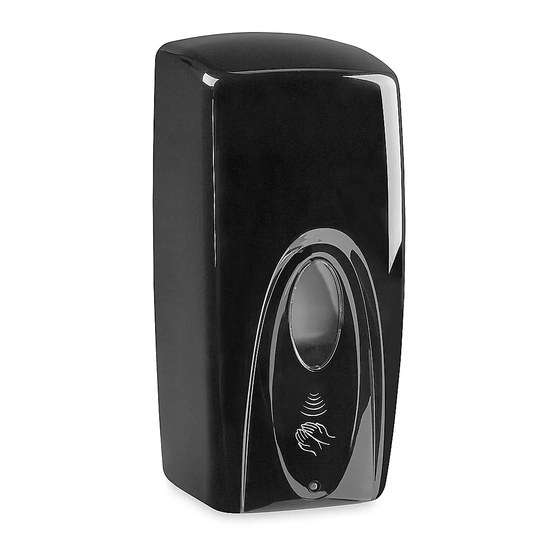
BULK SOAP AND SANITIZER
AUTO WALL-MOUNT
DISPENSER – 34 OZ.
TOOLS NEEDED
Phillips Screwdriver
OPENING DISPENSER
1. To open, insert key on the bottom of dispenser,
push key upward into the dispenser. (See Figure 1)
2. The front will open towards user.
Figure 1
GENERAL MOUNTING INSTRUCTIONS
• Can use double sided tape (not included) on
glazed tile, painted or unpainted metal walls. Tape
will not work well if wall surface is porous, like brick or
wood.
• On all other wall surfaces, use screws and anchors
(included) or other appropriate hardware based on
surface type.
• Install dispenser at least 8" above a sink or counter.
Never install where it can drip on floor, creating
hazardous conditions.
PAGE 1 OF 9
1-800-295-5510
uline.com
Electric Drill
INSTALLATION
Pour le français, consulter les pages 7-9.
• If dispenser is mounted too close to the sink or
counter or if it senses an obstacle in its way, the
LED light will blink green frequently. If it is able to
make internal adjustments, after 15 seconds the
LED light will go back to normal. If it is not able to
make the appropriate adjustments, the LED light
will blink green and red until obstacle is removed
or dispenser is remounted at correct distance from
counter or sink.
• To be in compliance with ADA regulations, the
dispenser should be mounted no more than 48"
from the ground.
NOTE: Dispenser opens towards the front. For
ideal placement, the dispenser should be
mounted 8" above any countertop, fixture or
obstruction and 2" below any cabinet, fixture or
obstruction.
MOUNTING WITH DOUBLE-SIDED TAPE
1. Thoroughly clean wall surface using a general
purpose cleaner and a paper towel. Let dry
completely. For silicone buildup, use a pumice-type
cleaner or grout cleaner to clean the surface.
(See Figure 2)
Para Español, vea páginas 4-6.
Figure 2
0621 IH-7174
Advertisement
Table of Contents

Related Manuals for U-Line H-7174


Summary of Contents for U-Line H-7174
- Page 1 Para Español, vea páginas 4-6. Pour le français, consulter les pages 7-9. H-7174 1-800-295-5510 uline.com BULK SOAP AND SANITIZER AUTO WALL-MOUNT DISPENSER – 34 OZ. TOOLS NEEDED Phillips Screwdriver Electric Drill INSTALLATION OPENING DISPENSER • If dispenser is mounted too close to the sink or counter or if it senses an obstacle in its way, the 1.
-
Page 2: Installing Batteries
INSTALLATION CONTINUED 2. Peel off paper from the back of tape (not included). 5. Replace the battery compartment cover by gently Press dispenser firmly to wall and hold for at least 30 sliding front brackets in place and pushing down. seconds to ensure tape has completely adhered to NOTE: When LED light frequently blinks red, wall. -
Page 3: Troubleshooting
INSTALLATION CONTINUED FILLING CARTRIDGE TROUBLESHOOTING 1. Open dispenser. NOTE: When battery is low, the red light will blink frequently. User should switch to OFF 2. Unscrew cartridge lid to open. position, and then change batteries. 3. Fill with liquid soap or gel hand sanitizer and Sensor works best when hands are placed within 2"... - Page 4 H-7174 800-295-5510 uline.mx DESPACHADOR AUTOMÁTICO DE PARED PARA JABÓN Y DESINFECTANTE POR VOLUMEN – 34 OZ. HERRAMIENTAS NECESARIAS Desarmador de Cruz Taladro Eléctrico INSTALACIÓN ABERTURA DEL DESPACHADOR • Si el despachador se instala demasiado cerca al lavabo o el mostrador o si detecta un obstáculo en Para abrir, inserte la llave en la parte inferior del su camino, la luz LED parpadeará...
-
Page 5: Instalación De Las Baterías
CONTINUACIÓN DE INSTALACIÓN 2. Despegue el papel del respaldo de la cinta 4. Coloque seis baterías AA alcalinas (no incluidas) en adhesiva (no incluida). Presione el despachador la orientación adecuada. (Vea Diagrama 4) firmemente contra la pared y manténgalo presionado por lo menos 30 segundos para Diagrama 4 asegurarse de que la cinta se haya adherido completamente a la pared. -
Page 6: Solución De Problemas
CONTINUACIÓN DE INSTALACIÓN LLENADO DEL CARTUCHO SOLUCIÓN DE PROBLEMAS 1. Abra el despachador. NOTA: Cuando la batería esté baja, la luz roja parpadeará frecuentemente. Debe cambiar a 2. Desenrosque la tapa del cartucho para abrir. la posición de apagado (OFF), y luego cambiar las baterías. - Page 7 H-7174 1-800-295-5510 uline.ca DISTRIBUTEUR AUTOMATIQUE DE SAVON ET DE DÉSINFECTANT EN VRAC – 34 OZ, FIXATION MURALE OUTILS REQUIS Tournevis cruciforme Perceuse électrique INSTALLATION OUVRIR LE DISTRIBUTEUR • Si le distributeur est installé trop proche de l'évier ou du comptoir, ou s'il détecte un obstacle dans son champ, Pour ouvrir le distributeur, insérez la clé...
-
Page 8: Installer Les Piles
INSTALLATION SUITE 2. Retirez la bande de papier sur l'endos du ruban 4. Insérez six piles alcalines AA (non incluses) dans la adhésif (non compris). Appuyez fortement le bonne orientation. (Voir Figure 4) distributeur contre le mur et tenez ainsi pendant au moins 30 secondes afin de vous assurer que le Figure 4 ruban adhésif a bien adhéré... -
Page 9: Dépannage
INSTALLATION SUITE REMPLIR LA CARTOUCHE DÉPANNAGE 1. Ouvrez le distributeur. REMARQUE : Lorsque les piles sont faibles, la lumière clignote fréquemment en rouge. 2. Ouvrez le couvercle de la cartouche en dévissant. Éteignez (OFF) le distributeur, puis changez les piles. 3.
Need help?
Do you have a question about the H-7174 and is the answer not in the manual?
Questions and answers