Advertisement
Available languages
Available languages
Quick Links
H-7206
LD3500 AUTOMATIC
LABEL DISPENSER
1. Turn machine off when not in use.
2. Remove liner material from take-up hub when it
reaches approximately 2" in diameter or if the motor
appears to be straining.
3. Do not operate if inspection reveals a damaged
power or sensor cord.
4. Keep strip plate, hold-down and hub free of adhesive
buildup.
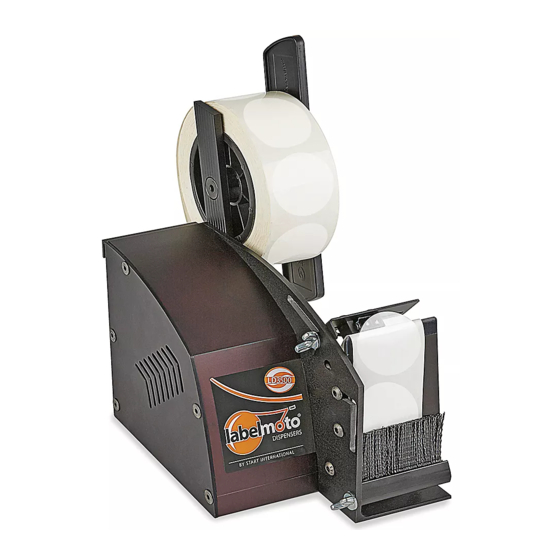
Figure 1
PAGE 1 OF 9
1-800-295-5510
uline.com
MAINTENANCE
INSTRUCTIONS
Reel Holder
Arm
Reel Holder
Arm
Photosensor
Strip Plate
Guide
Rod
NOTE: Machine must be unplugged from power
supply for steps 1 to 7.
1. Lift reel holder arm at 90° angle and lock into position
using provided hex wrench. (See Figure 1)
Para Español, vea páginas 4-6.
Pour le français, consulter les pages 7-9.
Reel Hanger
Bar
Take-up
Hub
Hold-Down
0821 IH-7206
Advertisement

Subscribe to Our Youtube Channel
Related Manuals for U-Line H-7206


Summary of Contents for U-Line H-7206
- Page 1 Para Español, vea páginas 4-6. Pour le français, consulter les pages 7-9. H-7206 1-800-295-5510 uline.com LD3500 AUTOMATIC LABEL DISPENSER MAINTENANCE 1. Turn machine off when not in use. Reel Hanger Reel Holder 2. Remove liner material from take-up hub when it reaches approximately 2"...
- Page 2 INSTRUCTIONS CONTINUED 2. Insert core holders into each side of label roll. Reel Hanger Figure 2 3. Slide loaded roll into reel hanger bar. (See Figure 2) Core holders NOTE: Labels should dispense from under the roll. 4. Feed label liner under guide rods. (See Figure 3) Figure 3 Guide Rods 5.
- Page 3 ADJUSTMENTS 1. To apply the proper amount of tension for proper Figure 6 label feeding and detection, loosen brush wing screw and press down to increase tension, then tighten screw. (See Figure 6) Brush Wing Screw 2. Loosen wing screw, then adjust sensor plate. Figure 7 Sensor 3.
-
Page 4: Mantenimiento
H-7206 800-295-5510 uline.mx DESPACHADOR AUTOMÁTICO LD3500 DE ETIQUETAS ADHESIVAS MANTENIMIENTO 1. Apague la máquina cuando no la esté utilizando. Soporte del Barra de Soporte 2. Retire el material del respaldo del buje del inicio Carrete Brazo del Carrete cuando alcance aproximadamente 2" del diámetro o si parece que el motor se está... - Page 5 CONTINUACIÓN DE INSTRUCCIONES 2. Inserte los soportes del núcleo en cada lado del rollo Diagrama 2 Barra de Soporte del Carrete de etiquetas. 3. Deslice el rollo dentro de la barra de soporte del Soportes del Núcleo carrete. (Vea Diagrama 2) NOTA: Las etiquetas deben despacharse por debajo del rollo.
- Page 6 AJUSTES 1. Para aplicar la cantidad de tensión adecuada para Diagrama 6 ingresar y detectar las etiquetas, afloje el tornillo de mariposa del cepillo y presione para aumentar la tensión, luego apriete el tornillo. (Vea Diagrama 6) Tornillo de Mariposa del Cepillo 2.
- Page 7 H-7206 1-800-295-5510 uline.ca LD3500 – DISTRIBUTEUR D'ÉTIQUETTES ADHÉSIVES AUTOMATIQUE ENTRETIEN 1. Éteignez la machine lorsqu'elle n'est pas en cours Barre de d'utilisation. Bras de support suspension d'enrouleur d'enrouleur 2. Retirez le matériau de dorsal du moyeu d'alimentation lorsque le rouleau atteint un diamètre Capteur d'environ 2 po ou si le moteur semble peiner.
- Page 8 INSTRUCTIONS SUITE 2. Insérez les supports de mandrin de chaque côté du Barre de suspension Figure 2 rouleau d'étiquettes. d'enrouleur 3. Faites glisser le rouleau ainsi chargé sur la barre de Supports de suspension d'enrouleur. (Voir Figure 2) mandrin REMARQUE : Les étiquettes doivent être dispensées par le bas du rouleau.
- Page 9 RÉGLAGES 1. Pour appliquer le montant de tension nécessaire Figure 6 à un processus d'alimentation et de détection d’étiquettes adéquats, desserrez la vis à oreilles du balai et appuyez pour accroître la tension, puis resserrez la vis. (Voir Figure 6) Vis à...
Need help?
Do you have a question about the H-7206 and is the answer not in the manual?
Questions and answers