
Related Manuals for Sam4s SAP-6600


Summary of Contents for Sam4s SAP-6600
- Page 1 SAM4POS Manual SAP-6600 / SAP-630FT All specifications are subject to change without notice.
- Page 4 Precaution Statements Follow these safety, servicing and ESD precautions to prevent damage and to protect against potential hazards such as electrical shock. 6. Observe the original lead dress, especially near 1-1 Safety Precautions the following areas : sharp edges, and 1.
- Page 5 "For pluggable equipment, the socket-outlet shall be installed near SAFETY NOTICE: the equipment and shall be easily accessible. Servicing Precautions WARNING: First read the-Safety Precautions-section of this manual. If some unforeseen circumstance creates a conflict between the servicing and safety precautions, always follow the safety precautions. WARNING: An electrolytic capacitor installed with the wrong polarity might explode.
- Page 6 Introduction 4s S 4POS Overview ................. 11 Hardware ..................11 Software ................... 12 Memory Supported Features ............SAP-6600 Controls & Connections .............. SAP-4800II Controls & Connections ............Rear VFD Display (optional) ............Passwords ...................... Password Notes ................18 Initial Clear ....................
-
Page 7: Table Of Contents
Navigating S 4POS Default Screens ..................... 21 Log On Screen .................. 21 Main Menu Screen ................Navigation Tips ..................... 25 Common Icons ................. 25 Related Item Sub-Menu ..............26 Left or Right Hand Display by Employee ........27 Using the On-Screen Keyboard ............27 Using an External Keyboard ............ - Page 8 End of Day End Of Day Sub Menu Reports ............Favorites Program Mode PLU ....................... 51 PLU Programming ................52 PLU Option Definitions ..............53 Edit/Sort ..................56 Adding New PLUs ................57 PLU Maintenance ................PLU STATUS GROUP ................. 63 PLU Status Group Programming .............
- Page 9 Options ......................89 Options ..................... 90 General Option ................. 90 Tax Option ..................93 Drawer Option .................. 94 Train Option ..................94 Level Option ..................95 Guest Check Option ................. 95 KP/KV Option .................. 96 Print Option ..................Contents Report Option ................... 98 Time Keeping Option ...............
- Page 10 Message ..................136 Error Message ................138 Report Message ................140 Label Print ..................Promotion ....................143 Promotion Programming ..............143 Promotion Group Programming ............. PRODUCT & INGREDIENT ..............155 Ingredient ..................156 Recipe ..................... 158 Product Mix ..................Product Mix Items ................Screen Edit ....................
- Page 11 Liquor Dispenser ................192 Kitchen Video ................192 Text Inserter ................... 193 Device Mapping ................194 KP Group ..................197 EFT Operation ................199 Card Read Format ................MSR Setting ................... Network & Revenue ..................206 Revenue Center ................207 Terminal &...
- Page 12 Program Scans ..................... Integrated Payment Appendix Introduction ....................What to Order? ................Configurations ..................... Required Programming for Integrated Payment .......... Device Programming ..............260 Options ................... 262 Tender Keys ................... 263 PLU Status Group for Gift Cards ........... Contents Load the EMV Parameters ..........254 Backup Program..............
- Page 13 Update S 4POS APP Remotely ..¡Error! Marcador no definido. Barcode Label Printing from S 4POS¡Error! Marcador definido. Required Programming ..¡Error! Marcador no definido. Manual Revision Record ...... ¡Error! Marcador no definido. • 13 Sam4POS 6600/4800II Program Manual v2.1...
- Page 14 Within a network, devices can have different settings and programs. This manual is specific to the SAP-6600 and SAP-4800II terminals. A separate manual is available for the Sam4POS application with the SAP-530 terminal.
- Page 15 4POS does not require allocation of memory for specific features. Database items such as PLUs, groups and operators can be added and used virtually without limit, as the memory on the SAM4s Android terminal far exceeds memory available on ECR-style proprietary terminals. This also means that certain functions can be replicated virtually without limit for example, tenders and discounts.
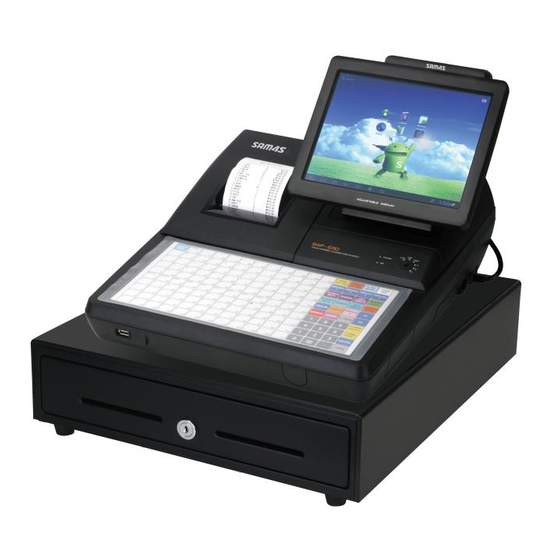
- Page 16 SAP-6600 Controls & Connections Standard 3-Track Front Facing M agnetic C ard R eader (MCR) Power Button located on the bottom right of the touch panel Standard 3-Track Front Facing M agnetic C ard R eader (MCR) Two v2.0 USB Ports...
- Page 17 SAP-6600 Connection Panel • COM1, COM2 = DB9M With Pin 9 voltage (+5V) • COM3 = RJ45 Pin 8 (0V / +5V / 12V) Voltage selectable in BIOS • Audio Line-Out port • Four v3.0 USB Ports on I/O / Two on rear/side I/O •...
- Page 18 SAP-4800II Controls & Connections 18 • Introduction Sam4POS 6600/4800II Program Manual v2.1...
- Page 19 Rear VFD Display (optional) Introduction • 19 Sam4POS 6600/4800II Program Manual v2.1...
- Page 20 SAP-4800-II Connection Panel A - COM4 (Powered) B - USB (2) C - Drawer 1 D - Drawer 2 E - LAN F - COM2 (Powered) G - COM1 (Powered) H - COM3 (Powered) I - DC In (Power Input) Passwords Specific passwords may be required to access the Report Mode and Program Mode.
- Page 21 ➢ You can enter the system Manager Password ➢ You can enter the operating code of any employee that has the ADMIN USER option checked. ➢ If an employee card system is used, employees with manager status can swipe their card to complete the transaction. Initial Clear The initial clear function allows you to exit any register activity and return to a beginning or cleared state.
- Page 22 Memory All Clear This operation clears all programming and returns S 4POS to the factory default. This operation is reserved for the System Admin only. Contact your local authorized dealer for assistance. Warning: This operation is not reversible; all programming, settings, and report totals will be lost. Be sure to back up the program prior to performing this procedure if you wish to save any of the current program files, settings or report totals.
-
Page 23: Navigating Sam4Pos • 23
Navigating S 4POS Default Screens Log On Screen Upon boot up, the Sign On screen displays. You can sign on or, if the time keeping feature is being utilized, clock in from this screen. To Sign-On to the Sam4POS application for the first time, use the default password “1” and touch “ENTER”. - Page 24 Main Menu Icon Details: The Operate icon opens the Register Mode, Operator’s sales entry screen. Choose Reports to generate system reports. Choose End of Day to run the end of day reports. You can identify Favorites that may be from various areas within the application such as a specific report or program screen.
- Page 25 Notes/Reminders Notes and reminders can be added and accessed from the Main menu screen. Navigating Sam4POS • 25 Sam4POS 6600/4800II Program Manual v2.1...
- Page 26 1. Sign on to the S 4POS application from the main Log On screen. 2. Press the Note icon on the upper right of the display to view or add notes. 3. On the note pad that displays; Press the icon to add a new note or reminder to the list.
-
Page 27: Navigation Tips
5. The new note is added to the list. 6. To edit or delete notes; tap/touch on desired note from list: 7. Press the note pad icon to edit the note; press the trash can icon delete the note; press icon to close note. -
Page 28: Related Item Sub-Menu
Add Record Edit / Sort Menu GOTO allows you to go to the programming options for that program area, group, recipe or MLU etcetera, from within the current program area. Drop down button opens a list of selections for the current program option. The pencil icon allows you to open a window to enter a value for the current program selection. -
Page 29: Left Or Right Hand Display By Employee
If you are inside a program or report area, you can take a shortcut to a related program area rather than backing out to the main program screen and reselecting the new program are. and following the menu to a different area. From an individual program screen, (as an example we will use the PLU programming screen) touch title PLU in the upper left to display a list of related programs. -
Page 30: Using The On-Screen Keyboard
Using the On-Screen Keyboard When a program or operation function requires an alphanumeric entry, the screen keyboard will display automatically. Type your descriptor and touch Done. The keyboard will hide automatically when your entry is completed. ?123 Press the CAPs button to capitalize a letter. -
Page 31: Using An External Keyboard
~ [ < Press the symbol key to access. ADDITIONAL FUNCTION KEYS: Using an External Keyboard For large scale programming, users may find an external USB keyboard more familiar and quicker to use for entering data. You can hide the on-screen keyboard by touching the ESC key on the external keyboard. -
Page 32: Editing A List
Advance to the next field Enter Shift + Enter OK and Continue Editing a List In a long list, multiple items can be deleted or inactivated from the Edit Mode. 1. Touch the EDIT/SORT Menu icon and select [EDIT MODE] to edit the list. 2. -
Page 33: Viewing/Hiding Options On Long Lists
Touch the Edit/Sort Menu icon and then press SORT . Select the desired method to sort the list from the available selections. i.e. GROUP # A to Z Z to A Viewing/Hiding Options on Long Lists Options where there are long lists of selections, such as PLU options, PLU Status Options, or Function Options and System Options, are categorized or organized in groups. -
Page 34: Sam 4Pos Operator Screen
4POS Operator Screen Touch the Register Mode icon on the Main Menu screen to open the S 4POS Register Mode Operator Screen. The operator screen is divided into different zones to facilitate regular sales transactions. Touch the Back Arrow icon to close the Register Mode operators screen and return to the main menu screen. -
Page 35: Operator Screen Zones
Sam4POS Operator Screen Operator Screen Zones Description Zone Receipt -- Displays the current sale information for the operator/cashier. You can touch to hide the 10-Key pad and expand the receipt area. 10-Key pad – used to enter amounts into open items or enter tender amounts. You can touch open the 10-Key pad if it is hidden. - Page 36 License Info – Touch this icon to display the terminal License information: Connection Method – Tap this icon to access the main Android, Wireless & Network settings. The Manager Password is required for access. Sam4POS Operator Screen Allows you to sign off the current employee and return to the main sign on screen. Date/Time –...
- Page 37 Price Level – displays the current Price Level, touch this icon to select or change to a different price level: KP Period – Allows the operator to select/change the KP Period: Sam4POS Operator Screen Destination – Tap this icon to set the default destination or select None: Employee –...
- Page 38 Sam4POS Operator Screen 38 • Sam4POS 6600/4800II Program Manual v2.1...
-
Page 39: Report Mode
Report Mode When the Report Mode is selected, a grid of six quick view summary reports displays for managers to quickly see selected report information. We can also choose to view or print detailed reports by touching the ‘REPORT MODE ’... - Page 40 Cash Declaration Calendar Report View Note-Pad/ Edit – used to show/hide the edit icons on the individual report cells. Press this icon to add or remove the report mode from the favorites list. Edit icon, brings up the Report Summary list to change the report that displays in the selected cell.
-
Page 41: Summary Reports
Summary Reports The Report Mode Summary Reports screen allows you to view selected report information without having to first run and print the report. Adding Reports to the Summary Report ◆ To add or edit the summary reports that are shown on the report mode quick view display, touch the add record icon summary reports. -
Page 42: Edit The Summary Reports
When you have maded your report selections, they will appear on the quick view screen. To display the report information you may need to exit the report mode and then return back again. If the report doesn’t display, touch the icon to see the report data: Edit the Summary Reports 42 •... -
Page 43: Detailed Reports
If desired, the current reports displayed in the report mode summary report view can be changed to display different reports or removed from the summary report view. ◆ Touch the Edit icon on the title bar to display or hide the edit icons for each report in the grid. The “Edit”... - Page 44 Additional reports are available by selecting the detailed report sub menu. From the sub menu report section, you can view, print or save the selected report as a CSV file. Reports are not cleared from this report mode, to clear reports you would need to go to the “End of Day” report mode. Select the specific report you wish to view from the list to open the report.
-
Page 45: Cash Declaration
Additional OPTIONS allow you to further define the report for specific data depending on the report that is selected. FILTERS provide further flexibility by allowing you to filter the report to show all employees or choose a specific employee to view just their individual totals. ... -
Page 46: Calendar Report View
Calendar Report View Daily Sales data can be viewed on a monthly calendar format, broken down for each day and week of the month by selecting the calendar report in the report mode. 46 • Report Mode Sam4POS 6600/4800II Program Manual v2.1... - Page 47 arrows to navigate to the desired month. Sales totals by the week ‘Day’ is displayed for SUN thru SAT. Daily totals for each day are reported on the calendar grid. Weekly totals for each week of the year show at the right of the week. Totals at the right show the totals for a selected day of the month.
- Page 48 End of Day End of Day operation allows the operator to close, Print and/or E-mail the Financial, PLU, Group, Period and Employee Reports for all employees or select specific reports for specified employees. Reports generated from this screen will clear the totals for the selected reports. 1.
- Page 49 End of Day 4. OPTIONS: Select the options for your report as desired: DETAILED DATA Breaks down the report data by individual transactions. Column headers are changed and include: SALE TIME, CLOSING, EMPLOYEE, SALE AMOUNT, and PAID AMOUNT. Detailed Data is sortable by clicking the column header.
- Page 50 End of Day 6. E-MAIL REPORTS: Check or uncheck the reports you want to clear and e-mail, all reports are selected by default. Report Selections are: FINANCIAL REPORT PLU REPORT GROUP REPORT PERIOD REPORT EMPLOYEE REPORT 7. Check or uncheck the report dates for your selected reports that you wish to clear. You can check/uncheck the select all box on the header row;...
- Page 51 End of Day End Of Pay The End of Pay report displays the Total time, Labor cost, and overtime for the selected date and employees. You can generate a report for a selected date/employee. To clear the Time Keeping data, select the date and employees you wish to clear and press the Generate icon.
-
Page 52: Favorites
End of Day Favorites The Favorites Menu allows you to quickly access specific program areas or reports that you may use frequently. Adding a favorite is an easy way to go to a screen you visit frequently, such as a certain program mode, or a specific report. - Page 53 Favorites • 53 Sam4POS 6600/4800II Program Manual v2.1...
-
Page 54: Program Mode
Program Mode When you select the program icon from the Main Menu Screen, the main PROGRAM MODE menu categories are displayed. Touch any of the categories shown to enter the programming options for that category. Program Mode Title Bar Return Mode Program Favorites Connection Sign Date & Back-Arrow Screen Title Scan Method Off Time 54 •... - Page 55 Program Mode Menu Selection Definitions Menu Icon Definition Selection Set PLUs and related functions: PLU programming, PLU Status Groups, PLU Stock, MLU Chains, Set Menu, Group programming, Non-PLU and Quick PLU. Set up Employees, Employee Authority Levels, Job Codes & Pay Rates, and Station programming. Set tax rates and/or enter tax table information for one or more state or local taxes and setup Tax Groups to assign in the PLU status group programming.
-
Page 56: Plu
Allows you to link S 4POS to a web site. PLUs are the products or services that are available for sale. The PLU programming has seven programming categories: PLU, PLU Status Groups, PLU Stock, MLU Chain, Group programming, Non-PLU, and Quick PLU programming. These seven categories will determine the how the PLU is registered in the sales mode. - Page 57 1. From the PROGRAM MODE main menu, touch PLU to view the PLU program selection window, touch PLU to view the PLU programming options. Here you can add, edit or delete items as necessary. 2. All existing PLUs are listed. You can edit an existing PLU by scrolling through the PLU list to the specific item you wish to edit.
-
Page 58: Plus
This field is used to provide the first type of sales analysis by category i.e. Beer, Lagers and so on. The GOTO button allows you to go to the programming options for that group. PLU STATUS GROUP LINK This is the programming for the status group link providing an en-masse program procedure for common system flags. - Page 59 Cost The PLU Cost tab allows you to enter the cost of merchant cost of the item. 1. From the PLU programming screen, select the PLU you want to add the cost to, press the COST tab. 2. Select the ‘NEW’ button at the bottom right of the display. The cost entry dialog displays. 3.
- Page 60 4. If the cost was entered incorrectly, you can edit the cost amount. Select the PLU you wish to edit the cost for and press the EDIT button at the lower right of the screen. 5. Enter the correct cost for the PLU and press OK. You are returned to the main PLU screen. 6.
- Page 61 2. Select the operation from the menu that you want to perform. EDIT MODE Selecting the Edit Mode from the menu selections allows you to select multiple PLUs at the same time or select all PLUs in the PLU file to edit the settings as necessary. Available actions include: •...
- Page 62 Type in the PLU descriptor in the “INPUT NAME” field, Enter a Price on the Price Level line, Type in or scan the new item PLU CODE or scan the new item in the “INPUT PLU CODE” field. If the item code entered is already being used in the PLU database, you will receive the warning: “PLU Code Already Exists”...
-
Page 63: Plu Maintenance
4. Note that the ‘searched criteria’ is highlighted in red in the results. 5. Select a PLU from the search results to go to the programming for that PLU. PLU Maintenance PLUs can be maintained easily in the S 4POS application, simply select the item and make the appropriate changes. - Page 64 2. Press YES to delete the selected item; select NO to exit without deleting. Inactivate / Activate PLU 1. Press and hold on the item you wish to make inactive, then select ‘INACTIVATE’ from the PLU maintenance list. Inactivated PLUs will be grayed out in the PLU list: 2.
- Page 65 1. INPUT NAME → STOCK quantity → PLU Code for the new item. 2. Press OK to add the new item; Press OK AND CONTINUE to add the item and continue adding more PLUs; Press CANCEL to cancel the new PLU entry. Copy to Existing Items Allows you to copy the settings or changes of the selected item to multiple items already in the PLU database.
-
Page 66: Plu Status Group
the copy – icon Press the confirmation dialog displays: Press YES to proceed with the copy procedure; all options, prices, will be copied to the selected items. The COST information is not copied. Press NO to exit the copy and return to the main PLU screen. Copy the Price to Existing Items This feature is similar to the ‘Copy to Existing Items’... -
Page 67: Plu Status Group Programming
In most applications, large groups of PLUs are set with many identical options, while the PLU number, descriptor and price are unique. On the PLU Programming, each PLU is assigned a descriptor, price or prices and a few unique options. The remaining PLU options are determined by linking the individual PLU to a PLU Status Group. -
Page 68: Plu Status Group Definitions
PLU Status Group Definitions General TAX GROUP Check for each tax rate to determine if the appropriate tax(es) is automatically calculated when the item is sold. CONDIMENT ITEM Condiments PLUs differ from non-condiment PLUs in the manner they display and print during operations. - Page 69 Compulsory COMPULSORY ALPHATEXT If selected, an alpha text message must follow the registration of this PLU. COMPULSORY CONDIMENT ENTRY? If selected, then a condiment entry must follow the registration of this PLU. Discount ALLOW SURCHARGE? If selected, the operation of an item surcharge after registration of a PLU reporting to this group is allowed.
-
Page 70: Edit/Sort
Select the kitchen video group # to which PLUs in this group are to be sent. Condiment PLUs with a "0" status here will "follow" the last main item. COLOR TO DISPLAY ON KV (0-31) The color code set here will control the color or screen format displayed on an optional kitchen video system requisition screen. -
Page 71: Plu Stock
PLU STOCK PLU stock is a simple inventory system where each whole unit PLU activity subtracts a value of "1" from the stock counter. (Note that if multiplication or decimal multiplication is used when the PLU is registered, the resulting quantity of activity will subtract from the stock counter. Stock is maintained increments to the second decimal position, i.e. -
Page 72: Mlu Chain
5. The appropriate entry window displays: 6. Enter the new quantity and then touch ADD, to add to the current quantity; SUBTRACT, to remove from the current quantity; or OVERRIDE, to enter a new quantity. Touch CANCEL if you wish to exit without making any changes. -
Page 73: Group
Group Groups are designated to accumulate totals for sales of PLUs assigned to each group for convenient reporting. A PLU can send its sales information to up to 3 group links. This program allows you to set up the groups that the PLUs will report to. You can create as many groups as are necessary for your application. -
Page 74: Non-Plu
7. Check the option Add to Group Total if you want totals for the selected group to be included in the totals on the Group Report. Typically, this option will be selected, you may however uncheck this option for groups for Lottery or similar groups of items. 8. - Page 75 There are 11 identifier numbers available for non-PLU code programming: “02” and “20” through “29”. The purpose of this program is to define the format of the 10-digit (part b) for each possible identifier. For example: ◆ The structure of Non-PLU identifier “02” could be defined to use 5 digits for the product code and 5 digits for the price.
- Page 76 digits in “part b”, between the product code & price field and counts as a digit in the Length Of Field 1 setting. TAB OR DECIMAL POINT OF FIELD 2 Enter the decimal point position for the price/weight/quantity field. Program Price Embedded PLUs 1.
- Page 77 Note: When you scan in the new embedded barcode, the price field on the item will fill in with zeros if the Non-PLU Code programming settings are correct. If the new PLU code includes the price, then you should delete this new item and start over with the Non-PLU Code settings. Price Embedded Barcode Registration Example With the embedded barcode properly programmed, when the item is scanned in the sales mode, 4POS will extend the price per pound ($3.99 in this example), by the weight of the item...
-
Page 78: Quick Plu
Quick PLU The Quick PLU menu provides another means to quickly access the programming for a specific PLU or program area. Six quick access program areas are provided, PLU, PLU Status Group, Stock, Group, MLU Edit, and Function Key. Select one of these categories to go directly to the programming maintenance screen for that category. - Page 79 5. The PLU code is shown in the window as in the example: 6. Press OK. 7. The programming for the PLU is shown; edit as necessary. 8. When you have finished editing the PLU, press the back arrow to return to the main Quick PLU menu screen.
-
Page 80: Employee
Employee Employee programming is broken down into four programing categories: Employee, Authority Level, Job Code & Pay Rate and Station programming. Each of these categories has additional programming options. 1. From the PROGRAM MODE touch EMPLOYEE to view the EMPLOYEE program selection window. -
Page 81: Employee Option Definitions
All existing employees are listed. You can edit an existing employee by scrolling through the employee list to the specific employee you wish to edit. If you have a large employee file, you can sort the employee list alphabetically or by employee number. -
Page 82: Employee Authority Level
Password OPERATING CODE Enter a number (up to 10 digits in length) that will be used by this employee to sign in and/or out. CLOCK IN CODE Enter the secret code number (up to 10 digits in length) that can be used to clock in/out. General ADMIN USER If selected, this employee will be allowed to perform manager functions without entering a manager... - Page 83 all functions. Other authority levels could be defined for servers, cashiers and managers that allow only the appropriate operations. REG MODE SIGN IN/OUT USING MCR This option forces the employee to use the Mag Card Reader for signing in and out of the ECR. See programming for details.
- Page 84 TRANSFER OF GUEST CHECK CAN COMBINE/SPLIT GUEST CHECK Selections are: Not Allow – Own - All ALLOW EDIT ANY CHECK CAN CLOCK-OUT WITH OPEN CHECK GUEST CHECK ENTRIES ONLY ALLOW CANCEL AFTER RECALL EDIT PGM/FUNCTION ALLOW PLU PRC CHANGE ONLY If selected, the employee can access the PLU programming screen, but can edit only the PRICE/HALO and PRICE LEVEL fields.
-
Page 85: Station
Edit Job Codes Job codes are used to break down the hours worked for all employees into different categories (See "Labor Groups" report in the Operation Manual.) A breakdown of hours by job is also reported for each employee. The job codes to be used by all employees are set up here. Each job code you create must be given a descriptor here. -
Page 86: Tax
General The general section assigns the default MLU Group, Default MLU and FLU used for the selected station. MLU GROUP DEFAULT MLU DEFAULT FLU Receipt Format Receipt format is used to assign the default printers to be used for the selected station. RECEIPT KITCHEN PRINTER GUEST CHECK... -
Page 87: Tax Programming
TAX PROGRAMMING 1. From the Program Mode menu, touch TAX to view the TAX program selections and select TAX. 2. Enter a DESCRIPTION for each of the 10 tax rates if desired. Descriptors can be up to 30 characters. This will be the descriptors printed on receipts and reports You can use the X at the end of the description field to clear the current descriptor. - Page 88 Tax Table Programming Notes In some cases, a tax that is entered as a percentage does not follow exactly the tax charts that apply in your area (even if the tax chart is based on a percentage). In these cases, we recommend that you enter your tax using tax table programming.
-
Page 89: Tax Group
Tax Charged Sale Amount Range Break points $0.00 $0.00 - $0.10 $0.01 $0.11 - $0.21 $0.02 $0.22 - $0.38 $0.03 $0.39 - $0.56 - Non-Repeat Breaks $0.04 $0.57 - $0.73 $0.05 $0.74 - $0.91 $0.06 $0.92 - $1.08 $0.07 $1.09 - $1.24 - Repeat Breaks $0.08 $1.25 - $1.41 $0.09... -
Page 90: Options
1. From the main Program Mode menu, touch TAX to view the TAX program selections then touch TAX GROUP. 2. Select a Tax Group to edit or create new Tax Groups as needed. 3. Turn ON/OFF the tax rates as needed for each Tax Group by pressing the On/Off radial button. Options Options programming is used to define the most fundamental parameters of the register system. -
Page 91: General Option
Options Options programming is used to define the most fundamental parameters of the register system. Options are separated into easily identifiable categories to simplify finding specific options. 1. Select OPTIONS from the Program Mode, OPTIONS menu selections. The list of option categories is displayed. - Page 92 Choose “None”, “One Item Delayed Consolidation” or “Immediate Consolidation”. AUTOMATIC SEAT# ASSIGNMENT (0: NONE) If selected each item that does not receive a seat # prior to registration, will be assigned the default seat number as set here. Using a seat number system assists prep staff in assembling orders correctly and facilitates payment of separate parts of a check.
- Page 93 DEFAULT DESTINATION You have the option of selecting a default destination; the default destination will automatically apply to all sales. Choose NONE for no selection. ENFORCE DESTINATION ENTRY AT START OF SALE You can enforce the destination selection to be entered at the beginning of a sale, by selecting this option.
- Page 94 This controls the search feature on the programming screens. The default setting is 2. If this is set to 0, there is no Auto-Search, the user must press DONE to search. SECONDS TO DISPLAY TOTAL/CHANGE (0:ALWAYS) This setting determines how long the data is displayed. Allowable settings are from 0 to 99 seconds. SECONDS TO DISPLAY TOTAL/CHANGE (0:ALWAYS) on POLE DISPLAY This setting determines how long the data is displayed on a remote pole display.
-
Page 95: Level Option
Drawer Option General ALLOW ITEM REGISTRATION WITH DRAWER OPEN Uncheck to force the drawer to be closed before registrations are allowed. OPEN DRAWER FOR CASH-DECLARATION When this option is selected, the drawer will open at the start of the CASH DECLARATION procedure. -
Page 96: Guest Check Option
ITEM POPUP: The price level applies for the next PLU only, and then returns to the default. TICKET POPUP: The price level remains active for the remainder of the transaction, and then returns to the default when the transaction is finalized. MODIFIER LEVEL IS STAY DOWN: The modifier will remain active until the next choice. - Page 97 PRINT DEVICE MAPPING DESCRIPTION ON KP Send on KP/KV PRINT VOIDED ITEM AT KP/KV If selected, then transaction void orders will not print or display at the appropriate printer/screen. PRINT ORDER ON KP AT SUBTOTAL Select if you wish to send/print items on the KP when the subtotal key is pressed, instead of when the sale is finalized.
-
Page 98: Print Option
Print Option Receipt & Journal PRINT REPRINT ON A REPRINTED RECEIPT When a receipt is reprinted, ** REPRINT ** is printed at the top of the reprinted receipt. PRINT SEAT# When this option is checked, the seat # will print on the receipt and journal. PRINT RECEIPT FOR SIGN ON/OFF If selected, a receipt is printed whenever an employee signs on or off. -
Page 99: Report Option
Report Option General EMAIL ADDRESS FOR EXPORT Enter the email addresses where you wish to send reports. Note: A Gmail account is needed for sending FROM, and the S 4POS must be added to "Trusted Devices" in the Google account security settings. GMAIL ACCOUNT Enter your Gmail eMail account (This is the eMail address that the S 4POS will send FROM). -
Page 100: Hash Option
With this option checked, the sign on screen displays separate buttons for Sign-On and for Time In/Out. Hash Option Here you can define which report totals will be updated when HASH items are registered. See “PLU Status Group” programming on page 59 to apply HASH status to PLUs assigned to the PLU Status Group. HASH UPDATES SALE (RECEIPT) TOTAL ADDS TO GROSS SALE TOTAL... - Page 101 SCREEN SAVER (MINUTES) Enter the number of minutes (0-99) before an inactive screen will automatically display; (0) will disable the screen saver. Press any key to refresh the screen. SCREEN SAVER TYPE Choose from Floating, Rotating or Clock: FLOATING requires a single image selected from USB or internal storage.
-
Page 102: Rounding
Rounding The Rounding option allows you to choose how the rounding is handled when fractional amounts result during operations like multiplication, division, applying discounts and tax calculations. You can select the rounding method for these operations to always round up, always round down, or round up at .5 (half a cent .005¢). -
Page 103: Tare Weight
TARE WEIGHT A tare is the amount of weight accounted for by the container or packaging. By entering a tare weight (as required by law in some areas) the weight of the container is subtracted and only the true weight of the product is measured on the scale. 1. -
Page 104: Function Key
Press OK or the Done key on the keypad to enter the tare. Function Key Function Key Programming is separated into three categories, Function Key, Tender Key and MACRO Key. The options for each vary by key type selected. Refer to the Function/Tender Key List for specific information about each key type. - Page 105 wish to edit. You can use the Sort Menu button type. You can also search by specific key types such as destination keys, discount keys, etc. 3. Select a function key to edit the options available on the key as needed. DESCRIPTOR Enter a custom descriptor as desired for the function, you can use the X at the end of the descriptor field to clear the current descriptor.
-
Page 106: Add New Function/Tender Key
Add New FUNCTION/TENDER KEY You can add additional functions or tender keys as your application requires. Press Add button to add a new function or tender key to the list. The NEW key dialog displays. 2. Type a descriptor for your new key at the Input Description field. The X at the end of the field, clears the current descriptor. -
Page 107: Copy Function/Tender Keys
4. Edit the options for the selected key as necessary. Copy Function/Tender Keys If your application requires more a certain type of key, you can copy the key with the same type and options as the original key. You can also use this procedure to delete or inactivate specific keys. 1. -
Page 108: Edit/Sort
Edit/Sort Use the Edit/Sort feature to maintain Function/Tenders more easily. This feature allows you to access the Edit Mode, Sort Function/Tenders alphabetically or by Type. We can also filter by the specific type of key. 1. Touch the Edit/Sort Menu button on the PLU programming screen. - Page 109 Cancel Used to abort a transaction in progress. All current items are removed. GENERAL HALO Amount – High Amount Lock-Out; This is the maximum amount accepted when the Cancel key is used. Manager Required? – Operation requires input of manager password to complete operation. CANCEL Print Receipt –...
- Page 110 KP Period Override – The default setting is NONE. Alternately, you can select a defined KP Period to be associated with this destination. Inverse Print – Check this option if you wish this destination to print in reverse. Display Subtotal on KV – MLU Link –...
- Page 111 Food Stamp Shift Touch FD STMP SHIFT to shift the pre-programmed food stamp status of an item prior to its registration. Food Stamp Subtotal Touch FOOD STAMP SUBTTL to display the total of food stamp eligible items registered in the current transaction.
- Page 112 NOT USED, CASH, CHECK, FOOD STAMP TENDER, and MISC. Note: If the Paid Type is set for TENDER and the Tender Category is set for MISC, you can use this key for easy TIP entry. List Sale Interrupt Allows the operator to list previously interrupted transactions, when the Clerk Interrupt Feature is used. A specific transaction can be selected to preview.
- Page 113 No Sale Use to open the drawer outside a transaction. GENERAL Manager Required? – Operation requires input of manager password to complete operation. NO SALE Print On Receipt – PLU Info If an Employee has authority to edit from PLU Info: They can view and edit PLUs from the PLU Info function. They can only view PLU ‘s from the If the Employee does not have the authority to edit from PLU Info:...
- Page 114 Print Hold Use to remove the "Hold" designation from an item or order, so that the items and their instructions are now sent to the kitchen printer/KVS at finalization. GENERAL Manager Required? – Operation requires input of manager password to complete operation. Promo Touch the PROMO key to void the price (the item remains) of an item.
- Page 115 Receipt On/Off Touch RECEIPT ON/OFF to toggle the receipt printing from on to off. This operation can also be performed by pressing the Receipt Icon on the header bar while in the register mode. Receipt Reprint Touch the Receipt Reprint key to issue a transaction receipt at the designated receipt printer. RECEIPT REPRINT Gift Receipt –...
- Page 116 Allow Tare Weight Entry – A tare is the amount of weight accounted for by the container or packaging. By entering a tare weight (as required by law in some areas) the weight of the container is subtracted and only the true weight of the product is measured on the scale. Tare Entry Is Compulsory –...
- Page 117 GENERAL HALO Amount – High Amount Lock-Out; This is the maximum amount accepted when this Store Table key is used. Manager Required? – Operation requires input of manager password to complete operation. TAX EXEMPT Check the Tax Rates (1-10) you wish to exempt when this destination is used. STORE CHECK Recall Check Link –...
- Page 118 TAXABLE Check the Tax Rates (1-10) you wish to exempt when this destination is used. TIP CHARGE Tip Amount – Select if the tip entered will be an amount or percentage. Deduct Tip From Cash In Drawer – Select this option to deduct tip amounts from the cash in drawer total on reports.
- Page 119 Allow Decimal Input – Allows use of the decimal key when inputting quantities; i.e. 3 32 [X/Time]. Program Mode • 119 Sam4POS 6600/4800II Program Manual v2.1...
-
Page 120: Tender Keys
Tender Keys There are four general tender types available in S 4POS, Cash, Check, Food Stamp and Misc. Each Tender type has additional programming associated with that specific type of tender. Each tender key description can be edited to further identify the specific tender. Cash Use CASH to finalize or tender cash sales. - Page 121 Need Manager for Under Tender – when checked, the manager is needed to approve the transaction if the amount entered is less than the sale amount. DRAWER Open Drawer – This is option is selected by default, uncheck this option only if you do not want to open the cash drawer when this tender is used.
-
Page 122: Macro Key
Compulsory Amount Entry – Check this option if you wish to enforce an amount to be entered prior to pressing this tender key. Do Not Allow Under-Tender – If this option is checked, only the amount of the sale or greater are accepted. - Page 123 Program Mode • 123 Sam4POS 6600/4800II Program Manual v2.1...
- Page 124 Adding MACRO’s You can create/add as many MACRO keys as are needed for your application. To add a new MACRO, press the 1. icon, the NEW MACRO dialog is displayed. Type in a name in the ‘INPUT A DESCRIPTION’ field for the new MACRO.
- Page 125 Select PLUs, Function Keys, Tender Keys, or MLU’s for the MACRO as needed for the operation you want the MACRO to perform. As you select items for your MACRO, they will appear in the key sequence grid to the right. You can use the keys to reposition items in the grid.
-
Page 126: Receipt & Message
The DELETE button will delete the selected MACRO. Edit/Sort MACRO’s Press the Edit/Sort Menu button 2. Select SORT to view the macro keys alphabetically. 3. The EDIT MODE allows you to select multiple MACRO’s from the list to delete them all. Copy MACRO MACRO keys can be copied to create new MACRO’s with the same operation or you can copy a MACRO to existing MACRO’s in the list by pressing and holding the desired MACRO. -
Page 127: Receipt
2. The RECEIPT & MESSAGE menu screen appears; touch the program area you wish to edit. Receipt Receipt programming allows you to program the header and footer information that appears on each of your receipts, kitchen and guest check printers that you may have. These receipt messages can then be assigned for use in the Employee - STATION - Receipt Format programming. - Page 128 2. You can copy a receipt message to a new message by pressing and holding an existing message in the list. Individual receipt messages can be deleted in this manner as well. 3. Use the Edit/Sort Menu icon to SORT the list alphabetically or choose EDIT MODE to select and delete receipts.
-
Page 129: Load A Custom Logo Image To The Receipt
Image Loaded In Printer: see “Image Loaded In Printer Button” on page 135 for details. Receipt Initialization: will clear all receipt format entries and restore to default. Receipt Description Option Definitions Element Name Element Description Logo Image 1 Image that appears at the top of the receipt above the pre-amble. Note: Images can be loaded from the terminal image gallery or from the images loaded into the printer;... - Page 130 2. Press the icon next to LOGO IMAGE 1, 2 or 3 to add an image to the selected receipt; The ‘CHOOSE PHOTO’ dialog window displays: 3. Press ‘IMAGE LOADED IN PRINTER’ to select an image that is defined in the internal printer. 4.
- Page 131 5. Choose the image you want for your selected Logo Image: Touch SAVE to load the selected image to the receipt. 6. Touch SAVE in the upper left corner of the screen. Program Mode • 131 Sam4POS 6600/4800II Program Manual v2.1...
- Page 132 7. The INFORMATION dialog, “DO YOU WANT TO DEFINE THIS IMAGE ON THE INTERNAL RECEIPT PRINTER?” is displayed: 8. Touch YES to save the selected image to the receipt printer and load the logo image for the receipt. 9. Image is saved and displays on receipt. 10.
- Page 133 Scroll left/right to the desired image. An enlarged image for the selected image will be displayed. 5. Scroll through the available defined images to your desired image. 6. Press SELECT to load the image as the Logo Image to your receipt. Pressing CLOSE will exit the image selection without loading an image.
-
Page 134: Message
3. The available images are displayed: 4. Select the appropriate Operation Button: NEW – Select this to add new images to the list b. SYNCH TO PRINTER – Sends all images to the printer DELETE – Removes the current image d. - Page 135 icon and type in a descriptor (up to 30 characters) for new message category. Press the X at the end of the description field to clear the current descriptor. Add a new message category by pressing the You can copy an existing message category by pressing and holding an existing category in the list.
-
Page 136: Error Message
Type in the message (up to 40 characters) and set the justification. You can also choose to have the message print DOUBLE WIDTH and/or PRINT RED. Press OK when done. Select OK AND CONTINUE to add more messages for the category. Press CANCEL if you wish to close the window without creating a new message. - Page 137 Default Error Messages ERROR MESSAGE DESCRIPTION ERROR MESSAGE DESCRIPTION SUCCESS DELETION OF THIS ITEM IS NOT ALLOWED AS LINKED PAYMENT ITEM EXITS DELETION OF THIS ITEM IS NOT ALLOWED COULD NOT FIND REQUSTED DATA DELETION OF THIS ITEM IS NOT ALLOWED AS LINKED HOTKEY ITEM EXISTS DATA VALIDATION FAILED DATA UPDATE FAILED...
- Page 138 SELECT ANOTHER PRICE LEVEL CAN NOT CANCEL PARTIALLY PAID SALE DELETION OF THIS ITEM IS NOT ALLOWED AS LINKED ENTER NON ZERO NUMBER MLU ITEM EXISTS NO DECIMAL ENTRY ALLOWED DELETION OF THIS ITEM IS NOT ALLOWED AS LINKED FLU FAILED TO DETECT SECOND DISPLAY ITEM EXITS ERROR MESSAGE DESCRIPTION...
- Page 139 RETURN OBJECT RANGE ERROR NO GROUP PGM FILE OPEN A CHECK FIRST NO AUTORITY PGM FILE DIFFERENT EMPLOYEE OWNS THIS CHECK NO CASHIER PRGM FILE CREATION ERROR NO PLU PGM FILE SELECT ITEM(S) FIRST NO PLU STATUS PGM FILE DELETE ERROR NO TAXTBL PGM FILE UPDATE ERROR NO JOBCODE PGM FILE...
-
Page 140: Report Message
IF THE IRC MODE IS ON CAN NOT CHANGE STORE NAME MAXIMUM SIZE: 576*240 DOTS PLEASE TURN OFF THE IRC MODE THEN CHANGE THE STORE NAME NO CHECK# CHECK COIN DISPENSER ALREADY CLOSED CARD FORMAT ERROR DIFFERENT TO DEALER NAME STORE TABLE FIRST NEED GUEST # FIRST STATION DOES NOT MATCH... - Page 141 HASH TOTAL SAM4S CASH DRAWER AUDACTION ESTIMATED TIPS Program Mode • 141 Sam4POS 6600/4800II Program Manual v2.1...
-
Page 143: Label Print
Label Print The Label Print programming is used to setup the different label types that may be used; such as product labels and shelf labels. You can customize the information that prints on the label to suit your application needs. Select LABEL PRINT from the PROGRAM MODE, RECEIPT &... -
Page 144: Promotion
PLU Code b. PLU Description PLU Price d. Barcode Text – type in a custom test to appear on your label; i.e. Joe’s Bait Shoppe Reverse – prints in reverse, dark background. You can rearrange the position of the elements where you want them to appear on the label by clicking on the element and dragging the element to the desired position. -
Page 145: Promotion Programming
2. The PROMOTION selection screen appears; touch the program area you wish to edit. 3. Select PROMOTION from the available selections to setup each promotion type. Promotion Programming Retailers often offer discounts when combinations of items are purchased. There are four promotion types available that can be set to accommodate various promotion schemes a retailer may utilize. - Page 146 Go to the PLU tab to select the items that can be used with this Mix & Match promotion. Multi Buy The Multi-Buy discount situation takes place where the merchant offers an amount or percentage discount when a specific combination of items is purchased, or offers the items at a fixed price. For example, purchase 2-Hamburgers, 1-French fry and 1-Medium soft drink to receive a $1 meal discount.
- Page 147 The COUNT refers to the number of items required for the selected item, the default setting is 1. You can edit this by selecting the item, then press the EDIT button. Combo Discount The Combo discount is similar to the multi-buy discount. In both situations, specific items must be sold to qualify.
- Page 148 Sweet Deal The Sweet Deal promotion is built by first programming a promotion group. The promotion group will have all the items that are eligible for the sweet deal. Then assign the promotion group to the sweet deal promotion and set the parameters for the sweet deal promotion; see page 149 for details about Promotion Group Programming.
- Page 149 g. The new Sweet Deal Promotion is created. You can edit the Count/Amount fields as necessary. If desired, you can copy a promotion or delete a promotion; simply press and hold on the promotion until the dialog show below is displayed. You can Delete the selected promotion or Copy the promotion to a new or existing item.
-
Page 150: Promotion Group Programming
Promotion Group Programming A promotion group is a group of PLUs that can be applied to a specific combo discount or sweet deal promotion. The promotion groups allow you to quickly add a group of items to be used with a promotion discount without having to add them individually. - Page 151 5. The complete list of PLUs is displayed; Select the PLUs you want to include in the promotion group from the list, you can view PLUs from All groups or choose a specific group to view PLUs from just that group. You can also search for specific PLUs by name; “Pizza” for example. 6.
- Page 152 8. Pressing the GOTO button opens the PLU programming screen. Press the back arrow on the PLU screen to return to the promotion group programming. 9. You can use the DELETE button to remove selected items from the promotion group. Load MLU Button When programming the items for a Promotion Group, we can select items from a specific MLU instead of scrolling through a complete list of PLUs.
- Page 153 2. The complete list of PLUs for all groups is displayed. 3. On the PLU list press the LOAD MLU button in the upper right of the display; The MLU Screens are displayed: Program Mode • 151 Sam4POS 6600/4800II Program Manual v2.1...
- Page 154 4. Choose an item from the selected MLU to add to the Promotion Group. 5. You are returned to the complete list of PLUs for all groups. Repeat the process to add additional items using the Load MLU method to the Promotion Group as desired. 6.
-
Page 155: Product & Ingredient
PRODUCT & INGREDIENT Inventory control on the S 4POS uses menu explosion to break down the PLU or menu item sold to the customer into its component ingredients. This information is then used on the Food Cost Report. • NOTE: Be careful not to confuse the separate and distinct inventory features of the SAM4POS Ingredients and Recipes use a menu-explosion type inventory system to break down the PLU or menu item sold to the customer into its component ingredients. -
Page 156: Ingredient
2. The PRODUCT & INGREDIENT selection screen displays; touch the program area you wish to edit. Ingredient Before recipes can be created, you must first define all the ingredients that will be used with recipes. These ingredients are the component items that make up your product; i.e. Hot Dog, Burger, Sandwich, etc. - Page 157 Use these buttons to add NEW, EDIT existing and DELETE ingredients as necessary. Add Ingredients 1. Select INGREDIENT from the PRODUCT & INGREDIENT menu selections. 2. Press NEW to add a new ingredient to the list, the new item dialog displays 3.
-
Page 158: Recipe
3. Continue editing ingredients as necessary. Recipe The Recipe programming allows you organize ingredients into recipes that are then linked to the PLUs being sold. If a PLU is linked to a recipe, PLU sales activity will update information on the Food Cost Report. - Page 159 Add Ingredient-Items / Edit a Recipe If you are editing an existing recipe, use the buttons at the bottom of the screen to revise the recipe as necessary. GOTO – NEW – EDIT – DELETE BUTTONS DEFINITIONS: GOTO – Use this button to go to the Ingredient Programming screen. NEW –...
- Page 160 2. Select Delete from the available selections; the confirmation dialog appears: 3. Press YES to delete the selected recipe, the recipe will be deleted; choose No to keep the recipe. 4. Alternately, you can use the Edit Mode on the Edit/Sort button to select multiple recipes from the list to delete.
- Page 161 6. Press YES to copy the ingredient to the selected recipes; you are returned to the main recipe screen. Program Mode • 159 Sam4POS 6600/4800II Program Manual v2.1...
-
Page 162: Product Mix
Product Mix Product Mix can be used to implement a simplified ingredient system for tracking only essential ingredients associated with items (i.e. cups for beverages or number of pieces for chicken menus.) Multiple groups of product mix items can be created. 1. - Page 163 DESCRIPTION Each product mix group item can have a 30-character descriptor. Product Mix Option Tab UNIT DESCRIPTOR Enter a 4-Character descriptor for the unit, using the Alpha-keyboard overlay. This descriptor is for report purposes. UNIT COUNT Enter the number of pieces in the unit; for the example shown, 120 burgers to the case: Enter 120. Product Mix PLU Tab Displays a list of the PLUs currently assigned to the selected Product Mix;...
- Page 164 2. ALL groups are selected by default in the groups list and all of the PLUs are shown in the PLU list. You can choose a specific group from the list to see just the PLUs in that group. Scroll through the list of PLUs and select the items to add to the Product Mix group.
- Page 165 5. Select the items you wish to include in the Product Mix Group; The SELECTED ITEM COUNT reflects the number of items selected and the number of remaining selections available. Press OK to add the selected items the product mix group. 6.
- Page 166 2. Press the Load MLU button at the top right of the display, the MLU selection screen appears: 3. Select the appropriate MLU and select an item from the MLU to add to the PMG. You are returned to the PLU list: 164 •...
- Page 167 4. Continue adding items to the PMG as desired, Press OK when finished adding items. The selected items are added to the product mix group. 5. You can edit the count for any or all the items in the group. Select the items in the list you want to edit; press the EDIT button.
-
Page 168: Screen Edit
Screen Edit The Screen Edit program area is used to setup the Table Map, Menu Lookup (MLU Edit) and Function Lookup (FLU Edit) screens that will be used to complete register operations on the S 4 POS. NOTE: The SAP-530 terminals will also have the Real Keyboard programming here. 1. - Page 169 2. The default TABLE MAP is displayed. Table Map Screen Sections Title Bar; press the Table Map Sub Menu drop down to view the other Screen Edit program areas. MLU, FLU. Table Edit Pane to add NEW tables, EDIT or DELETE selected tables within a seating zone.
- Page 170 2. Type in a name for the Table Seating Zone and customize the background and text color as desired. A 25-color palette is provided. 3. Press OK to view you edits on the main table map screen. Add Additional Table Seating Zones 1.
- Page 171 2. Type in a name for the new seating zone, edit the background and text color as desired with the 25color palette that is provided. 3. Press OK to add the new zone or press OK AND CONTINUE to add more zones as desired. Pressing CANCEL will exit without adding the new zone.
- Page 172 2. In the “Input Description” field, type in the name (up to 10 characters) that you want to appear on the new tables. 3. Enter in the number of tables associated with the seating zone in the “Count” filed. 4. Customize the background and text color as desired. 5.
- Page 173 9. Press the TABLE HEIGHT COUNT to select the number of tables you want to see per column. Allowable settings range is from 3 to 8. 10. The table grid displays as per your selection. Each table zone has its own settings for the Table Width and Height so each zone can have a different appearance.
- Page 174 172 • Program Mode Sam4POS 6600/4800II Program Manual v2.1...
-
Page 175: Mlu Edit
MLU Edit The selected Menu Look Up (MLU) determines what is displayed in the item area of the operator screen. The MLU Edit screen is separated into MLU Groups and individual MLU’s. MLUs are selected by touching a MLU key in the vertical panel next to the item area. See the sample at “S 4POS Operator Screen”... - Page 176 Design Item Attributes; Background & Text color, Font Style (normal or italic), Font Size and Alignment MLU Groups MLU Groups organize the MLUs that will be displayed in the register. The default MLU group can be assigned by station so each station can display a different MLU group as desired. For example: the bar station can have a different default MLU Group than the dining area.
- Page 177 icon to select MLU’s you want to delete from the list. 4. Use the icon to delete the selected MLU’s. 5. Press the trash can Editing a MLU Group or a MLU 1. From the MLU Group or MLU pane, press and hold your selection. A list of edit options displays: Function Item EDIT...
- Page 178 Select an MLU Group from the list to view the MLU’s associated with that group. Open a new MLU or select from the list of existing MLU’s in the group. Select a cell on the item area of the MLU you wish to program. Press one of the 5 ITEM LOAD selection buttons;...
- Page 179 Editing the Appearance of MLU Screens 1. You can rearrange the items as desired on the grid. Press and drag the selection to the desired location. 2. The appearance of the items on the MLU screen can be edited using the elements in the designer pane. Program Mode •...
- Page 180 Note: When you select an individual item and type in a new name, the original name Descriptor appears and the TYPE of key is displayed: Key Type & Code Original Descriptor Input Name 3. When adding items to a selected MLU, if you select more items to load than the number of available spaces on the MLU, the S 4POS will automatically create additional MLU buttons for you.
-
Page 181: Flu Edit
c) Select more items than the available cells; Press OK. d) The selected items are added to the MLU; additional FOOD MLU’s are created as necessary for all the selected items. (i.e. FOOD - #1 thru FOOD #5). FLU Edit A Function Look Up (FLU) is very similar to a MLU, except that no PLU items can be assigned to a FLU. - Page 182 FLU Edit Screen Sections FLU Selection Pane FLU Key Assignment Pane; up to 14 keys can be assigned. Edit/Design Item Attributes FLU Selection Pane You can add new FLU’s or select an existing FLU to edit from this section. The FLU screens provide up to 14 single keys which can have functions, tenders, Macro’s or MLU keys assigned.
- Page 183 4. The new FLU for DISCOUNTS is created and appears in the FLU selection pane. is used to select and delete FLU’s from the list. 5. The edit icon FLU Key Assignment Pane The FLU assignment pane allows up to 14 individual keys to be assigned. Choose from function keys, tender keys, Macro’s or MLU’s.
-
Page 184: Device
Once keys are assigned, you can edit the key Name/descriptor if desired. Use the shape designer to change keys from single, double or quad keys. Use the Font Style/Size keys to edit the background color of the keys and text color, style, and size. These Font Align selections allow you to align the font left, center, or right. -
Page 185: Device Setting
SORT – Sort devices alphabetically. Printer Add all the printers to be used in the system for receipt printers, kitchen printers. AVAILABLE PRINTER TYPES: SAM4S 3 Inch, 2 Inch, EPSON TMT88III, TM-U220, TMT88II, SNBC BTP-L520 Program Mode • 183 Sam4POS 6600/4800II Program Manual v2.1... -
Page 186: Scanner
General DEVICE MODEL SAM4S 3 Inch, 2 Inch, EPSON TMT88III, EPSON TM-U220, TMT88II SNBC BTP-L520 COMMUNICATION TYPE Serial, Ethernet Serial COM PORT COM1 thru COM4 BAUD RATE 1200, 2400, 9600, 19200, 38400, 57600, 115200 DATA BITS 7 or 8 PARITY... -
Page 187: Line Display
1 or 2 FLOW CONTROL NONE, XON_XOFF (S/W), RTS_CTS (H/W) Line Display Add all line displays (customer displays) utilized in the system. General DEVICE MODEL SAM4S CDP or SAM4S ML700 COMMUNICATION TYPE Serial Serial COM PORT COM1 thru COM4 BAUD RATE... -
Page 188: Eft
PARITY NONE, EVEN, ODD STOP BITS 1 or 2 FLOW CONTROL NONE, XON_XOFF (S/W), RTS_CTS (H/W) The S 4POS terminals only support EMV enable devices for integrated payment transactions. General DEVICE MODEL Datacap COMMUNICATION TYPE Serial Serial COM PORT COM1 thru COM4 BAUD RATE 1200, 2400, 9600, 19200, 38400, 57600, 115200 DATA BITS... -
Page 189: Liquor Dispenser
NONE, EVEN, ODD STOP BITS 1 or 2 FLOW CONTROL NONE, XON_XOFF (S/W), RTS_CTS (H/W) Kitchen Video General DEVICE MODEL SAM4S KDS COMMUNICATION TYPE Serial Serial COM PORT COM1 thru COM4 BAUD RATE 1200, 2400, 9600, 19200, 38400, 57600, 115200... -
Page 190: Text Inserter
NONE, XON_XOFF (S/W), RTS_CTS (H/W) Text Inserter General DEVICE MODEL TALON COMMUNICATION TYPE Serial, Ethernet Serial COM PORT COM1 thru COM4 BAUD RATE 1200, 2400, 9600, 19200, 38400, 57600, 115200 DATA BITS 7 or 8 PARITY NONE, EVEN, ODD STOP BITS 1 or 2 FLOW CONTROL NONE, XON_XOFF (S/W), RTS_CTS (H/W) - Page 191 2. The DEVICE MAPPING programming screen displays. 3. Choose the device from the selection list to map the device to the S 4POS terminal. 4. Press the NEW button to assign a device. The NEW item dialog for the selected device displays. (The NEW item input dialog is specific to the device selected.
- Page 192 EDIT – Allows changes to the printer and time period selections. d. DELETE – Will delete the selected device assignment. Device Mapping Settings Printer: Input a DESCRIPTION for the device (up to 30 characters). SELECT DEVICE: from the list of available devices as set in the Device Setting screens.
-
Page 193: Kp Group
Coin Dispenser: Input a DESCRIPTION for the device (up to 30 characters). SELECT DEVICE: from the list of available devices as set in the Device Setting screens. Liquor Dispenser: Input a DESCRIPTION for the device (up to 30 characters). SELECT DEVICE: from the list of available devices as set in the Device Setting screens. - Page 194 Select KP GROUP from the DEVICE selection menu or press the icon to add a new KP Group(s). Input a description (up to 30 characters) for the KP Group and press OK to close the dialog or press OK AND CONTINUE to add additional KP Groups. Press CANCEL if you wish to exit the add KP Group without adding the group.
- Page 195 Press the icon access the EDIT MODE to select and delete KP Groups select SORT to sort the KP Groups alphabetically. Operation 4POS supports integrated credit card processing with Datacap equipment and supports the EMV protocol. (There will be no Non- integration.) Credit Card (EFT) maintenance operations...
- Page 196 Void Return By Record Number Use the Void Mode function at the S 4POS terminal to perform transaction voids that will correct the appropriate sales totals. If “terminal based” processing is used, the Local Transaction Report contains details of each transaction in the current batch. When “host Issue Local Transaction based”...
-
Page 197: Card Read Format
Card Read Format The Card Read Format programming determines the card data that will be utilized when the employee is set to use the MSR for employee Sign On/Off and or for Time In/Out. In addition, we can setup the parameters for cards used for Age Verification. - Page 198 Note: When deciding the START number in the Column of Number, do not include the Sentinel Character and any characters (i.e. =) that may appear within the data line. Employee Card One Employee Card setup is provided and cannot be deleted, no additional employee card formats are allowed.
-
Page 199: Msr Setting
4POS on the SAP-4800II terminal, the MSR is controlled by the OS; we can use the MSR Setting menu to reconfigure the track information on the integrated MSR. These settings are not available on the SAP-6600 or SAP-530 terminal with S 4POS loaded. - Page 200 4. The current MSR settings are displayed; edit the setting as needed. Use Start Sentinel: Track 1 = % (percent sign) Track 2 = ; (semi-colon) Track 3 = & (ampersand) b. Use End Sentinel: Track 1 = ? Track 2 = ? Track 3 = ? Check the “Use Carriage Return (End of Track#) for all tracks.
-
Page 201: Network & Revenue
Network & Revenue IRC (Inter Register Communications) is defined in the Terminal & Network selection in the Network & Revenue programming. The IRC uses standard Ethernet communications. When the IRC is active, all terminals in the system are updated automatically when program changes are made. -
Page 202: Terminal & Network
Type a DESCRIPTION for the selected Revenue Center; the X at the end of the field clears the current description. Press the icon to Test, Sort, or enter the Edit Mode for the selected device. EDIT MODE – Set devices as inactive or delete devices as necessary. - Page 203 My Terminal Info TERMINAL DESC – Description for the terminal STORE NAME - Enter a name for the store MAC ADDRESS - This is the MAC address of the current terminal. IP ADDRESS - Internet Protocol address for the current terminal. APP VERSION - 4POS application version installed on the current terminal.
- Page 204 Main Terminal Radial Button Operation When activating the IRC in a system, one of the terminals in the system must be designated as the Main Terminal. In an IRC configuration the Main Terminal will display as shown: IMAGE SYNC – Press this button to synchronize the images in an IRC network.
- Page 205 Satellite Terminals Radial Button Operation When the IRC is activated in a system, the Satellite Terminals in an IRC configuration (terminals that are not set as the MAIN terminal) will display as shown: INACTIVE – In an IRC network press this button if you wish to set the selected terminal inactive. IMAGE SYNC –...
-
Page 206: Irc Network Setup
IRC Network Setup Overview IRC (Inter Register Communications) is defined in the Terminal & Network selection in the Network & Revenue programming. The IRC uses standard Ethernet communications. When the IRC is active, all terminals in the system are updated automatically when program changes are made. Connect all the S 4POS terminals to be included in the system to a network switch. - Page 207 4. The current terminal information is displayed; TERMINAL DESC STORE NAME MAC ADDRESS IP ADDRESS APP VERSION DATABASE VERSION BUILD VERSION REGISTER Change Terminal IP Address The terminal IP address is set in the main Android settings. You can go to these setting from the 4POS application.
- Page 208 3. Touch SETTINGS; The Manager Required / Manager Password entry dialog displays (depending on the authority settings for the current employee): 4. Enter the manager password (default is 9999), then press ENTER. 5. On the Settings menu, go to Wireless & Networks; Chose Ethernet, then touch Change Ethernet Settings: 6.
- Page 209 7. Select the IP Settings drop down and select ‘Static’ 8. Set the Ethernet settings ; 9. You Must enter: IP Address - (first 3 octets must match on all terminals in the system, last octet must be unique at each terminal). Note: The static IP address chosen needs to be out of the DHCP scope range to prevent IP address conflicts.
- Page 210 Exit the Sam4POS 2. Exit the S 4 POS application by pressing the Exit icon at the top right of the display: 3. Enter the Manager Password at the Manager Required prompt (default is 9999): 4. The main Android screen displays; 5.
- Page 211 Set Store Name The Store Name for all terminals in the IRC system must have the same store name. The store name is case sensitive. 1. From the PROGRAM MODE \ NETWORK & REVENUE \ TERMINAL & NETWORK; type in a Store Name at each terminal. Press the X at the end of the field to clear the current name. 2.
- Page 212 5. When set as the main terminal, additional options are available: SYNCH DATA – Synchronizes database information to all other terminals, other terminals will restart after they synchronize. Afterward, a list of synchronized terminals is displayed. RELEASE MAIN – Releases the current MAIN terminal; Note: IRC must be turned off on all substations before the current MAIN station can be released.
-
Page 213: Time Schedule
Time Schedule The Time Schedule programming enables certain actions to automatically occur at a predetermined time. Time schedules are available for: Price Level, Screen Level, KP Time Period, Auto Reboot and Auto End Of Day. All the time schedules are programmed in the same manner. 1. - Page 214 Press the add record icon to add a new price level to the list. Define the periods the price level is to be active. Price Level Settings DESCRIPTION Type in a description schedule. PERIOD Check the specific days of the week for the time schedule to occur.
-
Page 215: Screen Level
(up to 30 characters) Screen Level MLU screens can be set to automatically load at certain times. This is useful if you want different MLU screens such a Breakfast/Lunch/Dinner to display at a specified time. 1. From the Time Schedule menu screen, touch Screen Level to view/add/edit screen levels. Press the add record icon to add a new Time Activated Screen Level to the list. - Page 216 3. Define the setting for activation of the new screen levels. Screen Level Settings DESCRIPTION Type in a description for the schedule. PERIOD Determine the specific days of the week for the time schedule to occur. Alternately you can check Weekdays or Weekends or both to select all the days of the week. Start Activate At –...
- Page 217 (up to 30 characters) KP Time Period You can use the KP Time Period programming to automatically switch the KP Period at specified times. KP Time Periods are used when setting up KP Group programming. 1. From the TIME SCHEDULE menu, touch KP TIME PERIOD to view/add/edit KP Time Periods. Press the add record icon to add a new KP Time Period to the list.
-
Page 218: Time Period
for the KP Time Period. Determine the specific days of the week for the KP time period to activate, or choose WEEKDAYS or WEEKENDS or both to select all the days of the week. Start Activate At – set the start time for the KP time period to begin. End Activate At –... -
Page 219: Reboot
(up to 30 characters) Auto Reboot The Auto Reboot allows you to set a time for the terminal to automatically reboot. 1. From the Time Schedule menu screen, touch Auto Reboot to view/add/edit auto reboot times. Press the add record icon to add a new time activated auto reboot to the list. -
Page 220: Auto End Of Day
Auto End Of Day If desired the End Of Day reporting can be set to automatically run at a specified time. Report totals as defined in the End Of Day (EOD) report screen will be cleared the same as if they were executed from the EOD screen. - Page 221 3. Define the activation settings for the new End Of Day time. Auto End Of Day Settings DESCRIPTION Type in a description (up to 30 characters) for the scheduled auto reboot. Use the X at the end of the field to clear the current description. PERIOD Determine the specific days of the week for the scheduled auto reboot to occur, or Choose WEEKDAYS, WEEKENDS or check both to select all the days of the week.
-
Page 222: System
System The System menu provides access to the S 4POS application License information, as well as program backup and restore operations. We can also access the Android terminals settings, access the Super Macro files, load upgrades via APK install, Team Viewer remote access operations and perform touch calibration. - Page 223 License Registration All S 4POS terminals require a license to operate properly. To manually register the license for the 4POS terminal. You can press the on the title bar for details. Note: Be sure to set the terminal to the proper date and time prior to license registration. Please perform the following: 1.
-
Page 224: Database
Accept EULA and enter the manager password at the prompt Database The database menu provides access to the database backup operations for the current program files. The database can be backed up manually or you can set the backup to execute at a specified date and time. - Page 225 3. Select the device PATH you wish to back up to. PATH selections are: USB, Internal SD Card, External SD Card. 4. Press OK to initiate the backup of the current database. 5. When the backup has completed, the confirmation, ‘Database Backup Success’ displays: 6.
- Page 226 Automatic Backup We can also program the S 4POS to perform an automatic backup. This backup will occur every day at the specified time as long as the automatic backup is checked. 1. Press the AUTOMATIC BACKUP option at the top of the screen. 2.
- Page 227 8. Press OK. 9. Exit out of the System \ Database menu screen. The backup will initiate at the specified time. 10. After the Automatic backup runs, the Database Backup Success confirmation message displays briefly: Program Mode • 225 Sam4POS 6600/4800II Program Manual v2.1...
-
Page 228: Log Backup
Log Backup The log backup provides a means to save log data and database files to a USB drive or an SD Card. S 4POS Log files are stored for 10 days on the terminal. We can also send the log data to an FTP site if desired. Backing up to an FTP site requires access to an active internet connection. -
Page 229: Settings
7. Each Log file currently available in the S 4POS will be backed up to the directory as defined: D:\SAM4POS\Log\S 4POS\POS-MAIN\DemoStore. 8. When the backup is complete, the confirmation messages will display briefly: Press OK; then Press OK 9. The data files are saved as a zipped (compressed) file to the directory as defined. The file is saved as a Date_Time stamped format such as Log_20171019_090922.zip. - Page 230 1. Touch the SYSTEM icon on the main PROGRAM MODE screen to display all the program categories. The System menu displays. 2. From the SYSTEM menu touch SETTINGS. The MANAGER REQUIRED / MANAGER PASSWORD entry dialog displays (depending on the current employee authority settings): 3.
- Page 231 4. On the Settings menu, scroll down the category list on the left-side menu to the SYSTEM category. 5. Select Accessibility from the available selections. 6. Select Large text to make the font in the register mode larger. icon. 7.
- Page 232 7. To return to the S 4POS application press the COM Port Voltage Setting SAP-6600 COM Port voltage settings is enable in the SAP-6600 bios settings. An external Keyboard is required to access the BIOS settings. 1. Power off the S 4POS terminal and connect a USB keyboard.
-
Page 233: Super Macro
Cash Drawer / COM Port Voltage Setting SAP-4800 II 1. Touch the SYSTEM icon on the main PROGRAM MODE screen to display all the program categories. The System menu displays. 2. From the SYSTEM menu touch SETTINGS. 3. Enter the MANAGER PASSWORD at the prompt. 4. -
Page 234: Program Backup & Restore
indicates the keystroke is a PLU entry indicates the keystroke is a mode selection [REG] indicates the register sales mode is selected [POWER] indicates terminal lost power/ rebooted 3. Press the appropriate operation button to: Backup – Backup the data to an SD Card or USB Drive. b. -
Page 235: Apk Install
2. Select .CSV BACKUP to save the program files in a comma separated format or IMAGE BACKUP to save the current image file in the terminal. 3. Choose the device you wish to backup to; PATH selections are: USB, b. Internal SD Card, or External SD Card. - Page 236 3. select ‘UPDATE APP LOCAL’ from the Choose APP Update 4. The APK Installer screen appears: 5. Press the appropriate SAM4POS APK file you want to load. (It’s possible to have multiple update files on the same drive.) The Install dialog displays: 6.
-
Page 237: Team Viewer
7. The ‘Installing…’ dialog displays while the new application files are loaded. When it is finished, the ‘APP Installed’ dialog screen is displayed: 8. After APK file installation is complete, Press “Open”. 9. If this is the first installation, the user License Agreement may display; Accept the agreement to continue. - Page 238 3. When the support person signs on with the code provided, the confirmation screen below is displayed. 4. Press Allow to confirm you want to allow remote support access. 5. The S 4POS application will close and the main Android screen is loaded. 236 •...
-
Page 239: Calibrator
6. Touch the SAM4POS icon to reinitiate the S 4POS application. This operation can be accomplished remotely by the support personnel or by the local personnel at the site. 7. The main sign on screen will appear, sign on and perform operations as needed. Note that all the screens now indicate “TEAMVIEWER MODE”... - Page 240 2. Select the Calibrate from the available options; 5-Point, or 9-Point Calibration. 3. Select the Calibration Offset; 7 %, 10% or 15 %. (Moves the calibration targets further in/out depending on selection.) 4. Press Calibrate; press and hold the each of the targets as they appear until instructed to ‘Release to Proceed’.
- Page 241 Press the return icon twice to return to the S 4 POS System menu. Program Mode • 239 Sam4POS 6600/4800II Program Manual v2.1...
-
Page 242: Etc
4POS has the ability to link to various web sites directly from the S 4POS application. The ETC programming allows this functionality via the WEB View menu selection. This programming requires an active internet connection. The ETC program area also allows us to view the S 4POS Version information. - Page 243 3. The NEW entry dialog displays; Input a Name for the site you are adding. 4. Type in the URL for the web site. 5. Press OK to add the site or press OK and Continue to add additional sites. 6.
- Page 244 The dialog below is displayed: Select EDIT to change the name of the link or change the URL for the site. Select DELETE if you want to remove this web link from the list. Press YES to delete the selection; press NO if you do not want to delete. Web View - Edit / Sort Press the Edit/Sort icon to access the edit mode and the sort options.
- Page 245 2. The main Program Scan selection menu is displayed: 3. Select the program area you wish to Scan; Select the options/filters for the selected scan; Press the refresh icon. 4. Check Options and filters for your scan; Press the Print icon to preview/print your selection. Available Scans Include: Options: –...
- Page 246 Options: – Preview, Option Category Filters: – PLU Status Group Link PLU STOCK Options: – Preview, Option Category Filters: – From PLU ~ To PLU Group #1, #2, #3 FILTERS: – MLU CHAIN Options: – Preview, Option Category Filters: – MLU Chain GROUP Options: –...
- Page 247 TARE WEIGHT Options: – Preview, Option Category Function Key FUNCTION KEY Options: – Preview, Option Category Filters: – Function Key TENDER KEY Options: – Preview, Option Category Filters: – Tender Key MACRO KEY Options: – Preview, Option Category Receipt & Message RECEIPT Options: –...
- Page 248 Screen Edit TABLE MAP Options: – Preview, Option Category MLU EDIT Options: – Preview, Option Category FLU EDIT Options: – Preview, Option Category Device DEVICE SETTING Options: – Preview, Option Category KP GROUP Options: – Preview, Option Category CARD READ FORMAT Options: –...
- Page 249 Program Mode • 247 Sam4POS 6600/4800II Program Manual v2.1...
- Page 250 XPI v8.42B. VeriFone Part Numbers: M280-703-A3-WWA-3 –VeriFone Vx805 PWR282-001-01-A – Power Cable CBL282-031-02-A – Serial Interface Cable Load XPI Application (Version 8.42B) Processor Encryption (Specific to merchant installation) Configurations Sam4s SAM4POS/ Datacap ECR Configuration 248 • Sam4POS 6600/4800II Program Manual v2.1...
- Page 251 Single ECR Multi ECR (3 or Less) NOTE: If you have an installation with 3 IPTran LT units, all three have a separate batch and work independent of each other (separate batching, separate reporting). 249 • Sam4POS 6600/4800II Program Manual v2.1...
-
Page 252: Required Programming For Integrated Payment
Multi ECR (4 or More) NOTE: If you have multiple PDC’s and a Tran Server there is only one batch and it can be controlled at any of the registers. PDC’s must have a connection to the internet. Also note: PDC’s are paired to a specific Tran Server. A PDC from one site will not work with the Tran Server from another site. - Page 253 5. Select the Serial COM PORT where the Datacap device is connected. 6. Set the BAUD RATE to “19200” DATA BITS to “8” PARITY to “NONE” STOP BIT to “1” FLOW CONTROL = “NONE” Use these same settings for both, the IPTran LT and the new style PDC. Note: When a TranServer is used with new style PDC’s connected to the terminals, they are to be identified as a DATACAP terminal in the device settings.
-
Page 254: Options
Options The following options are used for integrated payment operations. System 1. Go to the PROGRAM MODE \ OPTIONS \ OPTIONS Options 1. Select SYSTEM OPTION from OPTIONS menu to view and set the necessary options as indicated below: COLLECT CARD HOLDER NAME Select this option to print the cardholder’s name below the signature line. -
Page 255: Tender Keys
Tender Keys Misc Miscellaneous Tender keys are used for Charge tenders, Debit Card tender, Gift Cards redeemed, and all other tender types that the merchant accepts. GENERAL HALO Amount – High Amount Lock-Out; This is the maximum amount accepted when this tender is used. -
Page 256: Plu Status Group For Gift Cards
HALO Amount – High Amount Lock-Out; This is the maximum amount accepted when this tender is used. For example, as a store policy you may only accept food stamp amounts up to $50; You would set the HALO as 50.00. TAX EXEMPT Use this setting to exempt the specified tax rates (1-10) when food stamps are redeemed. -
Page 257: Backup Program
3. Parameter Download This procedure is explained on page 275 in this supplement. This operation loads the parameters for the Pin-Pad. Backup Program It is a good practice to back up the program data from the ECR after all the programming is completed and the equipment tested for proper operation. -
Page 258: Eft Operation
EFT Operation EFT Operation Menu 4POS supports credit card processing with Datacap integrated payment appliance and supports the EMV integration protocol. (There will be no Non-EMV integration.) Credit Card (EFT) maintenance operations can be performed at the S 4POS terminal from the EFT Operation menu. In the Pre-EMV environment Datacap stored some information in the Tran that allowed the registers to run some reports, such as the local transaction report. - Page 259 2. The EFT Operation menu is displayed; select the Datatran_Operation. 3. Refer to the appropriate Operation Definition menu below for information on each operation. EFT Operation Function Key To avoid giving employees access to the Program mode, certain EFT operations can be accessed from the REG mode using the EFT OPERATION function key.
- Page 260 The MACRO sequence would simply be the numeric #5 followed by the EFT Operation function key: [EFT OPERATION] The MACRO would then be assigned to a position on an MLU or FLU. Datatran_Operation Definitions From the main PROGRAM MODE menu, select DEVICES, then choose EFT OPERATION: Operation Definition Initialize EFT...
-
Page 261: Performing Eft Operations
Use this operation to verify a card is valid, activated, not reported as lost/stolen. Zero Auth Performing EFT Operations When performing EFT Operations, the EFT Operation communication between the ECR and the Tran device is displayed on the S 4POS. When the specified operation is completed, the register will print the results of the requested operation at the register’s receipt printer. - Page 262 Close Batch You must close the batch daily. This procedure clears the EMV File temporarily stored in the ECR memory. (Or perform “Clear EMV File” if Auto Batch is used.) NOTE: When a batch is closed, a new batch is automatically opened for the next day. 1.
- Page 263 1. From the main PROGRAM MODE menu screen, select DEVICE, then touch EFT OPERATION. 2. Select Datatran_Operation from the selections. 3. Select VOID SALES BY REPORD NUMBER; The register will display the Void Sales By Record Number entry dialog: 4. At the prompt: Enter the transaction ‘Invoice Number’ then Enter the ‘Original Transaction Amount’.
- Page 264 NOTE: This report lists the transactions stored in ECR memory for tip and record updating. The transactions here may not be the same as the transactions in the current batch. This operation is Only to be used for troubleshooting . . . Not for reporting purposes. SAM4POS TERMINAL 2017-09-27 22:37...
- Page 265 Gratuity Entry The processor must allow “By Record” operations (Tokenization) for this operation. Gratuities (Tips) indicated by the customer on the payment draft must be entered at the ECR before the batch is closed. Tips that were not entered at the time of the transaction, are entered using the Gratuity Entry selection on the EFT OPERATION function key menu, or from the Gratuity Entry selection on the EFT OPERATION menu accessed from the Program Mode / Device menu selections.
- Page 266 INVOICE: 00033 REFERENCE: 1002 RECORD:00030 - - - - - - - - - - - - - - - - - - - - NO. 00000153 REG# POS-1 EMPLOYEE 4. The Display shows the tip entry on the EFT Operation dialog: 5.
- Page 267 5. You can PRINT the response if desired; then press CLOSE to exit back to the EFT Operation screen. Get Gift Card Balance This procedure will print a receipt with the cardholder’s current balance. 1. Select GET GIFT CARD BALANCE from the EFT Function key menu or from the EFT OPERATION menu.
- Page 268 Self-Initiated Load Typically, we would not need to perform this operation. The Tran parameters are loaded each time the device is rebooted You will be asked to enter the Device ID of the IP Tran LT or PDC device. The device will call Datacap’s host PC and load itself. 1.
- Page 269 Diagnostics Use only with Datacap Support as necessary to troubleshoot Datacap issues. 1. From the main PROGRAM MODE menu screen, select DEVICE, then touch EFT OPERATION. 2. Select Datatran_Operation from the selections. 3. Scroll down the list of options and touch DIAGNOSTICS. 4.
- Page 270 Clear EMV File This is the internally stored file that stores the Authorization Response messages that allow the SAM4POS terminal to perform “By Record Number” transactions. Specifically, the Void Transaction by Record Number and Gratuity Entry. This file should be cleared each day as we have a limited amount of space to hold the file and most likely, “By Record Transactions”...
- Page 271 4POS Terminal 10/10/2017 11:22 11:20:04 SEND AT&UE7 11:20:07 SEND AT&UM149 99 1 0 0 * * 0 .00 * 00005 * 3 101017 112004 0 * 00005 0 * * * * * * 1 * 11:20:26 RECEIVE 11:20:26 RECEIVE 11:20:26 SEND AT&UI109 00005 999 MERCHNAT ID: 19497801...
Need help?
Do you have a question about the SAP-6600 and is the answer not in the manual?
Questions and answers