Table of Contents
Advertisement
Quick Links
Color Code Dot
Stationary Die
WIRE
SIZE (AWG)
INSULATION DIAMETER (Max.)
8
6
4
2
1. INTRODUCTION
This instruction sheet provides information on product
application and a maintenance and inspection
procedure for the crimping dies listed in Figure 1. The
dies are used in Hydraulic Crimping Heads 58422–1,
69066, 1752877–1, and 1752787–1. For detailed
information on the hydraulic power unit and hydraulic
crimping head, refer to the instructions packaged with
these tools.
These dies are designed to crimp AMPLI–BOND and
PLASTI–GRIP terminals on wire sizes 8 AWG to
2 AWG. Dies are coated with a preservative to
prevent rust and corrosion. Wipe preservative from
dies, particularly from crimping areas.
All dimensions in this document are in millimeters
NOTE
[with inches in brackets]. Figures and illustrations
i
are for reference only and are not drawn to scale.
Reasons for reissue are provided in Section 6,
2. DIE INSTALLATION AND REMOVAL
Avoid personal injury. Exercise caution to avoid
DANGER
accidentally depressing foot pedals or trigger
control of hydraulic power unit when installing or
removing dies.
2.1. Die Installation
1. Refer to the chart in Figure 1 and verify that you
have the proper die set for the terminal and wire
size being used.
E
2007 Tyco Electronics Corporation, Harrisburg, PA
All International Rights Reserved
TE logo and Tyco Electronics are trademarks.
*Trademark. Other products, logos, and company names used are the property of their respective owners.
Crimping Dies 48858-1 through
48861-1 for AMPLI-BOND* and
PLASTI-GRIP* Terminals
Standard Expansion Dies
TERMINAL
COLOR CODE
7.57 [.298]
9.58 [.377]
11.10 [.436]
12.82 [.505]
Figure 1
TOOLING ASSISTANCE CENTER 1-800-722-1111
PRODUCT INFORMATION 1-800-522-6752
Color Code Dot
PART NO.
Red
48858-1
Blue
48859-1
Yellow
48860-1
Red
48861-1
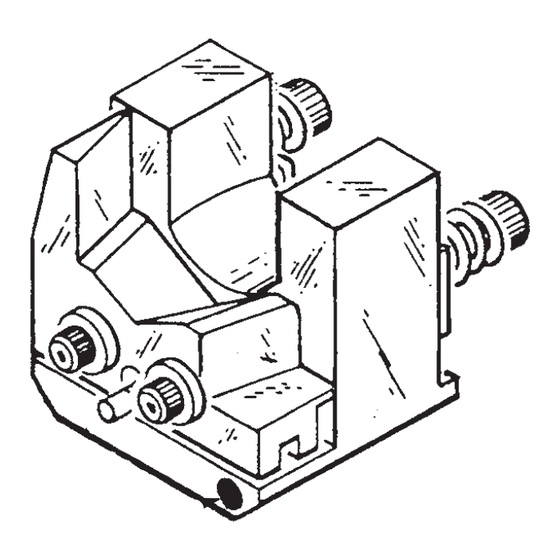
2. Remove latch pin on head, then open yoke. See
Figure 2.
3. Loosen set screw in yoke.
4. Insert stationary die into well of yoke as shown
in Figure 2. Tighten set screw.
5. Activate power unit to advance ram until set
screw is visible.
Latch Pin Removed
Stationary
Die
Moving Die
Ram
Figure 2
This controlled document is subject to change.
For latest revision and Regional Customer Service,
visit our website at
Instruction Sheet
408-1724
28 NOV 07
Rev N
Moving Die
DIE SET
COLOR CODE
Red Dot
Blue Dot
Yellow Dot
Red Dot
Yoke
Setscrew
Stop Plate
Setscrew
of 6
1
www.tycoelectronics.com
LOC B
Advertisement
Table of Contents

Related Manuals for Tyco Electronics 48858-1


Summary of Contents for Tyco Electronics 48858-1
- Page 1 For latest revision and Regional Customer Service, All International Rights Reserved visit our website at TE logo and Tyco Electronics are trademarks. www.tycoelectronics.com LOC B *Trademark. Other products, logos, and company names used are the property of their respective owners.
- Page 2 408-1724 Crimping Dies 48858-1 through 48861-1 6. Loosen set screw in ram and insert moving die Bottom of into ram well as shown in Figure 2. Tighten set Terminal Tongue screw. Faces Stationary Die NOTE Moving die must be properly oriented to mate with stationary die.
- Page 3 408-1724 Crimping Dies 48858-1 through 48861-1 2. To adjust the insulation crimp, loosen socket 3. Press and hold insulation die down against the head cap screws and push pin–key all the way in pin–key. This will prevent the spring–loaded so that insulation crimp section of the die is in the pin–key from popping back.
- Page 4 408-1724 Crimping Dies 48858-1 through 48861-1 9. Remove crimped terminal from dies and visually may gage within permissible limits, worn or damaged inspect insulation crimp. die closure surfaces can affect the quality of the crimp. Examples of possible damaged die surfaces 10.
- Page 5 Order replacement parts pin–keys all the way out so that insulation crimping through your Tyco Electronics Representative, or call sections of dies are in the tight position. 1–800–526–5142, or send a facsimile of your See Figure 10, Detail B.
- Page 6 408-1724 Crimping Dies 48858-1 through 48861-1 Detail B Detail A Wire Barrel Dies Bottomed Inspection of Inspection of But Not Under Pressure Insulation Barrel Wire Barrel Crimping Dies Crimping Dies Socket Head Cap Screws Cap Screws and Wire Barrel Dies Bottomed...
Need help?
Do you have a question about the 48858-1 and is the answer not in the manual?
Questions and answers