Table of Contents
Advertisement
Quick Links
The product complies with the European Safety Standards EN60335-2-30 and the European Standard Electromagnetic
Compatibility (EMC) EN55014, EN60555-2 and EN60555-3 These cover the essential requirements of EEC Directives
2006/95/EC and 2004/108/EC
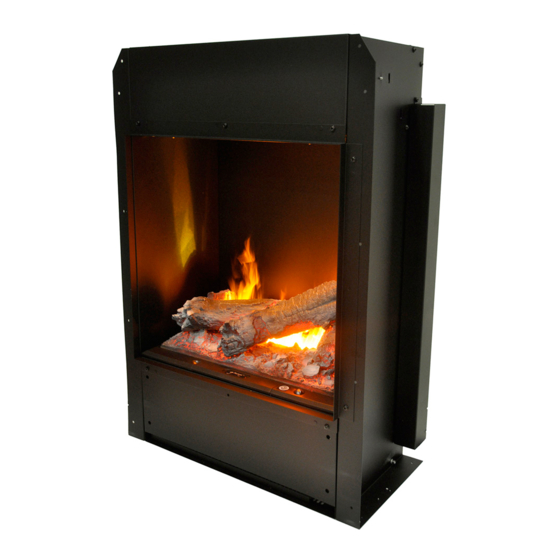
KIT Glamm H3D 700 ( With Heating System )
KIT Glamm H3D 800 ( With Heating System )
Dimensions
H 700 mm x W 490 mm x D 255 mm
H 823 mm x W 490 mm x D 255 mm
1,1 litres ( filtered water)
Autonomy
Frequency
4 x 50W Xenon Amber
Heating power
12,86 kg/13,07 kg
Capacity
8 hours
Voltage
220/240 V
50 Hz
Lamps
2000 W
Weight
Advertisement
Table of Contents

Related Manuals for GlammFire KIT Glamm H3D 700


Summary of Contents for GlammFire KIT Glamm H3D 700
- Page 1 KIT Glamm H3D 700 ( With Heating System ) KIT Glamm H3D 800 ( With Heating System ) Dimensions H 700 mm x W 490 mm x D 255 mm H 823 mm x W 490 mm x D 255 mm...
-
Page 3: Table Of Contents
GlammFire. PAG./3 INDEX 1—Important Safety Advice 1.1—Warning 1.2—Damage 1.3—Location 1.4— Plug Position 1.5—Use of Other Controls 1.6— Unplugging 1.7— Owner/User 1.8— Electricity 2—General Information 3—Installation Instructions 3.1—Before You Start 3.2—Installation 3.4—Instructions of installation — Images 4—Operating the Fire 4.1—Manual Controls 4.1.1—Setting the Thermostat... - Page 4 “H” “W” “X” “Y” Modelo Glamm H3D 700 Glamm H3D 800...
- Page 5 GlammFire. PAG./5...
- Page 7 GlammFire. PAG./7...
- Page 8 Congratulations on purchasing your GlammFire Electric appliance. This quality product has been designed with preci- sion and rigour that characterizes us to offer you pleasant and soothing moments. Please read the instructions for use carefully and effective before using the appliance.
-
Page 9: 1-Important Safety Advice
GlammFire. PAG./9 1—Important Safety Advice When using electrical appliances, basic precautions should always be followed to reduce the risk of fi re, electrical shock and injury to persons, including the following: 1.1—Warning WARNING: In order to avoid overheating, do not cover the heater. Do not place material or garments on the heater, or obstruct the air circulation around the heater. -
Page 10: 2-General Information
2—General Information Only use filtered water in this appliance. Always ensure that the appliance is sitting on a level surface. Although this heater complies with safety standards, we do not recommend its use on deep pile carpets or on long hair type of rugs. - Page 11 GlammFire. PAG./11 7. Ensure that the cable is not placed above the disc on the Transducer Unit (Fig 5b). To prevent the cable becoming pinched between the nozzle and the sump, place the cable in the slot in the wall of the sump.
-
Page 12: Instructions Of Installation - Images
3.4—Instructions of installation — Images... - Page 13 GlammFire. PAG./13...
- Page 15 GlammFire. PAG./15...
-
Page 16: 4-Operating The Fire
4—Operating the Fire 4.1—Manual Controls The manual controls are located beneath the hinged flap. (See Fig. 10 for Manual Control lay out). Switch “A”: Controls the electricity supply to the Fire. must be in the “ON” ( I ) position for the Fire to operate either with or without heat. Note: This switch Switch “B”: Press once to turn on the flame effect. -
Page 17: 1-Setting The Thermostat
GlammFire. PAG./17 4.1.1—Setting the Thermostat Ensure the fire is plugged in and switch it on to the full heat setting. Turn the Control Knob ‘C’ fully to the right (max temperature setting) to warm the room rapidly. When the room temperature has reached the desired level, turn the thermostat knob back slowly until you hear the thermostat just click off. -
Page 18: 1-Switching On The Appliance
4.2.1—Switching on the appliance Press and hold the button for 3 seconds to activate the remote control. FIRE will be displayed and ON will be blinking. P r e s s to switch on the appliance. To turn off the appliance press so that FIRE is blinkin, press twice. -
Page 19: 6-Setting The Date And Time
GlammFire. PAG./19 Caution: In order to avoid a hazard due to inadvertent resetting of the thermal cut-out, this appliance must not be supplied through an external switching device, such as a timer, or connected to a swith that is regularly switched on and off by utiliy. -
Page 20: 8-Setting The Timer Modes
4.2.8—Setting the timer modes To set the timer: Press the button Press the button once to program the icon and click on Press twice and click on Note: The days of the week are indicated at the top of the screen Day 1= Monday Day 2= Tuesday Day 4= Wednesday... -
Page 21: 9- Manual Mode
GlammFire. PAG./21 4.2.9—Modo manual To select a constant heat mode. This mode ignores the timer and maintains the displayed temperature. Press the button Press the button twice to highlight the hand icon and click on to confirm to set the desired temperature 4.2.10—Protection against low temperatures:... -
Page 22: 11-Screen Personalization
4.2.11—Screen Personalization: The maximum temperature setting of the product is 32°C. You have the option to reduce this temperature and to change from °C to °F. Press the button Press the button twice and the SP message will flash, then click on to confirm Press the button a n d... -
Page 23: 5-Maintenance
GlammFire. PAG./23 5—Maintenance 5.1—General Tips Only use filtered tap water in this appliance. Always ensure that the appliance is sitting on a level surface. If you intend not using the appliance for longer than 2 weeks, remove and empty the sump and water tank. -
Page 24: Cleaning
6. Remove the defective lamp, by gently lifting vertically and disengaging the pins from the lamp holder, (Fig.4 and 4a). Replace with a Xenon Amber, 12V, 45W, Gu5.3 base, 8º beam angle, coloured lamp. (Purchased from our your sup- plier) 7. -
Page 25: 3-Air Filter
GlammFire. PAG./25 11. Clean the Nozzle with the brush and flush out thoroughly with water. (Fig.15) 12. Reverse the above steps to reassemble. 5.4.3—Air Filter 1. Gently lift out the fuel bed and place carefully on the ground. 2. Gently slide the air filter upwards out of its plastic holder. (Fig.16) 3. -
Page 26: 7-Overall Dimensions
7—Overall Dimensions “H” “W” “X” “Y” Modèle Glamm H3D 700 Glamm H3D 800... - Page 27 GlammFire. PAG./27 Equipment Guarantee beneficiary Version Address Controller Tel. Availability date Local…………………………………………..Date…………………….. Signature Series and Guarantee numbers Distributor code Name and Address of the Distributor Warranty This Electric Appliance carries a guarantee against defects of manufacture and faulty workmanship for a period of 2 years from the date of purchase.
- Page 28 Recuperadores Pachinha Lda. Zona Industrial da Lagoa, Lote G1 4950-850 CORTES - MONÇÃO PORTUGAL Tel(+351) 251 654 800 Fax(+351) 251 654 801 info@glammfire.com www.glammfire.com PT04405-C...
Need help?
Do you have a question about the KIT Glamm H3D 700 and is the answer not in the manual?
Questions and answers