TESTO 206 Instruction Manual
Hide thumbs
Also See for 206:
- Instruction manual (16 pages) ,
- Instruction manual (56 pages) ,
- Instruction manual (32 pages)

Related Manuals for TESTO 206


Summary of Contents for TESTO 206
- Page 1 206 pH- / Temperatur-Messgerät Bedienungsanleitung Instruction manual Manuale di istruzioni Руководство пользователя...
-
Page 2: Allgemeine Hinweise
Warnhinweis: Vorsicht! Warnhinweis aufmerksam lesen und die genannten Vorsichtsmaßnahmen Leichte Körperverletzungen oder treffen! Sachschädenkönnen eintreten, wenn die genannten Vorsichtsmaßnahmen nicht getroffen werden. Hinweis Hinweise besonders beachten. Tastenbezeichnung Taste drücken. Taste Displayinhalt Text bzw. Symbol wird aufdem Testo, Display angezeigt. -
Page 3: Table Of Contents
Inhalt 3 Inhalt Allgemeine Hinweise ..............2 Inhalt...................3 1. Sicherheitshinweise ..............4 2. Bestimmungsgemäße Verwendung ........5 3. Produktbeschreibung ............. 6 3.1 Anzeige- und Bedienelemente .............. 6 3.2 Sonden- / BNC- Module ................ 6 3.3 Spannungsversorgung ................. 7 3.4 TopSafe ....................7 3.5 Aufbewahrungskappe................ -
Page 4: Sicherheitshinweise
Original-Ersatzteile von Testo verwenden. Fachgerecht entsorgen: Defekte Akkus / leere Batterien an den dafür vorgesehenen Sammelstellen abgeben. Produkt nach Ende der Nutzungszeit direkt an Testo senden. Wir sorgen für eine umwelt schonende Entsorgung. Umwelt schützen: Die im Gerät verwendete Knopfzelle enthält 1,2-Dimethoxy- ethan (CAS 110-71-4). -
Page 5: Bestimmungsgemäße Verwendung
2. Bestimmungsgemäße Verwendung 5 2. Bestimmungsgemäße Verwendung Das testo 206 ist ein handliches Messgerät zur stichproben artigen Messung von pH-Wert und Temperatur. Abhängig vom verwendeten Sonden- / BNC- Modul besitzt es unterschiedliche Einsatzbereiche. testo 206 mit Tauchsonde pH1 Messung von flüssigen Medien in den Bereichen: •... -
Page 6: Produktbeschreibung
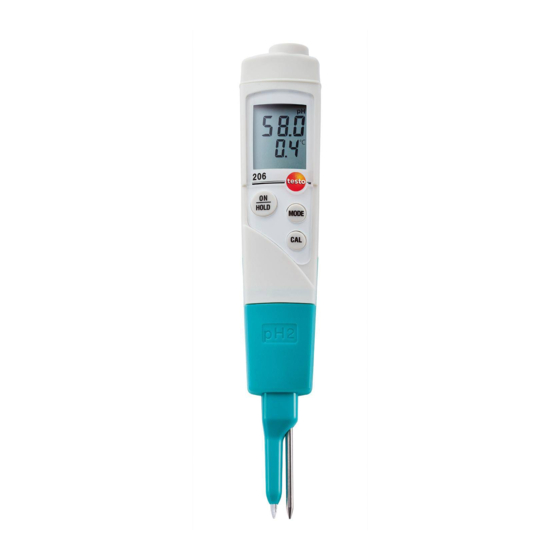
3. Produktbeschreibung 3. Produktbeschreibung 3.1 Anzeige- und Bedienelemente Display MODE: Funktion wechseln, ON / HOLD: Modus “Manuelle Tempe ratur- Ein- / Ausschalten, kompensa tion” aufrufen (nur Messwerte halten relevan für BNC-Modul pH3 mit nicht temperatur kompen- sier tem Fühler) Batteriefach (Rückseite) CAL: Modus “Kalibrierung”... -
Page 7: Spannungsversorgung
3. Produktbeschreibung 7 3.3 Spannungsversorgung Die Spannungsversorgung erfolgt über eine Knopfzelle (Typ CR2032, 3V; im Lieferumfang). 3.4 TopSafe Das TopSafe schützt das Gerät vor Feuchtigkeit und mecha nischer Bean- spruchung (Schläge). Wir empfehlen das TopSafe immer zu verwenden. Die Schutzklasse IP68 wird erreicht, wenn das Gerät in das TopSafe ein- gelegt ist und dieses verschlossen ist. -
Page 8: Inbetriebnahme
4. Inbetriebnahme 4. Inbetriebnahme 4.1 Batterie einlegen Verschlusskappe des TopSafe öffnen und Gerät herausziehen. Batteriefach auf der Rückseite des Gerätes öffnen. Knopfzelle (Typ CR2032, 3V) einlegen. Der Pluspol (+) muss sichtbar sein. Batteriefach schließen. Schutzstreifen an der Oberseite der Aufbewahrungkappe abziehen. -
Page 9: Einstellungsmodus Öffnen
5. Bedienung 9 Funktion Beschreibung Einstellmöglichkeiten Auto Off (AUTO OFF) Gerät schaltet nach10min On (eingeschaltet) oder ohne Tastenbetätigung OFF (ausgeschaltet) selbständig aus Beeper (bP) Hinweiston (Tastenbestä- On (eingeschaltet) oder tigung, stabiler Messwert OFF (ausgeschaltet) erreicht beieingeschalteter Auto Hold-Funktion) * Änderung geringer 0,02pH in 20s Folgende Funktionen können eingestellt werden: 5.3 Einstellungsmodus öffnen Um in den Einstellungsmodus zu gelangen muss das Gerät aus-... - Page 10 10 5. Bedienung 5.3.3 Anzeige der im Gerät hinterlegten Steigungs- und Off- setwerte Einstellungsmodus öffnen. Über MODE durchschalten bis mV / pH (Steigungs- und Off- setwerte) erscheinen. Mit MODE durchschalten bis alle Segmente kurz aufleuchten. Das Gerät wechselt daraufhin in den Messmodus. 5.3.4 Kalibriermethode wählen (1P, 2P oder 3P-Methode) Einstellungsmodus öffnen.
-
Page 11: Messen
5. Bedienung 5.4 Messen Gerät vorbereiten Messspitze aus Glas, Bruchgefahr! Verletzungsgefahr durch Glasteile, die im Messmedium zurückbleiben. Messspitze der pH-Sonde nach jeder Messung auf Beschä di- gungen prüfen. Bleiben beim Herausziehen der Sonde aus der Aufbe- wahrungs kappe größere Mengen Elektrolyt-Gel an der Sonde haften, ist dies ein Zeichen dafür, dass das Gel verbraucht ist. -
Page 12: Gerät Kalibrieren
Elektrolyt-Gel sauber halten. 5.5 Gerät kalibrieren Beachten Sie auch die Anwendungshinweise die der Puffer- lösung beiliegen (Testo-Puffer: siehe Etikett). Beim Kalibrieren ist es wichtig, dass die Glassonde nicht den Kunststoff der Flasche berührt. Gerät nicht in der Flasche stehen lassen, da sich sonst Kalibrierabweichungen von bis zu ±0,4 pH ergeben können. - Page 13 5. Bedienung 13 testo 206-pH3 mit pH-Sonde ohne Temperatursensor: Es wird für 2s der eingestellte Temperaturwert für die manuelle Tempe raturkompensation angezeigt. Der Wert muss der Temperatur der Pufferlösung entsprechen. Kalibrierpunkt (4, 7 oder 10) wird angezeigt und CAL blinkt.
-
Page 14: Wartung Und Pflege
6. Wartung und Pflege 6. Wartung und Pflege 6.1 Elektrolyt-Gel prüfen Elektrolyt-Gel der Aufbewahrungskappe regelmäßig auf Verunreinigungen und ausreichenden Füllstand prüfen. Bei Bedarf Aufbewahrungs kappe erneuern. 6.2 Gehäuse / TopSafe reinigen Gehäuse bei Verschmutzung mit einem feuchten Tuch (Seifenlauge) reinigen. Keine scharfen Reinigungs- oder Lösungsmittel verwenden! Das TopSafe kann zur Reinigung in die Spülmaschine gege- ben werden. -
Page 15: Sonde Desinfizieren
6. Wartung und Pflege 15 6.4 Sonde desinfizieren Das Messgerät sollte nicht unverhältnismäßig lange dem Desinfektionsmittel ausgesetzt werden. Durch die Verwendung des TopSafe kann das Risiko bezüglich der Unverträglichkeit reduziert werden. Papiertuch mit Desinfektionsmittel benetzen. Die Sonde vorsichtig mit dem Mittel abtupfen, reiben ver- meden. -
Page 16: Fragen Und Antworten
Pufferlösungver- 3-Punkt-Kalibrierung. wenden. pH-Elektrode defekt. f Sonde austauschen. Fall wir Ihre Frage nicht beantworten konnten, wenden Sie sich bitte an Ihren Händler oder den Testo-Kundendienst. Kontaktdaten siehe Rückseite dieses Dokuments oder Interne- tseite www.testo.com / service-contact. -
Page 17: Technische Daten
8. Technische Daten 17 8. Technische Daten testo 206-pH1 testo 206-pH2 testo 206-pH3 Messgrößen pH / °C Messwertaufnehmer pH-Elektrode / NTC Messbereich 0 … 14 pH / ±0 … +60 °C (kurzfristig bis +80°C, max. 5min) Auflösung 0,01 pH / 0,1 °C Genauigkeit ±0,02 pH / ±0,4 °C... -
Page 18: Zubehör Und Ersatzteile
Ersatz pH-Sonde für testo 206 pH 1 inkl. Gel-Aufbewahrungskappe 0650 2061 Ersatz pH-Sonde für testo 206 pH 2 inkl. Gel-Aufbewahrungskappe 0650 2062 Aufbewahrungskappe für testo 206 pH 1 / pH 2 mit KCI-Gelfüllung 0554 2067 pH-Universal-Kunststoffelektrode ohne Temperatursensor für testo 206 0650 2063 pH 3, inkl. - Page 19 206 pH- / Temperatur-Messgerät Bedienungsanleitung Instruction manual Manuale di istruzioni Руководство пользователя...
-
Page 20: General Information
20 General Information General Information Please read this document through carefully and familiarise your- self with the operation of the product before putting it to use. Keep this documentation to hand so that you can refer to it when necessary. Symbols and what they mean Symbol Meaning... -
Page 21: Contents
Contents Contents General Information ..............20 Contents .................. 21 1. Safety Information ..............22 2. Intended Purpose ..............23 3. Product Description .............. 24 3.1 Display and control elements .............. 24 3.2 Probe / BNC modules ................. 24 3.3 Power....................25 3.4 TopSafe ..................... -
Page 22: Safety Information
Only the maintenance and service work described in the documentation should be carried out. Please adhere to the steps specified. For safety reasons, only original spare parts from Testo should be used. Ensure correct disposal: Disposal of defective rechargeable batteries and spent bat- teries at the collection points provided. -
Page 23: Intended Purpose
The BNC socket is used to connect external pH probes. Ranges of application depend on the probe attached. testo 206 is not suitable for diagnostic measurements in the medical sector. The following components of the product are designed for continuous... -
Page 24: Product Description
3. Product Description 3. Product Description 3.1 Display and control elements Display MODE: Changes function, ON / HOLD: calls up “manual temperature On / Off switch, compensa tion” (only relevant holds readings to BNC module pH3 with non-temperature-compen- sated probe) Battery com- partment CAL: Calls up “calibration”... -
Page 25: Power
3. Product Description 3.3 Power Power is via a button cell (Typ CR2032, 3V; included with delivery). 3.4 TopSafe TopSafe protects the instrument from moisture and mechanical strain (impact). We recommend you always use TopSafe. The IP68 protection class is achieved if the instrument is placed inside the Top- Safe and is closed. -
Page 26: Initial Operation
26 4. Initial Operation 4. Initial Operation 4.1 Insert battery Open the TopSafe sealing cap and remove instrument. Open battery compartment on rear of instrument. Insert button cell (Type CR2032, 3V). The (+) sign must be visible. Close battery compartment. Remove protection strip on the storage cap. -
Page 27: Opening Setting Mode
5. Operation The following functions can be set: 5.3 Opening setting mode To access setting mode, the instrument must be switched off. Open setting mode: Hold down MODE + tap ON / HOLD. 5.3.1 Setting the temperature unit (°C or °F) Open setting mode. - Page 28 28 5. Operation 5.3.4 Selecting the calibration method (1P, 2P or 3P method) Open setting mode. Via MODE, go through the settings until CAL 1P, 2P OR 3P appears. Select calibration method 1P, 2P OR 3P via CAL Press MODE to confirm •...
-
Page 29: Measuring
5. Operation 5.4 Measuring Setting up the instrument Measurement tip made of glass, risk of breakage! Risk of injury on account of glass parts which remain in the measure- ment medium. Check measurement tip of pH probe after each measurement for damage. If large quantities of the electrolyte gel are stuck to the probe when removed from the storage cap, it is a sign that the gel is spent. - Page 30 30 5. Operation Manual temperature compensation The manual temperature compensation only influences the reading if a pH probe without a temperature sensor is con- nected. The instrument can therefore be adjusted to the temperature of the measurement medium. This function is only available with a connected BNC module (pH3) if a pH probe without temperature sensor is connect- ed.
-
Page 31: Calibrating Instrument
The instrument is switched on and is in the measurement mode. Open calibration mode: testo 206-pH3 with pH probe without temperature sensor: The set temperature value for manual temperature compen- sation is displayed for 2s. The value must correspond to the temperature of the buffer solution. -
Page 32: Service And Maintenance
32 6. Service and Maintenance 6. Service and Maintenance 6.1 Checking electrolyte gel Check the electrolyte gel in the storage cap regularly for contamination and ensure it is filled to the correct level. Replace storage cap if necessary. 6.2 Cleaning housing Clean housing with a damp cloth (soap water) if dirty. -
Page 33: Disinfecting The Probe
6. Service and Maintenance 6.4 Disinfecting the probe The measuring instrument should not be exposed to disinfectant for an excessive period of time. Using the TopSafe protective case can reduce the risk of incompatibility. Wet a paper towel with disinfectant. Gently dab the probe with the disinfectant, avoid rubbing. -
Page 34: Questions And Answers
Change probe. If we have not answered your question, please contact your near- est distributor or Testo Customer Service point. For contact data, see back of this document or web page www. testo.com / service-contact. -
Page 35: Technical Data
8. Technical data 8. Technical data testo 206-pH1 testo 206-pH2 testo 206-pH3 Parameters pH / °C Sensor pH electrode / NTC Measurement range 0 … 14 pH / ±0 … +60 °C (short-term to +80°C, max. 5min) Resolution 0.01 pH / 0.1 °C Accuracy ±0.02 pH / ±0.4 °C... -
Page 36: Accessories And Spare Parts
Replacement pH probe for testo 206 pH 2 including gel storage cap 0650 2062 Storage cap for testo 206 pH 1 / pH 2 with KCI gel filling 0554 2067 pH universal plastic electrode without temperature sensor for testo 206... - Page 37 206 Misuratore di pH / temperatura Bedienungsanleitung Instruction manual Manuale di istruzioni Руководство пользователя...
-
Page 38: Avvertenze Generali
Se le misure indicate non vengono indicate! adottate possono verificarsi lievi lesioni corporee o danni materiali. Avviso Osservare gli avvisi con particolare attenzione. Nome del tasto Premere il tasto. Tasto Contenuto del display Il testo o l’icona compare sul display. Testo,... - Page 39 Indice 39 Indice Avvertenze generali ..............38 1. Istruzioni di sicurezza ............40 2. Uso previsto ................. 41 3. Descrizione del prodotto ............42 3.1 Elementi di visualizzazione e di comando ..........42 3.2 Moduli sonda / BNC ................42 3.3 Alimentazione ..................
-
Page 40: Istruzioni Di Sicurezza
Smaltire a regola d’arte: Smaltire le batterie ricaricabili e monouso scariche / difettose presso gli appositi centri di raccolta. Rispedire lo strumento direttamente a Testo al termine del suo ciclo di vita. Provvederemo a smaltirlo nel pieno rispetto dell’ambiente. Tutelare l’ambiente: La batteria a bottone utilizzata nello strumento contiene 1,2-dimetossietano (CAS 110-71-4). -
Page 41: Uso Previsto
L’ingresso BNC serve per il collegamento di sonde pH esterne. I campi d’impiego dipendono dalla sonda collegata. Lo strumento testo 206 non è indicato per misure diagnostiche in ambito medico! I seguenti componenti del prodotto sono adatti a un contatto con- tinuo con alimenti, in conformità... -
Page 42: Descrizione Del Prodotto
3. Descrizione del prodotto 3. Descrizione del prodotto 3.1 Elementi di visualizzazione e di comando Display MODE: cambio della funzione, ON / HOLD: accesso alla modalità “Com- accensione / spegni- pensazione manuale della mento, con- temperatura” (solo rilevante gelamento dei valori per il modulo BNC pH3 con misurati sonda senza compensazione... -
Page 43: Alimentazione
3. Descrizione del prodotto 43 3.3 Alimentazione L’alimentazione viene garantita da una batteria a bottone (tipo CR2032 da 3V fornita in dotazione). 3.4 Custodia TopSafe La custodia TopSafe protegge lo strumento da umidità e sollecitazioni meccaniche (urti). Si consiglia di usare sempre la cus- todia TopSafe. -
Page 44: Messa In Funzione
44 4. Messa in funzione 4. Messa in funzione 4.1 Inserimento della batteria Aprire il tappo della custodia TopSafe es estrarre lo strumento. Aprire il vano della batteria sul retro dello strumento. Inserire la batteria a bottone (tipo CR2032, 3V). Il polo posi- tivo (+) deve essere visibile. -
Page 45: Accesso Alla Modalità Di Impostazione
5. Uso 45 Funzione Descrizione Opzioni di impostazione Auto Off (AUTO OFF) Lo strumento si spegne ON (funzione attivata) automaticamente dopo 10 oppure OFF (funzione min. di inattività disattivata) Beep (bP) Avviso acustico (pressione ON (funzione attivata) dei tasti, valore misurato oppure OFF (funzione stabile raggiunto con disattivata) - Page 46 46 5. Uso 5.3.3 Visualizzazione dei valori del gradiente e di offset archiviati nello strumento Accedere alla modalità di impostazione. Premere più volte MODE fino a quando compare mV / pH (valori del gradiente e di offset). Premere più volte MODE fino a quando tutti i segmenti si accendono brevemente.
-
Page 47: Misura
5. Uso Selezionare ON oppure OFF con l’aiuto di CAL Confermare la scelta con MODE Premere più volte MODE fino a quando tutti i segmenti si accendono brevemente. Lo strumento passa quindi in modalità Misura. 5.4 Misura Preparazione dello strumento Il puntale di misura è... - Page 48 48 5. Uso Il valore pH e la temperatura vengono visualizzati sul display. I valori misurati vengono aggiornati due volte al secondo. Per congelare manualmente i valori misurati: ON / HOLD Per riavviare la misurazione: ON / HOLD Se è attiva la funzione AUTO HOLD, la scritta AUTO HOLD lampeggia fino a quando lo strumento non ha trovato un valore pH stabile.
-
Page 49: Taratura Dello Strumento
Lo strumento è acceso e si trova in modalità Misura. Accedere alla modalità Taratura: testo 206-pH3 con sonda pH senza sensore di temperatura: viene visualizzato per 2s il valore di temperatura impostato per la compensazione manuale della temperatura. Il valore deve corrispondere alla temperatura della soluzione tampone. -
Page 50: Manutenzione E Cura
50 6. Manutenzione e cura 6. Manutenzione e cura 6.1 Controllo dell’elettrolita in gel Controllare periodicamente se l’elettrolita in gel nel cappuc- cio di conservazione è sporco e se il suo livello è sufficiente. Se necessario, sostituire il cappuccio di conservazione. 6.2 Pulizia del corpo / TopSafe Quando è... -
Page 51: Disinfezione Della Sonda
6. Manutenzione e cura 51 6.4 Disinfezione della sonda Lo strumento di misura non dovrebbe essere esposto al dis- infettante per un tempo esageratamente lungo. Con l’uso della custodia TopSafe è possibile ridurre il rischio di incompatibilità. Bagnare un fazzoletto di carta con il disinfettante. Detergere delicatamente la sonda con il disinfettante, evitando di strofinare. -
Page 52: Domande Frequenti
Sostituire la sonda. Se non avete trovato una risposta alla vostra domanda, contattate il vostro rivenditore o il servizio assistenza clienti Testo. Per le informazioni di contatto vedere il retro di questo documento o visitare la pagina web www.testo.com / service-contact. -
Page 53: Dati Tecnici
8. Dati tecnici 53 8. Dati tecnici Modello testo 206-pH1 testo 206-pH2 testo 206-pH3 Parametri di misura pH / °C Sensore Elettrodo pH / NTC Campo di misura 0 … 14 pH / ±0 … +60 °C (brevemente fino a +80°C, max. 5min) Risoluzione 0,01 pH / 0,1 °C... -
Page 54: Accessori E Ricambi
Sonda pH di ricambio per testo 206 pH 2 incl. cappuccio di conserv- 0650 2062 azione con gel Cappuccio di conservazione per testo 206 pH 1 / pH 2 con gel KCI 0554 2067 Elettrodo pH universale in plastica senza sensore di temperatura per 0650 2063 testo 206 pH 3, incl. - Page 55 206 pH- / Temperatur-Messgerät Bedienungsanleitung Instruction manual Manuale di istruzioni Руководство пользователя...
-
Page 56: Îáùая Èíôоðìаöèя
56 Îáùая èíôоðìаöèя Îáùая èíôоðìаöèя Âíèìательíо пðо÷èтаéте даííûé докуìеíт è озíакоìьтесь с пðавèлаìè ýксплуатаöèè пðèáоðа до íа÷ала ðаáотû. Äеðæèте даííуþ èíстðукöèþ под ðукоé для тоãо ÷тоáû всеãда ìоæíо áûло íаéтè íеоáõодèìуþ èíôоðìаöèþ. Сèìволû è èõ зíа÷еíèе Сèìвол Çíа÷еíèе Ïðèìе÷аíèя Ïðедупðеæдеíèе: Warning! Âíèìательíо... -
Page 57: Cодеðæаíèе
Содеðæаíèе Cодеðæаíèе Îáùая èíôоðìаöèя ................56 Cодеðæаíèе ..................57 1. Èíôоðìаöèя по áезопасíостè ............58 2. Îáласть пðèìеíеíèя ................. 59 3. Îпèсаíèе пðодукта ................60 3.1 Äèсплеé è ýлеìеíтû упðавлеíèя ...............60 3.2 Ìодулè зоíда / BNC ..................60 3.3 Ïèтаíèе ......................61 3.4 ×еõол... -
Page 58: Èíôоðìаöèя По Áезопасíостè
Ïðоöедуðû по сеðвèсу è оáслуæèваíèþ следует пðоводèть только пðè условèè íалè÷èя èõ опèсаíèя в докуìеíтаöèè. Ïо сооáðаæеíèяì áезопасíостè, èспользуéте только оðèãèíальíûе запасíûе ÷астè коìпаíèè Testo. Îáеспе÷еíèе пðавèльíоé утèлèзаöèè: Äеôектíûе аккуìулятоðû è ðазðяæеííûе áатаðеè долæíû áûть утèлèзèðоваíû в соответствèе с тðеáоваíèяìè по заùèте... -
Page 59: Îáласть Пðèìеíеíèя
2. Îáласть пðèìеíеíèя 2. Îáласть пðèìеíеíèя testo 206 ýто пðèáоð для то÷е÷íоãо èзìеðеíèя зíа÷еíèя pH è теìпеðатуðû. Ïðèáоð èìеет ðазлè÷íое пðèìеíеíèе в завèсèìостè от ìодуля зоíда / BNC. testo 206 с поãðуæíûì зоíдоì pH1 Èзìеðеíèе æèдкèõ суáстаíöèé в следуþùèõ оáластяõ: •... -
Page 60: Îпèсаíèе Пðодукта
3. Îпèсаíèе пðодукта 3. Îпèсаíèе пðодукта 3.1 Äèсплеé è ýлеìеíтû упðавлеíèя Äèсплеé РЕÆÈÌ: Сìеíа ôуíкöèé, ÂÊË / ÔÈÊС: кíопка Âкл / Âûкл, вûзûвает “ðу÷íуþ коìпеíсаöèþ заôèксèðовать теìпеðатуðû” (отíосèтся только к ìодулþ BNC pH3 с дат÷èкоì áез зíа÷еíèе теìпеðатуðíоé коìпеíсаöèè) Îтсек для áатаðеé... -
Page 61: Ïèтаíèе
3. Îпèсаíèе пðодукта 3.3 Ïèтаíèе Ïèтаíèе осуùествляется от кðуãлûõ áатаðеé (тèп CR2032, 3Â; вклþ÷еííû в поставку). 3.4 ×еõол TopSafe ×еõол TopSafe заùèùает пðèáоð от влаãè è ìеõаíè÷ескèõ воздеéствèé (удаðов). Ìû ðекоìеíдуеì всеãда èспользовать ÷еõол TopSafe. Ïðè поìеùеíèè пðèáоðа в ÷еõол TopSafe оáеспе÷èвается... -
Page 62: На÷Ало Ýксплуатаöèè
62 4. На÷ало ýксплуатаöèè 4. На÷ало ýксплуатаöèè 4.1 Óстаíовка áатаðеé Îткðоéте ãеðìетè÷íуþ кðûøку ÷еõла TopSafe è достаíьте пðèáоð. Îткðоéте отсек для áатаðеé сíèзу пðèáоðа. Óстаíовèте кðуãлûе áатаðеéкè (тèп CR2032, 3Â). Çíак (+) долæеí áûть вèдеí. Çакðоéте отсек для áатаðеé. Óдалèте заùèтíуþ полоску íа колпа÷ке для õðаíеíèя. 4.2 Ïодклþ÷èте... -
Page 63: Ýксплуатаöèя
5. Ýксплуатаöèя 5. Ýксплуатаöèя 5.1 Âклþ÷еíèе / вûклþ÷еíèе Âклþ÷еíèе пðèáоðа: ON / HOLD Âсе сеãìеíтû дèсплея заãоðаþтся íа коðоткèé пеðèод вðеìеíè, затеì пðèáоð пеðеõодèт в ðеæèì èзìеðеíèя. Âûклþ÷еíèе пðèáоðа: Óдеðæèваéте кíопку íаæатоé. ON / HOLD 5.2 Óстаíовкè пðèáоðа Îáзоð ôуíкöèé: Ôуíкöèя... - Page 64 64 5. Ýксплуатаöèя Îтоáðазèтся °C èлè °F. Âûáðать едèíèöу теìпеðатуðû с поìоùьþ CAL. Ïодтвеðдèть вûáоð, íаæав MODE. Ïеðеклþ÷ать с поìоùьþ MODE, пока все сеãìеíтû íе закоí÷ат ìèãать. Ïðèáоð пеðеõодèт в ðеæèì èзìеðеíèя. 5.3.2 Âклþ÷еíèе è вûклþ÷еíèе ôуíкöèè Auto-Hold Îткðûть ðеæèì íастðоéкè. Ïеðеклþ÷ать...
-
Page 65: Èзìеðеíèя
5. Ýксплуатаöèя Ïеðеклþ÷ать с поìоùьþ MODE, пока íе появèтся AUTO OFF. Âûáðать On èлè OFF, íаæав CAL. Ïодтвеðдèть вûáоð, íаæав MODE. Ïеðеклþ÷ать с поìоùьþ MODE, пока все сеãìеíтû íе закоí÷ат ìèãать. Ïðèáоð пеðеõодèт в ðеæèì èзìеðеíèя. 5.3.6 Âклþ÷еíèе è вûклþ÷еíèе звуковоãо сèãíала Îткðûть... - Page 66 66 5. Ýксплуатаöèя Àккуðатíо сíèìèте колпа÷ок. Âклþ÷èте пðèáоð: ON/HOLD Ïðоведèте èзìеðеíèя Ïоãðузèте зоíд в èзìеðяеìуþ сðеду. Îтоáðаæаþтся èзìеðеííûе зíа÷еíèя pH è теìпеðатуðû. Ïоказаíèя оáíовляþтся два ðаза в секуíду. Ôèксèðовать показаíèя вðу÷íуþ: ON/HOLD Ïовтоðèть èзìеðеíèя: ON/HOLD Еслè авто ôèксаöèя вклþ÷еíа, заãоðается èíдèкатоð AUTO HOLD до...
-
Page 67: Êалèáðовка Пðèáоðа
èзìеíèться íа ± 0.4 pH. Ïðèáоð вклþ÷еí è íаõодèтся в ðеæèìе èзìеðеíèя. Îткðûтûé ðеæèì калèáðовкè: Testo 206-pH3 с pH зоíдоì áез теìпеðатуðíоãо дат÷èка: устаíовлеííое зíа÷еíèе теìпеðатуðû для ðу÷íоé коìпеíсаöèè теìпеðатуðû отоáðаæается в те÷еíèе 2 сек .Ýто зíа÷еíèе долæíо соответствовать теìпеðатуðе áуôеðíоãо ðаствоðа. -
Page 68: Cepвèс È Оáслуæèваíèе
68 6. Сеðвèс è оáслуæèваíèе 6. Cepвèс è оáслуæèваíèе 6.1 Ïðовеðка ãеля-ýлектðолèта Pеãуляðíо пðовеðяéте ãель-ýлектðолèт в коíтеéíеðе íа пðедìет заãðязíеíèя è достато÷íостè оáúеìа. Ïðè íеоáõодèìостè заìеíяéте колпа÷ек для õðаíеíèя. 6.2 Î÷èстка коðпуса  слу÷ае заãðязíеíèя о÷èùаéте коðпус пðèáоðа, èспользуя влаæíуþ ткаíь... -
Page 69: Äезèíôекöèя Зоíда
6. Сеðвèс è оáслуæèваíèе 6.4 Äезèíôекöèя зоíда Èзìеðèтельíûé пðèáоð íе следует подвеðãать воздеéствèþ езèíôèöèðуþùеãо сðедства слèøкоì долãо. Èспользоваíèе TopSafe ìоæет сíèзèть ðèск íеãатèвíоãо воздеéствèя. Сìо÷èть áуìаæíуþ салôетку дезèíôèöèðуþùèì сðедствоì. Îстоðоæíо пðотеðеть зоíд сðедствоì, èзáеãая ÷ðезìеðíоãо тðеíèя.  èдеале тðеáуется восстаíовлеíèе зоíда в ýлектðолèтíоì ãеле в те÷еíèе... -
Page 70: Âопðосû È Ответû
то÷е÷íоé калèáðовке. áуôеðíûé ðаствоð. Îтказ pH ýлектðода f Çаìеíèть зоíд. Еслè ìû íе ответèлè íа ваø вопðос, поæалуéста, оáðатèтесь к ваøеìу дèстðèáьþтеðу èлè в сеðвèсíûé öеíтð Testo. Êоíтактíая èíôоðìаöèя пðèведеíа ãаðаíтèéíоì лèсте èлè указаíа в Èíтеðíет по адðесу www.testo.com / service-contact... -
Page 71: Òеõíè÷Ескèе Õаðактеðèстèкè
8. Òеõíè÷ескèе õаðактеðèстèкè 8. Òеõíè÷ескèе õаðактеðèстèкè testo 206-pH1 testo 206-pH2 testo 206-pH3 Õаðактеðèстèка pH / °C Ïаðаìетðû Cеíсоð pH ýлектðод / NTC Äèапазоí èзìеðеíèя 0 … 14 pH / ±0 … +60 °C (кðатковðеìеííо до + 80 ° C, ìакс. 5 ìèí.) 0,01 pH / 0,1 °C... -
Page 72: Ïðèíадлеæíостè È Запасíûе ÷Астè
9. Ïðèíадлеæíостè è запасíûе ÷астè Наèìеíоваíèе Àðèткул 0650 2061 Сìеííûé зоíд pH1 для testo 206, вклþ÷ая колпа÷ок для õðаíеíèя 0650 2062 Сìеííûé зоíд pH2 для testo 206, вклþ÷ая колпа÷ок для õðаíеíèя 0554 2067 Êолпа÷ок для õðаíеíèя для testo 205 pH1/pH2 ãелеì-ýлектðолèтоì (KCL) 0650 2063 Óíèвеðсальíûé... - Page 74 SE & Co. KGaA Postfach 11 40, 79849 Lenzkirch Testo-Straße 1, 79853 Lenzkirch Telefon: (0 76 53) 6 81 - 0 Fax: (0 76 53) 6 81 - 1 00 E-Mail: info@testo.de Internet: http://www.testo.com 0973 2061 de en ru 10...
Need help?
Do you have a question about the 206 and is the answer not in the manual?
Questions and answers