KaVo EXPERTsurg LUX Instructions For Use Manual
Hide thumbs
Also See for EXPERTsurg LUX:
- Instructions for use manual (68 pages) ,
- Instructions for use manual (68 pages)
Table of Contents
Advertisement
Quick Links
Advertisement
Table of Contents

Subscribe to Our Youtube Channel
Related Manuals for KaVo EXPERTsurg LUX


Summary of Contents for KaVo EXPERTsurg LUX
- Page 1 Instructions for use EXPERTsurg LUX REF 1.008.3500 Always be on the safe side.
- Page 2 Manufacturer: Distributed by: Kaltenbach & Voigt GmbH KaVo Dental GmbH Bismarckring 39 Bismarckring 39 D-88400 Biberach D-88400 Biberach www.kavo.com Phone +49 (0) 7351 56-0 Fax +49 (0) 7351 56-1488...
-
Page 3: Table Of Contents
Product description............................. 14 ................................14 EXPERTsurg LUX..........................14 Controls..............................16 Foot control ............................17 Rating plates of EXPERTsurg LUX and foot control................17 Technical Specifications of the EXPERTsurg LUX................19 Scope of delivery........................... 20 First use..............................21 Unpacking............................. 21 Installing the bottle holder........................21 ................................ - Page 4 5.2.1 Setting the language......................29 5.2.2 Setting the LUX brightness....................29 5.2.3 Setting the LUX afterglow time..................30 5.2.4 Setting the operating mode of the foot control..............30 5.2.5 Setting the clock time....................... 31 5.2.6 Setting the date........................ 32 5.2.7 Setting the volume......................
- Page 5 12.2 Guidelines and manufacturer's declaration - electromagnetic resistance to jamming......62 12.3 Guidelines and manufacturer's declaration - electromagnetic resistance to jamming......63 12.4 Recommended safe distance between portable and mobile HF telecommunications equipment and the EXPERTsurg LUX..........................64 5 / 66...
-
Page 6: User Instructions
This document is for dentists and dental office staff. 1.3 Service Direct questions regarding the product, service and maintenance to the following address. Please indicate the product serial number in all requests. Service hotline: +49 7351 56-1500 Service.Instrumente@kavo.com Additional information can be obtained at: www.kavo.com 6 / 66... -
Page 7: Repair Service
Upon justified complaints of flaws or a short delivery, KaVo will make good its warranty by replacing the prod‐ uct free of cost or repairing it according to the customer's wishes. Other claims of any nature whatsoever, in particular with respect to compensation, are excluded. -
Page 8: Damage In Transit
Dispose of and recycle the sales packaging appropriately in accordance with current packaging regulations, employing waste management or recycling companies. Comply with the comprehensive return system. KaVo has had its sales packaging licensed for this purpose. Please comply with the regional public waste-disposal system. -
Page 9: Information On The Packaging: Storage And Transportation
1 User instructions If the product is damaged but there was no discernable damage to the packaging upon delivery, proceed as follows: Report any damage to the shipping company either immediately or no later than 7 days after delivery. Leave the product and packaging in the condition in which you received it. Do not use a damaged product. -
Page 10: Safety
2 Safety 2 Safety 2.1 Description of safety instructions 2.1.1 Warning symbol Warning symbol 2.1.2 Structure DANGER The introduction describes the type and source of the hazard. This section describes potential consequences of non-compliance. ▶ The optional step includes necessary measures for hazard prevention. 2.1.3 Description of hazard levels Safety instructions distinguishing between three hazard levels are used in this document to prevent personal and property damage. -
Page 11: Information On Electromagnetic Compatibility
• Medical electrical devices are subject to special measures regarding elec‐ tromagnetic compatibility and must be operated in accordance with the KaVo assembly instructions. • High-frequency communications devices may interfere with electrical medi‐... -
Page 12: Safety Instructions
2 Safety International For country-specific information on disposal, contact your dental supplier. 2.4 Safety instructions WARNING Application of un-authorised accessories or un-authorised modifications of the product. Accessories that have not been approved and/or inadmissible modifications of the product could lead to hazards and/or personal injury or material dam‐ age. - Page 13 2 Safety CAUTION Rotating parts while the pump is operating Injury ▶ Do not stick anything in the pump. Turn off the device when the pump is open. CAUTION Risks from electromagnetic fields. Electromagnetic fields might interfere with the functions of implanted systems (such as pacemakers).
-
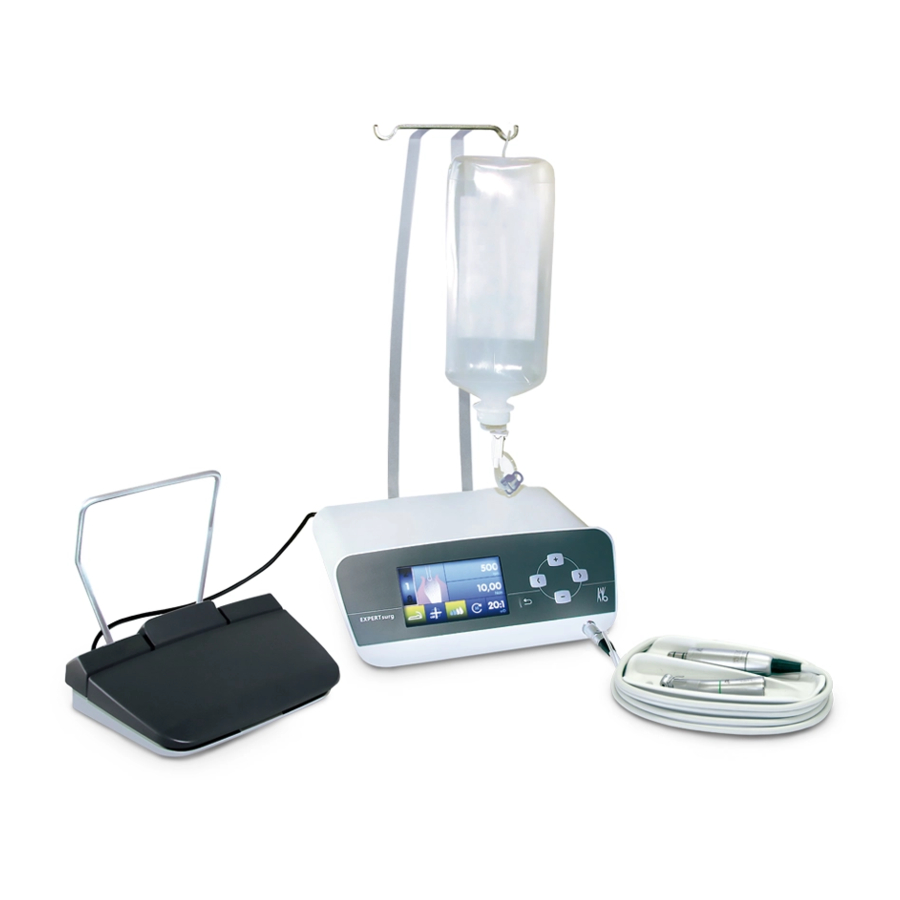
Page 14: Product Description
3 Product description 3 Product description 3.2 EXPERTsurg LUX Hand-held control panel Bottle holder ① ② Hose pump Hose fixation/hose recognition ③ ④ Foot control Surgical motor ⑤ ⑥ Coolant hose Handpiece tray ⑦ ⑧ Motor cable Symbol of type B application part ⑨... - Page 15 3 Product description Rear Hose pump locking mechanism On-button ① ② Power plug Please note the instructions for use ③ ④ Follow the instructions for use SD card slot (for software update only) ⑤ ⑥ Foot control electrical outlet ⑦ 15 / 66...
-
Page 16: Controls
3 Product description 3.3 Controls Program step Display of the activity ① ② Maximal torque reached Torque limit ③ ④ Speed Left arrow key ⑤ ⑥ Plus key, increase value Right arrow key ⑦ ⑧ Minus key, decrease value Back key ⑨... -
Page 17: Foot Control
Program button Direction of motor rotation key ③ ④ 3.5 Rating plates of EXPERTsurg LUX and foot control The rating plates of EXPERTsurg and foot control are affixed on the underside of the housing and include the following symbols: CE mark... - Page 18 3 Product description Please note the instructions for use Please note the electronic instructions for use Follow the instructions for use Operating mode: continuous operation with intermittent load Alternating current (AC) Supply voltage Protection class II Manufacturer YYYY = Year manufactured XXXXXXX = Serial number Material number Type:...
-
Page 19: Technical Specifications Of The Expertsurg Lux
3 Product description 3.6 Technical Specifications of the EXPERTsurg LUX Width 265 mm Depth 255 mm Height 100 mm Weight Approx. 1.9 kg Weight of foot control approx. 1.1 kg Weight of motor approx. 125 g Input voltage 100 - 240 V ~... -
Page 20: Scope Of Delivery
700 to 1,060 hPa Max. elevation for operation up to 3000 m 3.7 Scope of delivery The scope of delivery of the EXPERTsurg LUX includes the following: ▪ EXPERTsurg LUX unit ▪ Foot control ▪ Surgical motor INTRA LUX S600 LED ▪... -
Page 21: First Use
4 First use 4 First use 4.1 Unpacking Note You need to keep the cardboard box and all packaging materials to be able to safely ship the unit in the future. ▶ Open the cardboard box. ▶ Remove the hose boxes. ▶... -
Page 22: Connecting The Surgical Motor
4 First use 4.5 Connecting the surgical motor Note The parts as delivered are not sterile, except for the coolant hose! Before the first treatment of a patient, the surgical motor, motor cable, and the hand‐ piece tray need to be sterilised. See also 2 Sterilisation [ð... -
Page 23: Connecting The Coolant Container And Hose Set
4 First use 4.6 Connecting the coolant container and hose set CAUTION Running, open hose pump. Injury hazard ▶ Turn off the device before opening the hose pump. CAUTION Danger of tipping due to the coolant containers being too heavy. Malfunctions. - Page 24 4 First use ca.10 mm Coolant hose SR Point ① ② Hose adaptor Lock ③ ④ Pump hose Puncture needle ⑤ ⑥ Hose clamp ⑦ 24 / 66...
- Page 25 4 First use ▶ Close the hose clamp ⑦ of the hose set. ▶ Attach the coolant hose ① to the straight or contra-angle handpiece. ▶ Place the coolant hose ① tightly, without loops or kinks, against the outside of the motor cable and attach it in regular intervals using the enclosed clips ⑦.
-
Page 26: Electrical Connection
4 First use ▶ Stick the puncture needle ⑥ into the coolant container and hook-in the coolant container on the bottle holder. ▶ Check the sealing and firm seating of the puncture needle ⑥. Prevent fluid from leaking above the device. ▶... - Page 27 4 First use ▶ Plug the mains cable first into the mains socket on the device and then the other end of the mains cable into the electrical outlet of the supply network. 27 / 66...
-
Page 28: Operation
5 Operation 5.1 Switching the device on ▶ Turn the device on. Note Unless the equipment is monitored, KaVo recommends turning it off for safety and energy-saving reasons. 5.2 Device settings The following device settings can be made or displayed: ▪... -
Page 29: Setting The Language
5 Operation ▶ Press the plus or minus keys to select the desired setting. ▶ Press the right arrow key to activate the selected setting. ▶ Press the plus and minus keys concurrently to change selected and activated settings. ▶ Press the left arrow key to return to the selection of device settings. ð... -
Page 30: Setting The Lux Afterglow Time
5 Operation ▶ Press the right arrow key to activate the selected setting. ▶ Press the plus and minus keys concurrently to change the selected setting. ▶ Press the left arrow key or back key to return to the selection of device settings. ð... -
Page 31: Setting The Clock Time
5 Operation The motor speed can be set continuously up to the maximal level using the foot control. ▶ Press the right arrow key to activate the selected setting. ▶ Press the plus and minus keys concurrently to change the selected setting. ▶... -
Page 32: Setting The Date
5 Operation ▶ Press the right arrow key to activate the selected setting. ▶ Press the plus and minus keys concurrently to change the selected setting. ▶ Press the left arrow key or back key to return to the selection of device settings. ð... -
Page 33: Setting The Lcd Brightness
5 Operation ▶ Press the right arrow key to activate the selected setting. ▶ Press the plus and minus keys concurrently to change the selected setting. ▶ Press the left arrow key or back key to return to the selection of device settings. ð... -
Page 34: Version
5 Operation ▶ Press the right arrow key to activate the selected setting. ▶ Press the plus and minus keys concurrently to change the selected setting. ▶ Press the left arrow key or back key to return to the selection of device settings. ð... -
Page 35: Attaching The Straight Or Contra-Angle Handpiece
All straight and contra-angle handpieces with INTRAmatic connection ISO 3964 can be attached. ▶ Place the KaVo handpiece on the motor, lightly press it against the motor while turning it slightly in the direction of the arrow until the guide stud can be heard to lock into place. -
Page 36: Removing The Straight Or Contra-Angle Handpiece
▶ Twist the straight or contra-angle handpiece slightly to pull it off. 5.4 Setting and executing program steps The EXPERTsurg LUX is based on program steps and assigned activities and can be used intuitively via the graphic user guide. Program step 1: Marking The current program step is shown as a digit ①... - Page 37 5 Operation Program step Symbol Activity Speed [rpm] Torque [Ncm] Transmission Coolant flow ratio Marking 200 – 2000 5 – 20 27:1 0 – 4 500 (D) 10 (D) 20:1 (D) 2 (D) Pilot drilling 200 – 2000 5 – 20 27:1 0 –...
-
Page 38: Examples Of Program Set Sequences
5 Operation Program step Symbol Activity Speed [rpm] Torque [Ncm] Transmission Coolant flow ratio Treatment – – – – completed (can be set from program step 4) (D) = factory setting (default setup) Note The listed indications are only examples. In order to prevent risks, it is essen‐ tial to comply with the manufacturer recommendations concerning implants, handpieces, and tools. -
Page 39: Selecting The Program Steps
5 Operation Step Symbol Example 3: Activity "Free application" as step 1, screw in implant manually Step Activity Free use Marking Pilot drilling Template drilling Treatment com‐ pleted (can be set from program step 4) Symbol 5.4.3 Selecting the program steps ▶... -
Page 40: Selecting Activities
5 Operation See also 2 Foot control [ð 5.4.4 Selecting activities ▶ Press the arrow keys until the activities display is highlighted. ▶ Press the plus or minus keys to select the desired activity. ð The activity is saved automatically. 5.4.5 Limiting the program steps The number of program steps can be limited. -
Page 41: Changing Default Values
5 Operation ▶ Press the arrow keys until the program step display ① is highlighted. ▶ Press the plus and minus keys to select the program step ② that terminates the treat‐ ment (can be set from program step 4). ▶... -
Page 42: Setting The Torque Limit
ð The value is saved automatically. 5.5.2 Setting the torque limit Note The EXPERTsurg LUX reduces the power to prevent the maximal torque set‐ ting from being exceeded. This may lead to the motor coming to a standstill if the rotating handpiece is blocked. -
Page 43: Setting The Coolant Flow
5 Operation 5.5.3 Setting the coolant flow CAUTION Coolant dosed incorrectly. Tissue damage. ▶ Please note the instructions for use of the attachment tool. ▶ Set the coolant flow sufficiently high. The coolant flow can be set to 4 levels or switched off: ▪... -
Page 44: Changing The Direction Of Motor Rotation
5 Operation See also 2 Foot control [ð 5.5.4 Changing the direction of motor rotation ▶ Press the arrow keys until the display of the direction of motor rotation is highlighted. ▶ Press the plus and minus keys concurrently to change the direction of motor rotation. The direction of motor rotation can be changed during the treatment using the direction of motor rotation key of the foot control. -
Page 45: Setting The Transmission Ratio
The One-Touch calibration ensures that the torque on the contra-angle handpiece is accurate. Note One-touch calibration should be carried out only with KaVo surgical handpie‐ ces with a transmission ratio of 27:1 or 20:1. The one-touch calibration cannot be carried out with third-party handpieces or handpieces with different transmission ratios. -
Page 46: Foot Control
5 Operation ▶ Press the plus or minus keys to start the one-touch calibration. ð The display shows "Press foot control". CAUTION The motor starts at full speed. Risk of injury. ▶ Hold the motor firmly or put it in a safe holder during the calibration. ▶... -
Page 47: Selecting The Program Steps
5 Operation ▶ Press the coolant key of the foot control to set the coolant flow. ▶ Press the direction of motor rotation key of the foot control to set the direction of motor rotation. 5.6.2 Selecting the program steps Program steps can be selected during the treatment using the program key of the foot control. -
Page 48: Disposal
6 Disposal 6 Disposal Note The coolant hose with accessories needs to be exchanged and discarded af‐ ter each treatment. ▶ Close the hose clamp ①. ▶ Pull the puncture needle ② out of the coolant container. ▶ Open the lock ③ and remove the hose. ▶... -
Page 49: Reprocessing Steps In Accordance With Din En Iso 17664
7 Reprocessing steps in accordance with DIN EN ISO 17664 7 Reprocessing steps in accordance with DIN EN ISO 17664 Note The reprocessing methods for surgical motors with motor cables and straight and contra-angle handpieces are described in the corresponding IfU. Note The instructions for cleaning and sterilisation have been validated by the manufacturer. -
Page 50: Machine Cleaning
7.1.2 Machine cleaning CAUTION Damage by liquids. Faults on electric components. ▶ Do not subject the EXPERTsurg LUX unit to machine-based cleaning. The following parts of the unit are released for machine-based cleaning: ▪ Handpiece tray ▪ Motor and motor cable Note Please comply with the corresponding Instructions for use when you re-proc‐... -
Page 51: Disinfection
Permissible disinfectants (the uses correspond to the existing manufacturer's instructions and national guide‐ lines. Please note material safety data sheets.) KaVo recommends the following products based on the com‐ patibility of the materials. The microbiological efficacy must be ensured by the disinfectant manufacturer. -
Page 52: Drying
7 Reprocessing steps in accordance with DIN EN ISO 17664 KaVo recommends thermodisinfectors in accordance with EN ISO 15883-1, which are operated with alkaline cleaning agents with a pH value of max. 10 (e.g. Miele G 7781/G 7881 – Validation was carried out with Pro‐... -
Page 53: Packaging
7 Reprocessing steps in accordance with DIN EN ISO 17664 7.3 Packaging Note The quality and use of the sterilisation packaging must comply with applicable standards and be suitable for the sterilisation procedure! Note If potentially infectious liquids and particles can contact the products, it is rec‐ ommendable to cover and protect these areas with sterile disposable prod‐... -
Page 54: Storage
The coolant container needs to be disposed and the hoses need to be changed after each patient. KaVo medical devices released for sterilisation are temperature-resistant up to 138 ℃ (280.4 °F). The following parts of the unit are released for sterilisation: ▪... -
Page 55: Troubleshooting
8 Troubleshooting Note If your problem cannot be rectified after reading the following troubleshooting documentation, please contact a KaVo-trained Service Technician. Note The permitted work is described in the Technician's Instructions that is availa‐ ble to the trained service staff. - Page 56 8 Troubleshooting Malfunction Cause Remedy The motor makes a grind‐ The motor is not correctly ▶ Firmly insert the motor hose into the housing. ing noise or the motor plugged on or screwed on. ▶ Firmly screw on the motor hose to the runs out of true.
- Page 57 Service symbol is green Service is soon due. ▶ Arrange a precautionary appointment at a KaVo subsidiary or with a KaVo au‐ thorised dealer. Service symbol is yellow The servicing time has ex‐ ▶ Arrange an appointment at a KaVo sub‐...
-
Page 58: Run A Software Update
9 Run a software update Please proceed as follows to update the software: ▶ Download the current firmware file from www.kavo.de/produkte. ▶ Copy the firmware file to an SD card (storage capacity 1 - 32 GB, FAT format). ▶ Turn the device off. -
Page 59: Safety Checks ("Stk")
The EXPERTsurg LUX must be subjected to a service check including safety check ("STK") every 2 years. The safety check may only be done by a professional trained by KaVo or in a shop trained by KaVo. Perform the safety check ("STK") as described in the KaVo technician's instructions. -
Page 60: Accessories
11 Accessories 11 Accessories The following accessories are approved for the EXPERTsurg LUX: ▪ Hose set sterile S600 (10 units) (10098757) ▪ Handpiece tray (10093411) ▪ Motor INTRA LUX S600 LED (10088000) ▪ Motor cable S600 (10091700) ▪ KaVo SURGmatic straight and contra-angle handpieces... -
Page 61: Details On Electromagnetic Compatibility
12.1 Guidelines and manufacturer's declaration - electromagnetic transmission The EXPERTsurg LUX is designed for operation in an environment like the one described below. The EX‐ PERTsurg LUX customer or user should ensure that the unit is used in an environment matching the descrip‐... -
Page 62: Guidelines And Manufacturer's Declaration - Electromagnetic Resistance To Jamming
12.2 Guidelines and manufacturer's declaration - electromagnetic resistance to jamming The EXPERTsurg LUX is designed for operation in an environment like the one described below. The EX‐ PERTsurg LUX customer or user should ensure that the unit is used in an environment matching the descrip‐... -
Page 63: Guidelines And Manufacturer's Declaration - Electromagnetic Resistance To Jamming
12.3 Guidelines and manufacturer's declaration - electromagnetic resistance to jamming The EXPERTsurg LUX is designed for operation in an environment like the one described below. The EX‐ PERTsurg LUX customer or user should ensure that the unit is used in an environment matching the descrip‐... -
Page 64: Recommended Safe Distance Between Portable And Mobile Hf Telecommunications Equipment And The Expertsurg Lux
12.4 Recommended safe distance between portable and mobile HF telecommunications equipment and the EXPERTsurg LUX The EXPERTsurg LUX is designed for operation in an electromagnetic environment like the one described be‐ low. The customer or user of the EXPERTsurg LUX can help prevent electromagnetic interference by keeping the minimum safe distance between portable and mobile HF telecommunication devices (transmitters) and the EXPERTsurg LUX –...
Need help?
Do you have a question about the EXPERTsurg LUX and is the answer not in the manual?
Questions and answers