Table of Contents
Advertisement
Quick Links
Advertisement
Table of Contents
Troubleshooting

Subscribe to Our Youtube Channel
Related Manuals for Spectra Logic BlackPearl


Summary of Contents for Spectra Logic BlackPearl
- Page 1 Spectra Logic BlackPearl Converged Storage System User Guide SpectraLogic.com...
- Page 2 MERCHANTABILITY OR FITNESS FOR A PARTICULAR PURPOSE, BOTH OF WHICH ARE EXPRESSLY DISCLAIMED. In no event shall Spectra Logic be liable for any loss of profits, loss of business, loss of use or data, interruption of business, or for indirect, special, incidental or consequential damages of any kind, even if Spectra Logic has been advised of the possibility of such damages arising from any defect or error.
- Page 3 To make sure you have the most current version of this guide check the Spectra Logic Technical Support portal at support.spectralogic.com/documentation/user-guides/. To make sure you have the release notes for the most current version of the BlackPearl Release Notes, check the Spectra Logic Technical Support portal at support.spectralogic.com/documentation/release-notes/.
- Page 4 IT, AND AGREE TO BE BOUND BY ITS TERMS AND CONDITIONS. 2. OWNERSHIP It is understood and agreed that Spectra Logic Corporation, a Delaware corporation with offices at 6285 Lookout Road, Boulder, CO 80301 ("Licensor") is the owner of all right, title and interest to the Software Product, regardless of the media or form of the original download, whether by the World Wide Web, disk or otherwise.
- Page 5 5. GRANT OF LICENSE AND RESTRICTIONS A. Spectra grants you a non-exclusive, non-transferable End-User license right to install the Software Poduct solely for the purpose for which it was created. B. Unless provided otherwise in the Documentation or by prior express written consent of Spectra, you shall not display, modify, reproduce and distribute any Art Work, or portion(s) thereof, included with or relating to the Software Product, if any.
- Page 6 9. INTELLECTUAL PROPERTY RIGHTS A. Spectra shall retain all right, title, and interest in the Software Product and to any modifications or improvements made thereto, and any upgrades, updates or Documentation provided to End User. End User will not obtain any rights in the Software Product, its updates, upgrades, and Documentation, as a result of its responsibilities hereunder.
- Page 7 13. LIMITATION OF LIABILITY TO THE MAXIMUM EXTENT PERMITTED BY APPLICABLE LAW, IN NO EVENT SHALL SPECTRA, ITS AFFILIATES OR LICENSEES, BE LIABLE FOR ANY SPECIAL, INCIDENTAL, INDIRECT, OR CONSEQUENTIAL DAMAGES WHATSOEVER (INCLUDING, WITHOUT LIMITATION, DAMAGES FOR LOSS OF BUSINESS PROFITS, BUSINESS INTERRUPTION, LOSS OF BUSINESS INFORMATION, OR ANY OTHER PECUNIARY LOSS) ARISING OUT OF THE USE OF OR INABILITY TO USE THE SOFTWARE PRODUCT OR THE PROVISION OF OR FAILURE TO PROVIDE SUPPORT SERVICES, EVEN IF SPECTRA HAS BEEN ADVISED OF THE POSSIBILITY OF...
- Page 8 Contacting Spectra Logic To Obtain General Information Spectra Logic Website: spectralogic.com United States Headquarters European Office Spectra Logic Europe Ltd. Spectra Logic Corporation 6285 Lookout Road 329 Doncastle Road Bracknell Boulder, CO 80301 Berks, RG12 8PE United Kingdom Phone:1.800.833.1132 or 1.303.449.6400 Phone:44 (0) 870.112.2150...
-
Page 9: Table Of Contents
Table of Contents Table of Contents About This Guide Intended Audience BlackPearl User Interface Screens Related Information Related Publications Tape Library User Guides Online Forum Chapter 1 - Product Overview Overview Features Components Front View Rear View Rear Panel Front View of the 96-Bay Expansion Node... - Page 10 Considerations for BlackPearl NAS Systems Connect Ethernet Cables Power On the System BlackPearl System and 44-Bay Expansion Node(s) BlackPearl System with 96-Bay or 107-Bay Expansion Nodes Configure the BlackPearl Management Port Automatically Import Activation Keys Log Into the BlackPearl User Interface...
- Page 11 Tape and Disk Partitions Tape Partitions Disk Partitions Special Considerations for Ejecting Tapes Special Considerations for Reading Tapes in a Non-BlackPearl Environment Example Configurations Single Copy on Tape Dual Copy on Tape Single Copy on Nearline Disk Single Copy on Nearline Disk and Tape...
- Page 12 Delete a Storage Domain Member Edit a Storage Domain Delete a Storage Domain Manage Data Replication Rules Edit a BlackPearl Data Replication Rule Edit an Amazon S3 Data Replication Rule Edit a Microsoft Azure Data Replication Rule Delete a Data Replication Rule...
- Page 13 Edit a BlackPearl Replication Target Edit an Amazon Replication Target Edit an Azure Replication Target Verify a Replication Target Put a Replication Target in Standby State Activate a Replication Target Delete a Replication Target Manage a Disk Partition Edit a Disk Partition...
- Page 14 Configure the Spectra S3 Service Configure the Active Directory Service Configure the SNMP Service Configure the Vail Service Configure and Use Encryption Configure the Encryption Service Change the Encryption Password Unlock the Self-Encrypting Drives Create an Encryption Password USB Key PSID Erase an Encryption Drive Configure Users and S3 Groups Description of User Types...
- Page 15 Create a Volume Create an Hourly Schedule Create a Daily Schedule Create a Weekly Schedule Create a Share Create a CIFS Share Create an NFS Share Configure NAS Services Configure the CIFS Service Configure the NFI Service Configure the NFS Service Configure the NAS Replication Service Create an Hourly Schedule Create a Daily Schedule...
- Page 16 Edit the NFI Service Delete the NFI Service Configuration Manually Starting an NFI Replication Reinitialize NFI Replication Restoring Files From an NFI Target BlackPearl System Chapter 9 - Working with Tape Libraries and Media Format Tapes Cancel Tape Format Inspect Tapes...
- Page 17 Offline a Tape Drive Online a Tape Drive Remove a Tape Drive from a Tape Partition Delete a Tape Partition Data Migration Chapter 10 - Operating the BlackPearl System S3 Operations Download an Object Cancel Spectra S3 Jobs Edit an S3 Job...
- Page 18 Database Backup & Restore Create a Database Backup Schedule Manually Generate a Database Backup Restore from a Database Backup Delete Backup Edit Backup Data Policy Show Backup Physical Placement Reboot or Shut Down a BlackPearl System Using the BlackPearl User Interface...
- Page 19 Manually Generate Log Sets Email a Log Set Download a Log Set Delete Log Sets Chapter 12 - Maintaining the BlackPearl System Data Integrity Verification - Disk Media Cancel Disk Media Verification Data Integrity Verification - Tape Media Cancel Tape Media Verification...
- Page 20 How does a user know if the tape media is running out of space? Can data be overwritten on existing tapes? How does a user cancel a write from the BlackPearl cache to tape? (cancel an in- progress job) How does a user know if a component of the BlackPearl system has an error?
- Page 21 Resolving a BlackPearl Management Port IP Address Conflict Using the Console Using a Separate Computer Network Setup Tips Configuration Connectivity to the Network Troubleshooting Tools Spectra Logic Technical Support Before Contacting Support Determine System Serial Number Opening a Support Ticket...
- Page 22 Interface Specifications System Interface Connectors Expansion Node and Tape Drive Interface Connectors Interface Cables Universal Serial Bus (USB) Support Appendix C - Installation Checklist Appendix D - BlackPearl 1.0 Chassis Overview & Specifications Components Front View Rear View Rear Panel Specifications...
- Page 23 Recycling Your System Conflict Minerals Policy Appendix F - Open Source Code Acknowledgements & Package List Apache FreeBSD Java Samba Nginx Ruby Ruby on Rails Included Packages Index...
-
Page 24: About This Guide
EARL NTERFACE CREENS The BlackPearl user interface changes as new features are added or other modifications are made between software revisions. Therefore, the screens you see in the BlackPearl user interface may differ from those shown in this guide. November 2020... -
Page 25: Related Information
Read text marked with “Note” for additional information or suggestions about the current topic. Related Publications For additional information about the Spectra BlackPearl Converged Storage System and the Spectra S3 interface, refer to the publications listed in this section. Spectra BlackPearl Converged Storage System The following documents related to the Spectra BlackPearl Converged Storage System are available on the Support Portal website at support.spectralogic.com, and from the... - Page 26 • The Spectra BlackPearl & Verde HotPair Installation & Configuration Guide document provides detailed information on installing and using a the BlackPearl system in a HotPair configuration. The following documents are available after logging into your Support portal account at: support.spectralogic.com.
-
Page 27: Tape Library User Guides
About This Guide Online Forum Tape Library User Guides Spectra Logic Tape Libraries User Guides for Spectra Logic tape libraries are posted on the Support Portal website at: support.spectralogic.com/documentation/user-guides. IBM Tape Libraries ® User Guides for compatible IBM tape libraries are posted on the IBM Knowledge Center website at: ibm.com/support/knowledgecenter/products/. -
Page 28: Chapter 1 - Product Overview
Chapter 1 - Product Overview Chapter 1 - Product Overview This chapter provides an overview of the Spectra Logic BlackPearl Converged Storage System features and components. Topic Overview page 29 Features page 29 Components page 32 Front View page 32 Rear View page 34 Rear Panel page 36... -
Page 29: Overview
The BlackPearl system includes the following features: 44-Bay Expansion Node The BlackPearl 4U expansion node accommodates up to 44 disk drives with an active bezel, and 45 disk drives with a passive bezel. Up to eight 44-bay expansion nodes can be connected to a BlackPearl 4U system, which allows the system to use the 44-bay expansion nodes as storage domain targets. - Page 30 LTFS Format The BlackPearl system with a supported tape library, writes data on tape in the open Linear ® Tape File System (LTFS) format to ensure you are always able to access it.
- Page 31 Developer Program, or develop their own client. The user moves data through the client to the BlackPearl system and then the system handles all interaction with the tape library. Spectra S3 Interface The Spectra S3 interface is a data transport and communication interface that allows software clients to direct and manage “bulk”...
-
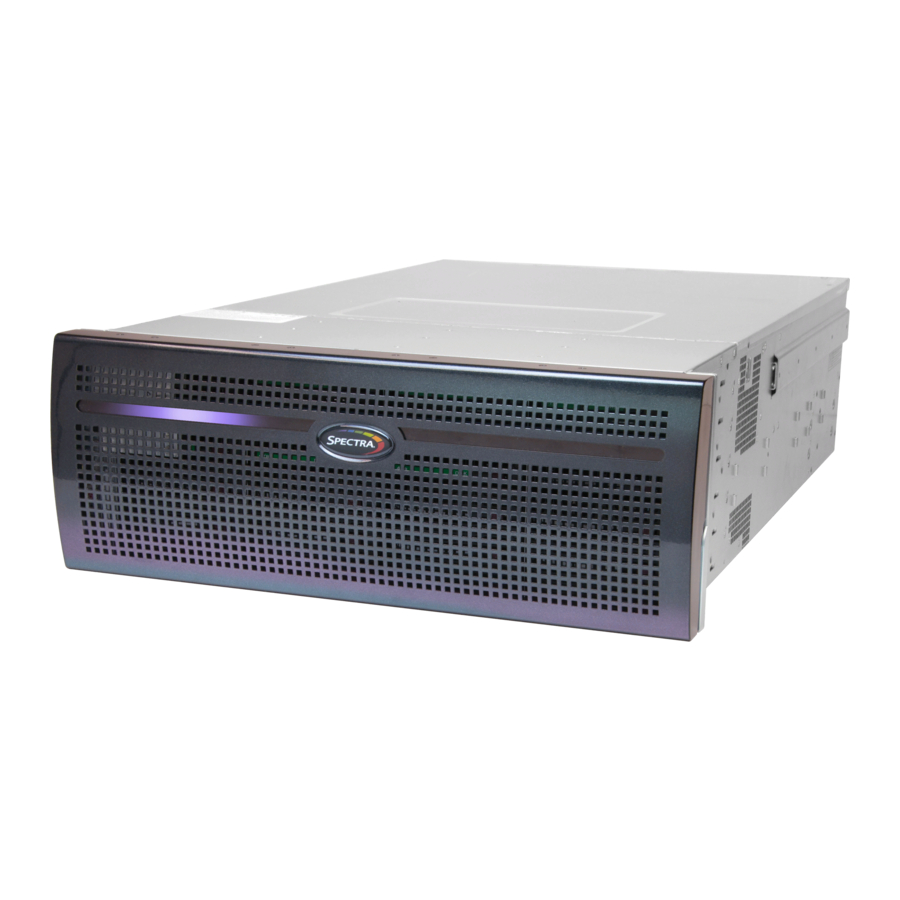
Page 32: Components
Chapter 1 - Product Overview Components OMPONENTS The following sections show the locations of and briefly describe the BlackPearl system major front and rear panel components. Front View Figure 1 Figure 2 show the components on the front of the BlackPearl systems with the front bezel removed. - Page 33 The BlackPearl 2U system includes ten spinning-disk drives and two high- performance solid-state drives in the front of the chassis. The drive sleds slide into bays in BlackPearl enclosure and lock in place. The front of each drive sled has a handle for removing the sled from the chassis and a latch for locking the drive sled in place.
-
Page 34: Rear View
Figure 3 Figure 4 show the major components on the rear of the current chassis of the BlackPearl system. For a description of the components on the BlackPearl 1.0 chassis, see "BlackPearl 1.0 Chassis Overview & Specifications" on page 415 on page page 415. - Page 35 Additional drives are installed in the front of the chassis. The drive sleds slide into bays in the BlackPearl enclosure and lock in place. The front of each drive sled has a handle for removing the sled from the chassis and a latch for locking the drive sled in place.
-
Page 36: Rear Panel
Chapter 1 - Product Overview Components Rear Panel Figure 5 shows the components on the rear panel of the current chassis for the BlackPearl 4U and 2U systems. For a description of the components on the BlackPearl 1.0 chassis, see "BlackPearl 1.0 Chassis Overview &... - Page 37 (optional) available expansion slot. A four-port SAS card provides connectivity to SAS drives in a Spectra Logic tape library, or provides connectivity for up to two 44-bay expansion nodes, and up to four 96-bay or 107-bay expansion nodes. Fibre Channel...
-
Page 38: Front View Of The 96-Bay Expansion Node
40 GigE network. A system can contain different types of not shown) network interface cards, but can only use one type at a time. Note: Spectra Logic recommends using the 40 GigE ports for data transfer to ensure maximum performance. Front View of the 96-Bay Expansion Node Figure 6... -
Page 39: Rear View Of The 96-Bay Expansion Node
• Each power supply has a single LED that lights to indicate when the power is on and functioning normally. SAS connectors The rear panel of the 96-bay expansion node has two SAS ports used to connect an expansion node to a BlackPearl system. November 2020 User Guide-BlackPearl Converged Storage System - 39 -... -
Page 40: Front View Of The 107-Bay Expansion Node
The status LEDs indicate power status, as well as hardware faults for fans, LEDs power supplies, and temperature. (not shown) Power button The power button controls the main AC power for the 107-bay expansion (not shown) node. November 2020 User Guide-BlackPearl Converged Storage System - 40 -... -
Page 41: Rear View Of The 107-Bay Expansion Node
The rear panel of the 107-bay expansion node has one or two expander connectors panels which include one Ethernet port and four SAS ports used to connect a 107-bay expansion node to a BlackPearl system. Fans Eight hot-swappable fans, in banks of two, provide the cooling for the 107- bay expansion node. -
Page 42: Blackpearl User Interface
EARL NTERFACE The BlackPearl user interface provides browser-based configuration, management, and monitoring of the BlackPearl system. The following sections describe the common features that appear in all screens in the user interface. Menus The menu bar appears along the top edge of each screen. Use the menu bar drop-down menus to navigate through the interface. - Page 43 • Network—Provides controls for configuring the Ethernet ports on the BlackPearl system, configure a static route, Domain Name Servers, date and time, as well as entering SMTP (Simple Mail Transport Protocol) information to allow the system to send emails.
- Page 44 • Tools > Data Integrity Verification—Provides a tool for data integrity verification of storage pools. Logout Logs the current user out of the BlackPearl user interface and returns to the login screen. The information in the following table can be found on the Status bar, located at the bottom of all screens.
-
Page 45: Status Icons
• Microsoft Internet Explorer version 11 or later ® • Opera Software Browser version 12 or later Note: Spectra Logic recommends using Google Chrome to access the BlackPearl user interface. November 2020 User Guide-BlackPearl Converged Storage System - 45 -... -
Page 46: Chapter 2 - Initial Configuration
Chapter 2 - Initial Configuration Chapter 2 - Initial Configuration This chapter describes the initial setup of the Spectra BlackPearl Converged Storage System, necessary for operation in your environment. Topic Before You Begin page 47 Connect Ethernet Cables page 47 Power On the System page 47... -
Page 47: Before You Begin
EARL YSTEMS If you BlackPearl system includes NAS drives, it is important that the drives that are to be used for NAS are not installed in any chassis in the system when the system is powered on for the first time. -
Page 48: Blackpearl System And 44-Bay Expansion Node(S)
Power On the System BlackPearl System and 44-Bay Expansion Node(s) To power on a BlackPearl system, remove the front bezel and then gently press the power button on the front panel. If your configuration includes both a BlackPearl master node and one or more 44-bay expansion nodes, power on all chassis together. -
Page 49: Blackpearl System With 96-Bay Or 107-Bay Expansion Nodes
107-bay expansion node initializes before powering on the BlackPearl Converged Storage System master node. To power on a BlackPearl system, remove the front bezel, and then gently press the power button on the front panel. The power LED illuminates indicating that power is on. See System Status LEDs on page 304... -
Page 50: Configure The Blackpearl Management Port
EARL ANAGEMENT The default IP address for the BlackPearl management port is set to 10.0.0.2, with a netmask of 255.255.255.0. If your network is already using this IP address, or you want to configure a different IP address for the management port, use the BlackPearl console to configure the management port IP address. -
Page 51: Automatically Import Activation Keys
CTRL-R. 5. Connect a cable from your network to the BlackPearl management port on the BlackPearl system. You are now able to connect to the BlackPearl user interface with the IP address displayed in Step 4. 6. Disconnect the monitor and USB keyboard from the BlackPearl system. -
Page 52: Log Into The Blackpearl User Interface
When the BlackPearl system detects the USB device it automatically imports the activation keys and power cycles the system. 2. Wait while the BlackPearl system performs its power-on sequence and then log into the BlackPearl user interface. Do not remove the USB device until after the system power cycles and the... - Page 53 When using the shipped certificates, you must pass a security check every time you attempt to access the management port to view the BlackPearl user interface, or when you attempt to transfer data using the data port. Notes: •...
-
Page 54: Install Nas Drives
Verde logo and interface design. The interface changes to the BlackPearl interface and functionality after you enter all activation keys provided. See Automatically Import Activation Keys on page 51. The remainder of this guide assumes that you are logged in to the BlackPearl user IMPORTANT interface. NAS D NSTALL... -
Page 55: Configure The Data Connection
Configure the Data Connection ONFIGURE THE ONNECTION This section describes using the BlackPearl user interface to configure one or more data connections for the BlackPearl system. The system includes two 10GBase-T ports, and two 10 GigE ports on the rear panel (see Figure 5 on... - Page 56 Interface dialog box displays. Note: Depending on your hardware configuration, the New Aggregate Interface dialog box may look different than what is shown below Figure 17 The New Aggregate Interface dialog box. November 2020 User Guide-BlackPearl Converged Storage System - 56 -...
- Page 57 • The gateway entered for the last configured IPv6 connection sets the default gateway for the BlackPearl system. • The IPv6 Gateway does not need to be configured when the BlackPearl system is connected to a SLACC network. 8. Change the MTU (Maximum Transmission Unit) value, if desired. If you set the MTU value to something other than 1500, ensure that your switch configuration supports larger MTU settings, as well as all the hosts on the network.
-
Page 58: Configure A Single Port Data Connection
Figure 19 The Edit Data # dialog box. 3. Select DHCP to configure the system to automatically acquire an IPv4 address using DHCP. This setting does not apply to IPv6. November 2020 User Guide-BlackPearl Converged Storage System - 58 -... -
Page 59: Configure A Static Route
When an additional network or external network is only available from one, but not all, of the data connections configured on the BlackPearl system, a static route is required in order for the system to communicate to the additional network. - Page 60 For example, if one data connection is on the 10.2.2.x network and another connection is on the 10.2.4.x network, when the 10.2.3.x network is connected externally to the 10.2.4.x network, a static route must be configured on the BlackPearl system to route communication with the 10.2.3.x network through the data connection on the 10.2.4.x network.
-
Page 61: Create A User
Use the instructions in this section to create users, which act as S3 users when interacting with the BlackPearl system through a Spectra S3 SDK (Software Development Kit) client, or Spectra S3 API. Each user has a unique S3 Access ID and Secret Key. -
Page 62: Create A User
3. Enter the desired Username for the user. The Username cannot contain capital letters or spaces and is limited to 16 characters. The Username is used to identify the user in the Spectra S3 environment. November 2020 User Guide-BlackPearl Converged Storage System - 62 -... - Page 63 12. Click Create to create the new user. The system generates a unique S3 Access ID and Secret Key for the user. 13. If desired, repeat Step 2 on page 62 through Step 12 to create additional users. November 2020 User Guide-BlackPearl Converged Storage System - 63 -...
-
Page 64: View S3 Credentials
Users screen, and then select Action > Show S3 Credentials. The S3 Credentials dialog box displays. Figure 23 The S3 Credentials dialog box. 3. Use the S3 Access ID and S3 Secret Key to access the BlackPearl system using a Spectra S3 client, Spectra S3 API, or Vail sphere. Using the User Profile Screen 1. -
Page 65: Next Steps
Chapter 2 - Initial Configuration Next Steps TEPS The BlackPearl system now has the necessary components configured to begin designing your storage architecture. Continue with one of the following steps: • See Understanding Spectra Advanced Bucket Management Concepts on page 66 information about Spectra S3 and Advanced Bucket Management concepts you need to understand before you begin designing the storage architecture of the BlackPearl system. -
Page 66: Chapter 3 - Understanding Spectra Advanced Bucket Management Concepts
Chapter 3 - Understanding Spectra Advanced Bucket Management Concepts This chapter explains the concepts of the BlackPearl system advanced bucket management. It is important to understand the information in this chapter before you begin designing the storage architecture of the BlackPearl system. -
Page 67: Goals Of Advanced Bucket Management
This information allows the BlackPearl system to plan the initial storage of the objects in its cache, and how it will store the data on tape. The response to the Create Bulk Put command is a specifically ordered list of how the BlackPearl system wants those files (objects) sent. - Page 68 HTTP PUT command because it too contains a payload for the BlackPearl system. This payload is a list of objects that the client wants to get from the BlackPearl system. It is not necessary for the request payload to contain the size of the files because the BlackPearl system already knows the sizes of the objects (files).
-
Page 69: Spectra S3 Clients
Users can leverage a library of existing Spectra S3 clients available through the Spectra Logic Developer Program, develop their own client. The user moves data through the client to the BlackPearl system and then the system handles all interaction with the data storage hardware. TORAGE OMAINS A storage domain is a collection of data partitions and, when applicable, media type combinations. -
Page 70: Data Persistence Rules
• Bucket Isolated allocates an entire tape or pool to a bucket when needed. Allocating an entire pool to a bucket may use up resources quickly and is not recommended. November 2020 User Guide-BlackPearl Converged Storage System - 70 -... -
Page 71: Data Replication Rules
• BlackPearl target — A BlackPearl system remote to the local system that stores replicated data. • Amazon S3 target — An AWS S3 instance remote to the BlackPearl system that stores replicated data. • Microsoft Azure target— A Microsoft Azure instance remote to the BlackPearl system that stores replicated data. -
Page 72: Tape And Disk Partitions
Tape partitions refer to data partitions configured on Spectra Logic or other supported tape libraries. When you create a partition on a tape library attached to a BlackPearl system, the system automatically detects the tape library partition and adds it to the list of available partitions in the BlackPearl user interface. -
Page 73: Disk Partitions
Nearline storage pools on the 96-bay expansion node are automatically created by the BlackPearl system when the system detects a sufficient number of disks for a new storage pool, and there is a capacity key installed on the system to license the additional storage space. -
Page 74: Special Considerations For Reading Tapes In A Non-Blackpearl Environment
If the tapes are ejected from the BlackPearl system and loaded into a non-BlackPearl system, the file names match the object names. If you do not configure this option, object names are assigned a UUID string, which is not human readable. -
Page 75: Example Configurations
Chapter 3 - Understanding Spectra Advanced Bucket Management Concepts Example Configurations XAMPLE ONFIGURATIONS Below are explanations of the preconfigured data policies on the BlackPearl system, which include data persistence rules and storage domain targets. Note: For information on additional data policy settings that are not available through the BlackPearl user interface, see the Spectra BlackPearl Spectra S3 API Reference. -
Page 76: Single Copy On Tape
Once data is written on tape, it is removed from the BlackPearl cache if the system detects that more cache space is needed for incoming data. - Page 77 When using a Spectra S3 client, this setting can Priority be overridden when sending a GET job by specifying a different priority in the Get Job command. See the Spectra BlackPearl Spectra S3 API Reference for more information. November 2020...
- Page 78 When using a Spectra S3 client, this setting can be overridden when sending a PUT job by specifying a different priority in the Put Job command. See the Spectra BlackPearl Spectra S3 API Reference for more information. When the storage domain receives a VERIFY job, it is processed with low priority, which is the lowest setting.
- Page 79 Bucket Isolation Data from different buckets can be mixed on to the Standard Level same piece of media. November 2020 User Guide-BlackPearl Converged Storage System - 79 -...
-
Page 80: Dual Copy On Tape
Data integrity verification is not performed before verifying null automatically. data Secure Media Media allocated to the storage domain may be reused cleared Allocation by another storage domain if all data is deleted. November 2020 User Guide-BlackPearl Converged Storage System - 80 -... - Page 81 Fewer tape drives are used, so performance is Optimization lower. File names use the format {bucket name}/{object id}, for LTFS File Naming Object ID example, bucket1/1fc6f09c-dd72-41ea-8043- 0491ab8a6d82. Media Ejection selected Media ejection is allowed. Allowed November 2020 User Guide-BlackPearl Converged Storage System - 81 -...
- Page 82 When using a Spectra S3 client, this setting can Priority be overridden when sending a GET job by specifying a different priority in the Get Job command. See the Spectra BlackPearl Spectra S3 API Reference for more information. When the storage domain receives a PUT job, it is...
- Page 83 When using a Spectra S3 client, this setting can be overridden when sending a PUT job by specifying a different priority in the Put Job command. See the Spectra BlackPearl Spectra S3 API Reference for more information. When the storage domain receives a VERIFY job, it is processed with low priority, which is the lowest setting.
- Page 84 Bucket Isolation Data from different buckets can be mixed on to the Standard Level same piece of media. November 2020 User Guide-BlackPearl Converged Storage System - 84 -...
-
Page 85: Single Copy On Nearline Disk
This data policy persists a single copy of each job sent to the system on to nearline disk, which is provided by 96-bay expansion nodes. Once data is written on nearline disk, it is removed from the BlackPearl cache if the system detects that more cache space is needed for incoming data. - Page 86 When using a Spectra S3 client, this setting can Priority be overridden when sending a GET job by specifying a different priority in the Get Job command. See the Spectra BlackPearl Spectra S3 API Reference for more information. November 2020...
- Page 87 When using a Spectra S3 client, this setting can be overridden when sending a PUT job by specifying a different priority in the Put Job command. See the Spectra BlackPearl Spectra S3 API Reference for more information. When the storage domain receives a VERIFY job, it is processed with low priority, which is the lowest setting.
- Page 88 Data is moved to disk and maintained on disk media Type Permanent until data is deleted from a bucket. Data from different buckets can be mixed on to the Isolation Level Standard same piece of media. November 2020 User Guide-BlackPearl Converged Storage System - 88 -...
-
Page 89: Single Copy On Nearline Disk And Tape
This data policy persists a single copy of each job sent to the system on to both nearline disk and tape media. Once data is written on both disk and tape, it is removed from the BlackPearl cache if the system detects that more cache space is needed for incoming data. Note: This data policy is automatically created when the system detects a disk partition and a tape partition. - Page 90 Job chunks are written across as few pools as possible. Optimization File names use the format {bucket name}/{object id}, for LTFS File Naming Object ID example, bucket1/1fc6f09c dd72 41ea 8043 0491ab8a6d82 Media Ejection selected Media ejection is allowed. Allowed November 2020 User Guide-BlackPearl Converged Storage System - 90 -...
- Page 91 When using a Spectra S3 client, this setting can Priority be overridden when sending a GET job by specifying a different priority in the Get Job command. See the Spectra BlackPearl Spectra S3 API Reference for more information. When the storage domain receives a PUT job, it is...
- Page 92 When using a Spectra S3 client, this setting can be overridden when sending a PUT job by specifying a different priority in the Put Job command. See the Spectra BlackPearl Spectra S3 API Reference for more information. When the storage domain receives a VERIFY job, it is processed with low priority, which is the lowest setting.
- Page 93 Data is moved to disk and maintained on disk media Type Permanent until data is deleted from a bucket. Data from different buckets can be mixed on to the Isolation Level Standard same media. November 2020 User Guide-BlackPearl Converged Storage System - 93 -...
-
Page 94: Single Copy On Nearline Disk And Dual Copy On Tape
This data policy persists a single copy of each job sent to the system on to nearline disk and two copies of the job on to tape media. Once data is written on both disk and tape, it is removed from the BlackPearl cache if the system detects that more cache space is needed for incoming data. - Page 95 Fewer tape drives are used, so performance is Optimization lower. File names use the format {bucket name}/{object id}, for LTFS File Naming Object ID example, bucket1/1fc6f09c-dd72-41ea-8043- 0491ab8a6d82. Media Ejection selected Media ejection is allowed. Allowed November 2020 User Guide-BlackPearl Converged Storage System - 95 -...
- Page 96 Object ID example, bucket1/1fc6f09c dd72 41ea 8043 0491ab8a6d82 Media Ejection selected Media ejection is allowed. Allowed Auto Eject on Job Media is not auto ejected upon job completion. cleared Completion November 2020 User Guide-BlackPearl Converged Storage System - 96 -...
- Page 97 When using a Spectra S3 client, this setting can Priority be overridden when sending a GET job by specifying a different priority in the Get Job command. See the Spectra BlackPearl Spectra S3 API Reference for more information. When the storage domain receives a PUT job, it is processed with normal priority, which is after high priority jobs but before low and normal priority jobs.
- Page 98 When using a Spectra S3 client, this setting can Job Priority be overridden when sending a VERIFY job by specifying a different priority in the Create Verify Job command. See the Spectra BlackPearl Spectra S3 API Reference for more information. Default Verify cleared Data is not verified after a write.
- Page 99 Data is moved to disk and maintained on disk media Type Permanent until data is deleted from a bucket. Data from different buckets can be mixed on to the Isolation Level Standard same media. November 2020 User Guide-BlackPearl Converged Storage System - 99 -...
-
Page 100: Chapter 4 - Configuring Advanced Bucket Management
Add Data Persistence Rules and Replication page 130 Rules to a Data Policy Add a Data Persistence Rule to a Data Policy page 130 Add a BlackPearl Data Replication Rule to a page 132 Data Policy November 2020 User Guide-BlackPearl Converged Storage System... -
Page 101: Create A Storage Pool
Create a Nearline Disk Pool Use the instructions in this section to create a nearline disk pool. If your BlackPearl system does not include an 96-bay expansion node, or your 107-bay expansion node does not contain SATA drives, continue with Create an Online Disk Pool on page 105. - Page 102 Create a Storage Pool 1. From the menu bar, select Configuration > Advanced Bucket Management > Storage & Policy Management to display the Advanced Bucket Management screen. Figure 30 The Advanced Bucket Management screen. November 2020 User Guide-BlackPearl Converged Storage System - 102 -...
- Page 103 The Storage Pool Preview pane does not display until you have selected the disks you want to use in the storage pool. Figure 31 The New Nearline Disk Pool dialog box. November 2020 User Guide-BlackPearl Converged Storage System - 103 -...
- Page 104 This type of RAID provides the most data protection. 4. Click Create Pool. The new nearline disk pool is listed on the Advanced Bucket Management screen. November 2020 User Guide-BlackPearl Converged Storage System - 104 -...
-
Page 105: Create An Online Disk Pool
Create a Storage Pool Create an Online Disk Pool If you add a 44-bay or 107-bay expansion node with SAS drives to the BlackPearl system, or otherwise make online disks available for use, use the instructions in this section to create a new online disk pool. - Page 106 The Storage Pool Preview pane does not display until you have selected the disks you want to use in the storage pool. Figure 32 The New Online Disk Pool dialog box. November 2020 User Guide-BlackPearl Converged Storage System - 106 -...
-
Page 107: Create A Disk Partition
ARTITION Disk partitions are collections of one or more storage pools, which are configured on either 44-bay, 96-bay, or 107-bay expansion nodes, connected to the BlackPearl system. Disk partitions are specified in storage domains as storage targets. Use the instructions in this section to create a new disk partition. -
Page 108: Create A Tape Partition
Tape Library User Guides for your Spectra Logic or other supported tape library to create a partition. Once the BlackPearl system detects a partition on a tape library connected to it, the tape partition is automatically listed on the Advanced Bucket Management screen. -
Page 109: Create A Replication Target
Replication targets allow you to configure the BlackPearl system to automatically replicate data to another BlackPearl system, or to the Azure or Amazon S3 clouds. If your BlackPearl system does not include the feature to replicate data to cloud targets, continue with Create a Storage Domain on page 118. - Page 110 Targets to display the Replication Targets screen. Figure 34 The Replication Targets screen 2. Select Action > New BlackPearl Target. The New BlackPearl Target dialog box displays. Figure 35 The New BlackPearl Target dialog box. 3. Enter a name for the BlackPearl target in the Name field.
- Page 111 The source system only reads data from the target system if Tape the source system cannot read from a non-ejectable tape. Never Data is never read from the target system November 2020 User Guide-BlackPearl Converged Storage System - 111 -...
-
Page 112: Create An Amazon S3 Target
Create an Amazon S3 Target Configuring an Amazon S3 target allows a data policy on the BlackPearl system to replicate data to the Amazon S3 cloud. With replication enabled, as soon as data is PUT to the cache of the source system it begins replication to the Amazon S3 cloud. - Page 113 • Object ID - objects display a UUID when viewed on the Amazon target. • Object Name - objects display their name when viewed on the Amazon target. 4. Enter a name for the Amazon S3 target in the Name field. November 2020 User Guide-BlackPearl Converged Storage System - 113 -...
- Page 114 9. Optionally, enter a Cloud Bucket Prefix and/or Cloud Bucket Suffix. Bucket names on the BlackPearl system must be unique within the system, but bucket names in AWS S3 must be unique across the world. To permit friendlier, shorter local bucket names on the...
- Page 115 1 and 365. The default is 30. When data is pre-staged by the S3 service so that the BlackPearl system can retrieve the data in an S3-standard manner, you must specify an expiration period in days. This is the minimum number of days before the pre-staged copy expires.
-
Page 116: Create A Microsoft Azure Target
13. Click Create. The new Amazon S3 target appears on the Replication Targets screen. Create a Microsoft Azure Target Configuring a Microsoft Azure target allows a data policy on the BlackPearl system to replicate data to the Microsoft Azure cloud. With replication enabled, as soon as data is PUT to the cache of the source system it begins replication to the Microsoft Azure cloud. - Page 117 Azure must be unique across the world. To permit friendlier, shorter local bucket names on the BlackPearl system while avoiding naming conflicts with Microsoft Azure, the system adds the defined Cloud Bucket Prefix and Cloud Bucket Suffix to the BlackPearl bucket name when it replicates the bucket. For example, if Cloud Bucket Prefix=prefix, Cloud Bucket Suffix=suffix, and the bucket name=name, the resulting name of the bucket on the Azure target is prefix-name-suffix.
-
Page 118: Create A Storage Domain
This setting determines when data is read back from the Microsoft Azure target, if needed. Note: Spectra Logic recommends that Default Read Preference be kept at the default of Last Resort. Name... - Page 119 • Disk pools are not subject to automatic data integrity verification. However, you can initiate data integrity verification for disk pools manually. See Data Integrity Verification - Disk Media on page 345 for more information. November 2020 User Guide-BlackPearl Converged Storage System - 119 -...
- Page 120 Storage domains for pool partitions should generally have a Capacity write optimization because pools are very fast and under less contention. It is rare for a pool storage domain to benefit from Performance mode. November 2020 User Guide-BlackPearl Converged Storage System - 120 -...
- Page 121 • Object Name — LTFS file names use the format {bucket name}/{object name}, for example bucket1/video1.mov. Object names must comply with LTFS file naming rules. If the tapes are ejected from the BlackPearl system and loaded into a non-BlackPearl tape partition, the file names match the object names.
-
Page 122: Create An Hourly Schedule
Enter a number for Every _ hours on the hour. This value specifies the interval, in hours, between ejecting tapes. For example, if this value is set to 4, the system ejects tapes every four hours. November 2020 User Guide-BlackPearl Converged Storage System - 122 -... -
Page 123: Create A Daily Schedule
Use the instructions in this section to add a storage domain member to a storage domain. 1. From the menu bar, select Configuration > Advanced Bucket Management > Storage & Data Policy Management to display the Advanced Bucket Management screen (see Figure 30 on page 102). November 2020 User Guide-BlackPearl Converged Storage System - 123 -... - Page 124 You cannot add a disk partition to a storage domain that already uses a tape partition, and you cannot add a tape partition to a storage domain that already uses a disk partition. November 2020 User Guide-BlackPearl Converged Storage System - 124 -...
-
Page 125: Create A Data Policy
Use the instructions in this section to create a new data policy. 1. From the menu bar, select Configuration > Advanced Bucket Management > Storage & Data Policy Management to display the Advanced Bucket Management screen (see Figure 30 on page 102). November 2020 User Guide-BlackPearl Converged Storage System - 125 -... - Page 126 5. Select or clear the Minimize Spanning check box. When enabled, this setting minimizes the spanning of data across multiple tapes or pools. Jobs less than 1 TB never span media. Note: Enabling this option can adversely affect capacity utilization and performance. November 2020 User Guide-BlackPearl Converged Storage System - 126 -...
- Page 127 CRC, if specified. Notes: • CRC, MD5, and SHA-512 perform the best for their corresponding cryptographic strengths on the BlackPearl system. • Using SHA-256 and SHA-512 reduces single stream performance and may reduce throughput capabilities of the system.
- Page 128 PUT job to succeed. If you select Keep Multiple Versions, if the PUT of the earlier version is not complete before the PUT of the latest version, the BlackPearl system believes the CAUTION latest version to be the same object as the earlier version and rejects it, and only the earlier version is retained.
-
Page 129: New Data Policy Acl For A Group
Figure 42 The New Data Policy ACL For Group dialog box. 4. Using the Name drop-down menu, select the group to be assigned to the data policy ACL. 5. Click Create. November 2020 User Guide-BlackPearl Converged Storage System - 129 -... -
Page 130: New Data Policy Acl For A User
Add a Data Persistence Rule to a Data Policy 1. If necessary, select Configuration > Advanced Bucket Management > Storage & Data Policy Management to display the Advanced Bucket Management screen (see Figure 30 on page 102). November 2020 User Guide-BlackPearl Converged Storage System - 130 -... - Page 131 3. Select Action > New Data Persistence Rule. The New Data Persistence Rule dialog box displays. Figure 45 The New Data Persistence Rule dialog box. 4. Use the Storage Domain drop-down menu to select a storage domain from the list of previously created storage domains. November 2020 User Guide-BlackPearl Converged Storage System - 131 -...
- Page 132 8. Click Create. The new data persistence rule displays on the Data Policy details screen. Add a BlackPearl Data Replication Rule to a Data Policy 1. If necessary, select Configuration > Advanced Bucket Management > Storage & Data Policy Management to display the Advanced Bucket Management screen (see Figure 30 on...
- Page 133 6. In the BlackPearl Data Policy entry field, enter the name of the data policy on the target BlackPearl system to use when creating the bucket for replicated data. Alternatively, you can leave the field blank.
- Page 134 • Standard IA (default) — Provides fast access to less frequently accessed data. • Glacier — Provides secure, long-term archive for rarely accessed data. • Deep Archive — Provides a low-cost, secure long-term archive for data that does not require quick retrieval. November 2020 User Guide-BlackPearl Converged Storage System - 134 -...
- Page 135 Permanent , or Retired. Note: You cannot create a replication rule as Retired. You can only modify a rule from permanent to retired after creating the replication rule. November 2020 User Guide-BlackPearl Converged Storage System - 135 -...
-
Page 136: Create A Bucket
Clients write data to the system using a “bulk PUT” command, and read from the system with a “bulk GET” command. For more information on using these commands see the Spectra BlackPearl Spectra S3 API Reference. Note: Buckets can also be created using a Spectra S3 client, or Spectra S3 API. - Page 137 • For BlackPearl software version 4.0 or later, if the bucket name is incompatible with the naming requirements of the cloud target provider, bucket creation fails and an error message displays.
-
Page 138: Create A New Bucket Acl For A Group
4. Using the Name drop-down list, select a group from the list of exiting S3 groups on the BlackPearl system. 5. Select the desired Permissions for the group ACL. 6. Click Create. November 2020 User Guide-BlackPearl Converged Storage System - 138 -... -
Page 139: Create A New Bucket Acl For A User
4. Using the Name drop-down list, select a user from the list of exiting users on the BlackPearl system. 5. Select the desired Permissions for the user ACL. 6. Click Create. November 2020 User Guide-BlackPearl Converged Storage System - 139 -... -
Page 140: Transfer Data
Spectra BlackPearl Spectra S3 API Reference, and documentation specific to each Spectra S3 client. The Spectra BlackPearl system limits the number of simultaneous active jobs. The number of simultaneous jobs differs depending on the software installed on the BlackPearl system. -
Page 141: Chapter 5 - Managing Advanced Bucket Management Settings
Chapter 5 - Managing Advanced Bucket Management Settings This chapter describes using the BlackPearl user interface to manage storage domains, data policies, disk partitions, and buckets on the system after configuring Advanced Bucket Management. For initial Advanced Bucket Management configuration steps, see "Configuring Advanced Bucket Management"... -
Page 142: Manage A Storage Domain
Never_Select. 1. From the menu bar, select Configuration > Advanced Bucket Management > Storage & Data Policy Management to display the Advanced Bucket Management screen (see Figure 30 on page 102). November 2020 User Guide-BlackPearl Converged Storage System - 142 -... -
Page 143: Exclude A Storage Domain Member
1. From the menu bar, select Configuration > Advanced Bucket Management > Storage & Data Policy Management to display the Advanced Bucket Management screen (see Figure 30 on page 102). November 2020 User Guide-BlackPearl Converged Storage System - 143 -... -
Page 144: Cancel Storage Domain Member Exclusion
1. From the menu bar, select Configuration > Advanced Bucket Management > Storage & Data Policy Management to display the Advanced Bucket Management screen (see Figure 30 on page 102). November 2020 User Guide-BlackPearl Converged Storage System - 144 -... -
Page 145: Edit A Storage Domain
Save, explaining why the edit is not allowed. 1. From the menu bar, select Configuration > Advanced Bucket Management > Storage & Data Policy Management to display the Advanced Bucket Management screen (see Figure 30 on page 102). November 2020 User Guide-BlackPearl Converged Storage System - 145 -... -
Page 146: Delete A Storage Domain
1. From the menu bar, select Configuration > Advanced Bucket Management > Storage & Data Policy Management to display the Advanced Bucket Management screen (see Figure 30 on page 102). November 2020 User Guide-BlackPearl Converged Storage System - 146 -... -
Page 147: Manage Data Replication Rules
Data Policy Management to display the Advanced Bucket Management screen (see Figure 30 on page 102). 2. Double-click the data policy with the BlackPearl data replication rule that you want to edit, or select the data policy and then select Action > Show Details. The Data Policy details screen displays (see Figure 44 on... -
Page 148: Edit An Amazon S3 Data Replication Rule
Chapter 5 - Managing Advanced Bucket Management Settings Manage Data Replication Rules 3. Double-click the row of the BlackPearl data replication rule that you want to edit, or select the row for the replication rule and then select Action > Edit Rule. - Page 149 Add an Amazon S3 Data Replication Rule to a Data Policy on page 134 for a description of each field. 6. Click Save. The edited Amazon S3 data replication rule displays on the Data Policy details screen. November 2020 User Guide-BlackPearl Converged Storage System - 149 -...
-
Page 150: Edit A Microsoft Azure Data Replication Rule
Add a Microsoft Azure Data Replication Rule to a Data Policy on page 135 for a description of each field. 6. Click Save. The edited Microsoft Azure data replication rule displays on the Data Policy details screen. November 2020 User Guide-BlackPearl Converged Storage System - 150 -... -
Page 151: Delete A Data Replication Rule
4. Type DELETE into the entry field, and then click Delete. ANAGE A OLICY Use the instructions in this section to manage access control lists (ACLs), and to edit or delete persistence rules, replication rules, and data policies. November 2020 User Guide-BlackPearl Converged Storage System - 151 -... -
Page 152: Edit A Data Policy
3. Edit the fields as necessary. See Create a Data Policy on page 125 for a description of each field. 4. Click Save. The edited data policy displays on the Advanced Bucket Management screen. November 2020 User Guide-BlackPearl Converged Storage System - 152 -... -
Page 153: Delete A Data Policy
3. Select the row for the data policy ACL which you want to delete. 4. From the menu bar, select Action > Delete Data Policy ACL. A confirmation window displays. 5. Click Delete. November 2020 User Guide-BlackPearl Converged Storage System - 153 -... -
Page 154: Edit A Data Persistence Rule
Add Data Persistence Rules and Replication Rules to a Data Policy on page 130 for a description of each field. 6. Click Save. The edited data persistence rule displays on the Data Policy details screen. November 2020 User Guide-BlackPearl Converged Storage System - 154 -... -
Page 155: Delete A Data Persistence Rule
Storage Domain details screen will open. A confirmation dialog box displays. Figure 66 The delete data persistence rule confirmation dialog box. 4. Type DELETE into the entry field, and then click Delete. November 2020 User Guide-BlackPearl Converged Storage System - 155 -... -
Page 156: Manage Replication Targets
Use the instruction in this section to manage existing replication targets. Edit a BlackPearl Replication Target Use the instructions in this section to modify the configuration of an existing BlackPearl replication target. 1. From the menu bar, select Configuration > Advanced Bucket Management > Replication Targets to display the Replication Targets screen (see Figure 34 on... -
Page 157: Edit An Amazon Replication Target
3. Edit the fields as necessary. See Create an Amazon S3 Target on page 112 for a description of each field. 4. Click Save. The edited Amazon replication target displays on the Replication Targets screen. November 2020 User Guide-BlackPearl Converged Storage System - 157 -... -
Page 158: Edit An Azure Replication Target
1. From the menu bar, select Configuration > Advanced Bucket Management > Replication Targets to display the Replication Targets screen (see Figure 34 on page 110). November 2020 User Guide-BlackPearl Converged Storage System - 158 -... -
Page 159: Put A Replication Target In Standby State
Put a Replication Target in Standby State If you need to perform service on a replication target, it is recommended that you first put the replication target into a standby state. Otherwise, the BlackPearl system may attempt to use the target while it is in service. -
Page 160: Activate A Replication Target
2. Select the replication target that you want to activate and then select Action > Activate Target. The Activate Target dialog box displays. Figure 72 The Activate Target dialog box. 3. Click Activate. The target is now in an active state. November 2020 User Guide-BlackPearl Converged Storage System - 160 -... -
Page 161: Delete A Replication Target
Figure 73 The Delete target type Target dialog box. 3. Click Delete to delete the selected replication target. ANAGE A ARTITION Use the instructions in this section to edit or delete a disk partition. November 2020 User Guide-BlackPearl Converged Storage System - 161 -... -
Page 162: Edit A Disk Partition
3. Edit the fields as necessary. See Create a Storage Pool on page 101 for a description of each field. 4. Click Save. The edited disk partition displays on the Advanced Bucket Management screen. November 2020 User Guide-BlackPearl Converged Storage System - 162 -... -
Page 163: Delete A Disk Partition
Import a Nearline or Online Disk Pool Data present on storage pools on expansion nodes can be moved from one BlackPearl system to another, either to increase name space redundancy, or as part of disaster prevention. Use the instructions in this section to import a pool. - Page 164 4. Disk pools eligible for import display with a health of Foreign. Select the nearline pool you want to import in the Storage Pools pane, and select Action > Import Pool. The Import dialog box displays. Figure 76 The Import dialog box. November 2020 User Guide-BlackPearl Converged Storage System - 164 -...
- Page 165 Recent Accept Existing Keep the file currently in the BlackPearl database. 6. Configure the import parameters for new buckets present on the storage pool. a. Using the drop-down menu, select the User to be the owner of the imported bucket(s).
-
Page 166: Delete A Nearline Or Online Disk Pool
Show Bucket Physical Placement Once data is transferred to the BlackPearl system, you can view the physical placement of the data. The BlackPearl user interface displays data placement on disk pools, tapes, and replication targets. Use the instructions in this section to view physical placement of a specified bucket. -
Page 167: Edit A Bucket Acl
You cannot change the user of an existing bucket ACL list. The Name drop-down list is unavailable. 4. Select or clear the desired Permissions for the bucket ACL. 5. Click Save. November 2020 User Guide-BlackPearl Converged Storage System - 167 -... -
Page 168: Delete A Bucket Acl
5. Use the Data Policy drop down menu to change the data policy assigned to the bucket. For more information on data policies, see Data Policies on page 69. 6. Click Save. November 2020 User Guide-BlackPearl Converged Storage System - 168 -... -
Page 169: Delete A Bucket
2. Select the bucket you want to delete and select Action > Delete. A confirmation dialog box displays. Figure 82 The bucket delete confirmation dialog box. 3. Type DELETE BUCKET into the entry field, and then click Delete. November 2020 User Guide-BlackPearl Converged Storage System - 169 -... -
Page 170: Chapter 6 - Additional Configuration Options
Chapter 6 - Additional Configuration Options Chapter 6 - Additional Configuration Options This chapter describes using the BlackPearl user interface to configure additional options for the Spectra BlackPearl Converged Storage System. Topic Configure Network Connections and Settings page 171 Configure Ethernet Ports page 171... -
Page 171: Configure Network Connections And Settings
Figure 83 The Network screen. Configure Ethernet Ports This section describes using the BlackPearl user interface to configure the IP addressing for the Ethernet ports in the BlackPearl system. The system includes two 10 GigE ports on the rear panel (see Figure 5 on page 36). - Page 172 • You can configure link aggregation for better performance. • While different types of Ethernet network interface cards can be installed in the same BlackPearl system, only one type port can be used in each link aggregation configuration. • You can only use the BlackPearl management port to access the BlackPearl user interface.
- Page 173 If you select DHCP, you are not able to see the IP address assigned by DHCP IMPORTANT before you are logged out of the BlackPearl user interface. Contact your system administrator to determine the DHCP address for the management port.
- Page 174 • The gateway entered for the last configured IPv6 connection sets the default gateway for the BlackPearl system. • The IPv6 Gateway does not need to be configured when the BlackPearl system is connected to a SLACC network. 7. Change the MTU value, if desired. If you set the MTU value to something other than 1500, ensure that your switch configuration supports larger MTU settings, as well as all the hosts on the network.
- Page 175 Notes: • If you selected DHCP in Step 4, this option is unavailable. • The gateway entered for the last configured IPv4 connection sets the default gateway for the BlackPearl system. November 2020 User Guide-BlackPearl Converged Storage System - 175 -...
- Page 176 • The gateway entered for the last configured IPv6 connection sets the default gateway for the BlackPearl system. • The IPv6 Gateway does not need to be configured when the BlackPearl system is connected to a SLACC network. 8. Change the MTU (Maximum Transmission Unit) value, if desired. If you set the MTU value to something other than 1500, ensure that your switch configuration supports larger MTU settings, as well as all the hosts on the network.
- Page 177 BlackPearl system. Note: The IPv6 Gateway does not need to be configured when the BlackPearl system is connected to a SLACC network. 7. Change the MTU (Maximum Transmission Unit) value, if desired. If you set the MTU value to something other than 1500, ensure that your switch configuration supports larger MTU settings, as well as all the hosts on the network.
-
Page 178: Configure Dns Settings
3. Click Delete to clear the Ethernet configuration. Configure DNS Settings The DNS settings on the BlackPearl system are used to allow domain name lookup on the system. Use the following instructions to enter DNS information on the system. 1. From the menu bar, select Configuration > Network, or click the Network pane from the Dashboard screen. -
Page 179: Configure Smtp Settings
IP address, the buttons are unavailable, and the information must be entered manually. 4. If the BlackPearl management port is configured with a static IP address, or if you selected Manual, enter the following information: a. Enter the IP address of one or more name servers in the Name Servers field. - Page 180 6. Enter an email address in the From Address field. This is the email address that displays as the sender whenever the system generates an email. This email address should uniquely identify the BlackPearl system to assist in troubleshooting and be recognized by the SMTP server as a valid domain address.
-
Page 181: Configure Date And Time
BlackPearl system. Note: If you plan to join an Active Directory domain, you must configure the BlackPearl system to use NTP. If the system time and the Active Directory time are more than 5 minutes apart, joining the domain fails. -
Page 182: Edit The System Name
• Valid - BlackPearl.domain.com • Invalid - BlackPearlSystem.domain.com • If your system is using firmware BlackPearl 3.2.2, or earlier, there are no character restrictions on system names. However, Spectra Logic recommends limiting system names to letters, numbers, and hyphens to maintain compatibility with the RFC 1123 standard. -
Page 183: Configure Networking Services
Chapter 6 - Additional Configuration Options Configure Networking Services ONFIGURE ETWORKING ERVICES Use the following instructions to configure networking services on the BlackPearl system. For instructions on configuring NAS services, see Configure NAS Services on page 233. Configure the Spectra S3 Service 1. - Page 184 • If the Auto-Activate Timeout is set to 0, the data path backend will never auto- activate. 6. Using the drop-down menu, select a behavior for Auto-Inspect. This setting configures whether tape inspections are performed by the system based on a tape’s last known state, or each time the BlackPearl is initialized. Value Description Full...
- Page 185 Disabled The BlackPearl system does not perform any IOM operations. Notes: • IOM is enabled by default. Spectra Logic recommends leaving the feature enabled. • Automatic tape compaction is configured on a per tape partition basis (see Edit a Tape Partition on page 286 for more information).
- Page 186 This option makes imported foreign options available, and schedules a verify job with the selected priority at a later time. Note: This option is unavailable if you selected Default Verify Data Prior to Import in Step 12 on page 186. 14. Click Save. November 2020 User Guide-BlackPearl Converged Storage System - 186 -...
-
Page 187: Configure The Active Directory Service
Configure Networking Services Configure the Active Directory Service The Active Directory service in the BlackPearl user interface is used to connect the system to a Windows Active Directory domain. Before you can join a domain, you must configure the BlackPearl system to use NTP. See Configure Date and Time on page 181. - Page 188 • The BlackPearl system uses “Pre-Windows 2000”login names for Active Directory users. Login names greater than 20 characters in length, or containing special characters (for example ‘@’) are not able to log into the BlackPearl user interface. • You must enter the user name and password each time the BlackPearl system joins an Active Directory domain.
- Page 189 3. Select Action > Add Advanced Parameter. The Add Advanced Parameter dialog box displays. Figure 98 The Add Advanced Parameter dialog box. 4. Enter the desired Parameter and Value. 5. Click Create. November 2020 User Guide-BlackPearl Converged Storage System - 189 -...
- Page 190 1. From the menu bar, select Configuration > Services. The Services screen displays (see Figure 94 on page 183). 2. Double-click the Active Directory row, or select the Active Directory row and select Action > Show Details. The Active Directory details screen displays. November 2020 User Guide-BlackPearl Converged Storage System - 190 -...
-
Page 191: Configure The Snmp Service
If no community string is specified, then the BlackPearl system responds to all SNMP queries. 5. Enter the primary contact for the BlackPearl system in the Contact field. 6. Enter the physical location of the system in the Location field. - Page 192 8. Click Save. Download the MIB File If you want to communicate with the system using SNMP, you must first download the BlackPearl Converged Storage System MIB (Management Information Base) file, and load the ® ® file into a compatible network node manager program, such as HP OpenView 1.
-
Page 193: Configure The Vail Service
Configure the Vail Service The Vail service configures a BlackPearl system for use with a Spectra Vail sphere. The Vail service only displays in the Services menu after an activation key is entered. Use the instructions in this section to configure the Vail service. - Page 194 S3 service. Note: For new BlackPearl systems, Spectra Logic recommends using the 80/443 pair of ports. 6. Click Save. The Edit Sphere dialog box refreshes to display the Location drop-down menu.
-
Page 195: Configure And Use Encryption
Configure and Use Encryption ONFIGURE AND NCRYPTION If your BlackPearl system includes Self Encrypting Drives (SEDs), use the encryption service to set the level of encryption, configure passwords, and unlock the drives so that they are usable for data transfer. -
Page 196: Change The Encryption Password
BlackPearl system, at all other times. 5. Enter a Password to unlock the self-encrypting drives, and then Confirm the password. 6. Enter the User Password of the user currently logged in to the BlackPearl user interface. 7. Enter ENCRYPT into the confirmation dialog box. -
Page 197: Unlock The Self-Encrypting Drives
4. Enter the (current) Old Password. 5. Enter the desired New Password, and then Confirm the new password. 6. Enter the User Password of the user currently logged in to the BlackPearl user interface. Unlock the Self-Encrypting Drives If the encryption service is configured to not store the password on the BlackPearl system, use the instructions below to manually unlock the self-encrypting drives after the system initializes. -
Page 198: Create An Encryption Password Usb Key
3. Select Action > Unlock Drives. The Enter Password dialog box displays. Figure 108 The Enter Password dialog box. 4. Enter the encryption Password. 5. Enter the User Password of the user currently logged in to the BlackPearl user interface. 6. Click Save. Create an Encryption Password USB Key... -
Page 199: Psid Erase An Encryption Drive
3. Select Action > Create USB Key. The Create USB Key confirmation window displays. Figure 109 The Create USB Key confirmation window. 4. Enter the User Password of the user currently logged into the BlackPearl user interface. 5. Click Create. Note: Once created, remove the USB key from the system and store it in a safe location until it is needed. - Page 200 Chapter 6 - Additional Configuration Options Configure and Use Encryption 4. Power down the system as described in Reboot or Shut Down a BlackPearl System on page 331. 5. Locate the drive(s) in the chassis using the slot number and verify the serial number(s) you recorded in Step 3.
-
Page 201: Configure Users And S3 Groups
Using the Users Screen 1. From the menu bar, select Configuration > Users. The Users screen displays a list of all configured users (see Figure 21 on page 62). November 2020 User Guide-BlackPearl Converged Storage System - 201 -... - Page 202 5. If you are changing the password, enter the desired New Password, then Confirm New Password. Note: The new password does not take effect until after you log out of the BlackPearl user interface (see Exit the BlackPearl User Interface on page 333).
- Page 203 13. Click Save. Using the User Profile Screen 1. From the right side of the menu bar, select Current User > User Profile. The User Profile screen displays. November 2020 User Guide-BlackPearl Converged Storage System - 203 -...
-
Page 204: Change S3 Secret Key
4. If you are changing the password, enter the desired New Password, then Confirm New Password. Note: The new password does not take effect until after you log out of the BlackPearl user interface (see Exit the BlackPearl User Interface on page 333). - Page 205 3. Select either Generate Key Automatically or Enter Specific Key. 4. Optionally, if you selected Enter Specific Key, enter the desired key in the entry box. 5. Click Change to change the S3 secret key for the user. November 2020 User Guide-BlackPearl Converged Storage System - 205 -...
-
Page 206: Create An S3 Group
Configure Users and S3 Groups Create an S3 Group An S3 group on the BlackPearl system is a group of previously created S3 users. Members of an S3 group can be individual users, or groups of users. When creating an S3 group, you specify the global bucket and data policy access control lists. - Page 207 2. Double-click the S3 group to which you want to add a different S3 group as a member, or select the group and from the menu bar select Action > Show Details. November 2020 User Guide-BlackPearl Converged Storage System - 207 -...
- Page 208 3. From the menu bar, select Action > Add User Member. The Add Group Member dialog box displays. Figure 118 The Add User Member dialog box. 4. Using the User drop-down menu, select the user to add as a member. 5. Click Add. November 2020 User Guide-BlackPearl Converged Storage System - 208 -...
-
Page 209: Remove An S3 Group Member
4. Under Global Data Policy Access Control List, select Enabled to allow the user access to any data policy created on the system. 5. Click Save. November 2020 User Guide-BlackPearl Converged Storage System - 209 -... -
Page 210: Delete A User Or S3 Group
Because the certificates are not signed, you must pass a security check every time you attempt to access the management port to view the BlackPearl user interface, or when you attempt to transfer data using the data port. -
Page 211: Manually Enter Activation Keys
The private key must be in PEM format. 6. Click Save. ANUALLY NTER CTIVATION If this is an initial installation and your BlackPearl documentation kit included a USB device, see Automatically Import Activation Keys on page 51 for instructions for importing activation keys. - Page 212 EM_S3_TAPE_COUNT Enables the specified number of tape slots present in the attached Spectra Logic or supported tape library. b. Product key - There is only one product key for the BlackPearl system. Key Type Description EM_S3 Enables the system to use the BlackPearl interface and functionality.
- Page 213 4. Enter the key, exactly as provided, in the Activation Key field and click Create to save the key on the system. The Activation Keys screen displays with the newly entered key listed. 5. If necessary, repeat Step 3 through Step 4 to add additional keys. November 2020 User Guide-BlackPearl Converged Storage System - 213 -...
-
Page 214: Chapter 7 - Configuring Network Attached Storage
Chapter 7 - Configuring Network Attached Storage This chapter describes using the optional Network Attached Storage (NAS) features. If you have not purchased a NAS activation key, these features do not display in the BlackPearl user interface. Topic Overview of NAS Storage Pools, Volumes,and page 214... -
Page 215: Storage Pools
When creating a new storage pool, keep the following in mind: • Each storage pool requires a minimum of one drive. Spectra Logic recommends using eight drives or more in a storage pool to reduce the impact of the overhead. Overhead is the space on the storage pool used to store parity data, and not used for data storage. - Page 216 Use the following steps to create a new storage pool. 1. From the menu bar, select Configuration > NAS > Pools, or click the Pools pane on the Dashboard. The NAS Pools screen displays. Figure 124 The NAS Pools screen. November 2020 User Guide-BlackPearl Converged Storage System - 216 -...
- Page 217 Note: The Storage Pool Preview pane does not display until you have selected the disks you want to use in the storage pool Figure 125 The New Pool dialog box. November 2020 User Guide-BlackPearl Converged Storage System - 217 -...
- Page 218 Notes: • The combined storage pool and volume name must be 78 characters or fewer. To avoid problems sharing volumes, Spectra Logic recommends a pool name of 32 characters or fewer. • Each pool name must be unique. This field is case sensitive. Only the following special characters are allowed: hyphen (-), underscore (_), colon (:), and period(.).
- Page 219 NFS shares and typically has little impact on CIFS share performance. 4. Click Create. The NAS Pools screen displays. The storage pool is automatically created and is available for use immediately. November 2020 User Guide-BlackPearl Converged Storage System - 219 -...
-
Page 220: Create A Volume
If you want to configure the volume to use the NFI service (Network File Interface) to automatically transfer files from the NAS storage to the local system’s storage domains or to a remote BlackPearl system, configure the NFI service before configuring the volume. See Configure the NFI Service on page 235. - Page 221 For example, for a volume named Share One, the corresponding NFS share is named Share_One to external network computers, but it is named Share One in the BlackPearl user interface. November 2020 User Guide-BlackPearl Converged Storage System...
- Page 222 NFS. Compression If desired, select the check box to enable the BlackPearl system to compress stored data. If the data being written is compressible there is an increase in write performance to the volume, which is dependent on how much compression occurs on the data being written.
- Page 223 Configure the NFI Service on page 235. d. Enter the name of the Bucket to use to store the data on the BlackPearl system. If the bucket does not exist, it is automatically created. Notes: • The bucket name cannot contain a colon (:), forward slash (/), or space.
-
Page 224: Create An Hourly Schedule
Create a Volume e. Configure the NFI Volume Policy Schedule: The NFI Volume Policy Schedule transfers data from the NAS volume to a BlackPearl system at intervals based on number of hours, days, or days of the week. Decide which interval to use for the schedule and follow the appropriate instructions. -
Page 225: Create A Daily Schedule
Enter a number for Every _ days. This value specifies the interval, in days, between transferring data to the BlackPearl system. For example, if this value is set to 2, the system copies data every two days at the time specified in Step b. -
Page 226: Create A Weekly Schedule
Select one or more days for Every week on:. This determines the day(s) of each week the system copies data to the BlackPearl system. 4. Click Create. The Volumes screen refreshes to show the new volume. -
Page 227: Create A Share
Active Directory, you can enable local administrator status on the system to allow a specified user to access the CIFS shares in a Windows workgroup environment. The username and password configured on the BlackPearl system are used to access the CIFS shares when using a Windows workgroup environment. - Page 228 2. Double-click the row for the user for which you want to enable local administrator status, or select the user, and then select Action > Edit. The Edit User dialog box displays. Figure 132 The Edit User dialog box. November 2020 User Guide-BlackPearl Converged Storage System - 228 -...
- Page 229 3. Use the drop-down menu to select the Volume you want to share. 4. Set the Name for the CIFS share. This is the name that is displayed in Active Directory configurations. November 2020 User Guide-BlackPearl Converged Storage System - 229 -...
- Page 230 Active Directory Domain administrator password. 1. Mount the new CIFS share to your Microsoft Windows operating system host. November 2020 User Guide-BlackPearl Converged Storage System - 230 -...
- Page 231 General tab of the Properties window displays. Note: You cannot use the Computer Management panel to set permissions on CIFS shares. Figure 135 The Properties window. 3. Click Security. The Security tab displays. Figure 136 The Security tab. November 2020 User Guide-BlackPearl Converged Storage System - 231 -...
-
Page 232: Create An Nfs Share
4. The network address displayed for Volume Mount Point is the address of the share you are currently configuring. Note: Before mounting an NFS share, make sure the client supports the NFSv3 protocol and properly handles file locking. November 2020 User Guide-BlackPearl Converged Storage System - 232 -... -
Page 233: Configure Nas Services
Hosts not listed are not able to access the volume. In addition to the host IP address, you must include one of the following permission parameters for each host you add to the BlackPearl system. Parameter... -
Page 234: Configure The Cifs Service
3. Select Action > Add Advanced Parameter. The Add Advanced Parameter dialog box displays. Figure 140 The Add Advanced Parameter dialog box. 4. Enter the desired Parameter and Value. 5. Click Create. November 2020 User Guide-BlackPearl Converged Storage System - 234 -... -
Page 235: Configure The Nfi Service
Configure the NFI Service The NFI service (Network File Interface) automatically transfers files from the NAS volumes on the system to BlackPearl managed object storage on the same system or on a remote BlackPearl system. 1. From the menu bar, select Configuration > Services to display the Services screen. -
Page 236: Configure The Nfs Service
Figure 143 The Configure dialog box for a local BlackPearl. a. Select Use remote BlackPearl b. Enter the IP address or the DNS name of the data port of the BlackPearl system to which you want to connect in the BlackPearl System entry field. If you do not know the IP address or DNS name of the data port on the BlackPearl system, select Configuration >... -
Page 237: Configure The Nas Replication Service
6. Click Save. Configure the NAS Replication Service If the BlackPearl system is on a network with Verde arrays or other BlackPearl systems with NAS enabled, you can select to replicate data from the NAS volumes on the system to one or multiple NAS replication targets. - Page 238 For both the source system and the targets, make sure you have completed the steps in "Initial Configuration " on page 46 starting on page page 46. 1. In the source system’s BlackPearl user interface, select Configuration > Services to display the Services screen (see Figure 139 on page 233).
- Page 239 9. Click Save. Configure Volumes for NAS Replication 1. In the source system’s BlackPearl user interface, select Configuration > NAS > Volumes. The Volumes screen displays. 2. Double-click the volume name you want to configure to replicate, or select the volume and select Action >...
- Page 240 • If the volume exists on the target, a warning message displays informing you that any data currently in the target volume is erased each time data is replicated. Confirm the warning message to continue. November 2020 User Guide-BlackPearl Converged Storage System - 240 -...
-
Page 241: Create An Hourly Schedule
3. Enter a number for Every _ days. This value specifies the interval, in days, between replicating data. For example, if this value is set to 2, the system replicates data every two days at the time specified in Step 2. 4. Click Create. November 2020 User Guide-BlackPearl Converged Storage System - 241 -... -
Page 242: Create A Weekly Schedule
3. Select one or more days for Every week on:. This determines the day(s) of each week the system replicates data. For example, based on the selections in Figure 149, the system replicates data every Monday, Wednesday, and Friday at 5:00 AM. 4. Click Create. November 2020 User Guide-BlackPearl Converged Storage System - 242 -... -
Page 243: Chapter 8 - Managing Network Attached Storage
Chapter 8 - Managing Network Attached Storage Chapter 8 - Managing Network Attached Storage This chapter describes using the BlackPearl user interface to manage storage pools, volumes, and shares on the system after configuring NAS. For initial NAS configuration steps, see "Configuring Network Attached Storage"... -
Page 244: Managing Storage Pools
Edit the NFI Service page 266 Delete the NFI Service Configuration page 267 Manually Starting an NFI Replication page 267 Restoring Files From an NFI Target BlackPearl page 269 System ANAGING TORAGE OOLS After creating one or more storage pools, use the instructions in this section to edit, expand, or delete a pool. -
Page 245: Expand A Storage Pool
2. From the list of existing storage pools, select the storage pool you want to expand, and then select Action > Expand. The Expand Pool screen displays options for adding additional drives to the storage pool. Figure 151 The Expand Pool screen. November 2020 User Guide-BlackPearl Converged Storage System - 245 -... -
Page 246: Delete A Storage Pool
Spectra Logic recommends that you avoid mixing drive types in a pool. 4. Use the slider to increase the number of drives to use in the storage pool. As you make changes, the graphics beneath the slider update to show the impact your changes have on the storage pool. -
Page 247: Managing Volumes
If desired, you can cancel the move of a volume from one storage pool to another. 1. From the menu bar, select Configuration > NAS > Volumes, or click the Volumes pane on the Dashboard. The Volumes screen displays (see Figure 126 on page 220). November 2020 User Guide-BlackPearl Converged Storage System - 247 -... -
Page 248: Edit A Volume
2. Double-click the volume you want to edit, or select the volume and then select Action > Edit. The Edit Volume name screen displays. Figure 154 The Edit Volume screen. 3. Change the configuration of the volume as required for your environment. November 2020 User Guide-BlackPearl Converged Storage System - 248 -... - Page 249 For example, for a volume named Share One, the corresponding NFS share is named Share_One to external network computers, but it is named Share One in the BlackPearl user interface. • If you change the name of a volume that is being shared, the share point is maintained after the volume name change.
-
Page 250: Delete A Volume
Snapshots are created instantly without any impact to system performance. Snapshots initially occupy very little space on the storage pool, but grow as data is deleted, because this data must be retained by the snapshot. November 2020 User Guide-BlackPearl Converged Storage System - 250 -... -
Page 251: Create A Snapshot
Action > Show Details. The details screen for that volume displays. Figure 156 The Volume details screen. 3. On the Volume details screen, select Action > New Snapshot. The New Snapshot dialog box displays. November 2020 User Guide-BlackPearl Converged Storage System - 251 -... -
Page 252: Create A Snapshot Schedule
— Create snapshots on certain days of the week. Create an Hourly Schedule 1. On the Volume details screen (see page 251), select Action > New Snapshot Figure 156 on Schedule. The New Snapshot Schedule dialog box displays. November 2020 User Guide-BlackPearl Converged Storage System - 252 -... - Page 253 2. Select Daily as the interval for the snapshot schedule. The dialog box changes to display options for the daily interval setting. Figure 159 The New Snapshot Schedule dialog box showing the daily interval options. November 2020 User Guide-BlackPearl Converged Storage System - 253 -...
- Page 254 6. Select one or more days for Every week on:. This determines the day(s) of each week the system generates snapshots. For example, based on the selections in Figure 160, the system creates a snapshot every Monday, Wednesday, and Friday at 5:00 AM. 7. Click Create. November 2020 User Guide-BlackPearl Converged Storage System - 254 -...
-
Page 255: Delete A Snapshot Schedule
2. Double-click the volume for which you want to delete the snapshot schedule, or select the volume, and then select Action > Show Details. The details screen for that volume displays. November 2020 User Guide-BlackPearl Converged Storage System - 255 -... -
Page 256: Delete Snapshots
2. Double-click the volume you for which you want to delete snapshot, or select the volume, and then select Action > Show Details. The details screen for that volume displays. Figure 162 The Volume details screen showing a snapshot. November 2020 User Guide-BlackPearl Converged Storage System - 256 -... -
Page 257: Restore To A Snapshot
Use the following instructions to restore a volume to its previous state using a previously generated snapshot. 1. From the menu bar, select Configuration > NAS > Volumes, or click the Volumes pane on the Dashboard. The Volumes screen displays (see Figure 126 on page 220). November 2020 User Guide-BlackPearl Converged Storage System - 257 -... - Page 258 4. A dialog box displays, asking you to confirm the rollback. Select Rollback to restore the volume to its state when the snapshot was created. Figure 165 Confirm the volume snapshot rollback. November 2020 User Guide-BlackPearl Converged Storage System - 258 -...
-
Page 259: Retrieve A Single File From A Snapshot
1. From the menu bar, select Configuration > Shares > CIFS. The CIFS Shares screen displays. 2. Select the share you want to edit, and then select Action > Edit. The Edit CIFS Share screen displays. Figure 166 The Edit NFS Share dialog box. November 2020 User Guide-BlackPearl Converged Storage System - 259 -... -
Page 260: Edit An Nfs Share
If you need to delete an NFS share, from the menu bar, select Configuration > Shares > NFS. The NFS Shares screen displays. 2. Select the share you want to delete, and then select Action > Delete. November 2020 User Guide-BlackPearl Converged Storage System - 260 -... -
Page 261: Managing Nas Replication
Cancel a NAS Replication In Progress below. 1. In the BlackPearl user interface, select Configuration > NAS > Volumes. The Volumes screen displays. 2. Double-click the volume name you want to replicate, or select the volume and select Action >... -
Page 262: Cancel A Nas Replication In Progress
Use the steps in this section to cancel a NAS replication. 1. In the BlackPearl user interface, select Configuration > NAS > Volumes. The Volumes screen displays. -
Page 263: Restoring Files From A Nas Replication Target
Disable NAS Replication for a Volume Use the instructions in this section to prevent any further replication from a volume currently configured to use NAS replication. 1. In the BlackPearl user interface, select Configuration > NAS > Volumes. The Volumes screen displays. November 2020... -
Page 264: Edit The Nas Replication Service
4. Clear the Enabled check box. The other options on the dialog box grey out and become un-editable. 5. Click Configure. The volume no longer replicates to the target. Edit the NAS Replication Service 1. On the source system’s BlackPearl user interface, select Configuration > Services to display the Services screen (see Figure 94 on page 183). -
Page 265: Delete The Nas Replication Service Configuration
Data is encrypted using Secure Socket Layer (SSL). 9. Click Save. Delete the NAS Replication Service Configuration 1. On the source system’s BlackPearl user interface, select Configuration > Services to display the Services screen (see Figure 94 on page 183). -
Page 266: Managing Nfi Replication
Figure 175 The NFI service details screen. 3. Select Action > Edit. The Edit NFI dialog box displays. 4. Edit the settings as described in Configure the NFI Service on page 235. 5. Click Save. November 2020 User Guide-BlackPearl Converged Storage System - 266 -... -
Page 267: Delete The Nfi Service Configuration
If desired, you can elect to reinitialize an NFI replication, which transfers all the files in the volume to the BlackPearl target during the next NFI replication. 1. From the menu bar, select Configuration > NAS > Volumes, or click the Volumes pane on the Dashboard. - Page 268 3. Select Action > Reinitialize NFI Transfer. A confirmation window displays. Figure 177 The Reinitialize NFI Transfer confirmation window. 4. Type REINITIALIZE in the entry field and click Reinitialize to reinitialize the NFI transfer. November 2020 User Guide-BlackPearl Converged Storage System - 268 -...
-
Page 269: Restoring Files From An Nfi Target Blackpearl System
Managing NFI Replication Restoring Files From an NFI Target BlackPearl System If files copied to the BlackPearl system using the NFI service are deleted from the NAS, you can retrieve the files from the BlackPearl storage domains using the Spectra EON Browser, Spectra Deep Storage Browser, or a Spectra S3 client. -
Page 270: Chapter 9 - Working With Tape Libraries And Media
Chapter 9 - Working with Tape Libraries and Media Chapter 9 - Working with Tape Libraries and Media This chapter describes using the BlackPearl user interface to perform tasks relating to tape libraries and tape media. Topic Format Tapes page 272 Cancel Tape Format page 273... - Page 271 Chapter 9 - Working with Tape Libraries and Media Topic Online a Tape Drive page 290 Remove a Tape Drive from a Tape Partition page 291 Delete a Tape Partition page 292 Data Migration page 292 November 2020 User Guide-BlackPearl Converged Storage System - 271 -...
-
Page 272: Format Tapes
BlackPearl system, to format a tape before it is inspected, to format a tape that has already been formatted by a BlackPearl system, or to format a tape that currently has reads or writes scheduled. If a tape contains data written by the current BlackPearl system, you must delete the objects and buckets before formatting the tape even if the force parameter is selected. -
Page 273: Cancel Tape Format
The system instructs the library to load the selected tapes into tape drives configured in the library, to format the tape(s) for LTFS. This is the format used by the BlackPearl system. This process can take up to 5 minutes per tape. -
Page 274: Inspect Tapes
APES Tapes are normally inspected automatically by the system. If you use the tape library's user interface to move a tape cartridge in a partition associated with a BlackPearl system, the tape may transition to the Pending Inspection state (see State on page 308) and become... -
Page 275: Eject Tapes
Eject Tapes JECT APES Tape media and the data they contain can be removed from the BlackPearl system by ejecting them. Once tapes are ejected from the system, they can be imported into another BlackPearl system, or stored off site. -
Page 276: Edit Tape Eject Information
Figure 182 The Edit Tape dialog box. 3. Enter information in the Eject Label and Eject Location fields. This information is stored on the BlackPearl database and is visible when re-importing the tape into a BlackPearl system. 4. Click Save. -
Page 277: Eject A Single Tape
Eject Tapes Eject a Single Tape Ejecting a tape moves that tape to the Entry/Exit pool of a Spectra Logic tape library, or the I/O slots of an IBM tape library. Any objects on the exported tape are inaccessible until the tape is re-imported into a storage pool. -
Page 278: Cancel Tape Ejection
If you requested a tape eject but it has not yet started, you can cancel the ejects in progress. Any tapes not already moved to the Entry/Exit pool of a Spectra Logic tape library, or the I/O slots of an IBM tape library are left in the storage partition and are usable by the BlackPearl system. -
Page 279: Import Tapes
Use the instructions in this section to import tape media into the BlackPearl system database. 1. Import the tape media into the Entry/Exit pool of a Spectra Logic tape library, or the I/O slots of an IBM tape library associated with the BlackPearl system as described in your Tape Library User Guides. -
Page 280: Imported Tape Object Name Restrictions For Amazon S3 Replication
• Greater Than symbol (>) • Less Than symbol (<) • Tilde (~) • Pound / hash tag character (#) • Vertical bar / pipe (|) • Non-printable ASCII characters (128–255 decimal characters) November 2020 User Guide-BlackPearl Converged Storage System - 280 -... -
Page 281: Import Blackpearl Foreign Tape(S)
Action > Import Foreign Tape. The Import Foreign BlackPearl Tape or Import All Foreign BlackPearl Tapes dialog box displays. The import settings are the same for importing a single tape or all BlackPearl foreign tapes. -
Page 282: Import Ltfs Foreign Tape(S)
Note: This option is unavailable if you selected Verify Data Prior to Import in Step 6. 8. Click Save. The foreign tape is imported into the BlackPearl system. 9. Repeat Step 2 through Step 8... -
Page 283: Manage Tapes Not In Inventory
If you export a tape cartridge from the tape library inventory before ejecting the tape from the BlackPearl system, the tape displays as “Not in Inventory” on the Tape Management screen. If you cannot, or do not want to re-import the tape into the tape library, use the instructions in this section to mark the tape as “Ejected”. -
Page 284: Delete Lost Or Ejected Tape
Activate a Tape Library Partition If you add a new tape library to your BlackPearl system, or your existing tape library has completed service, you must activate the tape partition in the BlackPearl user interface before the system is able to transfer data to the tape library. -
Page 285: Put A Tape Library Partition Into Standby
Figure 188 The Activate Tape Partition confirmation window. 3. Click Activate. The tape partition is activated and is usable by the BlackPearl system. Put a Tape Library Partition into Standby If you need to perform service on the tape library associated with your BlackPearl system, you must first put the tape library into a standby state. -
Page 286: Edit A Tape Partition
Tape Library and Tape Drive Options 3. Click Deactivate. The tape partition enters the standby state. Note: If you have multiple partitions in the same tape library configured for use by the BlackPearl system, you must repeat steps Step 2 on page 285 Step 3 for each partition in the tape library that requires service. -
Page 287: Reserve Or Make Available A Specified Tape Drive
2. Select the tape partition that contains the drive you want to online in the Tape Partitions pane, and select Action > Show Details. The Tape Partition details screen displays. November 2020 User Guide-BlackPearl Converged Storage System - 287 -... - Page 288 • Select Any to make the drive available for both read and write operations. 5. Using the Minimum Task Priority drop-down menu, select the Minimum Task Priority; the drive is reserved for tasks at or above the selected priority. 6. Click Save. November 2020 User Guide-BlackPearl Converged Storage System - 288 -...
-
Page 289: Offline A Tape Drive
If you need to perform service on a tape drive in the tape library associated with your BlackPearl system, you must first offline the tape drive. Otherwise, the BlackPearl system may attempt to use the tape drive while it is in service. -
Page 290: Online A Tape Drive
If you add a new tape drive to a partition in your tape library, or finish service on an existing tape drive, you must online the tape drive in the BlackPearl user interface before the system is able to transfer data to the tape drive. -
Page 291: Remove A Tape Drive From A Tape Partition
Online Tape Drive. The Online Tape Drive confirmation window displays. Figure 195 The Online Tape Drive confirmation window. 4. Click Activate. The tape partition is now online and is usable by the BlackPearl system. Remove a Tape Drive from a Tape Partition If desired, you can delete a specified tape drive in a tape library partition. -
Page 292: Delete A Tape Partition
Data Migration Delete a Tape Partition If desired, you can delete a specified existing tape partition from the BlackPearl system. Any tapes in the partition that contain data are disassociated from the partition. Any tapes without data on them and all tape drives associated with the partition are deleted from the BlackPearl system configuration. - Page 293 Chapter 9 - Working with Tape Libraries and Media Data Migration 2. If ejecting the older generation of tapes is desired, in the BlackPearl user interface, select Status > Tape Management to navigate to the tape management screen and make a note of all tape barcodes associated with the storage domain.
-
Page 294: Chapter 10 - Operating The Blackpearl System
Chapter 10 - Operating the BlackPearl System Chapter 10 - Operating the BlackPearl System This chapter describes procedures for day-to-day monitoring and operation of the Spectra BlackPearl Converged Storage System. Topic S3 Operations page 295 Download an Object page 295 Cancel Spectra S3 Jobs page 296... -
Page 295: S3 Operations
Spectra S3 client, or the Spectra Eon Browser. For information on using the Spectra Eon Browser, see the BlackPearl Eon Browser User Guide. Use the instructions in this section to download an object through the BlackPearl user interface. Notes: •... -
Page 296: Cancel Spectra S3 Jobs
Cancel Spectra S3 Jobs You can use the BlackPearl user interface to cancel an in-progress Spectra S3 job, or to cancel all S3 jobs, instead of using your Spectra S3 client. Use the instructions in this section to cancel a Spectra S3 job(s). -
Page 297: Edit An S3 Job
Chapter 10 - Operating the BlackPearl System S3 Operations 2. Cancel one or more in-progress jobs. a. Select the job to cancel and then select Action > Cancel or select Action > Cancel All Jobs. The Cancel Job or Cancel All Jobs screen displays. -
Page 298: Clear All Canceled Or Completed Jobs
5. Click Save. Clear All Canceled or Completed Jobs If desired, you can clear completed or canceled jobs from the BlackPearl user interface. 1. From the menu bar, select Status > S3 Jobs to display the S3 Jobs screen. Figure 202 The S3 Jobs screen. -
Page 299: Manually Starting The S3 Data Path Backend
S3 Operations Manually Starting the S3 Data Path Backend If the BlackPearl system is powered off for longer than the timeout value specified in the S3 service options, the data path backend must be manually started. Use the instructions in this section to manually start the data path backend. -
Page 300: Allow New Jobs
4. Click Submit. Allow New Jobs If you have configured the BlackPearl system to no longer accept new S3 jobs, use the instructions in this section to configure the system to allow new jobs. 1. From the menu bar, select Configuration > Services to display the Services screen (see Figure 94 on... -
Page 301: Monitor The Blackpearl System
LACK EARL YSTEM The Visual Status Beacon on the front bezel, and the BlackPearl user interface, combine to provide a number of tools for monitoring the health and performance of the BlackPearl system and its components. • The Visual Status Beacon light bar in the front bezel changes color to indicate the current... -
Page 302: Front Bezel Visual Status Beacon
Configuring the Visual Status Beacon Color on page 303 for more information. Yellow Scroll The system is experiencing a Warning condition. Log in to the BlackPearl user interface to determine the cause of the warning. Red Scroll The system is experiencing an Error condition. Log in to the BlackPearl user interface to determine the cause of the error. -
Page 303: Configuring The Visual Status Beacon Color
Monitor the BlackPearl System Configuring the Visual Status Beacon Color The BlackPearl system is configured to display a purple scrolling light on the Visual Status Beacon when the system is operating normally. If desired, you can change the color displayed for normal operation. -
Page 304: System Status Leds
BlackPearl user interface to determine which fan failed. • If the LED is solid red, it indicates an overheat condition. Check the BlackPearl user interface to view the status of the system. If the problem persists, contact Spectra Logic Technical Support. See Contacting Spectra Logic on page 8. -
Page 305: Check System Messages
If any system messages are generated by the system, the status bar displayed at the bottom of all BlackPearl screens shows the severity, date, and time of the highest severity unread message. If there are no system messages, this text does not display. -
Page 306: View The Status Of Hardware Components
This is especially useful when your BlackPearl system is operating in a “lights out” data center. Check the BlackPearl user interface regularly to ensure that you always know the status of the hardware components. - Page 307 Chapter 10 - Operating the BlackPearl System Monitor the BlackPearl System 1. From the menu bar, select Status > Hardware or click the Hardware pane on the Dashboard, or click the Hardware link on the status bar. The Hardware screen displays.
-
Page 308: View The Status Of Services
Shows the... Turn Beacon On Click Turn Beacon On to cause the Visual Status Beacon light on a BlackPearl system to flash blue. This is useful when you have multiple systems and need to locate a specific one, for example to replace a component. Click the button a second time to stop the light from flashing. -
Page 309: View The Status Of The System Pools
View the Status of the System Pools The System Pools pane of the Advanced Bucket Management screen provides status information about the database and cache pools configured on the BlackPearl system, as well as status information for each system pool. - Page 310 Chapter 10 - Operating the BlackPearl System Monitor the BlackPearl System The System Pools pane displays the following information. This column... Shows... Name The name of each system pool. This name cannot be edited. Health The current health of each system pool.
- Page 311 Chapter 10 - Operating the BlackPearl System Monitor the BlackPearl System 2. To view additional information about a system pool, select the system pool and then select Action > Show Details. The system pool name details screen displays. Figure 213 The BlackPearl_Cache details screen.
-
Page 312: View Bucket Contents
Chapter 10 - Operating the BlackPearl System Monitor the BlackPearl System This row... Shows... Write Performance The number of write performance drives assigned to the pool. Created The timestamp of when the pool was created. Stripe The location of all disks included in the pool. -
Page 313: View Spectra S3 Jobs Information
Chapter 10 - Operating the BlackPearl System Monitor the BlackPearl System View Spectra S3 Jobs Information The S3 Jobs screen displays the status of all Spectra S3 jobs the system is currently processing, all canceled jobs, and all completed jobs. - Page 314 Chapter 10 - Operating the BlackPearl System Monitor the BlackPearl System This column... Shows... Priority The priority for processing the job. The job priority determines the resources assigned and the processing order. Values: Critical, Urgent, High, Normal, Low, Background. Size The amount of data to be transferred by the job.
-
Page 315: View Tape Media Information
View Tape Media Information The Tape Management screen allows you to view the status of all tapes in the associated Spectra Logic or supported tape library, or in a specified bucket. 1. Display the Tape Management Screen: • To view the status of all tapes in the associated tape library, from the menu bar, select Status >... - Page 316 • DATA CHECKPOINT FAILURE DUE TO READ ONLY — The tape should have data on it that is recognizable to the BlackPearl system, but the system could not verify that the data on the tape is at the correct checkpoint or there was an error rolling back to a checkpoint because the tape is read only.
- Page 317 • LTFS WITH FOREIGN DATA— An LTFS formatted tape not associated with a BlackPearl system. This data must be copied into a bucket on this system using a raw import before it is accessible. • OFFLINE — The tape is in the E/E pool and requires user confirmation to move it to the storage pool and make it online.
- Page 318 Chapter 10 - Operating the BlackPearl System Monitor the BlackPearl System This column... Shows... Last Verified The timestamp of the last time data was verified on the tape cartridge, by either a manual verification, or when the number of days specified in the storage domain that owns the tape passed.
- Page 319 Chapter 10 - Operating the BlackPearl System Monitor the BlackPearl System This row... Shows... Tape Library The serial number of the partition on the Spectra Logic Partition or other supported tape library containing the tape cartridge. Assigned to Whether the tape is allocated to a storage domain.
-
Page 320: View Performance Metrics
Monitor the BlackPearl System View Performance Metrics The Performance screen displays performance metrics for the BlackPearl cache, individual data drives, network traffic, and CPUs. Performance graphs can be configured to display either the last 5 minutes of activity, or the last 25 hours. - Page 321 Chapter 10 - Operating the BlackPearl System Monitor the BlackPearl System 7. To see the performance data in greater detail, select the desired section you want to magnify in either the main or range indicator graph. Using the mouse, click and drag the cursor horizontally over the section of the detail graph that you want to magnify.
-
Page 322: View Reports
Chapter 10 - Operating the BlackPearl System Monitor the BlackPearl System View Reports The Reports screen allows you to generate reports on all aspects of the BlackPearl system, including component status, and configuration. Reports can be saved in either JSON or XML format. -
Page 323: Database Backup & Restore
Verify disk pools and tape media so that the database synchronizes with the actual data present on the system. Database backups are stored on a bucket on the BlackPearl system, and kept based on the settings of a preconfigured data policy named “Database Backup”. -
Page 324: Create A Database Backup Schedule
Additionally, creating only one backup a day is recommended. Note: If your BlackPearl system does not contain any permanent local storage, the database backup file must be downloaded manually to your host computer. Create a Database Backup Schedule Database backup schedules can be configured at intervals based on hours, number of days, or days of the week. - Page 325 Chapter 10 - Operating the BlackPearl System Database Backup & Restore 5. Enter a number for Every _ hours on the hour. This value specifies the interval, in hours, between generating backups. For example, if this value is set to 4, the system creates a backup every four hours.
- Page 326 Chapter 10 - Operating the BlackPearl System Database Backup & Restore 2. Select Action > Change Schedule. The Modify Database Backup Schedule screen displays. 3. Select Weekly. The Modify Database Backup Schedule screen changes to display the options for a daily backup schedule.
-
Page 327: Manually Generate A Database Backup
Chapter 10 - Operating the BlackPearl System Database Backup & Restore Manually Generate a Database Backup Use the instructions in this section to create a database backup manually. 1. From the menu bar, select Configuration > Database Backup. The Database Backup screen displays. - Page 328 Chapter 10 - Operating the BlackPearl System Database Backup & Restore There are two ways to restore from a database backup; restoring from a manual or automatic database backup, or restoring from an arbitrary file. Restoring from an arbitrary file is useful if you have copied your database backup files to another bucket.
-
Page 329: Delete Backup
Chapter 10 - Operating the BlackPearl System Database Backup & Restore 3. Enter RESTORE in the entry field, and then click Restore. The database is restored to the state it was in when the backup was generated. Restore Using an Arbitrary File... -
Page 330: Edit Backup Data Policy
Chapter 10 - Operating the BlackPearl System Database Backup & Restore 2. Select the backup you want to delete in the Backups pane, and then select Action > Delete. A confirmation dialog box displays. 3. Enter DELETE BACKUP in the entry field and click Delete. The backup is deleted. -
Page 331: Reboot Or Shut Down A Blackpearl System
EARL YSTEM This section discusses rebooting or shutting down a system. Using the BlackPearl User Interface Use the following instructions to reboot or shutdown a system using the BlackPearl user interface. November 2020 User Guide-BlackPearl Converged Storage System - 331 -... - Page 332 Chapter 10 - Operating the BlackPearl System Reboot or Shut Down a BlackPearl System 1. Click the power icon in the lower right-hand corner of any screen in the BlackPearl user interface. The Power screen displays. Figure 232 The Power icon.
-
Page 333: Power-Cycle Reset
EARL NTERFACE To exit the BlackPearl user interface, close the browser or click Logout on the right side of the menu bar. This ends the session. If the active session is idle for more than the set session timeout, the current user is automatically logged out. -
Page 334: Chapter 11 - Using Autosupport
Chapter 11 - Using AutoSupport Chapter 11 - Using AutoSupport This chapter describes using the BlackPearl user interface to configure the support features of the Spectra BlackPearl Converged Storage System. Topic About AutoSupport page 335 Enter Contact Information page 335 Configure Mail Recipients page 336... -
Page 335: About Autosupport
It is also used to generate AutoSupport Log (ASL) sets for use by Spectra Logic Technical Support. You can configure the system to email ASL sets when critical events occur, or on a monthly basis. You can also choose to have mail recipients receive ASL sets. -
Page 336: Configure Mail Recipients
1. From the menu bar, select Configuration > Mail Recipients. The Mail Recipients screen displays. 2. Select Action > New. The New Mail Recipient dialog box displays. Figure 235 The New Mail Recipient dialog box. November 2020 User Guide-BlackPearl Converged Storage System - 336 -... -
Page 337: Edit A Mail Recipient
(for example, an ampersand, &). Select Select Scheduled Log Sets, Error Log Sets, both options, or neither option for AutoSupport log the mail recipient. Scheduled log sets are sent from the BlackPearl Converged sets to send to this system Storage System on the first of each month. -
Page 338: Send A Test Email
2. From the list of mail recipients, select the name of the recipient you want to receive a test email, and then select Action > Send test email. Figure 237 The Mail Recipients screen. The BlackPearl system immediately sends a test email to the selected account. November 2020 User Guide-BlackPearl Converged Storage System... -
Page 339: Delete A Mail Recipient
Chapter 11 - Using AutoSupport Configure Mail Recipients 3. Verify the user received the email from the BlackPearl system. If the email is not received, verify that you entered the SMTP server settings correctly (see Configure SMTP Settings on page 179). -
Page 340: Log Sets
Chapter 11 - Using AutoSupport Log Sets The BlackPearl system automatically generates log sets when errors occur. Log sets can also be generated manually, or generated on a schedule. The system generates three types of log sets: • Log Sets contain information about the configuration and status of the BlackPearl system and are used for general troubleshooting. -
Page 341: Configure A Log Set Schedule
4. Select one or more days for Every week on:. This determines the day(s) of the week the system generates log sets. 5. Click Create. The Logs screen displays showing the newly created Log Set Schedule. November 2020 User Guide-BlackPearl Converged Storage System - 341 -... -
Page 342: Manually Generate Log Sets
Log Sets Manually Generate Log Sets Although the BlackPearl system auto generates log sets whenever errors occur, you may want to create log sets manually for troubleshooting purposes, or at the request of Spectra Logic Technical Support. Use the following instructions to manually generate a log set. -
Page 343: Email A Log Set
Statistic Log Sets are too large to be emailed from the system, and must be downloaded. See Download a Log Set, below. Figure 242 The Email Log Set dialog box. 3. Select the mail recipients you want to receive the log set, and click Email. November 2020 User Guide-BlackPearl Converged Storage System - 343 -... -
Page 344: Download A Log Set
Action > Delete All Kernel Logs Deletes all kernel log sets on the system. Action > Delete All Data Path Logs Deletes all data path log sets on the system. November 2020 User Guide-BlackPearl Converged Storage System - 344 -... -
Page 345: Chapter 12 - Maintaining The Blackpearl System
BlackPearl cache and database. Performing a data integrity verification on a disk pool is useful when you want to ensure the data on the disk pool is stored correctly. -
Page 346: Cancel Disk Media Verification
The affected files cannot be retrieved from the storage pool, and may need to be transferred to the BlackPearl system again, if the data policy did not specify multiple copies of the data. If you do not have copies of the affected files on your host or another location, they are lost. -
Page 347: Data Integrity Verification - Tape Media
Performing a data integrity verification on a tape cartridge is useful when you want to ensure the data on the tape is stored correctly. Spectra Logic recommends verifying any tape you plan to export from your BlackPearl system and store off-site. -
Page 348: Cancel Tape Media Verification
The replicated system configuration backup stores the current configuration of all settings for the BlackPearl system on a storage pool present in the system. This backup occurs automatically each time you create a storage pool, or once every seven days. If you make major changes to your BlackPearl system, Spectra Logic recommends that you backup the configuration manually. -
Page 349: Accessing The Technical Support Portal
The Spectra Logic Technical Support portal provides access to the Knowledge Base, the current version of BlackPearl software for the system, and additional service and support tools. You can also open or update a support incident and upload log files. - Page 350 Chapter 12 - Maintaining the BlackPearl System Accessing the Technical Support Portal 2. On the home page, click create an account. Figure 245 The Spectra Logic Technical Support portal home page. November 2020 User Guide-BlackPearl Converged Storage System - 350 -...
-
Page 351: Log Into The Portal
Accessing the Technical Support Portal 3. Enter your registration information. Your account is automatically associated with the serial numbers of all Spectra Logic products owned by your site. • If you have an invitation, follow the link and enter the invitation code. -
Page 352: Configuring Automated Software Upload
5. Optionally, select the Email Notifications Only check box to only receive an email when an updated software package is available instead of automatically download the file. 6. Select either Spectra Logic or Use Proxy as the Upload From location. Spectra Logic recommends using the Spectra Logic package server. -
Page 353: Updating Software
PDATING OFTWARE Some problems with the BlackPearl system may be fixed by updating the system’s software. Spectra Logic provides complete support for the most current release of software and one revision back. Customers using previously released software packages are asked to update to the current release as soon as possible. -
Page 354: Check The Currently Released Software Version
Technical Support portal. 2. Select Downloads > Product Software. 3. On the Product Software page, locate the BlackPearl system in the Spectra Product column. The currently released BlackPearl software version is listed in the Current Version column. -
Page 355: Download And Stage The Updated Software
2. Select Downloads > Product Software. The Product Software Screen displays. Figure 250 The Product Software screen. 3. Locate the BlackPearl system in the Spectra Product column. The currently released BlackPearl software version is listed in the Current Version column. 4. Click the name of the BlackPearl package. The package begins downloading through your web browser. -
Page 356: Install The Update
Chapter 12 - Maintaining the BlackPearl System Updating Software 5. From the BlackPearl menu bar, select Support > Software to display the Software screen. Click Choose File. Using your web browser, browse to the location of the update file and select the file to upload. -
Page 357: Replacing A Failed Component
AILED OMPONENT If a component in a BlackPearl system is not functioning properly, the system generates a message and the hardware icon on the status bar of the BlackPearl user interface changes to an error icon (see Status Icons on page 45). - Page 358 Chapter 12 - Maintaining the BlackPearl System Replacing a Failed Component 2. If you have multiple BlackPearl systems, you can use the beacon feature to help locate the system with the failed component. On the Hardware screen, click the server name.
- Page 359 Chapter 12 - Maintaining the BlackPearl System Replacing a Failed Component • The Spectra 96-Drive Chassis Fan Replacement Guide provides instructions for replacing a failed fan in the 96-bay expansion node. • The Spectra 96-Drive Chassis Power Supply Replacement Guide provides instructions for replacing a failed power supply in the 96-bay expansion node.
-
Page 360: Chapter 13 - Troubleshooting And Support
Chapter 13 - Troubleshooting and Support Chapter 13 - Troubleshooting and Support Use the information in this appendix to troubleshoot problems on the Spectra BlackPearl Converged Storage System as they arise, before contacting Spectra Logic Technical Support. Topic page 361 Troubleshooting page 368... -
Page 361: Faq
Chapter 13 - Troubleshooting and Support This section contains answers to frequently asked questions about the BlackPearl system and Spectra tape libraries. • Why does a user need to backup the BlackPearl database? How does a user verify the database backup schedule? below. •... -
Page 362: How Does A User Create A "Bucket Isolated" Data Policy For The Database Backup Tapes
Therefore, scheduling regular backups of the database is a best practice to ensure long term reliable operation. The BlackPearl user interface allows the administrator to set up regular and automatic database backups to both tape and disk, and also allows creation of an off site eject copy. -
Page 363: How Does A User Configure Their T50E Or T120 Library To Support Ejecting Tapes From The Blackpearl System
The BlackPearl eject function allows you to eject tapes from the BlackPearl user interface, which are then moved to the Entry/Exit port on the tape library. In order to use the BlackPearl eject function on a T50e or T120 library, you must configure a single partition and select Standard as the partition’s Entry/Exit Port Mode. -
Page 364: What Happens If The User Ejects The Wrong Tape
Eject has multiple definitions within the system: From the BlackPearl system’s perspective, eject means that a tape has been marked as ejected in the BlackPearl database and an instruction has been given to the tape library to move the tape for ejection from the library. -
Page 365: How Does A User Use Cleaning Media In A T50E Or T120 Library That Does Not Have A Cleaning Partition
In order to use the BlackPearl eject function on a T50e or T120 library, the library can only have a single data partition. In order for drives to be automatically cleaned, you must store cleaning media in the single data partition on your T50e or T120 library. -
Page 366: How Does A User Know If The Tape Media Is Running Out Of Space
Users with adequate permissions for a bucket could also use the BlackPearl user interface, a BlackPearl client, or an S3 browser tool like the Spectra Eon Browser to delete objects from a bucket. When all objects on a tape have been deleted, the tape is automatically reclaimed. -
Page 367: How Does A User Cancel A Write From The Blackpearl Cache To Tape? (Cancel An In-Progress Job)
Configure Mail Recipients on page 336 verify or set up email recipients. Use the information in the message emails, and the Messages screen in the BlackPearl user interface, and the Spectra Logic tape library’s BlueScale user interface, along with the Troubleshooting section page 368... -
Page 368: Generally, How Does A User Upgrade To Later Generations Of Media In The Same Library
LTO-6 drives and media) is allowed to be added to a tape partition as long as a few basic rules are followed: • The BlackPearl system requires that each generation of drives needs to be in its own separate library partition. - Page 369 If the BlackPearl system is connected to a Spectra T50e or T120 library, there cleaning can only be one partition on the library if you want to use the BlackPearl systems’ eject function. If there is cleaning media in the data partition, the BlackPearl system automatically initiates cleaning tape drives using this media.
- Page 370 If you cannot return your tape drives to good status, contact Spectra Logic Technical Support (see Contacting Spectra Logic on page 8). An email is sent Contact Spectra Logic Technical Support (see Contacting Spectra Logic on from the tape page 8). library that a tape...
- Page 371 Troubleshooting Issue Resolution An email is sent If the BlackPearl system detects a media error with a tape cartridge, the from the tape system attempts to roll-back to a previously saved, known good checkpoint. library indicating Use the instructions in this section to resolve a media error.
- Page 372 See Eject Tapes on page 275. The BlackPearl In order to use the BlackPearl eject function on a T50e or T120 library, you system displays an must configure a single partition and select Standard as the partition’s error message Entry/Exit Port Mode.
- Page 373 Tape Library User Guide. Once the tape is re-imported into the tape indicating that a library, use the BlackPearl user interface to Online the tape as described in tape it needs to Import Tapes on page 279. Once the tape has a status of Online, the system...
- Page 374 Either use your client to complete the GET job, or cancel the job as described below. 1. In the BlackPearl user interface, select Status > S3 Jobs. The S3 Jobs screen displays.
- Page 375 Troubleshooting Issue Resolution A system message The BlackPearl system reports a failure to backup the database in the system on the BlackPearl messages. Check the system messages to determine the cause. system indicates 1. In the BlackPearl user interface, select Status > Messages. The Messages that the database screen displays.
- Page 376 1. In the client software, collect a set of logs, if available. 2. Download the Archive Provider logs on to your local host computer. 3. In the BlackPearl user interface, select Support > Logs. The Logs screen displays. 4. Select Action > New Log Set to generate a log set for use in general troubleshooting.
-
Page 377: Resolving A Blackpearl Management Port Ip Address Conflict
ANAGEMENT DDRESS ONFLICT The default address of the BlackPearl management port is set to 10.0.0.2 with a netmask of 255.255.255.0. If your network is already using this IP address, you are not able to access the BlackPearl user interface. One resolution to the issue is to change the IP address of the machine already on your network to a different address. - Page 378 Chapter 13 - Troubleshooting and Support Resolving a BlackPearl Management Port IP Address Conflict 5. Resolve the security certificate warning for the BlackPearl user interface. The warning displays because the system does not have a security certificate. Notes: • Consult your browser documentation for instructions on how to resolve the security certificate warning.
-
Page 379: Network Setup Tips
IP address in your browser and log in again. 15. Disconnect the Ethernet cable from the BlackPearl management port. 16. Connect a cable from your network to the management port on the BlackPearl system. You are now able to connect to the system with the IP address configured. -
Page 380: Configuration
Network Setup Tips Configuration The first step is to configure the management and data ports using the BlackPearl user interface or the command line interface. Do not attempt to access the system directly and use the root console to modify interfaces. The web and command line interfaces are tightly integrated with the base operating system and configure additional system features based on network changes. - Page 381 Manually configure LACP on the switch ports. LACP does not get enabled automatically. For example, if only a single host is connected to the BlackPearl system through a link aggregated connection, the measured performance is lower than the potential maximum transfer rate because only one physical port of the two port link aggregation is being utilized by the switch.
-
Page 382: Troubleshooting
From your network, use the “ping” command (see Ping on page 383) to test the assigned IP address for the BlackPearl management port or data port. If this is not successful, use the following troubleshooting tips to ascertain if the problem is a network setup issue. Troubleshooting Port Link LED Does Not Light •... -
Page 383: Tools
A response of 0 msec means that the time was less than 1 ms. If the request times out, then check the settings on the switch to which the BlackPearl system is connected. -
Page 384: Spectra Logic Technical Support
UPPORT Spectra Logic Technical Support provides a worldwide service and maintenance structure. Before Contacting Support If you have a problem with your BlackPearl system, use the information in this section to attempt to resolve the problem. System Messages If you are encountering problems, review any System Messages that were posted (see... -
Page 385: Determine System Serial Number
Spectra Logic Technical Support Determine System Serial Number If you have more than one BlackPearl system, it is necessary to determine the serial number of the system before contacting Spectra Logic Technical Support. Use the following steps to determine the system serial number. - Page 386 Open a New Incident. Note: You must perform a search before you are able to open a new support incident. Figure 263 The Open or View Incidents page. November 2020 User Guide-BlackPearl Converged Storage System - 386 -...
- Page 387 When you are finished, click Create Incident. Figure 264 The Create Incident page. • If it is within the hours of coverage provided by your support contract, contact Spectra Logic Technical Support by telephone. See Contacting Spectra Logic on page 8.
-
Page 388: Remote Support
• If you are running BlackPearl 4.x or later, the primary administrator account is named “Administrator”. • If you have upgraded from BlackPearl 3.x to BlackPearl 4.0 or later, the settings and permissions of the primary administrator account are migrated from the “Spectra”... - Page 389 Configure Network Connections and Settings on page 171 for more information. 5. Click Save. After Spectra Logic Technical Support informs you that they no longer require root access to the system, you should disable Remote Support to prevent any IMPORTANT potential unauthorized access. See...
-
Page 390: Disabling Remote Support
• If you are running BlackPearl 4.x or later, the primary administrator account is named “Administrator”. • If you have upgraded from BlackPearl 3.x to BlackPearl 4.0 or later, the settings and permissions of the primary administrator account are migrated from the “Spectra”... - Page 391 Chapter 13 - Troubleshooting and Support Remote Support Figure 266 The Edit User dialog box. 3. Clear the Enable Remote Support check box. 4. Click Save. November 2020 User Guide-BlackPearl Converged Storage System - 391 -...
-
Page 392: Appendix A - Ipmi Configuration
Changing any other setting is not supported by Spectra Logic and may cause adverse system performance. 1. If the BlackPearl system is currently powered on, shut down the system as described in Reboot or Shut Down a BlackPearl System on page 331. - Page 393 LAN1 port for IPMI traffic. 8. If desired, select VLAN to enable or disable VLAN as needed. 9. To change the IPMI address settings, select Configuration Address source. The current address source information displays. November 2020 User Guide-BlackPearl Converged Storage System - 393 -...
- Page 394 11. Configure the Station IP address, Subnet mask, and Router IP address with the desired address values. Note: Only IPv4 addresses are valid. 12. Press F4 to exit the BIOS and save the entered settings. The BlackPearl system reboots. November 2020 User Guide-BlackPearl Converged Storage System - 394 -...
-
Page 395: Appendix B - Specifications
Appendix B - Specifications Data Storage Specifications Appendix B - Specifications This appendix provides detailed specifications for the BlackPearl systems, the 44-bay expansion node, 96-bay expansion node, and the 107-bay expansion node. The specifications listed here pertain to the currently shipping BlackPearl chassis. -
Page 396: Drive Specifications
96-Bay Expansion Node Drive Purpose Specification Storage Pools or NAS 8, 12, or 16 TB Spinning-Disk SATA ) 1 GB is defined as 1,000,000,000 bytes. ) 1 TB is defined as 1,000,000,000,000 bytes. November 2020 User Guide-BlackPearl Converged Storage System - 396 -... -
Page 397: Capacity
• 12 TB Spinning-Disk Self-Encrypting Drives Capacity Parameter Specification BlackPearl 4U System object cache 10 - 4 TB drives - 40 TB capacity using spinning-disk drives 10 - 8 TB drives - 80 TB 10 - 12 TB drives - 120 TB... -
Page 398: System Specification
107 - 16 TB drives - 1712 TB YSTEM PECIFICATION The following table provides an overview of the system devices installed in the BlackPearl systems. ) A 44-bay expansion node with an active bezel requires a Visual Status Beacon control sled installed in one drive storage slot. - Page 399 ) One port is available for data transfers, one port is dedicated to the BlackPearl user interface for system management. ) Each optional SAS card is used to connect the BlackPearl master node to disk expansion nodes or SAS tape drives. If your installation does not include an expansion node or SAS tape drives, the card is not installed.
-
Page 400: Size And Weight
• 4 HDDs & 2 SSDs 46.7 lb (21.2 kg) 67.7 lb (30.7 kg) • 9 HDDs & 2 SSDs 55.7 lb (25.3 kg) 76.7 lb (34.8 kg) BlackPearl 4U System and 44-Bay Expansion Node Parameter BlackPearl 4U System Shipping Container and 44-Bay Expansion Node Dimensions •... - Page 401 336 lb (152.4 kg) mounting kit 265 lb (120.2 kg) • Fully loaded chassis ) Includes the front bezel. Excludes cable management arm. ) Weights are approximate. ) Includes chassis and packaging. November 2020 User Guide-BlackPearl Converged Storage System - 401 -...
-
Page 402: Environmental Specifications
(-61 meters to 12,192 meters) 3,048 meters) ) When moving the BlackPearl system or expansion node from a cold storage environment to a warm operating environment, it must acclimate in its packaging for at least 12 hours before opening to prevent serious condensation damage. -
Page 403: 107-Bay Expansion Node
-200 feet to 10,000 feet -200 feet to 40,000 feet (-61 meters to (-61 meters to 12,192 meters) 3,048 meters) Heat Generation The following table shows the heat generation of each BlackPearl chassis. Chassis Heat Generation at Maximum Wattage BlackPearl 2U master node 3138 BTUs/hour... -
Page 404: Power Requirements
Appendix B - Specifications Power Requirements OWER EQUIREMENTS The BlackPearl systems, 44-bay, 96-bay, and 107-bay expansion nodes, have the following power requirements. Failure to meet the cabling and power specifications could damage your system, CAUTION result in data loss, or both. -
Page 405: Power Cord Specifications
Cables provided by Spectra Logic are between 6 ft (1.8m) to 6.5 ft (2m) in length. If you need to use a longer cord, make sure it conforms to the specifications listed below. - Page 406 Parameter Specification Power cordage SJT type, three-conductor, 14 AWG minimum Power input connectors BlackPearl 2U and 4U Master Node: Male: Connector must be of the proper type, rating, and safety approval. Female: IEC 60320 C13 44-Bay Expansion Node: Male: Connector must be of the proper type, rating, and safety approval.
- Page 407 1.7 square millimeters (0.0026350 square inches). Power input connectors BlackPearl 2U and 4U Master Node: • Male: Connector must be of the proper type, rating, and safety approval. • Female: IEC 60320 C13 44-Bay Expansion Node: •...
-
Page 408: Interface Specifications
Appendix B - Specifications Interface Specifications NTERFACE PECIFICATIONS This section provides information about the interfaces used to connect a BlackPearl system to expansion nodes, tape drives, and host systems. Note: For “Interface Specifications” for the BlackPearl 1.0 chassis, see "BlackPearl 1.0 Chassis Overview &... -
Page 409: Expansion Node And Tape Drive Interface Connectors
• T50e library: Two SFF-8088 ports per tape drive. Only a single port is required to connect the tape drive to a BlackPearl system. Either port can be used for the connection. • All other libraries: One SFF-8088 port per tape drive. -
Page 410: Interface Cables
Interface Specifications Interface Cables The type of cables required to connect the BlackPearl system to an Ethernet network, a 44- bay, 96-bay, or 107-bay expansion node, a SAS tape drive, or a Fibre Channel tape drive depend on the type of interface. -
Page 411: Universal Serial Bus (Usb) Support
Appendix B - Specifications Interface Specifications Universal Serial Bus (USB) Support Spectra Logic supports using the USB ports on the system for the following: • USB mass storage devices (for example, flash drives) • Keyboards & pointer devices (for example, a computer mouse) •... -
Page 412: Appendix C - Installation Checklist
Appendix C - Installation Checklist Appendix C - Installation Checklist This chapter provides a checklist for installing a BlackPearl system. If your BlackPearl system was installed by Spectra Logic Professional Services, all of the applicable steps in this checklist were performed by the installer. - Page 413 Appendix C - Installation Checklist Install and Configure the Spectra BlackPearl system Date Completed Install HBAs in the system. See The Spectra 12-Drive Chassis & 36-Drive Chassis HBA Installation guide. Rack mount the system and 44-bay expansion nodes. See the BlackPearl Rack Mounting Guide for instructions.
- Page 414 Appendix C - Installation Checklist Install and Configure the Spectra BlackPearl system Date Completed Check if tapes are ready for use. See View Tape Media Information on page 315. Tapes should have a status of Managed, Managed Format in Progress, Managed Format Pending, or Pending Inspection.
-
Page 415: Appendix D - Blackpearl 1.0 Chassis Overview & Specifications
System Specification page 420 Interface Specifications page 420 OMPONENTS The following sections show the locations of and briefly describe the BlackPearl 1.0 chassis major front and rear panel components. Front View Figure 270 Figure 271 show the components on the front of the BlackPearl systems with the front bezel removed. - Page 416 Data drives drives in the front of the chassis. The drive sleds slide into bays in BlackPearl enclosure and lock in place. The front of each drive sled has a handle for removing the sled from the chassis and a latch for locking the drive sled in place.
-
Page 417: Rear View
The drive sleds slide into bays in the BlackPearl enclosure and lock in place. The front of each drive sled has a handle for removing the sled from the chassis and a latch for locking the drive sled in place. -
Page 418: Rear Panel
Appendix D - BlackPearl 1.0 Chassis Overview & Specifications Components Component Description Note: The BlackPearl 2U system does not have data drives in the rear of the chassis. Empty drive sleds Empty drive sleds are installed in the unused drive bays to prevent (BlackPearl 4U contaminants from entering the enclosure and to maintain proper air flow. -
Page 419: Specifications
BlackPearl system. An optional SAS or Fibre Channel card provides connectivity between the BlackPearl system and tape drives in a Spectra Logic tape library. The BlackPearl management port is used to connect to a browser-based user BlackPearl interface to configure, manage, and monitor the BlackPearl system. -
Page 420: System Specification
Appendix D - BlackPearl 1.0 Chassis Overview & Specifications Specifications System Specification The following table provides an overview of the system devices installed in the BlackPearl systems. BlackPearl 2U System Parameter Specifications One multi-core processors System disk drives Two 250 GB SATA disk drives... - Page 421 Two SFP+ optical modules with LC connectors per optional Fibre Channel card Network Interface Cables The type of cables required to connect the BlackPearl system to the network depend on the type of interface being used. Interface Type Cable Requirements Ethernet (GigE) Shielded Category 5 (10/100BaseT connection)
-
Page 422: Appendix E - Regulatory & Safety Standards
EU Declaration of Conformity Appendix E - Regulatory & Safety Standards The Spectra BlackPearl Converged Storage System complies with the safety and regulatory agency standards listed below when installed by a Spectra Logic certified engineer or third- party provider. EU D ECLARATION OF... - Page 423 Essential health and safety requirements relating to electrical equipment Directive 72/336/EEC designed for use with certain violate limits. EN 60950-1 Safety requirements of information technology equipment including (EN 60950-1) electrical machines. November 2020 User Guide-BlackPearl Converged Storage System - 423 -...
- Page 424 Appendix E - Regulatory & Safety Standards EU Declaration of Conformity November 2020 User Guide-BlackPearl Converged Storage System - 424 -...
- Page 425 Appendix E - Regulatory & Safety Standards EU Declaration of Conformity November 2020 User Guide-BlackPearl Converged Storage System - 425 -...
-
Page 426: Certifications
Converged Storage System system on uninterruptable power supplies. ) The BlackPearl 4U System is regulatory model number "826-9", The BlackPearl 2U System is regulatory model number "847-12". The 44-Bay Expansion Node is regulatory model number "847JBOD-14", The 96-Bay Expansion Node is regulatory model number "BSP-5". The 107-Bay Expansion Node is regulatory model number "JBOD 108"... -
Page 427: Fcc Notice
MISSIONS ARNING AFETY TANDARDS AND OMPLIANCE The Spectra BlackPearl Converged Storage System system complies with the following domestic and international product safety standards. • EN 60950-1 Second Edition • UL 60950-1 Second Edition • CSA-C22.2 No. 60950-1-03 • Low Voltage Directive (EU: CE Mark) -
Page 428: Waste Of Electronic And Electrical Equipment (Weee) Directive
The RoHS marking indicates that this product is in compliance with European Council Directive 2011/65/2008, on the restriction of the use of certain hazardous substances in electrical and electronic equipment. ECYCLING YSTEM For information on recycling your Spectra appliance, check the Spectra Logic website at: spectralogic.com/environment. ONFLICT INERALS OLICY... - Page 429 Appendix E - Regulatory & Safety Standards Conflict Minerals Policy Affected suppliers to Spectra Logic will be required to commit to being or becoming “conflict-free” (which means that such supplier does not source conflict minerals) and sourcing, where possible, only from conflict-free smelters. Each affected supplier to Spectra...
-
Page 430: Appendix F - Open Source Code Acknowledgements & Package List
This appendix contains the licenses and notices for open source software used in the BlackPearl Converged Storage System product. If you have any questions or want to receive a copy of the free/open source software to which you are entitled under the applicable... -
Page 431: Java
YOU DO NOT WISH TO BE BOUND BY THE TERMS, THEN SELECT THE "DECLINE LICENSE AGREEMENT" (OR THE EQUIVALENT) BUTTON AND YOU MUST NOT USE THE SOFTWARE ON THIS SITE OR ANY OTHER MEDIA ON WHICH THE SOFTWARE IS CONTAINED. November 2020 User Guide-BlackPearl Converged Storage System - 431 -... - Page 432 Programs. THE LICENSE SET FORTH IN THIS SECTION 2 DOES NOT EXTEND TO THE COMMERCIAL FEATURES. YOUR RIGHTS AND OBLIGATIONS RELATED TO THE COMMERCIAL FEATURES ARE AS SET FORTH IN THE SUPPLEMENTAL TERMS ALONG WITH ADDITIONAL LICENSES FOR DEVELOPERS AND PUBLISHERS. November 2020 User Guide-BlackPearl Converged Storage System - 432 -...
- Page 433 Upon termination, you must destroy all copies of Software. November 2020 User Guide-BlackPearl Converged Storage System - 433 -...
- Page 434 Agreement. No modification of this Agreement will be binding, unless in writing and signed by an authorized representative of each party. SUPPLEMENTAL LICENSE TERMS November 2020 User Guide-BlackPearl Converged Storage System - 434 -...
- Page 435 Programs and/or Software. The license set forth in this Section C does not extend to the Software identified in Section G. November 2020 User Guide-BlackPearl Converged Storage System - 435 -...
- Page 436 Programs and/or Software. The license set forth in this Section D does not extend to the Software identified in Section G. November 2020 User Guide-BlackPearl Converged Storage System - 436 -...
- Page 437 G. LIMITATIONS ON REDISTRIBUTION. You may not redistribute or otherwise transfer patches, bug fixes or updates made available by Oracle through Oracle Premier Support, including those made available under Oracle's Java SE Support program. November 2020 User Guide-BlackPearl Converged Storage System - 437 -...
-
Page 438: Samba
You can find more information about the data Oracle collects as a result of your Software download at http://www.oracle.com/technetwork/java/javase/documentation/index.html. AMBA Samba is provided under the terms of the GNU General Public License (GPL version 3) November 2020 User Guide-BlackPearl Converged Storage System - 438 -... -
Page 439: Nginx
Ruby is copyrighted free software by Yukihiro Matsumoto <matz@netlab.jp>. You can redistribute it and/or modify it under either the terms of the 2-clause BSDL (see the file BSDL), or the conditions below: November 2020 User Guide-BlackPearl Converged Storage System - 439 -... - Page 440 6. THIS SOFTWARE IS PROVIDED “AS IS” AND WITHOUT ANY EXPRESS OR IMPLIED WARRANTIES, INCLUDING, WITHOUT LIMITATION, THE IMPLIED WARRANTIES OF MERCHANTABILITY AND FITNESS FOR A PARTICULAR PURPOSE. November 2020 User Guide-BlackPearl Converged Storage System - 440 -...
-
Page 441: Ruby On Rails
IN CONNECTION WITH THE SOFTWARE OR THE USE OR OTHER DEALINGS IN THE SOFTWARE. COMMON DEVELOPMENT AND DISTRIBUTION LICENSE (CDDL) Version 1.0 NCLUDED ACKAGES alsa-lib-1.1.2 apr-1.6.2.1.6.0 atf-0.21 avahi-app-0.7_2 bash-4.4.12_2 black_pearl-2.3_1 bluestorm_backend-2.0.1699941_7 bluestorm_frontend-2.1.1719512 bluestorm_gui-2.0.1717812_2 bluestorm_mgmt-2.0.1716751 bluestorm_tests-2.0.1657344_1 bluestorm_workers-2.0.1719648_6 November 2020 User Guide-BlackPearl Converged Storage System - 441 -... - Page 442 November 2020 User Guide-BlackPearl Converged Storage System - 442 -...
- Page 443 November 2020 User Guide-BlackPearl Converged Storage System - 443 -...
- Page 444 November 2020 User Guide-BlackPearl Converged Storage System - 444 -...
- Page 445 November 2020 User Guide-BlackPearl Converged Storage System - 445 -...
- Page 446 November 2020 User Guide-BlackPearl Converged Storage System - 446 -...
- Page 447 November 2020 User Guide-BlackPearl Converged Storage System - 447 -...
- Page 448 November 2020 User Guide-BlackPearl Converged Storage System - 448 -...
- Page 449 November 2020 User Guide-BlackPearl Converged Storage System - 449 -...
- Page 450 November 2020 User Guide-BlackPearl Converged Storage System - 450 -...
- Page 451 Appendix F - Open Source Code Acknowledgements & Package List Included Packages rubygem-web-console-3.5.1 rubygem-websocket-driver-0.6.5_1 rubygem-websocket-extensions-0.1.2 rubygem-xpath-2.1.0 rubygem-yard-0.9.9 rubygem-zfs-0.0.12.1642179 samba48-4.8.11_2 sedutil-1.0.1643852 sg3_utils-1.42 smartmontools-7.0 smp_utils-0.98_1 spectra_ltfs-2.4.1.0.1698234_2 sqlite3-3.22.0_1 staf-3.4.23_3 t5seeprom-0.0.1366684_1 talloc-2.1.14 tdb-1.3.16,1 tevent-0.9.37 tidy-html5-5.4.0_2 tmux-2.5 tomcat-native-1.2.12 tomcat85-8.5.16_1 verde_hotpair-2.1.1679414 vim-8.0.0702 xproto-7.0.31 zip-3.0_1 zsh-5.3.1_1 November 2020 User Guide-BlackPearl Converged Storage System - 451 -...
-
Page 452: Index
400 Cleans Remaining report 366 specifications 398, 420 Cleans Remaining, MLM report 366 updating 353 component OK icon 45 BlackPearl data replication rule components about 132 front view 32, 415 add to data policy 132 rear panel 36, 418... - Page 453 227 EU Declaration of Conformity 422 SMTP 179 snapshots 250 user 201 Conflict Mineral Policy 428 fax numbers, Spectra Logic 8 contact information, enter 335 FCC Notice 427 contacting Spectra Logic 8 Free BSD contacting, Technical Support 384 open source acknowledgement 430...
- Page 454 NAS volumes add 336 about 215 configure 336 configure 220 mailing address, Spectra Logic 8 create new CIFS share 227 maintenance, replace component 357 create new NFS share 232 management port, use 172 create snapshot 251 MIB file, download 192...
- Page 455 206 S3 service configure 183 performance metrics 320 Safety Standards and Compliance 427 phone numbers, Spectra Logic offices 8 sales, contacting 8 pools, see NAS storage pools, nearline serial number disk pools, or online disk pools 215 where to find 385...
- Page 456 404 portal 349, 351 power cords 405 contacting 8 size and weight 400 See also portal[technical support system 398, 420 Spectra Logic zzz] 387 contacting 8 typographical conventions 25 Spectra S3 clients 69 online forum 27 status lights 304...
- Page 457 201 types 201 Visual Status Beacon, lights 302 volumes, see NAS volumes 215 warning icon 45 website Spectra Logic 8 WEEE Directive 428 WORM tape media, not supported 72, 109, 272, 368 ZFS, open source acknowledgement 441 - 457 -...
Need help?
Do you have a question about the BlackPearl and is the answer not in the manual?
Questions and answers