Table of Contents
Advertisement
Advertisement
Table of Contents

Related Manuals for Baumatic BTC2.1SSS


Summary of Contents for Baumatic BTC2.1SSS
- Page 1 BTC2.1SS 30 cm 2 Hyperspeed zone domino hob...
- Page 2 User Manual for your Baumatic BTC2.1SS 30 cm Front touch control 2 hyperspeed zone ceramic hob. NOTE : This User Instruction Manual contains important information, including safety & installation points, which will enable you to get the most out of your appliance. Please keep it in a safe place so that it is easily available for future reference;...
-
Page 3: Table Of Contents
Unpacking the appliance Installing the appliance Electrical connection Connecting the mains supply cable Replacing the mains supply cable My appliance isn’t working correctly Baumatic Ltd. Conditions of Guarantee Contact details 5 – 8 14 - 15 15 - 16 16 - 17 17 - 18 18 –... -
Page 4: Environmental Note
Environmental note o The packaging materials that Baumatic uses are environmentally friendly and can be recycled. o Please discard all packaging material with due regard for the environment. -
Page 5: Important Safety Information
You should not use this appliance to store items on or as a work surface. o No modifications to the appliance are permitted by Baumatic Ltd. o You should not store or place flammable or highly flammable liquids/materials on top of or near the appliance. Items made from aluminium, plastic or plastic film should also be kept away from the appliance, as they may fuse to the surface. - Page 6 Baumatic strongly recommend that babies and young children are prevented from being near to the appliance and not allowed to touch the appliance at any time. During and after use, all surfaces will be hot. o If it is necessary for younger family members to be in the kitchen, please ensure that they are kept under close supervision at all times.
-
Page 7: Declaration Of Conformity
Please see the specific section of this booklet that refers to installation. o Baumatic Ltd. declines any responsibility for injury or damage, to person or property, as a result of improper use or installation of this appliance. -
Page 8: Specifications
dragged. o Cooking zones should not be switched on without cookware placed on it. Also the cookware should not be empty. o Food or liquid that has high sugar content may damage the hob top if it comes into contact with the ceramic hob surface. Any spillages should be wiped up immediately, however this may not prevent the hob surface from becoming damaged. -
Page 9: Optional Extras
BTJS Joining strip for domino hobs Electrical details Rated Voltage: Supply Connection: Max Rated Inputs: Mains Supply Lead: For future reference please record the following information which can be found on the rating plate and the date of purchase which can be found on your sales invoice. -
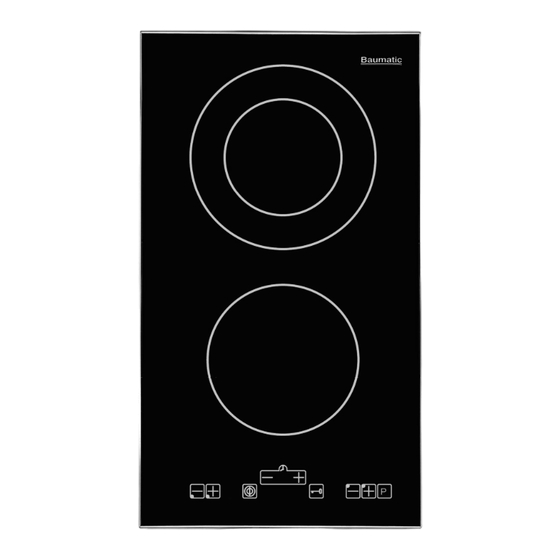
Page 10: Ceramic Hob Surface Layout
Control panel layout ON/OFF button Safety lock button Safety lock neon Minus button Plus button Cooking zone indicator Decimal point symbol Double hyperspeed zone dual circuit ON/OFF button Timer minus button Timer plus button Timer display Timer neon Double hyperspeed zone dual circuit indicator neon... -
Page 11: Using The Ceramic Hob
sing the ceramic hob efore first use PORTANT: You should clean the ceramic hob surface (see “Cleaning and maintenance” section). You should switch on one cooking zone at a time, for 5 minutes at the maximum setting. This will help to eliminate any new smell that exists and evaporate any humidity that has formed the heating elements during transit. -
Page 12: Turning On A Zone And Setting A Power Level
MPORTANT: A zone must be selected within 10 seconds of turning the hob on. o Press the plus (5) button for the zone that o Adjust the zone between power levels 1 urning on the dual circuit zones he double hyperspeed zone has two cooking areas that you can use, a central section and an outer section. -
Page 13: Turning Off The Double Hyperzone's Outer Section
o Both zones of the dual circuit most be switched on. o Press the double hyperspeed zone dual circuit ON/OFF button (8). o The double hyperspeed dual circuit indicator neon (13) will go out and the outer section will switch off. urning off a zone gradually urning off a zone instantly o An “H”... -
Page 14: Turning The Hob Off
nce you have switched off all of the cooking zones, you should turn off the hob. o Press the ON/OFF button (1). o It is possible to turn the hob off at any time esidual heat indicator o After a zone is switched off, the corresponding cooking zone indicator (6) will show the letter “... -
Page 15: Safety Cut-Off
lock feature is activated, then it will still be activated the next time that you turn the appliance on. Therefore before you can turn on a zone and set it to a power level, you will need to deactivate the safety lock by pressing the safety lock button afety cut-off o If one or more of the cooking zones are accidentally left on, a safety cut off will activate after a certain period of time. -
Page 16: Increasing The Power Level During Automatic Pre-Heating
stop flashing and the power level that you have selected will appear on the cooking zone indicator (6). o Once the automatic pre-heating time period is over, the hob will beep once and the decimal point symbol will go out. o The period of time that a zone will automatically pre-heat for before dropping to the actual power level, is shown in the table below:-... -
Page 17: The Hob Timer
will not switch off the zone, it will still be necessary for you to do this manually. The hob timer o Touch either the plus (10) or minus (9) buttons of the timer. If you press the minus button (9) “99” will appear on the timer display (11), if you press the plus button (10) “00”... -
Page 18: Hob Guidelines
the other zone in use, it will not switch off at the end of the countdown time. o If you wish to cancel the timer setting before it reaches the end of the countdown period, press the plus (10) and minus (9) buttons of the timer simultaneously. -
Page 19: Cleaning And Maintenance
Especially if pointed or hard objects are allowed to fall on it with some force. o DO NOT USE THE HOB IF THE SURFACE BECOMES BROKEN OR CRACKED. YOU SHOULD CONTACT THE BAUMATIC SERVICE DEPARTMENT IMMEDIATELY. Cleaning and maintenance Cleaning operations must only be carried out when the oven is cool. -
Page 20: After Each Use
o Wipe the appliance over with a damp cloth. o Dry the appliance by rubbing the surface with a clean cloth. Cleaning table Type of deposit Remove immediately? Sugar or food/liquid containing sugar Tin foil or plastic Fat splashes Metallic discolorations Water splashes or water rings... -
Page 21: Using A Specialist Ceramic Hob Cleaner
It is possible to purchase specialist ceramic hob cleaner/conditioner. You should follow the instructions given by the manufacturer of the specialist ceramic hob cleaner. You should ensure that it is suitable for use on your appliance. Installation The installation must be carried out by a suitably qualified person, in accordance with the current version of the following. -
Page 22: Unpacking The Appliance
When unpacking the appliance please check that the following items are contained within the packaging: 1 Baumatic hob 1 Ceramic hob scraper 1 Installation and instruction manual 1 Baumatic guarantee card 4 Fixing brackets 4 Fixing screws 4 Spring clips 1 Sealing strip... - Page 23 o Apply the sealing strip provided around the edge of the appliance. o The protective covering must be removed from both sides. o Do not leave a gap in the sealing agent or overlap the thickness. o IMPORTANT: Do not use a silicon sealant to seal the appliance against the aperture.
-
Page 24: Electrical Connection
This appliance must be installed by a qualified person in accordance with the latest edition of the I.E.E. Regulations and in compliance with Baumatic’s instructions. Before connecting the appliance, make sure that the supply voltage marked on the rating plate corresponds with your mains supply voltage. -
Page 25: Replacing The Mains Supply Cable
mains supply by means of a 13A plug and socket. o The cable can be looped if necessary, but make sure that is not kinked or trapped when the hob is in position. Care must be taken to avoid the cable being in contact with hot parts of the appliance. -
Page 26: My Appliance Isn't Working Correctly
* IMPORTANT: If the cooking zone does appear to be hotter than 60°C and the residual heat indicator has not come on, you should call the Baumatic Service Department. o A humming sound is heard when a cooking zone is selected. - Page 27 Or any installation other than the one specified by Baumatic Ltd. has been completed. Please refer to the conditions of guarantee document on page 28 of...
-
Page 28: Baumatic Ltd. Conditions Of Guarantee
Baumatic appliance. * In addition, your appliance is covered by a 5 year parts warranty. Baumatic Ltd will provide free of charge the parts required to repair the appliance, only if they are fitted by a Baumatic engineer, for any defect that arises due to faulty materials or workmanship within a period of 5 years from the original purchase date. -
Page 29: Contact Details
Headquarters Baumatic Ltd. Baumatic Buildings, 6 Bennet Road, Reading, Berkshire RG2 0QX, United Kingdom Sales Telephone +44 118 933 6900 Sales Fax +44 118 931 0035 Service Telephone +44 118 933 6911 Service Fax +44 118 986 9124 Spares Telephone...
Need help?
Do you have a question about the BTC2.1SSS and is the answer not in the manual?
Questions and answers