Table of Contents

Related Manuals for Thermo Scientific Microm HM 430


Summary of Contents for Thermo Scientific Microm HM 430
- Page 1 Thermo Scientific Sliding Microtome Microm HM 430 Thermo Scientific Sliding Microtome Microm HM 430 Instruction Manual Microm International GmbH part of Thermo Fisher Scientific Otto-Hahn-Str. 1A 69190 Walldorf / Germany 387 756 - English...
- Page 2 Thermo Scientific Sliding Microtome Microm HM 430 Microm International GmbH part of Thermo Fisher Scientific Otto-Hahn-Str. 1A 69190 Walldorf / Germany 387 756 - English...
- Page 3 1 year. Parts which prove to be defective during the warranty period will be repaired or replaced free of charge by Thermo Scientific. No other warranty is expressed or implied. Unauthorized modification or repair by third party persons will void the warranty.
- Page 4 Before operating the instrument, please read these instructions carefully to familiarize you with its proper operation and functions. The Thermo Scientific Sliding Microtome Microm HM 430 is a highly efficient sliding microtome for paraffin sectioning in routine. Only skilled or specially trained personnel must operate the microtome, i.e.
- Page 5 Thermo Scientific Sliding Microtome Microm HM 430 Intended use Table of contents Safety Precautions Part 1 Introduction Description of the Sliding Microtome HM 430 Technical Data HM 430 Part 2 Operating Instructions Setting up the microtome Cutting movement Locking the sledge...
-
Page 6: Table Of Contents
Thermo Scientific Sliding Microtome Microm HM 430 Part 4 Working with the microtome Preparation and orientation Coarse feed Sectioning instructions 4-3-1 Condition of the knife edge 4-3-2 Clean knife surfaces How to avoid malfunctions 4-4-1 Preparation of the specimen 4-4-2... - Page 7 Thermo Scientific Sliding Microtome Microm HM 430 SAFETY PRECAUTIONS WARNING SIGNALS AND SYMBOLS The installation and routine use of the Sliding Microtome HM 430 is easy and safe if the instructions in this manual are being observed. Note: Special instructions regarding operation of the instrument.
- Page 8 Please observe the following general precautions during operation of this instrument. Failure to comply with these precautions violates safety standards and the intended use of the instrument. Thermo Scientific is not liable for misuse of the instruments and failure to comply with basic safety requirements.
- Page 9 Thermo Scientific Sliding Microtome Microm HM 430 HAZARD OF INFECTION Specimens used during the intended operation of the instrument might potentially be infectious. For this reason, it is recommended to observe the general laboratory regulations concerning protection against danger of infection.
- Page 10 Thermo Scientific Sliding Microtome Microm HM 430 Fig. 1 Microm International GmbH part of Thermo Fisher Scientific Otto-Hahn-Str. 1A 69190 Walldorf / Germany 387 756 - English...
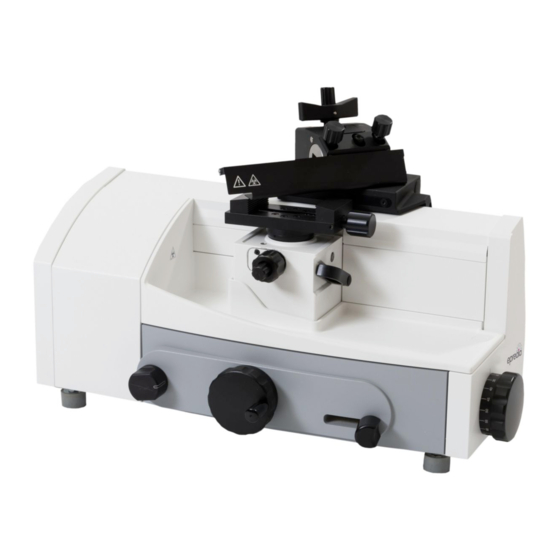
- Page 11 PART 1 INTRODUCTION DESCRIPTION OF THE SLIDING MICROTOME HM 430 The sliding microtome HM 430 from Thermo Scientific is a highly efficient instrument for sectioning paraffin in routine and research. The main applications are in human and veterinary medicine. Large and hard specimens from pharmaceuticals industry or from quality assurance labs can also be sectioned.
- Page 12 Thermo Scientific Sliding Microtome Microm HM 430 TECHNICAL DATA HM 430 Microtome: Section thickness range: ..........0,5 - 60 µm Resolution: ..........0,5 µm for 0 ... 5 µm ............... 1 µm for 5...10 µm ..............2 µm for 10...20 µm ..............
- Page 13 Thermo Scientific Sliding Microtome Microm HM 430 PART 2 OPERATING INSTRUCTIONS 2-1 SETTING UP THE MICROTOME Note: The kind of the used examination materials and all special conditions for their processing, pre-treatment and, if necessary, storage as well as instrument controls...
- Page 14 Thermo Scientific Sliding Microtome Microm HM 430 CUTTING MOVEMENT • To start the cutting movement of the microtome, move the sledge horizontally. • The knife (or blade) which is clamped into the knife carrier is drawn horizontally over the specimen towards the user. This way, sections are produced.
- Page 15 Thermo Scientific Sliding Microtome Microm HM 430 LOCKING THE SLEDGE For the protection against injury by unintended movements of the knife sledge, the microtome is equipped with a lock of the sledge in any position. Caution: The sledge should be locked for the user's personal safety, e.g.
- Page 16 Thermo Scientific Sliding Microtome Microm HM 430 2-3-1 ADDITIONAL BALLAST FOR SLEDGE As required by users to vary the weight of the Additional Ballast sledge, we have included additional ballast (Fig. 2- 3-1) into the standard equipment. To assemble the additional ballast, please proceed as described below: Fig.
- Page 17 Thermo Scientific Sliding Microtome Microm HM 430 SPECIMEN FEED 2-4-1 SETTING SECTION THICKNESS The required section thickness is set by turning the scaled wheel on the front side of the instrument to left or right side. The setting is locking and the currently selected value can be read on the highest point of the scale opposite the index marking (fig.
- Page 18 Thermo Scientific Sliding Microtome Microm HM 430 2-4-2 COARSE FEED For the fast up and downward travel between specimen and knife edge as well as for trimming, the microtome has a coarse feed with vertical direction. • The specimen clamping can be moved 40 mm vertically up or downwards via the coarse feed wheel (fig.
- Page 19 Thermo Scientific Sliding Microtome Microm HM 430 2-4-3 FINE FEED, MANUAL After having adjusted knife and specimen as well as having trimmed the specimen, sectioning can be started. • The feed of the section thickness which was preselected on the scaled wheel (fig. 5.1) is...
- Page 20 Thermo Scientific Sliding Microtome Microm HM 430 2-4-4 FINE FEED, AUTOMATIC • The feed of the section thickness which was preselected on the scaled wheel (fig. 5.1) is carried out either automatically by moving the knife sledge over integrated, selectable feed point or by manually activating the feed device.
- Page 21 Thermo Scientific Sliding Microtome Microm HM 430 2-4-5 MOVING THE AUTOMATIC FEED POSITION The automatic feed is carried out by moving the knife sledge into a selectable position behind the specimen. The knife sledge position, on which the feed of the...
- Page 22 Thermo Scientific Sliding Microtome Microm HM 430 SPECIMEN CLAMPING To clamp specimens, different specimen clamping systems are available. With the orienting adapter it is simple to align the specimen properly in relation to the knife. 2-5-1 STANDARD SPECIMEN CLAMP (Cat. no. 715480) The standard specimen clamp is used for rectangular and square paraffin blocks.
- Page 23 Thermo Scientific Sliding Microtome Microm HM 430 2-5-3 UNIVERSAL CASSETTE CLAMP (Cat. no. 715500) The universal cassette clamp represents a quick change system standardized embedding cassettes. • To insert or remove cassettes, press the lever (fig. 9.1) upwards. Fig. 9...
- Page 24 Thermo Scientific Sliding Microtome Microm HM 430 CHANGING SPECIMEN CLAMPS Due to the quick change system of the specimen clampings, specimen clamps can be easily and rapidly changed without needing any tools. • Loosen the clamping of the specimen clamp (fig.
- Page 25 Thermo Scientific Sliding Microtome Microm HM 430 KNIFE CARRIER Hazard of hand injuries: Due to moving parts in connection also with the microtome knife, a danger area arises, which might lead to hand injuries in case of non-compliance with the safety features of the microtome and when disregarding the instruction manual.
- Page 26 Thermo Scientific Sliding Microtome Microm HM 430 Protection against injury • The knife carrier is equipped with a knife guard (fig. 11.4) which should be used while knife or specimens are adjusted. Caution: Please note that knives with a length of more than 16 cm (e.g.
- Page 27 Thermo Scientific Sliding Microtome Microm HM 430 2-7-1 BLADE HOLDER FOR DISPOSABLE BLADES Two different types of disposable blades are available: low profile blades (height: 8 mm) and Clearance angle adjustement. high profile blades (height: 14 mm). When using •...
- Page 28 Thermo Scientific Sliding Microtome Microm HM 430 STANDARD EQUIPMENT The sliding microtome HM 430 is supplied with the following accessories: 1 hex head wrench 5 mm 1 hex head wrench 6 mm 1 cover 4 rubber feet with lower height...
- Page 29 Thermo Scientific Sliding Microtome Microm HM 430 2-9-3 HEIGHT ADJUSTMENT PLATES 5 mm 448070 10 mm 440400 20 mm 440410 2-9-4 MICROTOME KNIVES Steel knives, type c 16 cm 152020 18,5 cm 152270 22 cm 152030 25 cm 152040 30 cm...
- Page 30 Thermo Scientific Sliding Microtome Microm HM 430 PART 3 THEORY OF OPERATION CUTTING MOVEMENT The sliding microtome HM 430 has high- precision, zero-backlash linear roller bearings (cross roller bearings) for the bearing of the knife sledge and the block. These cross roller bearings allow a zero-backlash feed of the knife sledge.
- Page 31 Thermo Scientific Sliding Microtome Microm HM 430 SPECIMEN COARSE FEED After changing the specimen or moving the knife or knife carrier, it is necessary to adjust the specimen to the knife edge again. This can easily be done by means of the specimen coarse feed wheel on the left side of the instrument.
-
Page 32: Part 4 Working With The Microtome
Thermo Scientific Sliding Microtome Microm HM 430 PART 4 WORKING WITH THE MICROTOME PREPARATION AND ORIENTATION Before sectioning, the specimens must be prepared appropriately and embedded in suitable media. Cassettes as well as different forms for round and rectangular specimens can be used for embedding. -
Page 33: Sectioning Instructions
Thermo Scientific Sliding Microtome Microm HM 430 SECTIONING INSTRUCTIONS Hazard of hand injuries: Due to moving parts in connection also with the microtome knife, a danger area arises, which might lead to hand injuries in case of non-compliance with the safety features of the microtome and when disregarding the instruction manual. -
Page 34: How To Avoid Malfunctions
Thermo Scientific Sliding Microtome Microm HM 430 HOW TO AVOID MALFUNCTIONS 4-4-1 PREPARATION OF THE SPECIMEN When preparing specimens, be sure that a suitable embedding medium, fixation, dehydration and infiltration time are chosen. 4-4-2 SPECIMEN TEMPERATURE Sectioning is carried out at ambient temperature (excluding frozen sections). -
Page 35: Part 5 Maintenance
Thermo Scientific Sliding Microtome Microm HM 430 PART 5 MAINTENANCE Annual routine maintenance To secure section quality and functioning of the microtome, it is recommended that a routine maintenance be performed by a trained service technician once a year. Service contract... -
Page 36: Part 6 Cleaning And Care
Thermo Scientific Sliding Microtome Microm HM 430 PART 6 CLEANING AND CARE Cleaning intervals Cleaning, care and decontamination of the microtome depends on how frequently the microtome is used. For optimal sectioning, the instrument must be free of section waste, especially the guides and clamping mechanism. -
Page 37: Part 7 Conditions For The Transportation Of The Instrument
Thermo Scientific Sliding Microtome Microm HM 430 PART 7 CONDITIONS FOR THE TRANSPORTATION OF THE INSTRUMENT TAKING BACK THE INSTRUMENT FOR REPAIR OR ROUTINE MAINTENANCE Repair or maintenance work are normally carried out at the site of installation. If this is not possible... - Page 38 Thermo Scientific Sliding Microtome Microm HM 430 For transportation outside closed buildings, please observe the following measures: • Remove knife or blade and store it in a safe way. • Secure the sledge via the lock of the sledge as described in part 2-4.
-
Page 39: Disposal Of The Instrument After Final Shutdown
Thermo Scientific Sliding Microtome Microm HM 430 DISPOSAL OF THE INSTRUMENT AFTER FINAL SHUTDOWN After the final shutdown of the instrument, we recommend to contact a local recycling company for the disposal according to the national applicable regulations. To be applied in the countries of...
Need help?
Do you have a question about the Microm HM 430 and is the answer not in the manual?
Questions and answers