
Subscribe to Our Youtube Channel
Related Manuals for Vanraam VeloPlus3


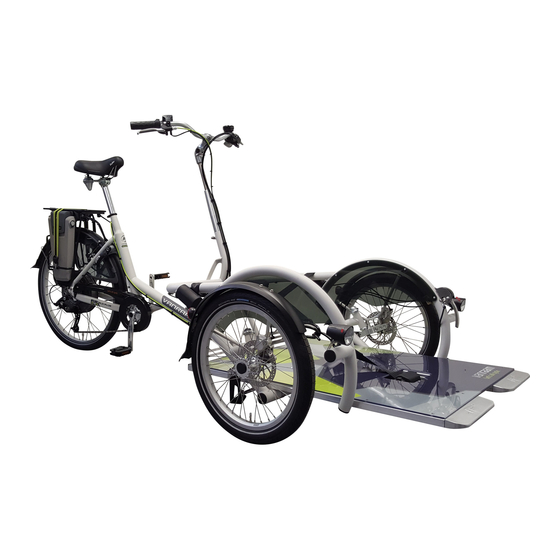
Summary of Contents for Vanraam VeloPlus3
- Page 1 User manual VeloPlus3 Van Raam Guldenweg 23 7051 HT Varsseveld, The Netherlands +31 (0)315 – 25 73 70 info@vanraam.com Version 21.01 www.vanraam.com...
-
Page 2: Table Of Contents
Table of contents Manufacturer contact details ........................3 Conformity ................................ 3 Introduction ..............................3 Delivery ................................4 Indication................................4 Intended usage ............................... 4 Safety measures............................. 5 Adjustment of the tricycle ........................... 7 Before the first use ............................12 Electro system Silent ..........................19 Van Raam E-Bike App .......................... -
Page 3: Manufacturer Contact Details
Conformity Van Raam declares as manufacturer that the VeloPlus3 tricycle, as described in this manual, has been produced in accordance with the Medical Devices Regulation (EU) 2017/745, risk category 1. All products have been produced in accordance with the 2006/42/EG guidelines. -
Page 4: Delivery
Upon delivery you should fill out the form “Form service, maintenance, modifications an warranty claims” in the back of this manual. Indication The VeloPlus3 is intended for cycling with children or adults who are in a wheelchair and transfer is not possible or difficult. Intended usage The tricycle is designed for normal use on level and solid ground. -
Page 5: Safety Measures
The manufacturer is not responsible for any damage or injury caused as a result of or during the course of any other type of use. Safety measures Ensure the tricycle is in good condition each time before using it. Check before •... - Page 6 Make sure that you do not reach a dangerous speed when driving downhill and • entering tunnels. Brake in time and bike at a moderate speed. In case of pregnancy, extra care is required owing to a higher risk of injury. •...
-
Page 7: Adjustment Of The Tricycle
Adjustment of the tricycle Before using the tricycle, adjust it to the measurements of the cyclist. This is of great importance, especially the saddle and the handlebars. If an optimal adjustment of the tricycle, as defined in the instructions, is not possible, you can contact your dealer for a fitting solution. - Page 8 Don't pull out the seat post further than the markings. If you do so, the tube won't be inserted deep enough into the shaft, increasing MIN INSERT the risk of breakage, which may lead to serious injuries. Handlebars height The height of the handlebars affects the comfort of the ride.
- Page 9 Position handlebars You can tilt the handlebars. This influences the distance from the handlebar to the upper body. Determine your own most comfortable position by using the bike. To tilt the handlebar: Slightly loosen the screws [A] and [B] with an Allen key.
- Page 10 Wheelchair transport If you want to transport a wheelchair on the VeloPlus3, follow the instructions below. 1. Attach the parking brake to the bike by squeezing the left brake [A] and lock it with the pin [B]. 2. Remove the safety pin.
- Page 11 Make sure that once the wheelchair is placed on the ramp, the wheelchair's weight causes the ramp to fold up automatically. When that is the case, the centre of gravity of the wheelchair is situated above the front wheels of the bicycle.
-
Page 12: Before The First Use
Before the first use Remove foil Remove the protective foil from the plate before using the bicycle. Parking brake Always use the parking brake if you park the tricycle and leave it behind. Block the tricycle with the hydro brake when passengers are getting on and off. - Page 13 Lighting Normally, the lighting on your bike can be operated manually and set to different modes. However, if your bike is equipped with the Silent Elektro system, your lighting will automatically turn off when the electric system is activated. The controls of both the manually operated and centrally operated lighting is explained below.
- Page 14 Under the pressure switch on the top of the front light is a battery indicator that lights up when the batteries are low. Once the battery indicator starts lighting up red, replace the batteries as soon as possible. The light comes with 4 pre-installed AAA alkaline batteries. Before use, remove the plastic strip that protects the batteries.
- Page 15 Manually operated rear light The rear light has three options which you can choose by pressing the button repeatedly: On- Auto-Off. 1x = ON 2x = AUTO The setting is as follows: 3x = OFF Press 1x: light is on •...
- Page 16 Centrally Operated Lighting The bike has been equipped with centrally operated lighting, with the lighting being connected to the electric system. The lighting will turn on automatically when the electric system is activated. Adjust the angle of the headlight, so that the centre of the light beam is aimed about ten metres in front of the bike.
- Page 17 Gears Your tricycle has eight gears. The gears can be adjusted by turning the handle. Never pedal when changing gears. Please note: If your bike has an electric motor at the rear, you must continue pedalling when changing gears. Please note! Do not shift gears and then paddle backwards. This could cause the chain to run off the sprocket.
- Page 18 Practice, in particular, with bends and braking, because a tricycle can react contrary to what you would expect. It may happen that the back wheel comes off the ground on the inside when going round a bend. To avoid this, the rider leans towards the inside of the bend with his body.
-
Page 19: Electro System Silent
Obstacles higher than five centimetres should be avoided. • Ensure that no dangerous speed develops while driving downhill and entering • tunnels. Brake on time and cycle at a moderate speed. Electro system Silent The Silent Electric motor system is a special developed support system by Van Raam for the rehabilitation market. - Page 20 1. On/off button Using the on/off button, the electrical system can be switched on or off. Switching on: Push the button briefly. • Switching off: Push the button for • two seconds. After the system is turned on, the electric motor is active in level 1. When the system is not used, it will automatically turn off after a certain time.
- Page 21 The behaviour of the battery depends on a lot of different factors and is strongly influenced by: capacity and voltage of the battery, degree of support that is used, temperature, wind speed, tyre pressure, cycling speed, weight of the user and the luggage, use of gearing etcetera.
- Page 22 4. Indication lights The level of charge in the battery is given by five LED lights: four of these are green, the one on the left can show either green or red, if charge is low. The battery is fully charged. When in use, the number of green LED lights on the battery will decrease.
- Page 23 Centrally Operated Lighting The bike is equipped with centrally operated lighting, with the lighting automatically turning on when the electric system is activated. Further instructions can be found in the chapter 'Before the first use'. Other functions The smart display has an automatic dimming function. With an inbuilt light sensor the lights of the display will automatically creating less distraction for the cyclist in darker or more shadowy conditions.
- Page 24 5. Then insert the connector of the charger into the charging point of the battery. The red LED will light up. The charger is now charging. Please note! If the battery is not connected properly, the green LED will light up (standby mode).
- Page 25 10. Pull the handle backwards and push the top of the battery to connect as shown in the drawing and close the lock. 11. Push the handle forward and close the lock. It is also possible to charge the battery while it is still in the holder.
- Page 26 Backup battery (optional) The bike can be supplied with a second battery. To activate the second battery (when the first battery is empty) turn the switch under the luggage carrier to the side of the second battery. Battery Deep Sleep Mode When the battery is nearly empty and has not been used for a week, the battery will enter deep sleep mode.
- Page 27 Don’t drop the battery, this can cause external and internal damage. • If your bicycle has a fault, the battery should be disconnected from the bicycle. • Keep in mind that your bike provides less support when it’s cold (0ºC and less) and the battery will discharge faster.
- Page 28 If a red LED light on the charger starts flashing, remove the plug form the mains • outlet and do not longer use the charger. In this case, contact your dealer. Charger Safety Measures Only charge Van Raam Li-Ion batteries with the included charger. Only connect •...
-
Page 29: Van Raam E-Bike App
The Van Raam E-Bike App can be downloaded free of charge from the Google Play Store or Apple App Store. For more information about the Van Raam App, you can visit the Van Raam website: www.vanraam.com. Version 21.01 29/51... - Page 30 From the 15th of July, 2020, all electric Van Raam bicycles will be delivered as Smart E-Bikes. You can recognize this by the large sticker with a yellow border on the battery. If you have a Smart E-Bike and you download the updated app, there are even more options.
-
Page 31: Accessories
Accessories Depending on your order, you can use the accessories as described below. Extra accessories are available at your dealer. Dividable frame The ramp can be disconnected from the bike, which can be convenient if, for example, you want to store the bike. To disconnect the ramp: 1. - Page 32 5. Remove the safety pin. 6. Hold the rear part (tricycle part) with one hand and then use your other hand to pull the lever backwards [A], allowing the tricycle to detach. The wheelchair element will now stand on the support wheel. 7.
- Page 33 Winch system Light It is possible to place the wheelchair on the bike with the help of a winch. To use the winch system: 1. Switch on the electrical system. Make sure that the light on the control panel is on. If this is not the case, you can switch on the winch system by briefly pressing the on/off button on the display of the electrical...
- Page 34 5. Use the control panel on the bicycle or the remote control to unwind the winch. Press and hold the button and at the same time guide the winch so that it unwinds correctly. Attention! Do not roll out the winch beyond the red line on the belt, otherwise the belt will roll back on incorrectly.
- Page 35 Attention! Make sure that the ramp locks into place! Otherwise very dangerous situations may arise. If the ramp does not engage, press with the foot [A] so that the ramp engages. Make sure that as soon as the wheelchair is placed on the ramp, the weight of the wheelchair automatically causes the ramp to fold up.
- Page 36 The control panel on the bike and the remote control are interconnected. When the battery light on the control panel is on continuously, the winch system is activated and the remote control (Remote Control, RC) is charged. When it starts flashing, the battery of the remote control is almost empty and needs to be replaced.
-
Page 37: Technical Specifications
Technical specifications Length (cm) Width (cm) Height (cm) Boarding height (cm) Length of inner leg (cm) 80 - 95 Front wheel 20“ Back wheel 26“ Weight (kg) approx 64 Max. load luggage rack (kg) Max. weight rider (kg) Max. weight passenger incl. wheelchair (kg) , 200 Brakes, front Disc brakes... -
Page 38: Maintenance And Adjustments To Be Done By Owner
Maintenance and adjustments to be done by owner Below you can find the instructions for maintenance and adjustments that you can do yourself on a regular basis, which will keep your tricycle in top condition. Cleaning The frame of the tricycle can be cleaned with a damp cloth. For areas that are dirtier you can use a mild detergent. -
Page 39: Repairs And Maintenance To Be Done By Dealer
In the event of technical trouble or faults, the tricycle should be taken to the dealer for repairs immediately. The replacing of safety-related components (especially frame, brakes, lighting, handlebars, front fork and actuation) should be performed by the dealer. If you still decide you want to replace components yourself, you are responsible for damage or harm due to incorrectly fitted components. -
Page 40: Adjustments By Dealer
Adjustments by dealer The correct tension of the chains Several chains are present on the tricycle These must have enough room for movement. Without any real effort, the chain must be able to be moved about half a centimetre up and down. -
Page 41: Disposal
Disposal If you want to dispose your tricycle, contact your dealer. You can also contact the local waste disposal company. They will dispose the tricycle according to the regulations of your town. Recycling the Battery If your battery is defective or if you are no longer using it, you must have it recycled. Please contact your dealer. -
Page 42: Guarantee
Guarantee The guarantee is valid for all faults in the product, which are proven to be caused by material or manufacturing error. We give a guarantee of five years on the frame and the front fork. For all accessories and other parts (except wear parts) we provide a two year guarantee, as legally regulated. -
Page 43: Frame Number
Frame number The frame number is printed on the sticker. This sticker is located on the frame, see the image below. Example sticker: Position of sticker: Behind the seat tube Version 21.01 43/51... -
Page 44: Service Record, Maintenance, Modifications And Guarantee Claims
Service record, maintenance, modifications and guarantee claims To maintain guarantee on the Van Raam tricycle, follow this service schedule. Service: Carried out (date): Signature dealer: Service after the first 200 KM or two months. Service 1 year after delivery. Service 2 year after delivery. Service 3 year after delivery. - Page 45 Here you have space to take notes or write down the maintenance on your bike: Version 21.01 45/51...
- Page 46 Version 21.01 46/51...
- Page 47 Version 21.01 47/51...
- Page 48 Version 21.01 48/51...
- Page 49 Version 21.01 49/51...
- Page 50 Version 21.01 50/51...
-
Page 51: Delivery And Service Form
Delivery and service form Congratulations on your purchase of your Van Raam tricycle. This bike is produced with utmost care. To guarantee the quality as much as possible Van Raam produces the cycles according to the ISO 9001:2015 quality standards. Van Raam has been certified by DNV GL Business Assurance BV.
Need help?
Do you have a question about the VeloPlus3 and is the answer not in the manual?
Questions and answers