Table of Contents
Advertisement
Quick Links
860538982
Issue 6, June 2014
www.commscope.com
SYSTIMAX 360
MPO Distribution Panel Instructions
General
™
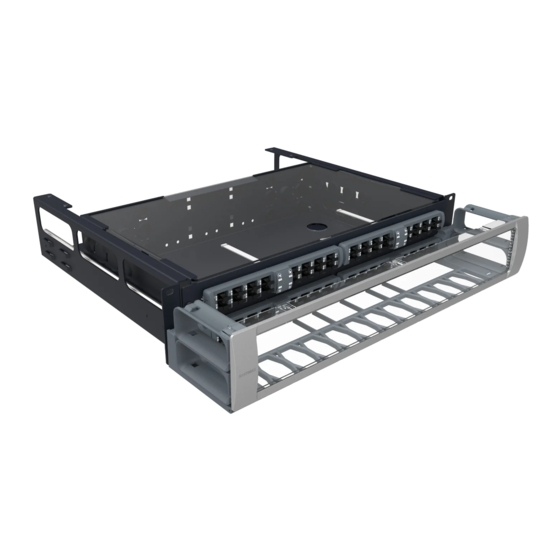
The SYSTIMAX 360
polycarbonate top cover. This sliding distribution shelf includes iPatch MPO kits designed for use in an iPatch
System and MPO adapters that allow connection of multi-fiber trunk cables terminated with push-on MPO
connectors.
These shelves mount in a standard 19-inch (483mm) rack with universal hole spacing. These shelves are
intended for indoor use, but may be used outdoors in a suitable enclosure.
Note: To use the SYSTIMAX 360 iPatch shelf in an existing iPatch System, the iPatch Rack and Panel
Managers must be running firmware version 8.1 or later and the imVision
version 10.1 or later. The System Manager firmware, used to manage the system, must be version 7.1 or later.
We recommend that you upgrade the System Manager software to version 7.1 or a later version before you
install the shelf.
Ordering information is listed below:
Material ID
360G2-iP-1U-32-MPO-DP-SD
760169144
760169185
360G2-iP-2U-64-MPO-DP-SD
1U MPO Distribution Panel
This product is covered by one or more of the following U.S. patents or their foreign equivalents:
5,923,807, 6,245,998. The iPatch System is covered by U.S. patents 6,285,293, 6,522,737 and 8,344,900
™
iPatch
360G2 shelf comes equipped with iPatch
Part No.
™
SYSTIMAX 360
iPatch
© 2014 CommScope, Inc. All rights reserved
®
G2 Fiber Sliding Shelf,
®
MPO kits, jumper-storage trough, and
®
Description
360G2 iPatch 1U 32-MPO distribution panel, sliding shelf
360G2 iPatch 2U 64-MPO distribution panel, sliding shelf
2U MPO Distribution Panel
®
G2 MPO Fiber Sliding Shelves
Controller must be running firmware
Page 1 of 9
Advertisement
Table of Contents

Related Manuals for CommScope SYSTIMAX 360 iPatch G2 MPO


Summary of Contents for CommScope SYSTIMAX 360 iPatch G2 MPO
- Page 1 This product is covered by one or more of the following U.S. patents or their foreign equivalents: 5,923,807, 6,245,998. The iPatch System is covered by U.S. patents 6,285,293, 6,522,737 and 8,344,900 © 2014 CommScope, Inc. All rights reserved Page 1 of 9...
-
Page 2: How To Contact Us
™ PartnerPRO Network Partner. Within the United States, report any missing/damaged parts or any other issues to CommScope Customer Claims at 1-866-539-2795 or email to claims@commscope.com. Outside the United States, contact your local account representative or PartnerPRO Network Partner. Tools Required ... -
Page 3: Important Safety Cautions
860538982 Instruction Sheet Separately Orderable Components Material ID Part No. Description 760039883 600-23BRKT Mounting bracket accessory kit for 23-inch (584mm) frame Important: Limits for iPatch shelf and panel connections: iPatch MPO fiber shelves are limited to a maximum number of rack units (RUs) and will not support a fully populated rack or cabinet. - Page 4 860538982 www.commscope.com Instruction Sheet Step 1 – Route Panel Bus Jumper 3.5” (89mm) Panel jumper Protective Flat retainer clips corrugated tubing 10-pin panel bus jumper connector 1. If it has not already been removed, slide the cover off the shelf.
- Page 5 860538982 Instruction Sheet Step 2 – Install Shelf and Connect Panel Bus Jumper 1. Mount the shelf in the rack using the four mounting screws provided. For a 19-inch (483mm) rack, mount shelf to rack using the pre-installed mounting brackets and four 12-24 x 1/2-inch screws provided.
- Page 6 860538982 www.commscope.com Instruction Sheet Step 3 – Install Trough For Unpopulated and Modular Shelves 1. Position trough on shelf so that indentions behind captive screws rest on the standoffs. 2. Using a Phillips head screwdriver, tighten the captive screw on each end of trough to secure it to shelf.
- Page 7 860538982 Instruction Sheet Step 4 – Route Trunk Cable(s) 1. Pull shelf out to fully extended position. 2. Pull the trunk cable(s) to the rack and determine the best way to route the cable to the shelf (from above or below).
- Page 8 860538982 www.commscope.com Instruction Sheet 7. Feed sub-units through opening in shelf and temporarily coil sub-units loosely inside shelf. 8. Rotate locknut as required to allow it to pass through the opening and enter shelf. Note: It may be necessary to temporarily remove a plug from an adjacent opening to provide sufficient clearance for locknut to be inserted through opening.
- Page 9 860538982 Instruction Sheet Step 6 – Install Cover and Door Install top cover and trough door (both provided) to shield shelf from foreign particles. The cover, which is made of clear, flame-retardant plastic, slides on and off shelf. The door for the patch cord trough is hinged and has touch-latches for closing and opening.
Need help?
Do you have a question about the SYSTIMAX 360 iPatch G2 MPO and is the answer not in the manual?
Questions and answers