Advertisement
Quick Links
CO
-Hobby-Set/CO
2
Set de CO
Modelo ficionado/CO
2
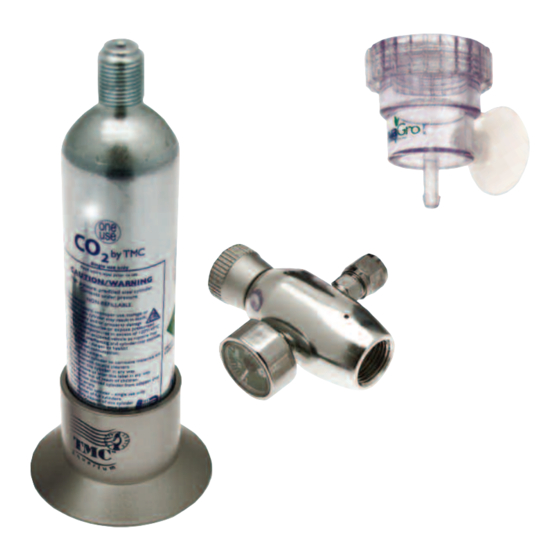
CO
canister
2
CO
-Gasbehälter
2
CO
-cilinder
2
Bouteille de CO
2
Cilindro de CO
2
Cilindro de CO
2
Cilindro CO
2
Cylinder stand
Behälter-ständer
Cilindersteun
Support de la bouteille
Soporte del cilindro
Suporte do cilindro
Supporto del cilindro
Dosing pipette
Dosierpipette
Doseerpipet
Pipette de dosage
Pipeta dosificadora
Pipeta doseadora
Pipetta dosatrice
FOR PLANTED AQUARIA
CO
Hobby Set
2
Hobby-Set/Ensemble Hobby CO
2
2
CO
diffuser
2
CO
-Diffusor
2
CO
-diffusor
2
Diffuseur de CO
Difusor de CO
2
Difusor de CO
2
Diffusore di CO
CO
pressure regulator
2
CO
-Druckregler
2
CO
-Drukregelaar
2
Régulateur de pression du CO
2
Regulador de presión de CO
2
Regulador de pressão do CO
2
Regolatore di pressione del CO
2
Non return valve
Rückschlagventil
Niet-teruglopend ventiel
Clapet anti-retour
Válvula anti retorno
Válvula de retenção
Valvola di non ritorno
1
Kit de quariofilista/Set Hobby CO
CO
outlet hosetail
2
nschluss CO
- uslass
2
CO
-uitgang koppelstuk
2
Sortie du CO
2
2
Derivación de la manguera
de salida de CO
2
Derivação da mangueira de
2
saída de CO
2
Raccordo di uscita della CO
Recommended water level
Empfohlener Wasserfüllstand
anbevolen waterniveau
Niveau d'eau recommandé
Nivel de agua recomendado
Nível de água recomendado
Livello d'acqua consigliato
Direction of CO
CO
-Flussrichtung
2
Richting van CO
Sens du débit de CO
Dirección del flujo de CO
Sentido do fluxo do CO
Direzione della portata di CO
CO
tubing
2
CO
-Schlauch
2
CO
-buizen
2
Tuyau de CO
2
Tubo de CO
2
Tubo de CO
2
Tubo per CO
2
2
CO
bubble counter
2
CO
-Blasenzähler
2
CO
-luchtbellenteller
2
Compteur de bulles de CO
2
Contador de burbujas de CO
2
Contador de bolhas de CO
2
Conta-bolle di CO
2
CO
inlet hosetail
2
CO
-Einlass-Schlauchende
2
2
CO
-ingang koppelstuk
2
dmission de CO
Derivación de la manguera de
entrada
de CO
2
Extremidade traseira da
mangueira
de entrada de CO
Raccordo di ingresso della CO
Flow
2
-stroom
2
2
2
2
2
90
o
push fit elbow connectors
o
90
Steckverbindungs-Winkelstücke
o
Vastklikbare 90
Raccords en coude de 90
Conectores angulares de 90
Conectores em forma de cotovelo de
encaixe levemente forçados 90
Raccordi a L 90
o
2
2
2
2
elleboogconnectors
o
à pousser
o
de presión
o
a compressione
Advertisement

Subscribe to Our Youtube Channel
Related Manuals for TMC Aquarium aquaGro CO2 Hobby Set


Summary of Contents for TMC Aquarium aquaGro CO2 Hobby Set
- Page 1 FOR PLANTED AQUARIA Hobby Set -Hobby-Set/CO Hobby-Set/Ensemble Hobby CO Set de CO Modelo ficionado/CO Kit de quariofilista/Set Hobby CO bubble counter diffuser outlet hosetail -Blasenzähler canister -Diffusor nschluss CO - uslass -luchtbellenteller -Gasbehälter -diffusor -uitgang koppelstuk Compteur de bulles de CO -cilinder Diffuseur de CO Sortie du CO...
- Page 2 PLE SE RE D C REFULLY BITTE SORGFÄLTIG LESEN/ ND CHTIG LEZEN .U.B LIRE TTENTIVEMENT/LE DETENID MENTE POR F VOR LEI TENT MENTE/LEGGERE CON TTENZIONE is supplied in a compressed gas cylinder pressurised to approximately 60 bar (900psi). In order to use this gas in an aquarium system the flow of gas has to be reduced to more manageable levels.
- Page 3 Le CO est fourni dans une bouteille de gaz comprimé, sous une pression d’environ 60 bar. Pour utiliser ce gaz dans un aquarium, le débit de gaz doit être réduit à des niveaux plus facilement gérables. Le régulateur de pression de CO Nano de TMC réduit le débit de CO de la bouteille et permet d’effectuer un réglage et un dosage de haute précision dans l’aquarium ou l’application de votre choix.
- Page 4 Instructions for Use Bedienungsanleitung/Gebruiksinstructies/Mode d’Emploi Instrucciones de Uso/Instruções de Utilização/Istruzioni per l’Uso Remove the self adhesive film from the bottom of the CO One Use cylinder stand then fix the stand on a level surface next to your aquarium, ensuring that it is located in a suitable position to allow the cylinder to be easily connected to the other CO equipment using the shortest length of tubing possible.
- Page 5 Tournez le bouton de réglage de la pression du régulateur D NS LE SENS DES IGUILLES D’UNE MONTRE, en position totalement fermée, et reliez ensuite le régulateur de pression à la bouteille de CO en vissant doucement la bouteille dans le régulateur, dans le sens des aiguilles d’une montre, jusqu’à...
- Page 6 Using the dosing pipette supplied, fill the bubble counter with fresh water to the specified level as indicated on the front, then position and secure it on the side of your aquarium or sump ensuring that it is in a convenient location to connect to the diffuser and pressure regulator.
- Page 7 Unscrew the hosetail locking nut on the pressure regulator and then thread the other end of the flexible CO tubing into the hole in the end of the locking nut, and attach this same end to the outlet hosetail. Re-attach and secure the hosetail locking nut. Die Sicherungsmutter am Druckregler lösen.
- Page 8 Carefully attach the securing suction cup to the diffuser then connect a length of flexible tubing to the diffuser’s CO inlet hosetail. USEFUL TIP: To make it easier to connect the flexible hosing to the diffuser’s CO inlet hosetail either lightly moisten the hosetail or briefly immerse the end of the flexible hosing in hot water before sliding onto the hosetail.
- Page 9 Position the diffuser in a vertical position as low as possible in the aquarium and, using the securing suction cup, attach the diffuser to the side of your aquarium. USEFULTIP: Ideally place the diffuser where there is good water circulation around it. This will help ensure that the CO exiting the diffuser is continuously moved from the diffuser and distributed throughout the aquarium.
- Page 10 Carefully cut the CO flexible tubing to your required length ensuring that it is a satisfactory length to successfully connect the diffuser to the CO outlet hosetail on the bubble counter without any kinks. Ensuring all connections are secure, open the pressure adjustment knob on the pressure regulator by turning it anti-clockwise, and start dosing CO to the bubble counter.
- Page 11 USEFUL TIP: For optimum plant growth a CO level of approximately 10-20 mg per litre is recommended within the aquarium. For best results and as a basic ‘rule of thumb’ it is recommended that to start with, the CO dosed into the CO bubble counter at approximately 10 bubbles per minute per 100 litres of aquarium water.
- Page 13 VEILIGHEID, ONDERHOUD EN REINIGINGSINSTRUCTIES • Trek de CO flexibele buis nooit met kracht los – schuif deze altijd voorzichtig weg. ls de CO -buis niet verwijderd kan worden, of hard geworden is, moet u deze met een scherp mes voorzichtig in de lengte opensnijden.
- Page 14 SEGURID D, M NTENIMIENTO E INSTRUCCIONES DE LIMPIEZ • No emplee nunca la fuerza para sacar el tubo flexible de CO ; sáquelo siempre deslizándolo con mucho cuidado. Si no puede quitar el tubo de CO o si se ha endurecido, debe cortarlo a lo largo con mucha precaución utilizando un cuchillo afilado.
- Page 15 ISTRUZIONI PER L SICUREZZ , M NUTENZIONE E PULIZI • Non usare mai la forza per rimuovere il tubo flessibile per CO , ma piuttosto farlo sempre scorrere con grande cura. Se non si riesce a rimuovere il tubo per CO o se questo si è...
- Page 16 For details of all the products in our quaGro range please visit our website - www.tropicalmarinecentre.co.uk - or speak to your local TMC stockist. Für Einzelheiten aller Produkte unserer quaGro-Palette besuchen Sie bitte unsere Website - www.tropicalmarinecentre.co.uk - oder sprechen Sie mit Ihrem örtlichen TMC-Fachhändler. ls u meer informatie wenst over alle producten in ons quaGro-aanbod, breng dan een bezoek aan onze website - www.tropicalmarinecentre.co.uk - of raadpleeg uw plaatselijke TMC-verdeler.
Need help?
Do you have a question about the aquaGro CO2 Hobby Set and is the answer not in the manual?
Questions and answers