Kalfire G80/48F User Instructions
Balanced-flue gas fires for gas type: ng, ulpg and nzlp
Hide thumbs
Also See for G80/48F:
- Installation instructions manual (96 pages) ,
- User manual (60 pages) ,
- Installation instructions manual (120 pages)
Table of Contents
Advertisement
Quick Links
Advertisement
Table of Contents

Related Manuals for Kalfire G80/48F


Summary of Contents for Kalfire G80/48F
- Page 1 User instructions BALANCED-FLUE GAS FIRES DON’T COMPROMISE.
- Page 3 Balanced-flue gas fires Kalfire G80/48F Kalfire G85/44C Kalfire G90/44S Kalfire G160/41F Kalfire G165/37C Kalfire G170/37S for gas type: NG, ULPG and NZLP Version 03-2021...
-
Page 5: Table Of Contents
Contents General information Maintenance Foreword Maintenance 5.1.1 Cleaning the (standard) Pictograms Warranty ceramic windows. 5.1.2 Cleaning instructions Safety anti-reflective glass Safety instructions for 5.1.3 Door dismantling and assembly decorative elements (corner and three-sided Safety related to use appliances) Three safety measures 5.1.4 Door dismantling and assembly for the gas fire (front and tunnel fireplaces) -
Page 7: General Information
This gas fire has been designed as in full or in part, without the prior ambiance heating and has not been written permission of Kalfire. Kalfire designed to be used as the principal reserves the right to make changes to heating unit for part of a house or the manual. -
Page 8: Pictograms
6. Should disruption occur within the warranty period caused by a Warranty conditions manufacturing error or material 1. The warranty period for Kalfire gas defect, Archifire Fireplaces will appliances amounts to two years deliver the components needed from the procurement date, that... - Page 9 8. Should the technical fitter approved duct system. 6. Should deviation from the Kalfire by Archifire Fireplaces be unable specifications have occurred in any to rectify the problem covered by the warranty, then he is entitled...
-
Page 10: Safety
100 cm (depending on the Kalfire GP from the fireplace. If a fireguard is model). used, this distance must be at least... - Page 11 WARNING Should the floor in Danger caused by fumes or gas leaks front of the fireplace consist of DANGER OF EXPLOSION! Fumes combustible material and the and/or gas leaks can cause life- distance from the underside of the threatening situations. Fumes can combustion chamber to the floor be the cause of carbon monoxide be smaller than 10 cm, a heat-...
-
Page 12: Three Safety Measures For The Gas Fire
2.3 Three safety measures for the gas fire 1. The flame is detected due to electronic ionisation measurement Should the gas fire be unable to detect a flame during ignition, the gas supply will be interrupted for one minute. A new ignition attempt will follow automatically. -
Page 13: Description
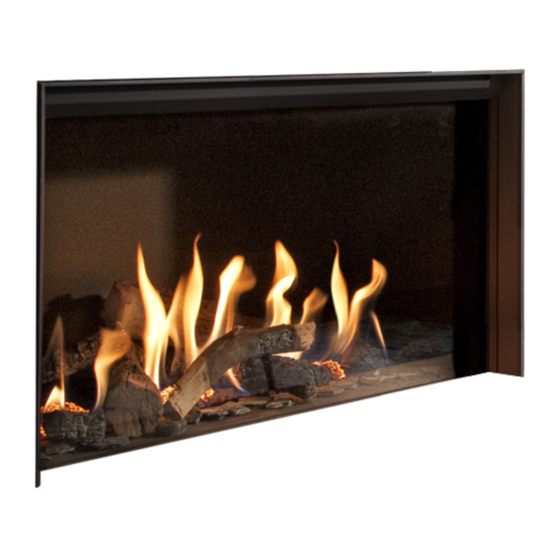
The following sections describe the engaging the Prestige burner. gas fire: - Description of the gas fire. The Kalfire G with a 3D burner generates an elongated and horizontal 3.1 Gas fire description flame pattern, well suited to a modern Kalfire gas fires are internationally household interior. -
Page 14: Operation
4. Operation 4.2 Using the iMatch remote control The upcoming sections provide Range of the RF signal information about the use of the gas The iMatch remote control uses a fire: radio-frequency (RF) signal to transfer - Replacing the batteries information to the gas fire. -
Page 15: Remote Control
3. RF-signal, a flashing icon indicating that the appliance is beyond the reach of the remote control. 4. flame intensity indicator (hybrid fire) 5. The flame is ignited if the icon is alight, if this icon is flashing one of the following notifications requires your attention: heat adequacy, ignition attempt or reignition... -
Page 16: Setting Day And Time
4.3 Setting day and time 3. Walk around the appliance at a Setting day and time. distance of 3 to 4 metres to measure Carry out the following steps to change the RFCK. If the RFCK shows a value the day and time settings: of 4, the transmission strength of the remote control is good. -
Page 17: Selecting The Thermostat Or Manual Operating Programme
4.6 Setting the flame intensity 1. By pressing P until the icon for The height of the flames can be thermostat or manual mode adjusted from high to low and is begin to flash. 2. Press P again to selec the icon of indicated on the display by numbers 1 through 8. -
Page 18: Programming Time Segments
4.9 Programming time segments while “ON 1” appears in the middle The thermostat function can be of the display (this is the first “on” combined with a timer programme that time). allows for up to three time segments to 11. Use the + and - buttons to set the be programmed. -
Page 19: Maintenance
5. Maintenance in the beginning), air contamination, quality of the type of gas etc. The following sections provide Conditions: information about the maintenance • of the fireplace. Filth and stains on the glass must be - Maintenance removed immediately. • - Malfuntions Never turn on the fireplace when it has filth or stains on the glass. - Page 20 Conditions: or abrasive substances. The • Filth or stains on the glass must be acceptable share of ammonia and removed immediately. solvents that are organically soluble • Never turn on the fireplace when it in water must be smaller than 5%. •...
-
Page 21: Door Dismantling And Assembly
5.1.3 Door dismantling and assembly Step 4: Next, grip the door by the (corner and threesided designated handles. Slightly lift the appliances) door with glass window out of the Door removal rabbet, move the entire door slightly WARNING: Wear (rubber) gloves to to the left or right (corner fireplace) prevent stains on the glass. -
Page 22: Door Dismantling And Assembly (Front And Tunnel Fireplaces)
5.1.4 Door dismantling and Step 3: Push the metal cover strip in left assembly (front and tunnel or right. fireplaces) Door removal WARNING: Wear (rubber) gloves to prevent stains on the glass. Step 1: Remove the guard / mesh screen. See Annex A.3 Step 1: Move the metal cover strips up from the upper side. -
Page 23: Malfunctions
guard / mesh screen. See Annex A.3. is turned on again manually. 5.2 Malfunctions 5.2.1 Removing or resetting a malfunction. Malfunctions can be organised in five categories: The automatic burner relay is equipped 1. Permanent malfunctions (indicated with a safety setting per gas type as >F<). -
Page 24: Error Codes Imatch Remote Control
5.2.2 Error codes iMatch remote control Error code Cause Solution Entire display Flat battery Replacing battery. flashing Low battery Replacing battery. NOLK 0 in the middle Bedienings- Druk kort op >NOLK< zal nu linksboven in het display of the fout verschijnen. - Page 25 Error code Cause Solution Tempera- Turn off the fireplace for approximately 30 minutes. ture of the Then turn on the fireplace. circuit board In case the error reappears, there is insufficient is too high ventilation in the chamber of the fireplace. No mains voltage supply...
- Page 26 Error code Cause Solution A flame is visible during ignition 1. Check if the ionisation pen is completely unobstructed by looking into the fireplace. Check if the plug in the technical box is correctly connected.See Wiring diagram on page 29. Check the connection with the ionisation pen and whether there are damages to the ionisation cable.
- Page 27 Error code Cause Solution Check whether the gas valve is open. Problem Measure the gas pressure at the gas valve intake. with This must be > 20 mbar or with a ULGP, NZLP (B/P) regulating > 40 mbar. the gas Measure the gas pressure at the exhaust side of the valve, gas valve during ignition, this must be >...
-
Page 28: Appendices
A. Appendices A.1 Wiring diagram Ionisation AUX enable OPEN enable HDIMS Shut Down Switch Domotica / iMatch Ground Stud KF00370 Wiring Diagram Hybrid Fig. 11: Technical box... -
Page 29: Wiring Diagram
Kalfire B.V. Geloërveldweg 21 NL – 5951 DH, Belfeld Certifies that the following Kalfire appliances, model gas fire: Kalfire G80/48F, G85/44C and G90/44S Kalfire G160/41F, G165/37C and G170/37S are in compliance with the appliances as described in the AS/NZS5601.1 Gas installa-... -
Page 30: Installing And Removing The
A.3 Installing and removing the guard / mesh screen Installing the guard / mesh screen front models Fig. A: fireplace with loose guard / mesh screen Fig B: fireplace with guard / mesh screen in place... - Page 31 Removing the guard / mesh screen front models: G80/48F and G160/41F Detail: guard / mesh screen is removed with the help of a guard tool. Fig. A: fireplace with guard / mesh screen in place Fig B: fireplace with loose guard / mesh screen...
- Page 32 Installing the guard / mesh screen corner and 3sided models: G85/44C, G90/44S, G165/44C, G170/44S Fig. A: fireplace with loose guard / mesh screen Fig B: fireplace with guard / mesh screen in place...
- Page 33 Removing the guard / mesh screen corner and 3sided models: G85/44C, G90/44S, G165/44C, G170/44S Fig. A: fireplace with guard / mesh screen in place Fig B: fireplace with loose guard / mesh screen...
- Page 36 Geloërveldweg 21 5951 DH Belfeld info@kal-fire.com KALFIRE.COM 621015 DON’T COMPROMISE.
Need help?
Do you have a question about the G80/48F and is the answer not in the manual?
Questions and answers