Table of Contents
Advertisement
Quick Links
RESISTRON
Replacing
RES-222/RES-440
Replacement
Instructions
The front panel dimensions and terminal assignment of
the RESISTRON RES-440 temperature controller are
compatible with those of the RES-222.
The steps that are necessary to migrate from
RES-222-0-3 or RES-222-0-5 (standard devices
without modifications) to RES-440 are described
Comparison of RES-222 / RES-440
Dimensions
The front panel cutout dimensions of the RES-222 and
RES-440 controllers are identical. The RES-440
RES-222
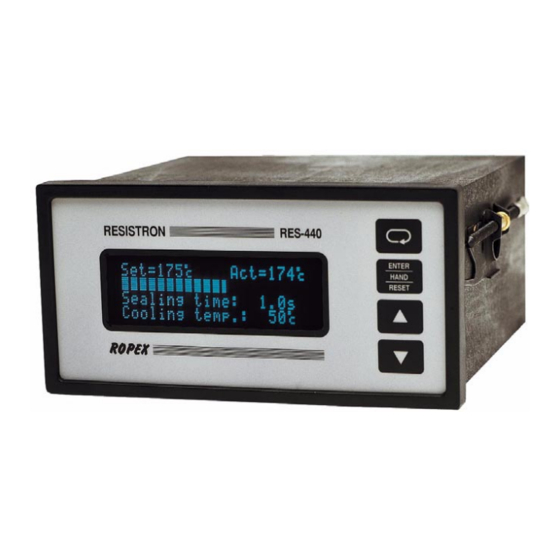
Temperature indication (actual value)
RES-222
Indication on an analog instrument (ATR-3).
GB
Industrie-Elektronik GmbH
Gansäcker 21
D-74321-Bietigheim-Bissingen
below. In addition, the differences between the
controller types are explained.
These instructions provide only a brief overview of the
two controllers. If in doubt, please refer to the latest
version of the controller documentation, which is
always binding.
features a protective film to IP42 instead of the
transparent hood. A transparent front cover featuring
IP65 is available as a option.
RES-440
RES-440
Indication on the 4-line display
(dynamic bar and digital value).
Tel: +49/(0)7142/7776-0
Fax: +49/(0)7142/7776-19
E-Mail:
info@ropex.de
Internet:
www.ropex.de
Data subject to change
Advertisement
Table of Contents

Related Manuals for Ropex RESISTRON RES-222


Summary of Contents for Ropex RESISTRON RES-222
- Page 1 RES-440 Temperature indication (actual value) RES-222 RES-440 Indication on an analog instrument (ATR-3). Indication on the 4-line display (dynamic bar and digital value). Industrie-Elektronik GmbH Tel: +49/(0)7142/7776-0 E-Mail: info@ropex.de Gansäcker 21 Fax: +49/(0)7142/7776-19 Internet: www.ropex.de D-74321-Bietigheim-Bissingen Data subject to change...
- Page 2 Set point selection RES-222 RES-440 Selection by means of a 10-turn potentiometer with Selection with step 1 in the software menu. If the a fine control knob. controller is active, the set point is also indicated on the display. Zero calibration RES-222 RES-440 Zero calibration by means of a 10-turn potentiometer...
- Page 3 Proceed as follows to replace the RES-222 controller RES-222. Please set these switches in accordance and install/start up the RES-440: with the ROPEX Application Report in order to 1. Switch off the line voltage and verify the safe avoid malfunctions.
- Page 4 If the zero has not been calibrated successfully, an error message appears on the display. In this case the controller configuration is incorrect ( section „Controller configuration“ of the RES-440 documentation and the ROPEX Application Report). Configure the controller correctly and repeat the AUTOCAL function. Page 4...
- Page 5 13.Set the heatsealing temperature (select the set exceeded") with the keys. Confirm your point) selection by pressing . Press the key for at ENTER HAND RESET Press the key briefly (to display step 1 in the least 2s (to return to the main or Alarm menu). Settings menu).
- Page 6 Menu structure of the RES-440 Settings Configuration Power-up message Language The relevant menu Main menu steps are shown on a gray background. Factory settings Heatsealing temp. Alloy/range Preheating temp. Max. temperature Starting delay Set point reached Heatsealing time 25 Set point exceeded Cooling value Hold mode Time control...
Need help?
Do you have a question about the RESISTRON RES-222 and is the answer not in the manual?
Questions and answers