Advertisement
Quick Links
OPERATOR'S MANUAL & PARTS LIST
MODEL – THGT500-A
FOLDING SACK TRUCK
Spares & Support: 01793 333212
Please read & understand this manual, paying particular attention to the safety
instructions, before use.
The manufacturer reserves the right to change the product specification and
livery according to continued product improvements.
193843001
09/06/2015
Advertisement

Related Manuals for The Handy THGT500-A


Summary of Contents for The Handy THGT500-A
- Page 1 OPERATOR’S MANUAL & PARTS LIST MODEL – THGT500-A FOLDING SACK TRUCK Spares & Support: 01793 333212 Please read & understand this manual, paying particular attention to the safety instructions, before use. The manufacturer reserves the right to change the product specification and livery according to continued product improvements.
-
Page 3: Table Of Contents
Assembly Is Required This product requires assembly before use. See the “Assembly” section for instructions. Because of the weight and size of the Trailer, it is recommended that a minimum of TWO adults be present to assist with the assembly. CONTENTS SAFETY INSTRUCTIONS SPECIFICATIONS... -
Page 4: Safety Instructions
SAFETY INSTRUCTIONS Read and understand the owner’s manual and labels affixed to the machine. Learn its application and limitations as well as the specific potential hazards. Retain these instructions for future reference. The operator is responsible for following the warnings & instructions in this manual and on the product. -
Page 5: Specifications
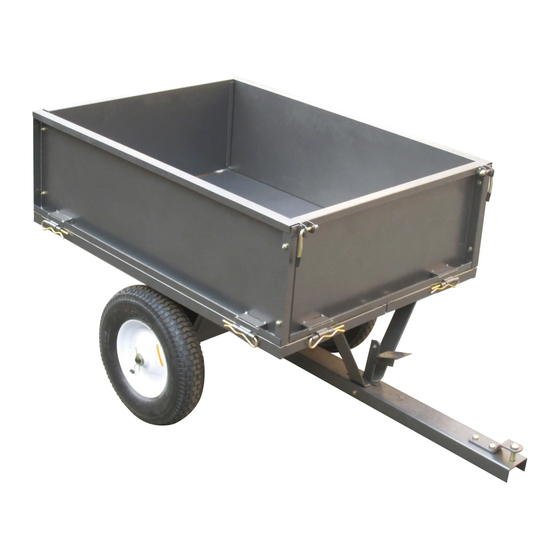
SPECIFICATIONS Model THGT500-A Product Number 193843001 Load Capacity 500lb (226.8kg) Bed Dimensions (mm) (L)1030 x (W)774 x (H)336 Overall Dimensions (mm) (L)1482 x (W)807 x (H)775 Tyre Size 47mm (16”) Tyre Type Pneumatic Tyre PSI (Recommended) 25 PSI (Do not exceed) -
Page 6: Controls & Features
CONTROLS & FEATURES CAUTION Read & follow all instructions for assembly & operation. Failure to properly assemble this equipment could result in serious injury to the user of bystanders, or cause equipment damage. Familiarise yourself with the location & function of the controls and features. Keep the manual in a safe place for future reference. -
Page 7: Operating Instructions
OPERATING INSTRUCTIONS WARNING – Before using the Trailer, review the below instructions & safety information with in the manual. Failure to follow these instructions may result in property damage or injury to the operator or bystanders. 1. DO NOT exceed the rated capacity of 500lb (226.8kg). 2. - Page 8 COMPONENTS Please check the contents of the carton are correct BEFORE assembling your new product. If any parts are missing, contact our Customer Service Team Telephone: 01793 333212 Email: customerservice@handydistribution.co.uk TOOLS REQUIRED Pliers Screw Driver – Phillips Head ...
- Page 9 COMPONENTS CONT’D Latch Spring x1 Hinge Pin x6 Hex Bolt M6x90 x1 R-Pin Ø3 x2 Flat Washer Ø16 x4 Spacer x2 Screw M6x16 x4 Screw M8x16 x8 Screw M8x20 x2 Screw M8x35 x4 Lock Nut M8 x14 Lock Nut M6 x5...
-
Page 10: Assembly
ASSEMBLY Attach the Bottom Panels and Support Tubes Lay the left and right bottom panels, face down Attach the baseboard support tubes to the panels using four sets of M8x35 screws & M8 nylon lock nut. Hand tighten the nuts. Attach the Draw Bar Support 1. - Page 11 Attach the Wheel Axle Support 1. Connect the two wheel axle supports and attach them to the bottom panels using eight M8 lock nut & screw M8x16. 2. Hand tighten the nuts. Attach the Release Pedal 1. Insert the release pedal into the tow bar and secure using the two spacers either side of the release pedal &...
- Page 12 Attach the Wheel Axle 1. Insert the tow bar assembly into the central slot in the wheel axle support. 2. Insert the axle through the hole and slide it through both the axle support and the Tow Bar assembly. 3. Now tighten all nuts & bolts in steps 1 through to 4. Attach the Wheels 1.
- Page 13 Attach the Rear Panel Slots and Lock Support Tube Attach the left and right rear panel slots on the left and right panel using four sets of the M6x16 screws and M6 lock nuts. Attach the Side Panel Attach the left and right side panel to the bottom panel using the four hinge pins.
- Page 14 Attach the Front Panel 1. Attach the front panel to the bottom panel and secure using two hinge pins. 2. Lock the left and right side panel assemblies in place using the top handles. Attach the Rear Panel 1. Slide the rear panel through the slots on the back side panels. NOTE: The rear panel pins must go through the holes on the side panels to lock the panel in place.
- Page 16 PARTS DIAGRAM...
- Page 17 PARTS LIST Part No. Description Part No. Description TH177-1 Left Bottom Panel TH177-22 Draw Bar Support TH177-2 Right Bottom Panel TH177-23 TH177-3 Wheel TH177-24 Handle A TH177-4 Wheel Axle Support TH177-25 Handle B TH177-5 Left Side Panel TH177-26 Handle Sleeve TH177-6 Right Side Panel TH177-27...
- Page 18 GJ HANDY & CO LTD USER WARRANTY POLICY 1. Users Statement of Warranty Each new machine is warranted against defective material or assembly of material under normal usage. The warranty applies to the original purchaser and covers faulty parts and the labour involved in replacing and repairing those parts, which are of original manufacture.
- Page 19 GJ HANDY & CO LTD USER WARRANTY POLICY 3. Not covered by this warranty The warranty policy does not cover any depreciation or damages caused by ordinary wear, rusting or corrosion, lack of correct maintenance or operation, misuse, abuse, lack of transportation or accident.
- Page 21 To order spare parts and see the complete range of garden machinery and garden equipment from Handy, visit: www.thehandy.co.uk Spares & Support: 01793 333212 This symbol on the product or on its packaging indicates that this product may not be treated as household waste.
Need help?
Do you have a question about the THGT500-A and is the answer not in the manual?
Questions and answers