Table of Contents
Advertisement
Advertisement
Table of Contents

Related Manuals for Nidek Medical NT-2000


Summary of Contents for Nidek Medical NT-2000
- Page 1 NON-CONTACT TONOMETER NT-2000 Model OPERATOR’S MANUAL...
- Page 2 : 34-14, Maehama, Hiroishi-cho, Gamagori, Aichi 443-0038, Japan NIDEK CO., LTD. Telephone: (81-533) 67-6611 (Manufacturer) Facsimile: (81-533) 67-6610 : 3F Sumitomo Fudosan Hongo Bldg., 3-22-5, Hongo, NIDEK CO., LTD Bunkyo-Ku, Tokyo 113-0033, Japan (Tokyo Office) Telephone: (81-3) 5844-2641 Facsimile: (81-3) 5844-2642 : 47651 Westinghouse Drive, Fremont, California 94539, U.
- Page 3 MEASUREMENT IS NOT INCLUDED. This Operator’s Manual contains the cautions for safety and operating procedures for the NIDEK NON-CONTACT TONOMETER Model NT-2000. This manual complies with IEC 60601. The cautions for safety and operating procedures must be thoroughly understood before using the instrument by reading this operator’s manual.
-
Page 4: Table Of Contents
Table of Contents Page § 1 INTRODUCTION ......................1-1 1.1 Outline ........................1-1 1.2 Principle ........................1-2 1.3 Indications for Use ..................... 1-2 1.4 Classifications ......................1-3 1.5 Symbol Information ....................1-4 § 2 SAFETY PRECAUTIONS .................... 2-1 2.1 In Storage, Transport, and Installation ................. 2-1 2.2 In Wiring and Connection ................... - Page 5 Page 6.2 Replacing the Fuses ....................6-3 6.3 Attaching the Chinrest Paper ..................6-4 6.4 Cleaning the Exterior ....................6-4 6.5 Consumables and Maintenance Parts List ..............6-4 § 7 SPECIFICATIONS AND CONFIGURATION ............7-1 7.1 Specifications ......................7-1 7.2 Standard Configuration ....................7-2 7.3 Options ........................
-
Page 6: Introduction
Suitable air pressure range Suitable air pressure range (depends on the patient) (depends on the patient) Time Time (Automatic shut-off function) (APC function) The NT-2000 is equipped with the above two features for obtaining stable measurement data and achieving smooth measurement. -
Page 7: Principle
As reliable measurement data may not be obtained under such a condition, pay special attention to how wide the eye is opened. 1.3 Indications for Use The Nidek Model NT-2000 is a non- contact tonometer that is indicated for use in the measurement of intraocular pressure of the human eye. -
Page 8: Classifications
[Degree of protection against electric shock] Type B applied part The NT-2000 is classified as a system with a Type B applied part. A system with a Type B applied part provides an adequate degree of protection against electric shock particularly regarding;... -
Page 9: Symbol Information
1 - 4 1.4 Symbol Information This symbol indicates that reference to the operator’s manual is necessary prior to operation and maintenance. This symbol indicates that the degree of protection against electric shock is for a Type B applied part. The symbol indicates the state of the power switch. -
Page 10: Safety Precautions
SAFETY PRECAUTIONS § 2 In this manual, Signal Words are used to designate a degree or level of safety alerting. The definitions are as follows. WARNING: Indicates a potentially hazardous situation which, if not avoided, could result in death or serious injury. CAUTION: Indicates a potentially hazardous situation which, if not avoided, may result in minor or moderate injury or a property damage... - Page 11 2 - 2 CAUTION • Hold the base of the instrument, not the forehead rest or the chinrest, from the sides for transport. Otherwise, the forehead rest and chinrest may be deformed or damaged. • Avoid installing the instrument where the instrument is exposed to direct air-conditioning flow. Changes in temperature may cause condensation in the instrument and affect sensitivity of the sensor and the measurement results.
- Page 12 2 - 3 CAUTION • The patient environment is the volume of space in which contact can occur between the patient and any part of the device (including connected devices) or between the patient and any other person(s) touching the device (including connected devices). Use devices that comply with IEC60601-1 in the patient environment.
-
Page 13: In Wiring And Connection
2 - 4 2.2 In Wiring and Connection CAUTION • Connect the power cord to a grounded wall outlet which meets the power requirements specified on the label on the instrument. Otherwise, the system may not perform sufficiently or may be damaged. •... -
Page 14: In Use
2 - 5 2.3 In Use WARNING • Before starting the measurement, be sure to set the safety stopper for each patient to prevent the air nozzle from touching the patient’s eye. If the air nozzle touches the eye, the cornea may be damaged. CAUTION •... -
Page 15: After Use And During Maintenance And Checks
2 - 6 2.4 After Use and during Maintenance and Checks CAUTION • After using the instrument, turn OFF the power and put the dust cover on the instrument. Accumulated dust may make the eye to be measured unsanitary and such a condition may affect the accuracy of the measurement. -
Page 16: Disposal
2 - 7 2.5 Disposal CAUTION • Follow local governing ordinances and recycling plans regarding disposal of the instrument. The circuit board includes lithium batteries. The disposal method varies according to the local government. Check the specified disposal method for a specific waste in advance. •... -
Page 17: Labels
2 - 8 2.7 Labels In order to catch the user’s attention, the appropriate warning labels are attached to the specified locations on the instrument. MADE IN JAPAN 18515-M535-D... -
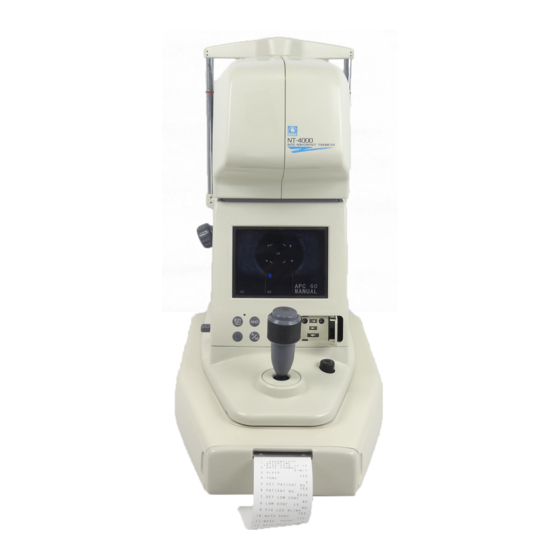
Page 18: System Descriptions
SYSTEM DESCRIPTIONS § 3 [Operator’s side] Measuring unit Screen Start button Control panel Joystick Cover for sub-switches Locking knob Safety stopper Power switch Printer [Patient’s Side] LEDs for detecting the eyelid Air nozzle Eye level marker Forehead rest LEDs for the cornea illumination Chinrest Chinrest elevation knob... - Page 19 3 - 2 [Operator’s Side] [Patient’s side] Safety stopper Air nozzle Used to provide a safety space** so that the Puffs out air. air nozzle does not touch the patient’s eye. * The “air nozzle” described in this manual Change the position of the stopper for each includes the observation window around the patient to keep the proper amount of space nozzle.
- Page 20 3 - 3 [Bottom View] Fuse holders Inlet Interface cable receptacle [Control Panel] Memory lamp switch switch switch switch [Sub-switches] Contrast adjusting control Eyelid detection mode setting switch Brightness adjusting control Not used Mode setting switch...
- Page 21 3 - 4 switch [Bottom View] Used to select the measurement range**. Every pressing of this switch changes the mea- Inlet surement range in the order of “APC 40” → The power cable is inserted here. “APC 60” → “40” → “60” → “APC 40”..* When the power switch is turned ON, the Interface cable connector initial setting is “APC 40”.
- Page 22 3 - 5 [Screen] Alignment target Charge indicator Alignment spot Focusing indicator Eye indication Applanation area Measurement data Measurement range Alignment mode indication...
- Page 23 3 - 6 [Screen] Eye indication The indication (either “R” (right) or “L” (left)) of the eye to be measured blinks. Charge indicator Indicates that the system is in the standby mode for the puffing out** of air. While it is indi- cated, air cannot be puffed out.
-
Page 24: Operating Procedures
OPERATING PROCEDURES § 4 4.1 Operation flow The following is the basic operation flow. POWER ON Setting of the measurement conditions (p.4-2, Step 3) * →Setting of the measurement range** (APC 40 / APC 60 / 40 / 60) →Setting of the alignment mode** (AUTO / MANUAL) Preparation of the patient (p.4-3, Step 4) Setting of the safety stopper (p.4-3, Step 5) Measurement (p.4-4, Step 6 to p.4-8, Step15 ) -
Page 25: Measurement Procedure
4 - 2 4.2 Measurement procedure 4.2.1 Basic measurement The basic measurement procedure is explained here. 1. Turn ON ( | ) the power switch. Without eyelid detection mode The indications as in the figure on the right appear on the screen. * The indication of the eyelid detection mode** appears if those modes are set beforehand with the sub-switches. - Page 26 4 - 3 4. Prepare the patient for measurement. Eye level marker 1) Wipe the forehead rest and chinrest that contact the patient with clean absorbent cotton or gauze dampened with rubbing alcohol. * If the chinrest paper is used, remove one piece for each patient.
- Page 27 4 - 4 6. Explain the measurement to the patient. To help the patient relax, make an explanation like the following one to the patient before starting the measurement: ((Example)) “You may be surprised by air puffed into your eye, but do not worry. Please be patient and relax for a moment until I can measure your intraocular pressure three times per each eye.”...
- Page 28 4 - 5 9. Perform alignment** to the eye to be measured. [In the case of “AUTO”] Alignment in the up, down, right, and left directions is automatically performed.* NOTE • Auto-alignment is performed only when the patient’s eye is being displayed on the screen.
- Page 29 4 - 6 10. Adjust the focusing** on the eye to be measured. While keeping the alignment, move the joystick Too close to the patient’s eye back and forth to change the focusing indicator** to the proper alignment** “ ”. Slightly pull the joystick toward you to move the Focusing...
- Page 30 In this case, eliminate the cause of the error and perform the measurement again. (For the details, see “4.3 Errors during Measurement”. (p. 4-10) *4 The eyelid detection mode** can be selected for the NT-2000 to judge the proper alignment to obtain accurate measurement values automatically. For the detail, see “4.4.1 Eyelid...
- Page 31 4 - 8 13. Repeat steps 9 to 12 and measure the intraocular pressure three times or more.* 14. Pull the joystick toward you once and move the main unit to the other eye. The indication of the eye toward which the joystick has been moved blinks.
- Page 32 4 - 9 17. To measure for the next patient, return to Step 4 (p. 4-3). 18. To finish the intraocular pressure measurement, turn OFF ( ) the power switch. 19. Check and clean the air-nozzle. See “4.5.1 Cleaning the air nozzle” (p.4-19). 20.
-
Page 33: Errors During Measurement
4 - 10 4.3 Errors during Measurement If the measurement is not performed correctly for a specific reason, an abbreviated error message appears and blinks for several seconds. In this case, eliminate the error following the instructions below. Error indication (1) APL: Applanation error As the eyelid was not opened enough, applanation** was not proper. - Page 34 4 - 11 (6) PRS: Pressure error The air pressure is not enough. Check the air pressure using the test mode** (p.4-13). If this error occurs repeatedly, contact NIDEK or your authorized distributor. (7) CHECK THE EYE: Condition of the patient’s eye needs to be checked. This error appears on the screen when the APL error occurs five times consecutively.
-
Page 35: Setting And Operation Of The Sub-Switches
4 - 12 4.4 Setting and Operation of the Sub-switches Eyelid detection mode setting switch The sub-switches under the cover set the following conditions: • Cancel/set of the eyelid detection mode** • Set of the test mode**, measurement mode and parameter setting mode. This section describes the setting and operation of each sub-switch. -
Page 36: Test Mode
4 - 13 4.4.2 Test mode In order to maintain the accuracy of the measurement, the test mode is used by checking the pressure of puffed out** air. NOTE • Before starting the test mode**, confirm that there is nothing in front of the air-nozzle. An obstruction may interfere with proper checking of the air pressure. -
Page 37: Parameter Setting Mode
4 - 14 4.4.3 Parameter setting mode 1. Open the cover for the sub-switches and slide the mode setting switch to the right (SET). The screen display changes as illustrated on the right. The parameters that can be changed appear four at a time. 2. - Page 38 4 - 15 (3: SLEEP) Setting of enabling or disabling the monitor auto OFF function. (factory setting: YES ) Joystick Turning it clockwise sets the parameter to “YES (enable)”. Turning it counterclockwise sets the parameter to “NO (disable)”. * In the monitor auto OFF function, all screen displays disappear after five minutes of inactivity.
- Page 39 4 - 16 (9: FIX LED BLINK) Setting of blinking or not blinking of the fixation light. (factory setting: YES ) Joystick Turning it clockwise sets the parameter to “YES (blinking)”. Turning it counterclockwise sets the parameter to “NO (not blinking)”.
- Page 40 4 - 17 (15: LOW CONF ALARM) Enabling or disabling the electronic sounds that are heard in the case of the low confidence error occurrence. (factory setting: NO ) Joystick Turning it clockwise changes the parameter to “YES (electronic sounds are heard). Turning it counterclockwise changes the parameter to “NO (electronic sounds are not heard)”.
- Page 41 4 - 18 4. If there are other parameters to be changed, repeat steps 2-3 and select the desired setting. To print out the contents of the parameters, press switch. 5. After the setting, return the mode setting switch to the center (MEAS) and close the cover for the sub-switch.
-
Page 42: Cleaning The Air Nozzle
4 - 19 4.5 Cleaning the Air Nozzle and the Pulse Detector After measurements are completed for a day, clean the air nozzle and pulse detector. If the eye image on the screen is not clear, the glass part of the air nozzle may be dirty with dust, tears, fingerprints, etc.. -
Page 43: Troubleshooting Guide
If the instrument does not work properly, check it referring to the table below before requesting repair. If the symptom is not eliminated, inform NIDEK or your authorized distributor of the symptom, model name (NT-2000) and serial number (see the label on the instrument). Symptom Cause Suggestion •... -
Page 44: Error Messages And The Countermeasures
If a message in the table below is displayed, check it referring to the countermeasures in the table. After that, inform NIDEK or your authorized distributor of the message number, the model name of the instrument (NT-2000), and the serial number (on the label on the instrument). Message No. -
Page 45: Maintenance
MAINTENANCE § 6 NOTE • If the instrument is sent back to NIDEK for service, it will be cleaned as described in 4.5 and 6.4. Furthermore, internal dust and dirt on the optical parts will be removed, and the appearance and internal parts of the instrument will all be in good condition. 6.1 Replacing the Printer Paper If the printer paper is running short, a red line appears on both sides of the printer paper. - Page 46 6 - 2 3. Remove the used printer paper and pull out the roller pivot. 4. Insert the roller pivot into the new printer paper roll. NOTE • Be careful about the direction that the printer paper is set. Otherwise, the data cannot be printed out. 5.
-
Page 47: Replacing The Fuses
6 - 3 6.2 Replacing the Fuses If the power is not supplied to the instrument by turning the power switch ON ( | ), the fuses may be blown. Replace the fuses with the new ones according to the procedures below. 1. -
Page 48: Attaching The Chinrest Paper
6 - 4 6.3 Attaching the Chinrest Paper 1. Extract the two pins from the chinrest. 2. Take an appropriate amount of the chinrest paper from the pack. The thickness of the chinrest paper sheets should be approximately 6mm or less. Chinrest paper 3. -
Page 49: Specifications
SPECIFICATIONS AND COMPOSITION § 7 7.1 Specifications 1. Measurement 1-1. Measurement range: 1 to 60 mmHg (1 mmHg increments) 1-2. Measurement range setting: APC 40 (1 to 40 mmHg) APC 60 (1 to 60 mmHg) 40 (1 to 40 mmHg) 60 (1 to 60 mmHg) 1-3. -
Page 50: Standard Configuration
7 - 2 7. External view 7-1. Dimension: 260 (W) × 487 (D) × 457 (H) mm (excluding protrusions) 7-2. Weight: Approx. 17kg 8. Environment 8-1. In use: Temperature: 10 to 40ºC (50 to 104 ºF) Humidity: 30 to 85% (non-condensation) 8-2. -
Page 51: Glossary
GLOSSARY • Alignment To align the corneal center of the patient’s eye with the air nozzle for measurement. • Alignment mode A mode to perform alignment. There are two kinds of modes: “Auto-alignment” The instrument automatically performs alignment. “Manual alignment” The alignment is performed by using the joystick NT-4000 has three methods of alignment. - Page 52 GLOSSARY-2 • Low confidence data The measured data with “ ”. It appears on the screen when measurement is performed in spite of a measurement error. (APL or ALM). As the confidence of the measured data is low, this kind of measured data is called “Low confidence data”.
Need help?
Do you have a question about the NT-2000 and is the answer not in the manual?
Questions and answers