ITOH DENKI F-RAT-NX75 Manual
Right angle transfer module
Hide thumbs
Also See for F-RAT-NX75:
- User manual (55 pages) ,
- Operating instructions manual (58 pages)
Table of Contents
Advertisement
Quick Links
Right Angle Transfer Module
F-RAT-NX75
Flat-Right Angle Transfer
〈 User Manual 〉
For IB-E04F-FT
Read this manual before use
Thank you for purchasing the Right Angle Transfer Module
(hereinafter referred to as "this product").
A PC application "Itoh Configurator E/IP (hereinafter referred to as "ICE")" and its user manual are
necessary for IB-E04F-FT setting and programming.
Contact us for the application and user manual.
Make sure to read this manual carefully before using, and start
using only after you have understood all the product' s functions,
safety information and precautions.
After reading the manual, make sure to keep it safe in a specified
place for future use, whenever necessary.
ITOH DENKI
ITOH DENKI
ITOH DENKI
Sorting
Module
No.579
Advertisement
Table of Contents

Related Manuals for ITOH DENKI F-RAT-NX75


Summary of Contents for ITOH DENKI F-RAT-NX75
- Page 1 Sorting Right Angle Transfer Module F-RAT-NX75 Flat-Right Angle Transfer 〈 User Manual 〉 For IB-E04F-FT Read this manual before use Thank you for purchasing the Right Angle Transfer Module (hereinafter referred to as “this product”). Make sure to read this manual carefully before using, and start using only after you have understood all the product’...
-
Page 2: Introduction
Features F-RAT-NX75 User Manual 1. Introduction Features Features of this product ・ This product is a module to divert at a right angle without changing its level, and there is no impact on the trays. ・ All-electric control. No pneumatics, which do not require compressor. - Page 3 ※2: Non-conductive pollution will occur, but it is assumed that condensation will happen to generate conductive property temporarily. About description of ・In this manual, F-RAT-NX75 is described as F-RAT, and F-RAT-NX75 and F-RAT the product are described separately, when needed.
-
Page 4: Procedures From Installation To Operation
Procedures from installation to operation F-RAT-NX75 User Manual 2. Procedures from installation to operation Procedures from installation to operation Read this manual Start using only after you have understood all the product’ s functions, safety information, and precautions. Advance preparation Prepare the 24V DC power supply, such as DC power supply units. -
Page 5: Table Of Contents
INDEX F-RAT-NX75 User Manual 2. Procedures from installation to operation INDEX Introduction …… 2 Procedures from installation to operation …… 4 Safety precautions …… 6 3-1. General precautions …… 8 3-2. Precautions on installation …… 10 3-3. Precautions on wiring …… 11 3-4. Precautions related to control …… 11 3-5. -
Page 6: Safety Precautions
3. Safety precautions F-RAT-NX75 User Manual 3. Safety precautions For parts names in sentences, refer to 6. Structures (P.24). 3-1. General precautions …… 8 3-2. Precautions on installation …… 10 3-3. Precautions on wiring …… 11 3-4. Precautions related to control …… 11 3-5. Precautions related to operation …… 12... - Page 7 Danger level F-RAT-NX75 User Manual 3. Safety precautions Danger level To prevent hazards to users and/or others, and/or damage to property in advance, the important precautions to be followed securely is described below. ■ The degree of hazard and/or damage that may result if a user disregards the description and operates the product improperly is caregorized as the following symbols and explained below.
-
Page 8: General Precautions
General precautions F-RAT-NX75 User Manual 3. Safety precautions 3-1. WARNING General precautions Do not use the product near places subject to explosive, flammable gas, and/or corrosive atmosphere, and/or combustible materials. Failure to follow this could result in explosion, fire, electric shock and/or injury. - Page 9 General precautions F-RAT-NX75 User Manual 3. Safety precautions 3-1. CAUTION General precautions Stop operation when abnormal sound is heard during operation. Failure to follow this could result in unexpected accidents. Do not use in a way exceeding the range of the product specifications. Failure to follow this could result in malfunction, fire, and/or injury. Turn off the power supply to the product before moving and/or installing the product, and performing maintenance and inspection (excluding those during operation). Working while the power is on could result in accidents due to unexpected operation. Observe the safety regulations required for installation locations, and/or products in use. Securely wire each cable to connection parts. Improper wiring could result in electric shock and/or malfunction. Do not turn on/off relays and/or contactors near power cables, signal cables, and/or driver cards. Failure to follow this could result in malfunction due to noise generation. LED or Pull-up/Pull-down circuits implemented in the output circuit of control devices could result in unexpected operation. Carefully check the output circuit. Turn on the power in order of external control devices, and then the product. Turn off the power in order of the product, and then external control devices. Turning on/off the power in the wrong order could result in malfunction. Do not unplug power and/or signal cables during operation. Also, do not run/stop this product by the power supply. (Use the signal.) Failure to follow this could result in malfunction. Do not forcibly rotate the MDR at times other than maintenance and inspection.
-
Page 10: Precautions On Installation
Precautions on installation F-RAT-NX75 User Manual 3. Safety precautions 3-1. CAUTION General precautions Do not turn on the power when trays are unstable. Failure to follow this could result in injury, accidents, and/or damage due to load collapse. Make sure to perform the start-up inspection, and check that devices are free from any abnormalities, and that safety equipment functions correctly before using the product. When disposing of the product, make consigning contracts with licensed industrial waste disposers, and consign the disposal to them. 3-2. WARNING Precautions on installation In principle, have two or more persons work when carrying and/or installing the product as it is a heavy load. When hoisting this product, never enter the area under the suspended load. When hoisting, use appropriate hoisting equipment, and pay special attention to prevent the balance of the suspended load from being lost and/or falling. -
Page 11: Precautions On Wiring
Precautions on wiring F-RAT-NX75 User Manual 3. Safety precautions 3-2. CAUTION Precautions on installation Take appropriate measures to prevent trays from popping out of the equipment. For example, mount guide rails on the conveyor frames. Failure to follow this could result in workers getting injured by trays popping out of the equipment. -
Page 12: Precautions Related To Operation
Precautions related to operation F-RAT-NX75 User Manual 3. Safety precautions 3-5. CAUTION Precautions related to operation Do not forcibly move trays when they are placed on the carrier wheels. Failure to follow this could result in damage and/or malfunction. Make sure to perform the start-up inspection before starting operation. At the start-up inspection, wear protective equipment, such as gloves. Failure to follow this could result in hands getting injured by metal parts. At the start-up inspection, shut off the power, and perform inspection. (excluding inspection to be performed when operating this product.) Failure to follow this could result in injury due to unexpected operation, such as getting caught and/or stuck. When operating this product at the start-up inspection, take appropriate measures to prevent fingers from getting stuck and/or caught in carrier wheels and/or rollers. Also, get ready to shut off the power in the event that something should happen. Failure to follow this could result in accidents/injury by getting caught and/or stuck. If any abnormalities are found at the start-up inspection, make sure to take countermeasures before the trial run. Failure to follow this could result in damage and/or malfunction. 3-6. CAUTION Precautions on maintenance and If any abnormalities are found, do not use this product until the ... - Page 13 · Check that all parts are installed. Failure to follow this could result in malfunction and/or unexpected accidents. Make sure to prepare repair/replacement parts designated by ITOH DENKI. Using parts other than those designated by ITOH DENKI could result in malfunction.
-
Page 14: Advance Preparation
4. Advance preparation F-RAT-NX75 User Manual 4. Advance preparation... - Page 15 Items to be prepared by customers F-RAT-NX75 User Manual 4. Advance preparation Wiring image AC power Sensors source Breaker F-RAT main unit Emergency stop switch IB-E04F-FT IB-E04F-FT 24V DC power unit HBM-201 As for the sensor input, and input/output signals of driver cards, 【Important】 adopt the number of inputs/outputs based on operation.
- Page 16 Items to be prepared by customers F-RAT-NX75 User Manual 4. Advance preparation ② Sensors Zone sensors to check the tray, and area sensors to check loading and discharging, etc. Area sensor (Discharge) Area sensor (Discharge) F-RAT zone sensor Area sensor (Load) Transfer direction Zone sensor...
- Page 17 Items to be prepared by customers F-RAT-NX75 User Manual 4. Advance preparation ⑥ Application Installing the designated application A PC application “ICE” and its user manual are necessary for IB-E04F-FT setting and programming. Contact us for the application and user manual. ■ Use ICE Ver1.1.4.0 or later.
- Page 18 Items to be prepared by customers F-RAT-NX75 User Manual 4. Advance preparation ⑧ Stay Size (mm) (option) 6040 / 7540 / 9040 6050 / 7550 / 9050 6060 / 7560 / 9060 6070 / 7570 / 9070 6080 / 7580 / 9080 X (Between frames) 21.3...
- Page 19 Items to be prepared by customers F-RAT-NX75 User Manual 4. Advance preparation ⑪ About the wiring method ⑪-1 When overcurrent When overcurrent protection devices need to be installed to the DC power supply, some protection devices power supplies that need to conform to the safety standards (UL60950-1, etc.) require are required...
-
Page 20: Product Check
Product check F-RAT-NX75 User Manual 5. Product check... - Page 21 Checking the model F-RAT-NX75 User Manual 5. Product check Checking the model Unpack the product, and check that the product model is as ordered. 〈 Product label details 〉 FLAT RIGHT ANGLE TRANSFER Model FーRATーNX75ーF6 0ー7 540ーEN RATED INPUT: DC24V, FE2.7A KT 4.4A PAYLOAD: max 50kg SERIAL No. 19 03 01 001 ITOH DENKI CO.,LTD MADE IN JAPAN Checking appearance ①Check that the main unit is free from any abnormalities, such as traces of scratches,...
- Page 22 Checking accessories F-RAT-NX75 User Manual 5. Product check Checking accessories Check that all the following items are included. Driver card・ Depending on the F-RAT input and output signal type, driver cards with the NPN (N) or PNP (P) Conversion cable signal input are included. (Not included when no driver card has not been specified.) For F−RAT−NX75−□□□−□□□□−EN...
-
Page 23: Structures
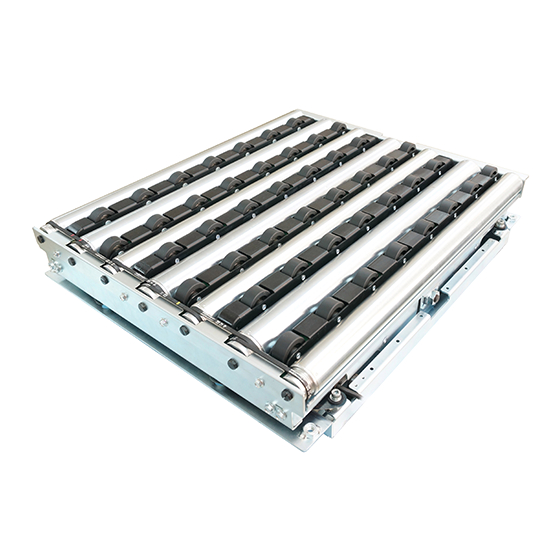
Structures F-RAT-NX75 User Manual 6. Structures... - Page 24 Product designation F-RAT-NX75 User Manual 6. Structures Structures Idler(φ48.6) Idler(φ38) Drive switching MDR(M3) Drive belt FE R LE T 0 ー 4 .4A 5 5 A NG ー7 A F6 0 R IG 5ー 50 kg N X7 24 V, FL AT T: ...
-
Page 25: Installation/Wiring
Installation/Wiring F-RAT-NX75 User Manual 7. Installation/Wiring 7-1. Before installation …… 26 7-2. Installation …… 35 7-3. Wiring …… 37... -
Page 26: Before Installation
Size 6040・6050 F-RAT-NX75 User Manual 7. Installation/Wiring 7-1. ・Prepare stands, and perform frame processing in advance by reference to the mounting holes in dimensions. Before installation ・Determine the mounting location for zone sensors to check the existence of trays, and area sensors to check loading and discharging. Then, prepare for them to be mounted. - Page 27 Size 6060・6070 F-RAT-NX75 User Manual 7. Installation/Wiring Size 6060 L595mm×W595mm (Mounting nut position) 22.5 22.5 * Cable (Pipe size) *Guide for cable marginal projecting length (mm) 4 × Mounting nut(M8) M1 : Carrier wheel transfer MDR 1000 M2 : Roller transfer MDR M3 : Drive switching MDR 1300 Size 6070 L595mm×W695mm (Mounting nut position) 22.5 22.5 * Cable (Pipe size) 4×取り付け用ナッ ト(M8) *Guide for cable marginal projecting length (mm) M1 : Carrier wheel transfer MDR 1000 M2 : Roller transfer MDR M3 : Drive switching MDR 1300...
- Page 28 Size 6080・7540 F-RAT-NX75 User Manual 7. Installation/Wiring Size 6080 (Mounting nut position) L595mm×W795mm 22.5 22.5 * Cable (Pipe size) 4 × Mounting nut(M8) *Guide for cable marginal projecting length (mm) M1 : Carrier wheel transfer MDR 1000 M2 : Roller transfer MDR M3 : Drive switching MDR 1300 Size 7540 (Mounting nut position) L745mm×W395mm 22.5 22.5 * Cable 4 × Mounting nut(M8) *Guide for cable marginal projecting length (mm) M1 : Carrier wheel transfer MDR M2 : Roller transfer MDR 1100 M3 : Drive switching MDR 1200...
- Page 29 Size 7550・7560 F-RAT-NX75 User Manual 7. Installation/Wiring Size 7550 L745mm×W495mm (Mounting nut position) 22.5 22.5 * Cable *Guide for cable marginal projecting length (mm) 4 × Mounting nut(M8) M1 : Carrier wheel transfer MDR M2 : Roller transfer MDR 1000 M3 : Drive switching MDR 1200 Size 7560 L745mm×W595mm (Mounting nut position) 22.5 22.5 * Cable 4 × Mounting nut(M8) *Guide for cable marginal projecting length (mm) M1 : Carrier wheel transfer MDR M2 : Roller transfer MDR M3 : Drive switching MDR 1200...
- Page 30 Size 7570・7580 F-RAT-NX75 User Manual 7. Installation/Wiring Size 7570 (Mounting nut position) L745mm×W695mm 22.5 22.5 * Cable *Guide for cable marginal projecting length (mm) 4 × Mounting nut(M8) M1 : Carrier wheel transfer MDR M2 : Roller transfer MDR M3 : Drive switching MDR 1200 Size 7580 (Mounting nut position) L745mm×W795mm 22.5 22.5 * Cable (Pipe size) *Guide for cable marginal projecting length 4 × Mounting nut(M8) (mm) M1 : Carrier wheel transfer MDR M2 : Roller transfer MDR M3 : Drive switching MDR 1200...
- Page 31 Size 9040・9050 F-RAT-NX75 User Manual 7. Installation/Wiring Size 9040 (Mounting nut position) L895mm×W395mm 22.5 22.5 * Cable 4 × Mounting nut(M8) *Guide for cable marginal projecting length (mm) M1 : Carrier wheel transfer MDR M2 : Roller transfer MDR 1100 M3 : Drive switching MDR 1100 Size 9050 L895mm×W495mm (Mounting nut position) 22.5 22.5 * Cable 4 × Mounting nut(M8) *Guide for cable marginal projecting length (mm) M1 : Carrier wheel transfer MDR M2 : Roller transfer MDR 1000 M3 : Drive switching MDR 1100...
- Page 32 Size 9060・9070 F-RAT-NX75 User Manual 7. Installation/Wiring Size 9060 L895mm×W595mm (Mounting nut position) 22.5 22.5 * Cable (Pipe size) 4 × Mounting nut(M8) *Guide for cable marginal projecting length (mm) M1 : Carrier wheel transfer MDR M2 : Roller transfer MDR M3 : Drive switching MDR 1100 Size 9070 L895mm×W695mm (Mounting nut position) 22.5 22.5 * Cable *Guide for cable marginal projecting length (mm) 4 × Mounting nut(M8) M1 : Carrier wheel transfer MDR M2 : Roller transfer MDR M3 : Drive switching MDRV 1100...
- Page 33 Size 9080 F-RAT-NX75 User Manual 7. Installation/Wiring Size 9080 L895mm×W795mm (Mounting nut position) 22.5 22.5 * Cable (Pipe size) 4 × Mounting nut(M8) *Guide for cable marginal projecting length (mm) M1 : Carrier wheel transfer MDR M2 : Roller transfer MDR M3 : Drive switching MDR 1100...
- Page 34 Mounting preparation for driver cards F-RAT-NX75 User Manual 7. Installation/Wiring Mounting preparation Hole processing on frames and control panel for driver cards ・Perform mounting processing on the frames and control panel by reference to the mounting holes for driver cards. ・For cable opening and projection from the F-RAT main unit, refer to ...
-
Page 35: Installation
Installing the F-RAT main unit F-RAT-NX75 User Manual 7. Installation/Wiring 7-2. Necessary tools Installation 13mm Phillips head screwdriver Precision slotted ratchet wrench screwdriver Stripper (No.2) Installing the Installing the F-RAT main unit F-RAT main unit Carry this product to the installing location. When lifting, hold the bottom of this product. - Page 36 About stays (option)) F-RAT-NX75 User Manual 7. Installation/Wiring About stays (option) Dedicated stay (optional) is prepared for F-RAT installation. ■ If users do not use the stays, be sure to use the mounting holes on the F-RAT main unit to secure the F-RAT.
-
Page 37: Wiring
Wiring F-RAT-NX75 User Manual 7. Installation/Wiring Mounting driver cards Mounting driver cards Use the included screws and nuts to mount driver cards on the conveyor frames or control panel. Recommended tightening torque ■ ・ IB-E04F-FT : 0.74N・m ・ HBM-201 : 1.0N・m Mounting sensors, Mounting sensors, control devices, and power supply units control devices, and... - Page 38 Wiring example (image) F-RAT-NX75 User Manual 7. Installation/Wiring Wiring example (image) F-RAT ④ ① ② ③ V-ribbed pulley :F-RAT zone sensor ① :Area sensor (on the opposite side of V-ribbed pulley) ② :Area sensor (on the side of V-ribbed pulley) ③ :Area sensor (on the left side when viewing V-ribbed pulley from the front) ④ :Area sensor (on the right side when viewing V-ribbed pulley from the front) IB-E IB-E LAN1 LAN2 Series CN302 Series (RemoteOUT) OUT 1 CN301 (RemoteIN) OUT 2 OUT 3 ④Area sensor IN 3 OUT 4 ③Area sensor...
- Page 39 IB-E04F-FT wiring F-RAT-NX75 User Manual 7. Installation/Wiring 〔IB-E04F-FT〕 IB-E04F-FT wiring IB-E04F-FT LAN 1 LAN 2 EtherNet/IP LAN 2 Node ID OUT 1 CN302 SEN B LAN 1 OUT 2 Power RUN B SEN A IN 3 OUT 3 ERR B RemoteOUT RUN A IN 2 OUT 4 CN301 ERR A OUT 5 IN 1 0V OUT1 RemoteIN OUT2 OUT3 OUT4 IN3 T7 T28 T27...
- Page 40 IB-E04F-FT wiring F-RAT-NX75 User Manual 7. Installation/Wiring Input/output circuit ■ Connect the COMMON terminal for remote input and remote output separately. CN301 [Remote input (CN301)] 734-264 (WAGO) Maximum allowable current: 10A ・Set the NPN/PNP signal switching for remote input using COMMON. Note that COMMON is common among RemoteIN1 to 3.
- Page 41 Wiring for HBM-201 F-RAT-NX75 User Manual 7. Installation/Wiring 〔HBM-201〕 Wiring for HBM-201 M3:Drive switching HBM-201 24V DC ■ Connector descriptions 1 2 3 4 5 (Power) 24V DC HBM-201BN:0V ( ) } HBM-201BP:24V #2 0V #1 24V DC HBM-201BN:0V ( ) } HBM-201BP:24V Functions Detailed descriptions Carrier wheel surface ・Carrier wheel and roller transfer surface are switched by inputting...
- Page 42 Wiring for HBM-201 F-RAT-NX75 User Manual 7. Installation/Wiring Switch settings Turn the driver card DIP switch and rotary switch to the following (factory setting). HBM−201B□ OFF OFF OFF OFF OFF OFF OFF OFF OFF OFF OFF HBM-201BP HBM-201BN ■ Do not change the factory settings.
-
Page 43: Ib-E04F-Ft Settings
8. IB-E04F-FT settings F-RAT-NX75 User Manual 8. IB-E04F-FT settings 8-1. Setting preparation …… 45 8-2. Property settings …… 48... -
Page 44: Setting Preparation
Flow of settings F-RAT-NX75 User Manual 8. IB-E04F-FT settings IB-E04F-FT controls the F-RAT with the property settings and ladder logic. Flow of settings This section explains the setting preparation and property settings. Setting the IP address } ↓ 8-1. Creating the project file Setting preparation ↓... - Page 45 Setting preparation F-RAT-NX75 User Manual 8. IB-E04F-FT settings 8-1. Controller settings Setting preparation Make sure that all DIP switches on SW401 of IE-B-E04F-FT are turned OFF. All switches are OFF under the factory settings. Do not change. ■ IB-E04F-FT LAN 1 LAN 2 EtherNet/IP Node ID LAN 2 OUT 1 SW401 SEN B...
- Page 46 Setting preparation F-RAT-NX75 User Manual 8. IB-E04F-FT settings Set the IP address to “192.168.1.XXX”, and Subnet mask to “255.255.255.0”. Click Setting the IP address “OK”. ↓ Creating the project file ↓ Registering IB-E04F-FT to be used ↓ IP address → 192.168.1.XXX IB-E04F-FT property settings Subnet mask →...
- Page 47 Setting preparation F-RAT-NX75 User Manual 8. IB-E04F-FT settings Setting the IP address Creating the project file ↓ Creating the project file Before creating the ladder logic and setting properties for the F-RAT, the project file ↓ needs to be created by ICE. Registering IB-E04F-FT to be used Select ‘New Project‘ from the main menu.
- Page 48 Property setting F-RAT-NX75 User Manual 8. IB-E04F-FT settings 8-2. Property setting Property setting In the property settings, set the F-RAT ladder logic selection and transfer speed to be Setting the IP address written to IB-E04F-FT. ↓ Click ‘Device’ on the project tree window, and display the IP address for the Creating the project file corresponding IB-E04F-FT.
- Page 49 Property setting F-RAT-NX75 User Manual 8. IB-E04F-FT settings Setting the IP address Property setting window ↓ Creating the project file ↓ Write/read buttons to IB-E04F-FT Selected Note Logic selection Registering IB-E04F-FT to be used ↓ IB-E04F-FT property settings ↓ Writing properties ↓ Creating the IB-E04F-FT ladder logic ↓...
- Page 50 Property setting F-RAT-NX75 User Manual 8. IB-E04F-FT settings Enter the F-RAT settings as described below. Setting the IP address ↓ Creating the project file ↓ Registering IB-E04F-FT to be used ↓ IB-E04F-FT property settings ↓ Writing properties ↓ Creating the IB-E04F-FT ladder logic ↓ Writing the ladder logic ↓...
- Page 51 Property setting F-RAT-NX75 User Manual 8. IB-E04F-FT settings About the transfer direction Setting the IP address ↓ Set the transfer direction with the ladder logic command and ‘Direction’ under properties. Creating the project file For details on the ladder logic, refer to “2.4 Ladder logic” (P.2-33) in the ICE instruction manual separately.
- Page 52 9. Control/Operation F-RAT-NX75 User Manual 9. Control/Operation 9-1. Creating the ladder logic …… 54 9-1-1. Switching the transfer direction …… 58 9-1-2. Changing the speed …… 58 9-2. Basic operation …… 59 9-2-1. Switching the transfer surface …… 64 9-2-2. About the initial position setting (teaching) of the transfer surface …… 65 9-3. Program example …… 66 9-4. What to do before operation...
-
Page 53: Creating The Ladder Logic
Flow of settings F-RAT-NX75 User Manual 9. Control/Operation IB-E04F-FT operates the F-RAT with the property settings and ladder logic Flow of settings This section explains the ladder logic creation and writing. Setting the IP address } ↓ 8-1. Creating the project file Setting preparation ↓... - Page 54 Creating the ladder logic F-RAT-NX75 User Manual 9. Control/Operation 9-1. Creating the IB-E04F-FT ladder logic Creating the ladder logic Create the F-RAT ladder logic to be written to IB-E04F-FT. Setting the IP address ↓ Start ICE, and select “File” - “Open” from the main menu. Then, open the Creating the project file project file that has been created in 8.1 Setting preparation.
- Page 55 Creating the ladder logic F-RAT-NX75 User Manual 9. Control/Operation Select ‘Logic’ on the project tree window, and right-click “add” to select. Setting the IP address ↓ Enter the logic name and creator’s name in Logic Information. Creating the project file ↓ Registering IB-E04F-FT to be used...
- Page 56 Creating the ladder logic F-RAT-NX75 User Manual 9. Control/Operation Setting the IP address Information window ↓ Double-click ‘Information’ to open the Logic Information window. Creating the project file ↓ Registering IB-E04F-FT to be used ↓ IB-E04F-FT property settings ↓ Writing properties ↓ Create the ladder logic on the program window.
- Page 57 Writing the ladder logic F-RAT-NX75 User Manual 9. Control/Operation Writing the ladder logic Setting the IP address ↓ Write the ladder logic to IB-E04F-FT. Creating the project file ↓ The created ladder logic will not be applied until it has been written. Registering IB-E04F-FT to be used Write the ladder logic.
-
Page 58: Switching The Transfer Direction
Switching the transfer direction F-RAT-NX75 User Manual 9. Control/Operation 9-1-1. Switching the transfer direction Switching the Set the transfer direction with the ladder logic command and ‘Direction’ under transfer direction properties. For details on the ladder logic, refer to “2.4 Ladder logic” (P.2-33) in the ICE instruction manual separately. -
Page 59: Basic Operation
Basic operation F-RAT-NX75 User Manual 9. Control/Operation 9-2. Basic operation Introduction About control In this manual, the signal input and output in “9-2. Basic operation” and “9-3. ■ Program example” is described when wiring has been performed based on the wiring example image. - Page 60 Basic operation F-RAT-NX75 User Manual 9. Control/Operation Operation image Turn on the power IB-E04F-FT Signal input to SensorAlarm A / SensorAlarm B Set the initial position IB-E04F-FT Signal output from RemoteOUT1 / RemoteOUT2 of the transfer surface (Teaching) Start teaching IB-E04F-FT Signal input to SensorAlarm A...
- Page 61 Basic operation F-RAT-NX75 User Manual 9. Control/Operation Set the initial Transfer surface Turn on Transfer surface Load Discharge position of the switch the power switch transfer surface (Prepare reception) The following operation is when MA/MB of IB-E04F-FT is set to RUN, and the transfer ■...
- Page 62 Basic operation F-RAT-NX75 User Manual 9. Control/Operation Set the initial Transfer surface Turn on Transfer surface Load Discharge position of the switch the power switch transfer surface (Prepare reception) F-RAT operation IB-E04F-FT Signal input/output Zone sensor Load for the discharge conveyor F-RAT zone sensor...
- Page 63 Basic operation F-RAT-NX75 User Manual 9. Control/Operation Set the initial Transfer surface Turn on Transfer surface Load Discharge position of the switch the power switch transfer surface (Prepare reception) F-RAT operation IB-E04F-FT Signal input/output Zone sensor Discharge for the discharge conveyor F-RAT zone sensor...
-
Page 64: Switching The Transfer Surface
Switching the transfer surface F-RAT-NX75 User Manual 9. Control/Operation 9-2-1. 安 Switching the transfer surface 全 Switching the 上 Use HBM-201 to switch the transfer surface. の transfer surface ご The transfer surface can be switched by inputting the signal to CN2#4 and CN2#5. 注 意... -
Page 65: About The Initial Position Setting (Teaching) Of The Transfer Surface
F-RAT-NX75 User Manual 9. Control/Operation 安 9-2-2. About the initial position setting (teaching) of the transfer surface 全 About the initial position 上 The initial position setting (teaching) of the transfer surface is necessary to set the transfer の setting (teaching) ご surface after the power is turned on. 注 of the transfer surface 意... -
Page 66: Program Example
Program example F-RAT-NX75 User Manual 9. Control/Operation 9-3. Program example Program example ■ Do not load trays from the roller transfer MDR direction while the carrier Operation by loading through wheel status is output (signal input to SensorAlarm B on IB-E04F-FT). roller transfer and discharging Failure to follow this could result in damage to trays, and malfunction. -
Page 67: What To Do Before Operation
Start-up inspection F-RAT-NX75 User Manual 9. Control/Operation 9-4. To prevent accidents and/or damage to devices during operation, refer to the below before operation, and check the safety. What to do before operation Items to check before turning on the power Start-up inspection Turn off the power of all connected devices, and perform the following inspection, taking necessary measures. - Page 68 Trial run F-RAT-NX75 User Manual 9. Control/Operation Trial run Items to check before the trial run Check below before the trial run. ・When the roller transfer MDR and/or idlers have been replaced, check that the drive belts have been mounted in the correct groove positions. ・Check all parts are installed.
-
Page 69: Maintenance/Inspection
10. Maintenance/Inspection F-RAT-NX75 User Manual 10. Maintenance/Inspection 10-1. LED indication …… 70 10-2. Checking and releasing errors …… 74 Before replacement work 10-3. …… 76 Replacement of MDR for roller transfer/idlers/roller drive belts 10-4. …… 78 Replacement of the carrier wheel cassette 10-5. …… 83... -
Page 70: Led Indication
〔IB-E04F-FT〕LED 詳細 F-RAT-NX75 User Manual 10. 保守点検 If errors occur with this product, identify the causes of errors by checking LEDs and 10-1. error signals on the driver card/controller, and perform recovery work. LED indication IB-E04F-FT IB-E04F-FT For carrier wheel transfer For roller transfer LED indication is found at the following locations. - Page 71 〔IB-E04F-FT〕LED details F-RAT-NX75 User Manual 10. Maintenance/Inspection LED indication ● LED type Description LED indication pattern Power OFF on the communication PCB (*1) ON (Green) Normal startup MS LED ON (Green) ⇔Blinking(1 Hz)(Red) Device (IP address, etc.) has not been specified Blinking(1 Hz)(Red) Communication error (LAN1 or LAN2 port)
- Page 72 〔IB-E04F-FT〕 Error details F-RAT-NX75 User Manual 10. Maintenance/Inspection Error details ● The table below describes the LED indication when an error occurs, occurrence condi- tions, and release conditions, as well as the ladder logic and MDR status during error generation. Use ICE to check errors, and release errors manually.
- Page 73 〔HBM-201〕Error details F-RAT-NX75 User Manual 10. Maintenance/Inspection Even if inputting the signal to CN2#4 and #5, but the signal output from CN2#1 and #2 〔HBM-201〕 does not change, the following errors have been assumed to occur. Errors can be For drive switching distinguished by the LED display.
-
Page 74: Checking And Releasing Errors
Error monitor F-RAT-NX75 User Manual 10. Maintenance/Inspection 10-2. Use ICE to check error status, and release errors manually. Checking and releasing ■ To release an error on HBM-201, use RemoteOUT on IB-E04F-FT. errors (Refer to HBM-201 error details) Checking error status Select ‘Dialog’ - ‘Error Information’ from the main menu. - Page 75 Error monitor F-RAT-NX75 User Manual 10. Maintenance/Inspection Click ‘Clear’ on the Error Information window to release the error. Releasing the error manually Specify the IP address for the controller where the error is to be released to display the selected IP address in SelectIP.
-
Page 76: Before Replacement Work
On the side of V-ribbed pulley On the side of V-ribbed pulley Size □□ 50 type On the side of V-ribbed pulley Size □□ 80 type On the side of V-ribbed pulley Size □□ 60 type On the side of V-ribbed pulley Example) Carrier wheel cassette Type B for F-RAT-NX75-F60- 7 5 50-EN: NX75-CC- 7 5 B... - Page 77 Replacement parts F-RAT-NX75 User Manual 10. Maintenance/Inspection Roller drive belt Part number:2PJ-265 (V-ribbed belt) *1 The part number of which only belts, size □□60 type, are used to link Φ38 idlers, is 2PJ-246. *1Indicates size (W direction) for the model of this product Example) F-RAT-NX75-F60-7560-EN...
- Page 78 Replacement of roller transfer MDR/idlers F-RAT-NX75 User Manual 10. Maintenance/Inspection If any abnormalities are found in one of the roller transfer MDR, idlers, and/or 10-4. Replacement of roller drive belts, replace them according to the following methods. roller transfer MDR/idlers /roller drive belts Before replacement Before replacement, prepare necessary tools.
- Page 79 Replacement of roller transfer MDR/idlers F-RAT-NX75 User Manual 10. Maintenance/Inspection Replacement procedures Slide the spring loaded shaft from the fixed hole(①), and remove the idler from the frame (②) <Figure seen from the side> Frame Fixed hole ①Push the spring loaded shaft ②Remove it from until it has passed through the...
- Page 80 Replacement of roller transfer MDR/idlers F-RAT-NX75 User Manual 10. Maintenance/Inspection Replacement procedures Lift up the tip of the roller transfer ②Remove the MDR (①), and remove the roller roller drive belt drive belt. (②) Remove the roller ①Lift up transfer MDR (③), and pull the power cable off the fixed hole on the frame (④)...
- Page 81 Replacement of roller transfer MDR/idlers F-RAT-NX75 User Manual 10. Maintenance/Inspection Replacement procedures Mount the roller drive belt on the V-ribbed pulley of the roller transfer MDR (①), align the tip of the attaching shaft with the ①Mount the roller notch shape, and fit it into the drive belt...
- Page 82 Replacement of roller transfer MDR/idlers F-RAT-NX75 User Manual 10. Maintenance/Inspection Align the tip of the attaching shaft Replacement procedures on the side of the belt on the V-ribbed pulley, where the roller drive belt has been mounted, with the notch shape on the frame,...
-
Page 83: Replacement Of The Carrier Wheel Cassette
Replacement of the carrier wheel cassette F-RAT-NX75 User Manual 10. Maintenance/Inspection If any abnormalities are found in the carrier wheels, replace the whole carrier 10-5. wheel cassette. Replacement of the carrier wheel cassette Before replacement Before replacement, prepare necessary tools. Tools to be used 8 mm/19 mm wrench 5 mm hex. - Page 84 Replacement of the carrier wheel cassette Replacement of the carrier wheel cassette F-RAT-NX75 User Manual 10. Maintenance/Inspection Replacement procedures Mounting the carrier wheel cassette on the F-RAT main unit Check the model of the removed On the side of V-ribbed pulley carrier wheel cassette and replacement carrier wheel cassette. Wheel for Location of the...
-
Page 85: Troubleshooting
Troubleshooting F-RAT が動かない F-RAT-NX75 User Manual 11. Troubleshooting... - Page 86 Troubleshooting F-RAT-NX75 User Manual 11. Troubleshooting If you believe the product may be malfunctioning, check the contents described in this section before contacting the supplier and/or asking for repair. Symptoms F-RAT does not operate Items to be checked Countermeasures References Is PWR LED (Green) for each Supply 24V DC.
- Page 87 Troubleshooting F-RAT-NX75 User Manual 11. Troubleshooting Symptoms When loading, Items to be checked Countermeasures References trays get stuck, or 7. Installation/ cannot be transferred Is the load conveyor level the Align levels of the load conveyor Wiring same as the level of the F-RAT? and the F-RAT.
- Page 88 Troubleshooting F-RAT-NX75 User Manual 11. Troubleshooting Symptoms ・The speed cannot be Items to be checked Countermeasures References changed Changing the ・The speed setting is Use MA to change the carrier Is MA used to change the carrier speed incorrect wheel speed, and use MB to wheel speed, and MB used to (⇒P.58)...
-
Page 89: Appendix
Appendix F-RAT-NX75 User Manual Appendix... -
Page 90: Appendix 1. Product Specifications
F-RAT main unit specifications F-RAT-NX75 User Manual Appendix Appendix 1. Product specifications F-RAT main unit specifications Size 60□□ 6040 6050 6060 6070 6080 595mm Total length (L) Carrier wheel transfer direction F-RAT Total width (W) Roller transfer direction 395mm 495mm 595mm 695mm 795mm main unit... - Page 91 Time from RUN signal input 15 msec or less ― to motor starting Transfer throughput 6000 ・F-RAT-NX75, nominal speed of 60 m/min, size 6050 type ・Using area sensors 5000 ・Ambient temperature:20℃ ・Conditions of trays: Cardboard of L405 mm × W350 30 kg ・Depends on the diverting conditions from the status where trays...
- Page 92 Replacement parts/Options F-RAT-NX75 User Manual Appendix Do not store carrier wheel cassettes in places subject to high temperature, high humid- Appendix 2. ■ ity, and/or direct sunlight. Failure to follow this could result in its lifetime to be signifi- Replacement parts/Options cantly shortened.
- Page 93 Replacement parts/Options F-RAT-NX75 User Manual Appendix Stay Size (mm) 6040 / 7540 / 9040 (with hex. bolt/plain washer/ spring washer) 6050 / 7550 / 9050 6060 / 7560 / 9060 6070 / 7570 / 9070 6080 / 7580 / 9080 X(Between frames) 21.3...
-
Page 94: Appendix 3. Residual Risk List/Map
Residual risk F-RAT-NX75 User Manual Appendix 【Seriousness of harm】 Appendix 3. WARNING: Indicates that there is a possibility that severe injury or even death may result if protective measures have Residual risk list/MAP not been taken CAUTION: Indicates that there is a possibility that minor injury may result if protective measures have not been taken... - Page 95 ■ Headquarters: Itoh Denki Co.,Ltd. 1146-2, Asazuma-Cho, Kasai, Hyogo 679-0105 Phone: +81 ( 0 ) 790 47 1225 Fax: +81 ( 0 ) 790 47 1328 www.itohdenki.co.jp ■ Europe, Middle East, Africa: Itoh Denki Europe SAS Phone: +33 ( 0 ) 4 50 03 09 99 Fax: +33 ( 0 ) 4 50 03 07 60 www.itoh-denki.com ■ North & South America: Itoh Denki USA, Inc Phone: +1 570 820 8811 Fax: +1 570 820 8838 ...
Need help?
Do you have a question about the F-RAT-NX75 and is the answer not in the manual?
Questions and answers