Table of Contents
Advertisement
Quick Links
PHONE 1-800-295-5510
FAX 1-800-295-5571
WEB uline.com
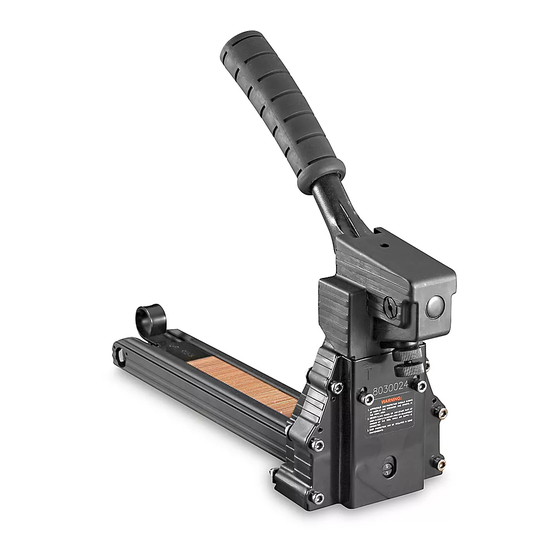
MANUAL CARTON STAPLER
MODEL:
H-1026
MANUAL
WARNING
Before operating this stapler familiarize yourself with the safety warnings and
instructions in this manual. Keep these instructions with the stapler for future
reference. If you have any questions, contact Uline at 1-800-295-5510.
CHICAGO
MINNEAPOLIS
LOS ANGELES
NYC/PHILA
ATLANTA
DALLAS
•
•
•
•
•
Advertisement
Table of Contents

Related Manuals for U-Line H-1026


Summary of Contents for U-Line H-1026
- Page 1 PHONE 1-800-295-5510 FAX 1-800-295-5571 WEB uline.com MANUAL CARTON STAPLER MODEL: H-1026 MANUAL WARNING Before operating this stapler familiarize yourself with the safety warnings and instructions in this manual. Keep these instructions with the stapler for future reference. If you have any questions, contact Uline at 1-800-295-5510.
-
Page 2: Table Of Contents
PHONE 1-800-295-5510 FAX 1-800-295-5571 WEB uline.com Table of Contents Tool Specifications Safety Instructions Loading the Tool Checking the Staple Leg Length Clinch Adjustment Depth Adjustment Tool Operation Clearing Tool Jams Troubleshooting Teeth Replacement Driver Replacement Pusher Spring Replacement CHICAGO MINNEAPOLIS LOS ANGELES NYC/PHILA ATLANTA... -
Page 3: Tool Specifications
PHONE 1-800-295-5510 FAX 1-800-295-5571 WEB uline.com Tool Specifications Model of Tool H-1026 HDCS 19-35 Dimensions: LxHxW 15x11.5x4.5 Weight (without Fasteners) 3.75 lbs Staple Specification: S-1396 C34 Stick Staple Capacity: 100 pieces Back to Top SAFETY INSTRUCTIONS 1. Read the manual and understand all safety instructions before operating the tool. -
Page 4: Loading The Tool
PHONE 1-800-295-5510 FAX 1-800-295-5571 WEB uline.com Loading the Tool 1. Pull the Pusher back until it stops on pusher pivots. Rotate pusher to position. 2. Insert up to 2 sticks of appropriate staples into the magazine. Let the sticks slide forward to the front of the magazine. -
Page 5: Clinch Adjustment
PHONE 1-800-295-5510 FAX 1-800-295-5571 WEB uline.com Clinch Adjustment Loosen adjustment nut. Turn adjustment screw clockwise to loosen clinch. Turn adjustment screw counter-clockwise to tighten clinch. After adjusting, tighten adjustment nut. Back to Top Depth Adjustment 1. Loosen front screw with a 6mm Allen wrench. 2. - Page 6 PHONE 1-800-295-5510 FAX 1-800-295-5571 WEB uline.com Operating Instructions Warning 1. Protect your eyes and ears. Wear: a. Safety glasses with side shields b. hearing protection. Ensure that anyone in the vicinity wears safety protection. 2. To prevent accidental injuries never place a hand or any other body part in the staple clinching area or adjustment window.
-
Page 7: Troubleshooting
PHONE 1-800-295-5510 FAX 1-800-295-5571 WEB uline.com Troubleshooting Warning Stop using the tool immediately if any of the following problems occur. Serious personal injury could occur. Any repairs or replacements must be done by a qualified person or authorized service center only. Problem Cause Remedy... -
Page 8: Driver Replacement
PHONE 1-800-295-5510 FAX 1-800-295-5571 WEB uline.com Driver Replacement 1. Loosen screw and nut with a 8mm spanner wrench and a 4mm Allen wrench. 2. Remove the magazine assembly. 3. Loosen the set screw with a 3mm Allen wrench to unlock the adjusting rod. 4. -
Page 9: Pusher Spring Replacement
PHONE 1-800-295-5510 FAX 1-800-295-5571 WEB uline.com Pusher Spring Replacement 1. Loosen the screws and nut with a 8mm Spanner wrench and a 4mm Allen wrench. 2. Remove the Magazine Assembly. 3. Pull the Pusher back until it stops on the rod, rotate the Pusher to position. 4.
Need help?
Do you have a question about the H-1026 and is the answer not in the manual?
Questions and answers