Norac UC4+ Manual

Norac UC4+ Manual

Spray height control system
Hide thumbs Also See for UC4+:

Advertisement

Procedure for Testing
UC4+, UC4 and UC3 Sensors

Advertisement

Table of Contents
loading
Need help?

Need help?

Do you have a question about the UC4+ and is the answer not in the manual?

Questions and answers

Summary of Contents for Norac UC4+

  • Page 1 Procedure for Testing UC4+, UC4 and UC3 Sensors...
  • Page 2 Reorder P/N: 44645-MAN1 Revision I NOTICE NORAC Systems International Inc. reserves the right to improve products and their specifications without notice and without the requirement to update products sold previously. Every effort has been made to ensure the accuracy of the information contained in this manual.
  • Page 3: Table Of Contents

    Contents Introduction ................. 1     Materials ..................2     CANbus Monitor Parts ............... 3     Setting Up ..................4     Testing UC4+ and UC4 Sensors ..........8     Testing UC3 Sensors ..............12     Replacing Transducers .............
  • Page 4: Introduction

    This manual serves as an instruction manual for testing UC4+, UC4 and UC3 sensors. This procedure is useful in determining if a sensor needs to be returned to NORAC for repairs or if it is possible to continue using it. This procedure also provides a method for performing some basic calibration of the UC4 sensor to improve its performance.
  • Page 5: Materials

     12 VDC (2A or greater) power supply  Computer with Windows operating system. * Items M06, M07 and M08 are available for re-order from NORAC. ** Item M05 is available for re-order from NORAC, as well as from the manufacturer: Item #...
  • Page 6: Canbus Monitor Parts

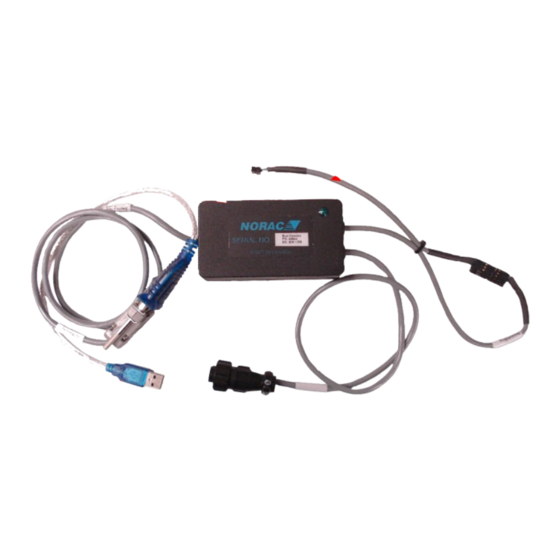
    3 CANbus Monitor Parts Bus Monitor Panel Programming Adapter USB to Serial CANbus Adapter Connector Figure 1: The NORAC CANbus Monitor Connections...
  • Page 7: Setting Up

    4 Setting Up * Refer to Appendix A for setup and calibration of the 44730 calibration stand. 4.1 Assemble the two parts of the test stand as shown in Figure 2. Insert the sheet metal insert into the rectangular hole. Install the spring, flat washer and wing nut onto the stud.
  • Page 8 4.2 Insert the alignment tool (44968-2) into the test stand. (Figure 3) 4.3 Adjust the threaded mount (A) of the golf ball target so the surface of the ball will touch the tip of the alignment tool (it may be necessary to align the calibration stand first (Step 4.4) before this is possible.
  • Page 9 4.7 If the test stand is ever disassembled, it must be realigned when reassembled. Use the alignment tool to check the alignment of the test stand before each use. 4.8 Inspect the sensor for visible damage. Inspect the transducer by removing the foam and looking through the screen.
  • Page 10 illuminated and switch off power supply. 4.15 Connect the sensor cable to the Bus Monitor Stand-Alone Power Cable AMP connector labeled “To CANBus”. 4.16 Once the sensor is connected to the Bus Monitor, turn on the power supply and allow the sensor to run for at least 5 minutes before proceeding to Section 5.
  • Page 11: Testing Uc4+ And Uc4 Sensors

    5 Testing UC4+ and UC4 Sensors 5.1 Start the provided UC4 ToolSuite software. Use the Connect function under the Tools menu (Figure 6) to connect to the sensor. A properly connected program will as it does in Figure 7 with data displayed in all fields.
  • Page 12 The sensor should still function, but its of room temperature accuracy and reliability will decrease. The sensor should eventually be returned to NORAC for repair. The temperature Cycle the sensor’s power OFF then ON and measurement will not try reconnecting the software.
  • Page 13 Test Result Action The temperature Ensure correct serial number measurement only displays displayed. If it is not, cycle the sensor’s zero. power OFF then ON and try reconnecting the software. If the temperature will not change, the thermistor is most likely damaged and the sensor should be repaired.
  • Page 14 Table 4: Results When Adjusting the Distance Measurement Test Result Action The sensor measurement The transducer is performing correctly. reads between 455 and 459. The sensor measurement Try adjusting it more. If it is outside the is not between 455 and adjustment range, change the transducer.
  • Page 15: Testing Uc3 Sensors

    6 Testing UC3 Sensors 6.1 The same procedure may be used to test UC3 sensors; however, only Steps 5.1, 5.2, 5.6 and 5.8 apply. The sensor gain cannot be adjusted.  With a UC3 sensor the analog gain setting does not apply and there is no signal strength reported.
  • Page 16: Replacing Transducers

    7 Replacing Transducers 7.1 Using a small flat screwdriver, remove the O-ring from around the sensor transducer. 7.2 Peel the RTV silicone off the two tabs on the transducer. The spade connectors on the wires should now slide off the tabs. Remove the silicone from the...
  • Page 17 angle bend as shown in Figure 10. Figure 10: Transducer Wire Positioning 7.5 Add two small beads of RTV silicon to fasten the spade connectors to the transducer terminals. CAUTION: Do NOT allow the RTV to contact any part of the transducer, except the wire connection tabs.
  • Page 18 NOTE: If the existing o-ring is made of black rubber, it is recommended that it be replaced with an orange silicone o-ring included in this kit (See Section 2 for ordering information). Follow the steps in Section 8 to replace the o-ring.
  • Page 19: Replacing O-Rings

    8 Replacing O-Rings NORAC recommends that all black rubber O-rings be replaced with an orange silicone O-ring even if the transducer is not being replaced. See Section 2 for ordering information. 8.1 Using a small flat screwdriver, remove the O-ring from around the sensor transducer.
  • Page 20: Frequently Asked Questions

    9 Frequently Asked Questions 9.1 Nothing happens when Connect is clicked. a) Ensure the power is turned on. b) Try cycling the power OFF then ON and reconnecting the UC5 Toolsuite Software. c) Check the COM port settings (under Settings) to make sure it is set up correctly with the proper COM port chosen.
  • Page 21 The Factory User password is used to enable features that are only required during the initial sensor setup. These features should ONLY be used at the NORAC factory. 9.5 When connected, everything looks fine except the distance value is much larger than it should be and it is not possible to adjust it back down to the correct value.
  • Page 22: Log Sheet

    10 Log Sheet This log sheet is provided to keep records of the sensors. Be sure to record the temperature offset, analog gain and distance offset BEFORE and AFTER calibrating each sensor. Analog Signal Date Serial Number Gain Distance Temperature Strength Percentage...
  • Page 23 Analog Signal Date Serial Number Gain Distance Temperature Strength Percentage...
  • Page 24 Analog Signal Date Serial Number Gain Distance Temperature Strength Percentage...
  • Page 25 Analog Signal Date Serial Number Gain Distance Temperature Strength Percentage...
  • Page 26: Appendix A - Adjusting 44730 Calibration Stand

    11 Appendix A – Adjusting 44730 Calibration Stand 11.1 Tools Required:  2 x 9/16 Wrenches  1 x 24” Square  1 x Tape Measure  1 x Pliers 11.2 With the sensor stand fully assembled, place it on a flat surface standing on end.
  • Page 27 1/16” (1.5mm) Figure 13: Squaring the Ball Target to the Mounting Ring 11.6 Place the square on the sensor ring as shown in Figure 14 and follow the procedure in Step 11.5. Figure 14: Squaring the Ball Target to the Mounting Ring 11.7 Repeat the process until the ball target is centered 20.5”...
  • Page 28 Notes:...
  • Page 29 Notes:...
  • Page 30 Notes:...
  • Page 31 Canada NORAC Systems International Inc. Phone: (+1) 306 664 6711 Toll Free: 1 800 667 3921 Shipping Address: 3702 Kinnear Place Saskatoon, SK S7P 0A6 United States NORAC, Inc. Phone: (+1) 952 224 4142 Toll Free: 1 866 306 6722 Shipping Address: 6667 West Old Shakopee Rd., Suite 111...

This manual is also suitable for:

Uc4Uc3

Table of Contents