
Related Manuals for aFe Power Scorpion


Summary of Contents for aFe Power Scorpion
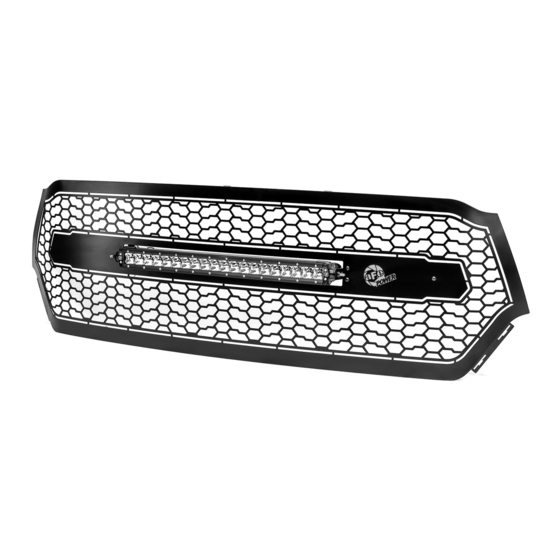
- Page 1 FLOW engineering Instruction Manual P/N: 79-21007L Scorpion Grille Make: Ram Model: 1500 Year: 2019-2020...
- Page 2 Disconnect the negative battery terminal before proceeding. • If you are missing any of the components, call customer support 951 493 7100 Qty. Label Description aFe Scorpion Grille 20” Single Row LED Brackets, “C” Lock nut, 1/4”-20 Nylon Washer, 1/4" Flat Lock Nut, #10-32 Nylon Nut, #10-32 Flange SS Screw, #10-32 x 1/2”...
- Page 4 Note: Before you begin, use “Painter’s Tape” to apply a protective guard around the work areas (fender and bumper valance). This will help protect the paint and finish of your vehicle. 1. Disconnect the negative battery terminal. 2. Locate twelve (12) plastic clips on top of plastic radiator cover. Carefully pry the pins out to remove and then set aside.
- Page 5 4. Remove the twelve (12) bolts that attach the factory grille assembly to the core support. Save for reinstallation.
- Page 6 Note: Use “Painter’s Tape” to apply a protective guard around the work areas (fender and Front bumper fascia). This will help protect the paint and finish of your vehicle. Note: It may be easier to remove the tire and the wheel well from the truck. 5.
- Page 7 7. Remove the one (1) bolt located on the inside of the fender on both sides of the vehicle. The bolt connects the fender to the bumper fascia. Save for reinstallation.
- Page 8 Note: Use “Painter’s Tape” to apply a protective guard around the work areas (fender and Front bumper fascia). This will help protect the paint and finish of your vehicle. 8. Disconnect the four (4) clips for the wheel arch moldings. Squeeze the clip from inside the fender to get them to release easier.
- Page 9 Note: Please go slow and use extreme caution while performing the following steps. Note: Use “Painter’s Tape” to apply a protective guard around the work areas (fender and Front bumper fascia). This will help protect the paint and finish of your vehicle. 9.
- Page 10 11. Remove three (3) bolts (on both sides of the vehicle) that retain the grille under the headlight. Save for reinstallation.
- Page 11 12. Lift the grille up off the headlight tabs and pull gently away from the truck. Remove the factory grille assembly from the vehicle.
- Page 12 Note: To prevent scratching painted parts use protective covering between the grille and a flat surface. 13. Remove the nine (9) bolts from the factory grille assembly and discard.
- Page 13 Note: To prevent scratching painted parts use protective covering between the grille and a flat surface. 14. Disconnect the clips that secure the factory outer grille to the factory inner grille. Remove the factory outer grille and discard. Save the inner grille for reinstalltion.
- Page 14 15. Remove and discard the two (2) nuts from the supplied 20” single row LED light.
- Page 15 (black). Snug the #10-32 flange nut up but do not tighten. 17. Install the supplied 20” single row LED light through the front of the aFe Scorpion grille. While holding the 20” single row LED light, install two (2) supplied #1 LED bar brackets (bracket feet point away from each other) from the back of the aFe Scorpion grille and onto the studs on the 20”...
- Page 16 18. Install the factory inner grille onto the aFe Scorpion grille. The studs on the aFe Scorpion grille come through the open locations where the outer grille was clipped. Push the factory grille over the studs. Install the eight (8) supplied “C” brackets onto the studs. Install the eight (8) supplied #10-32 nylon lock nuts onto the studs.
- Page 17 19. Before installing the aFe Scorpion grille, install the supplied power harness. The red wire goes on the positive battery terminal (+) and the black wire goes on the negative battery terminal (-). You will need to mount the switch inside the cab or to an available prewired...
- Page 18 20. Install the aFe Scorpion grille assembly onto the vehicle. 21. Plug the 20” Single Row LED light into the power harness. 22. Install the three (3) bolts removed in Step 11 (on both sides of the vehicle) that retain the...
- Page 19 Note: Remove all the painter’s tape prior to reinstalling the painted parts. 23. Reinstall the bumper fascia’s removed in Step 10 (on both sides of the vehicle). Push the bumper fascia’s in till they are clipped in securely into the aFe Scorpion grille assembly.
- Page 20 Note: Remove all the painter’s tape prior to reinstalling the painted parts. 24. Reinstall the wheel arch moldings into the bumper fascia and the fenders (on both sides of the vehicle).
- Page 21 25. Reinstall the one (1) bolt located on the inside of the fender (on both sides of the vehicle) that was removed in Step 7 and tighten to factory specifications.
- Page 22 Note: If the wheel well and the tire was removed, reinstall the parts and tighten to factory specifications. 26. Reinstall the wheel wells back into their proper positions. 27. Reinstall the four (4) screws into the wheel well (on both sides of the vehicle) removed in Step 5 and tighten.
- Page 23 28. Reinstall the twelve (12) screws into the core support removed in Step 4 and tighten.
- Page 24 29. Reinstall the plastic radiator cover onto the truck. 30. Reinstall twelve (12) plastic clips on top of plastic radiator cover removed in Step 2. 31. Reconnect the negative battery terminal.
- Page 25 32. Remove all the painter’s tape if any was applied. 33. Installation is now complete.
- Page 26 - ALWAYS install your lights on a fused circuit. Basic fusing guidelines: maximum 5A for every 10” of LED Light Bar. GENERAL USE, INSTALL AND ADJUSMENT TIPS NOTE 1: aFe Scorpion Grilles (with LED Light Bars installed), and LED Light Bars themselves are for OFF-ROAD USE ONLY.
- Page 27 GRILLE CARE INFORMATION aFe Power Scorpion Grilles are the finest in the industry but do require normal care. Wash regularly as you would when caring for your vehicles. Never use dish soap. GLOSS BLACK FINISH aFe Power Scorpion Grilles with gloss black powder coated finish may be washed regularly as you would when caring for your vehicles finish using soap and water.
- Page 28 advanced FLOW engineering, inc. 252 Granite Street Corona, CA 92879 TEL: 951.493.7100 • TECH: 951.493.7100 x23 E-Mail: Tech@aFepower.com 06-81297 1/13/2020 DK...
Need help?
Do you have a question about the Scorpion and is the answer not in the manual?
Questions and answers