quadient iX-3 Series Quick Installation Manual
Hide thumbs
Also See for iX-3 Series:
- User manual (296 pages) ,
- Quick installation manual (2 pages) ,
- Product replacement manual (2 pages)
Table of Contents
Advertisement
Quick Links
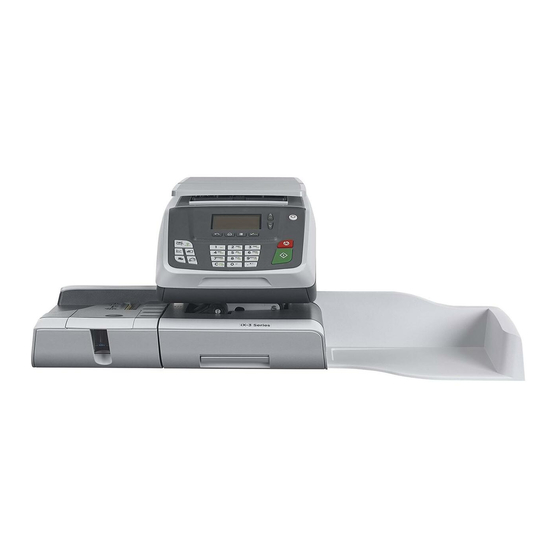
iX-3 Series Base
Quick Installation Guide
Mailing system components:
Feeding Table
1
Unpack all components from the box, remove packaging
and any transit tape.
5
Lift mailing system slightly on the left hand side and align the hooks to attach the
feeding table
(b)
– attach the catch tray to the right hand side of the mailing system
(c).
9
Installation Process
1 LAN
OK
Mem
Select LAN and press 'OK' to test connection type.
Mailing
System Base
Catch Tray
Back of the mailing system
2
Lift the cover of the mailing system to
reveal the ink cartridge
(h)
and meter
bays.
6
Lower weighing platform release panel at rear of
the mailing system. Place weighing platform
on top of the mailing system and slide forward to
lock. Lift panel to secure and clip cable into place.
10
Installation Process
Enter your registration code
734478
OK
Mem
Enter the following registration code : 734478
Weighing Platform
Weighing Platform
3
Open the cover. Place the meter
(i)
into the meter compartment and
(i)
slide in until it fits securely into position. Close the cover.
7
Connect the weighing platform connector
(d)
on the rear of the mailing system. Then connect the LAN cable
and power cable
11
Installation Process
Press the 'Next' to start the
Online service
declaration.
Next
Mem
Complete the declaration.
Power Cable
LAN Cable
connector
4
Insert the ink cartridge
(h)
'TOP' and 'LOCK' stickers facing upwards. Push the ink cartridge
towards the back of the mailing system until you hear a 'click' - close the
cover of the mailing system.
(e)
into the COM PORT
(f)
(g)
to each side of the mailing system.
For more help with your installation, please visit:
kb.quadient.com.au/ix3_install
Ink
Meter
Cartridge
at an angle into the mailing system with the
(h)
8
Turn on the mailing system using the switch
behind the power cable
(g)
and follow the steps
on screen.
Advertisement
Table of Contents

Related Manuals for quadient iX-3 Series


Summary of Contents for quadient iX-3 Series
- Page 1 Series Base Quick Installation Guide Mailing system components: Mailing System Base Power Cable LAN Cable Meter Cartridge Weighing Platform Feeding Table Catch Tray Weighing Platform connector Back of the mailing system Insert the ink cartridge at an angle into the mailing system with the...
- Page 2 To order consumables for your mailing system please call your dealer or iX-3 Series Quick Start Guide www.quadient.com.au visit For more information about your Postage Meter and to access a range of support and Getting to know your Postage Meter Quick steps to metering your mail features, log into your personalised account at www.myquadient.com.au or register today.
Need help?
Do you have a question about the iX-3 Series and is the answer not in the manual?
Questions and answers