
Related Manuals for Gaggia Milano GAGGIA MAGENTA MILK


Summary of Contents for Gaggia Milano GAGGIA MAGENTA MILK
- Page 1 ENGLISH FRANÇAIS GAGGIA MAGENTA MILK RI8701 (SUP 051P) Operating instructions Mode d'emploi 4219-465-02851 MAN. GAG. MAGENTA Milk 120V EN-FR Rev 01.indd 1 21/01/2021 12:04:23...
- Page 2 4219-465-02851 MAN. GAG. MAGENTA Milk 120V EN-FR Rev 01.indd 2 21/01/2021 12:04:29...
- Page 3 First installation / Première installation Confermi di voler cambiare la lingua in Italiano? In the next steps we will set the correct water hardness level 1 min. 1 sec. Capp in Cup System / Système Capp in Cup 4219-465-02851 MAN. GAG. MAGENTA Milk 120V EN-FR Rev 01.indd 3 21/01/2021 12:04:46...
- Page 4 English IMPORTANT SAFEGUARDS When using electrical appliances, basic safety precautions should always be followed, including the following: 1. Read all instructions. 2. Do not touch hot surfaces. Use handles or knobs. 3. To protect against fire, electric shock and injury to persons do not immerse cord, plugs, or appliance in water or other liquid.
- Page 5 English CAUTION This appliance is for household use only. Any servicing, other than cleaning and user maintenance, should be performed by an authorized service center. Do not immerse machine in water. To reduce the risk of fire or electric shock, do not disassemble the machine.
- Page 6 English Important safety information This machine is equipped with safety features. Nevertheless, read and follow the safety instructions carefully and only use the machine as described in these instructions, to avoid accidental injury or damage due to improper use of the machine. Keep this safety booklet for future reference. Warning General - Check if the voltage indicated on the machine corresponds to the local mains voltage before you connect the...
- Page 7 English Caution General - This machine is intended for normal household use only. It is not intended for use in environments such as staff kitchens of shops, offices, farms or other work environments. - Always put the machine on a flat and stable surface. Keep it in upright position, also during transport. - Do not place the machine on a hotplate or directly next to a hot oven, heater or similar source of heat.
- Page 8 English Caution - Make sure that the milk carafe is installed and the milk dispensing spout is open before you select a milk-based coffee beverage or milk froth. - Do not put any other liquids in the milk jug/carafe than water (for cleaning) or milk. - Do not clean the milk carafe in the dishwasher.
- Page 9 English Electromagnetic fields (EMF) This machine complies with all applicable standards and regulations regarding exposure to electromagnetic fields. Recycling - This symbol means that this product shall not be disposed of with normal household waste (2012/19/EU). - Follow your country’s rules for the separate collection of electrical and electronic products. Correct disposal helps prevent negative consequences for the environment and human health.
- Page 10 English Congratulations on your purchase of Gaggia Magenta Milk! This easy-to-use machine guarantees excellent results every day. Thanks to the intuitive interface, you can choose among 9 beverages and customise them according to your preferences. Before being packed, each of our high-quality machines undergoes rigorous testing in our laboratories in order to ensure its correct operation.
-
Page 11: Table Of Contents
English Contents Machine overview (Fig.2) ................................................................................................Control panel and display ................................................................................................Control panel overview (Fig. 1) ............................................................................................ Multifunction buttons ........................................................................................................First installation ................................................................................................................Manual rinse cycle ..........................................................................................................Measuring water hardness ................................................................................................INTENZA+ water filter ....................................................................................................... Installing the INTENZA+ water filter ....................................................................................... -
Page 12: Machine Overview (Fig.2)
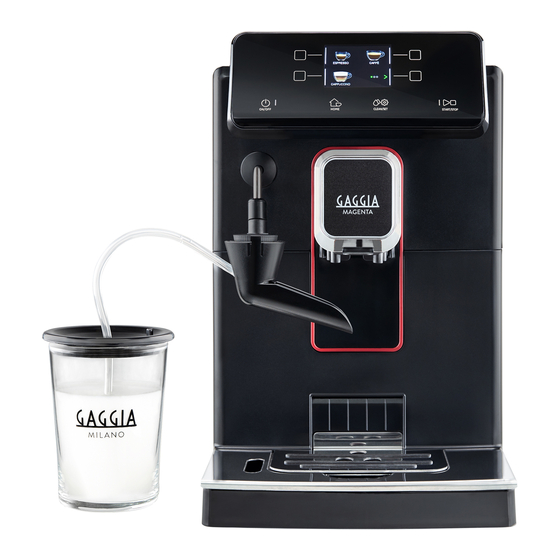
English Machine overview (Fig.2) Control panel Drip tray Adjustable coffee dispensing spout Drip tray grid Water tank lid Espresso tray Coffee bean container lid Capp in Cup system handle Pre-ground coffee compartment Steam tube Power cord socket Glass milk carafe Espresso tray insertion slot Glass milk carafe lid Full drip tray indicator... -
Page 13: Control Panel And Display
English Control panel and display Control panel overview (Fig. 1) Select the function shown on the display. 1/2 MULTIFUNCTION buttons To switch the machine on or off, by keeping the button pressed for a few ON/OFF button seconds. ON/OFF To open the beverage menu. HOME button HOME... -
Page 14: First Installation
English First installation Before using the machine, it is essential to follow a few simple steps, clearly described in the explanatory drawings you found in the quick guide at the 15 cm beginning of this instruction manual. Note: for even tastier coffee, we recommend that you initially prepare 5 cups of 15 cm coffee to allow the machine to self-adjust. -
Page 15: Measuring Water Hardness
English Measuring water hardness You will need to set the water hardness when you install your machine. Take the water hardness measuring strip contained in the packaging and follow the steps shown on the display during the installation phase. To change the water hardness later, press the CLEAN/SET button, then select "SETTINGS", and once in the settings menu, please select "WATER HARDNESS". -
Page 16: Installing The Intenza+ Water Filter
English Installing the INTENZA+ water filter Immerse the INTENZA+ water filter in cold water, in a vertical position and with the opening facing upwards. Press both sides of the filter gently to let air bubbles out. Remove the INTENZA+ water filter from the water. Set the machine according to the detected water hardness - see the “Measuring water hardness”... -
Page 17: Types Of Beverage
English Types of beverage Original recipe Description Ristretto A ristretto, served in a small cup, is an espresso whose brewing time is shorter than a regular espresso. This results in a coffee that is shorter and Coffee 30 ml less in rich in caffeine. Espresso The espresso is known around the globe as true Italian coffee. -
Page 18: Espresso Tray
English Espresso tray This machine was designed to guarantee flawless results, from a traditional espresso to a number of different beverages. If you want to enjoy an Italian espresso with a delicious layer of its natural “crema” on top and as tradition dictates, we suggest your using of the "Espresso Tray"... -
Page 19: Brewing Coffee Using Pre-Ground Coffee
English Finally, press the START/STOP button to start brewing. START/STOP Note: you can interrupt the brewing at any time by pressing the START/STOP button. START/STOP If you wish to customise the settings of a specific beverage, please refer to the “Beverage customisation”... -
Page 20: Preparation Of Coffee-Based Beverages And Frothed Milk
English Preparation of coffee-based beverages and frothed milk How to assemble the Capp in Cup system Note: Before preparing any milk-based beverage, make sure that the Capp in Cup system is fitted properly on the machine. Fit the spout on the main body of the Capp in Cup system. Insert the Capp in Cup system into the rubber grip on the steam tube until it locks into place. -
Page 21: Dispensing Hot Water
English 3 Place a cup or a glass under the Coffee dispensing spout and the Capp in Cup system. 4 Press the HOME button and choose the desired beverage from the menu. HOME Press the button corresponding to the desired beverage. Press the START/STOP button to start dispensing the selected bever- age. -
Page 22: Customising Beverages And Saving Settings (Memo)
English Press the "HOT WATER" button Finally, press the START/STOP button to commence dispensing. START/STOP ESPRESSO LUNGO AMERICANO Note: you can interrupt dispensing at any time by pressing the START/STOP ACQUA CALDA button. START/STOP If you wish to customise the settings of a specific beverage, please refer to the “Beverage Customisation”... -
Page 23: Coffee Grind Settings
English To change the intensity of the aroma or select the pre-ground, press the “ “ button. You can choose among 5 different degrees of intensity. Every time you press the “ ” button, the aroma strength changes by one degree. The display shows the selected intensity or the selection of the pre-ground. -
Page 24: Cleaning And Maintenance
English Cleaning and maintenance Regular cleaning and maintenance keep the machine in perfect condition and ensure perfect coffee flavour, a constant coffee flow and an excellent milk froth. Please refer to the following table to know when and how to clean the removable parts of the machine. -
Page 25: Cleaning The Capp In Cup System
English Part description When to clean How to clean Pre-ground coffee Weekly Clean the upper part using the handle of a spoon, compartment/coffee as shown below. outlet duct Espresso tray Depending on usage Remove the espresso tray and clean it with running water. -
Page 26: Cleaning The Brew Group
English Cleaning of the Capp in Cup system under running water Warning: the steam tube may be hot after use. Remove the Capp in Cup system from the steam tube (Fig. 23). Remove the rubber handle from the steam tube. (Fig. 24). Remove the Capp in Cup system spout (Fig. - Page 27 English Remove the coffee residues drawer. Cleaning the brew group under running water Clean the coffee outlet duct thoroughly with a spoon handle or with another round-tipped kitchen utensil. Rinse the brew group and the coffee residues drawer thoroughly with lukewarm water.
- Page 28 English Make sure that the yellow locking hook of the brew group is in the right position. To position the hook correctly, push it upwards to the highest possible position. If the hook is still in the lower position, it means that it is not positioned correctly. Reinsert the coffee residues drawer.
-
Page 29: Lubricating The Brew Group
English Lubricating the brew group In order to ensure the perfect performance of the machine, it is necessary to lubricate the brew group. Refer to the following table for the frequency of lubrication. Number of beverages prepared Lubrication Frequency of use daily frequency Every 4 months... -
Page 30: Descaling
English Descaling Descaling procedure Descaling needs to be carried out when the machine requires it. Use only Gaggia descaling solution designed to guarantee the machine’s excellent performance. The use of different products could damage the machine and leave residue in the water. Failure to descale the machine will void the warranty. Remove the Capp in Cup system if fitted on the machine. -
Page 31: What To Do If The Descaling Process Is Interrupted
English What to do if the descaling process is interrupted You can exit the descaling procedure by keeping the ON/OFF button on the control panel, pressed for a few seconds. If the descaling procedure is interrupted ON/OFF before its completion, proceed as follows: Empty the water tank and wash it thoroughly. -
Page 32: Water Filter
English Water filter When “WATER FILTER” is selected, follow the instructions on the display and those SETTING described under the “Installing the INTENZA+ water filter” and “Replacing the WATER FILTER INTENZA+ water filter” chapters. TIMER STAND-BY UNITS WATER HARDNESS Stand-by Time When “STAND-BY TIME”... -
Page 33: Error Code Key
English Error code key The list below reports the error codes that the display can show, their meanings and how to solve the problem. If the indicated solutions are ineffective because the display continues to show the error code icon and the machine does not return to normal operation, or if other error codes are displayed, you must contact an authorized service center or distributors in your country. -
Page 34: Troubleshooting
English Troubleshooting This chapter outlines the most common problems you may encounter while using the machine. If you are unable to solve the problem using the information provided below, visit the FAQ sections on www.gaggia.com or www.gaggia.it or contact the either the Customer Service Centre or the local distributors in your country. - Page 35 English Problem Cause Solution The brew group cannot The brew group is not in the correct The brew group has not been positioned be inserted. position. correctly before being placed back. Ensure that the lever is in contact with the base of the brew group and that the hook of the brew group is in its correct position.
-
Page 36: Gaggia Accessories
English Problem Cause Solution The “INTENZA+” filter Remove the air from the filter. Let the air bubbles out of the filter. cannot be inserted. The tank still contains some water. Empty the water tank before installing the filter. The rubber seal is not inserted onto Check the packaging and insert the seal onto the “INTENZA+”... -
Page 37: Technical Specifications
English Technical specifications Nominal voltage - Power rating - See data plate on the inside of the Power supply service door Housing material Thermoplastic type Dimensions 224 x 357 x 435 mm Weight 7,7 kg Power cord length 1200 mm Control panel Front panel Water tank... - Page 38 Français IMPORTANT Lors de l’utilisation d’appareils électriques, il est indispensable de respecter toujours les précautions de sécurité principales, y compris les suivantes: 1. Lire toutes les instructions. 2. Ne pas toucher les surfaces chaudes. Utiliser les poignées ou les boutons. 3.
- Page 39 Français PRÉCAUTIONS La machine est réservée à un usage domestique. Tout entretien, en dehors du nettoyage et de l’entretien usuel par l’usager, doit être fait par un service après- vente autorisé. Ne pas plonger la base dans l’eau. Pour éviter les courts-circuits et les décharges électriques, ne pas démonter la base.
- Page 40 Français INSTRUCTIONS SUR LE CORDON ÉLECTRIQUE A. Votre appareil est muni d’un cordon électrique court ou d’un cordon d’alimentation détachable, afin d’éviter de trébucher ou de s’emmêler avec un câble plus long. B. Des cordons détachables plus longs ou bien des rallonges sont disponibles et ne peuvent être utilisés que si l’on prend toutes les précautions d’usage.
- Page 41 Français Informations de sécurité importantes Cette machine est équipée de fonctions de sécurité. Veuillez néanmoins lire et suivre attentivement les consignes de sécurité et utiliser la machine uniquement tel qu’indiqué dans ces instructions, afin d’éviter toute blessure ou tout dommage accidentels dus à une mauvaise utilisation. Conservez cette brochure de sécurité pour toute consultation ultérieure.
- Page 42 Français Attention Informations d’ordre général - Cette machine est uniquement destinée à un usage domestique normal. Elle ne peut être utilisée dans des environnements tels que des cuisines réservées aux employés dans les entreprises, magasins, fermes et autres environnements de travail. - Placez toujours l’appareil sur une surface stable et plane.
- Page 43 Français Machines avec carafe à lait Avertissement - Pour éviter le risque de brûlure, vous devez tenir compte du fait que la distribution peut être précédée par l’émission de jets de lait et de vapeur. Attendez la fin du cycle avant de retirer la carafe à lait. Attention - Assurez-vous que la carafe à...
- Page 44 Français Attention - Pour des raisons d’hygiène, vérifiez que la surface extérieure de la buse de distribution d’eau chaude/de vapeur est propre. - Après la production de mousse de lait, nettoyez rapidement le mousseur à lait automatique en versant une petite quantité...
- Page 45 Français Félicitations pour l’achat de Gaggia Magenta Milk ! Cette machine garantit une grande facilité d’utilisation et toujours d’excellents résultats. Grâce à son interface intuitive, l’utilisateur pourra choisir parmi 9 boissons différentes et les personnaliser selon ses préférences. Avant d’être emballée, chaque machine est soumise à des essais rigoureux dans nos laboratoires, qui doivent assurer la haute qualité...
- Page 46 Français Table des matières Vue d’ensemble de la machine (Fig. 2) ........................................................................... Bandeau de commande et afficheur ................................................................................Vue d’ensemble du bandeau de commande (Fig. 1) ................................................................Touches multifonctions ...................................................................................................... Première installation ........................................................................................................Cycle de rinçage manuel ..................................................................................................Mesure de la dureté de l’eau ..............................................................................................
-
Page 47: Vue D'ensemble De La Machine (Fig. 2)
Français Vue d’ensemble de la machine (Fig. 2) Bandeau de commande Bac d’égouttement Buse de distribution du café réglable Grille du bac d’égouttement Couvercle du réservoir à eau Espresso tray Couvercle du réservoir à café en grains Poignée du système Capp in Cup Compartiment café... -
Page 48: Bandeau De Commande Et Afficheur
Français Bandeau de commande et afficheur Vue d’ensemble du bandeau de commande (Fig. 1) Pour sélectionner la fonction affichée. 1/2 Touches MULTIFONCTIONS Pour allumer ou éteindre la machine, en maintenant le bouton enfoncé pendant Touche ON/OFF quelques secondes. ON/OFF Pour accéder au menu des boissons. Touche HOME HOME Pour accéder au menu du nettoyage et des... -
Page 49: Première Installation
Français Première installation Avant d’utiliser la machine, il est essentiel d’effectuer quelques simples opérations, celles-ci étant décrites clairement dans le guide rapide par dessins explicatifs 15 cm figurant au début de ce mode d’emploi. Remarque: Pour avoir un café plus savoureux, il est conseillé de commencer par 15 cm distribuer 5 tasses de café... -
Page 50: Mesure De La Dureté De L'eau
Français Mesure de la dureté de l’eau Lors de la première installation, il faut saisir la valeur correspondante à la dureté de l’eau. Prendre la bande de mesure de la dureté de l’eau qu’on peut trouver dans l’emballage et suivre les instructions affichées pendant la phase d’installation. Pour modifier la dureté... -
Page 51: Installation Du Filtre À Eau Intenza
Français Installation du filtre à eau INTENZA+ Plonger le filtre à eau INTENZA+ verticalement dans l'eau froide (l'ouverture vers le haut) en le poussant délicatement sur les côtés pour permettre aux bulles d'air de sortir. Retirer le filtre à eau INTENZA+ de l’eau, le régler d’après la dureté de l’eau mesurée (voir le chapitre « Mesure de la dureté... -
Page 52: Types De Boisson
Français Types de boisson Recette originale Description Ristretto Le ristretto, servi dans une petite tasse, est un expresso dont le temps de distribution est réduit par rapport à l’expresso classique ; le café sera donc Café 30 ml plus serré et moins riche en caféine. Espresso L’expresso est reconnu dans le monde entier comme étant le véritable « café... -
Page 53: Espresso Tray
Français Espresso tray Cette machine a été conçue pour garantir la préparation de boissons impeccables, qu’il s’agisse de l’expresso traditionnel ou de beaucoup d’autres boissons disponibles. Si vous souhaitez déguster un expresso italien comme le veut la tradition, avec une délicieuse couche de crème naturelle en surface, nous vous conseillons d’utiliser l’« Espresso tray », spécifiquement conçu à... -
Page 54: Distribution De Café Avec Du Café Prémoulu
Français Enfin, appuyer sur la touche START/STOP pour commencer la distribution. START/STOP Remarque: Il est possible d’interrompre la distribution à tout moment. Pour ce faire, il suffit d’appuyer sur la touche START/STOP START/STOP Pour personnaliser les réglages de la boisson, se référer au chapitre « Personnalisation des boissons ». -
Page 55: Préparation De Boissons À Base De Café Et De Lait Émulsionné
Français Préparation de boissons à base de café et de lait émulsionné Comment assembler le système Capp in Cup Remarque: Avant de préparer n’importe quelle boisson à base de lait, s’assurer que le système Capp in Cup a bien été posé sur la machine. Assembler l’embout sur le corps central du système Capp in Cup. - Page 56 Français Introduire le tuyau d'aspiration du corps central du système Capp in Cup dans la carafe à lait, jusqu’à ce qu’il atteigne le fond de la carafe. 3 Positionner une tasse ou un verre sous la buse de distribution du café et le système Capp in Cup.
-
Page 57: Distribution D'eau Chaude
Français Distribution d’eau chaude Attention: Au début de la préparation, la buse de vapeur pourrait projeter des jets de vapeur et d’eau chaude. Retirer le système Capp in Cup et placer un récipient sous la buse de vapeur. Appuyer sur la touche HOME , faire défiler les différentes pages-écrans au moyen de la touche verte « ... - Page 58 Français Après avoir appuyé sur les touches « CAFÉ » ou « LAIT », ESPRESSO utiliser les touches vertes « » et « », pour régler la quantité souhaitée. COFFEE Appuyer ensuite sur la touche « » pour confirmer et revenir à la page 30 ml précédente, où...
-
Page 59: Réglage Du Degré De Mouture
Français Réglage du degré de mouture Le bouton de réglage du degré de mouture, situé dans le réservoir à café en grains, permet de régler le degré de mouture. Le moulin à café en céramique garantit une mouture parfaite et homogène pour la préparation de chaque tasse de café. L’arôme sera ainsi préservé, ce qui garantit un goût toujours parfait. -
Page 60: Nettoyage Et Entretien
Français Nettoyage et entretien Un nettoyage et un entretien réguliers maintiennent la machine dans des conditions optimales et garantissent un café excellent, un débit constant et une excellente mousse de lait. Consulter le tableau ci-dessous pour savoir quand et comment nettoyer toutes les pièces amovibles de la machine. Pour plus d’informations, lire les chapitres correspondants. -
Page 61: Nettoyage Du Système Capp In Cup
Français Description de la Quand nettoyer Comment nettoyer pièce Réservoir à marc de Dès que la machine le requiert Vider le réservoir à marc de café et le nettoyer café à l'eau courante. S’assurer que la machine est allumée pendant cette opération, sans quoi le réservoir à... -
Page 62: Nettoyage Du Groupe De Distribution
Français Nettoyage du système Capp in Cup à l’eau courante Attention: La buse de vapeur pourrait être chaude après l’utilisation. Retirer le système Capp in Cup de la buse de vapeur (Fig. 23). Enlever la poignée en caoutchouc de la buse de vapeur (Fig. 24). Enlever l’embout du système Capp in Cup (Fig. 25). - Page 63 Français Extraire le tiroir à résidus de café. Nettoyage du groupe de distribution à l'eau courante Nettoyer en profondeur la conduite de sortie du café avec le manche d'une petite cuillère ou avec un autre outil de cuisine à la pointe arrondie. Rincer soigneusement à...
- Page 64 Français Vérifier que le crochet jaune de blocage du groupe de distribution est dans la bonne position. Pour positionner correctement le crochet, le pousser vers le haut jusqu’à la position maximale pouvant être atteinte. Si le crochet est toujours en bas, il n'est pas correctement positionné. Réinstaller le tiroir à...
-
Page 65: Lubrification Du Groupe De Distribution
Français Lubrification du groupe de distribution Pour garantir un rendement optimal de la machine, il faut lubrifier le groupe de distribution. Consulter le tableau suivant au sujet de la fréquence de lubrification. Nombre de boissons préparées Fréquence de Fréquence d’utilisation quotidiennement lubrification Basse... -
Page 66: Détartrage
Français Détartrage Procédure de détartrage Le détartrage est à effectuer dès que la machine le requiert. Utiliser uniquement la solution détartrante Gaggia, qui a été étudiée pour garantir le rendement optimal de la machine. L'utilisation d'autres produits risque d’endommager la machine et de laisser des résidus dans l'eau. Si aucun détartrage de la machine n’est effectué, la garantie sera invalidée. -
Page 67: Que Faire En Cas D'interruption De La Procédure De Détartrage
Français Que faire en cas d’interruption de la procédure de détartrage Il est possible de quitter la procédure de détartrage en maintenant la touche ON/ du bandeau de commande, enfoncé pendant quelques secondes. Si la procédure de détartrage s'interrompt avant d’être terminée, procéder comme suit : ON/OFF Vider le réservoir à... -
Page 68: Filtre À Eau
Français Filtre à eau Après avoir sélectionné le « FILTRE À EAU », suivre les instructions affichées de SETTING WATER FILTER même que les indications des chapitres « Installation du filtre à eau INTENZA+ » et « Remplacement du filtre à eau INTENZA+ ». TIMER STAND-BY UNITS WATER HARDNESS Délai avant la mise en veille... -
Page 69: Signification Des Codes D'erreur
Français Signification des codes d'erreur Certains codes d’erreur susceptibles d’apparaître sur l’afficheur sont cités ci-après, avec leur signification et la solution au problème. Si les solutions indiquées sont inefficaces parce que l'icône du code d'erreur reste affichée et la machine continue à... -
Page 70: Dépannage
Français Dépannage Ce chapitre résume les problèmes les plus courants susceptibles de se produire sur la machine. Si les informations ci-dessous ne permettent pas de résoudre le problème, visiter le site www.gaggia.com ou www.gaggia.it. pour obtenir une liste des questions fréquentes ou contacter le Centre d’assistance après-vente ou un revendeur local. - Page 71 Français Problème Cause Solution Impossible d'introduire Le groupe de distribution ne se Le groupe de distribution n’a pas été mis en le groupe de trouve pas dans la bonne position. place avant d'être repositionné. S’assurer que distribution. le levier est en contact avec la base du groupe de distribution et que le crochet du groupe de distribution se trouve dans la bonne position.
- Page 72 Français Problème Cause Solution Le lait ne mousse pas. Le système Capp in Cup est sale ou Nettoyer le système Capp in Cup en suivant les n'est pas inséré correctement. Il se indications au chapitre « Nettoyage profond à pourrait également que toutes les l’eau courante du système Capp in Cup »...
-
Page 73: Accessoires Gaggia
Français Accessoires GAGGIA Le café et les accessoires sont en vente dans les centres agréés (Italie) ou chez les revendeurs du pays de l’utilisateur. Détartrant Filtre à eau INTENZA+ Tablettes de Milk circuit cleaner dégraissage (Philips) Gamme des cafés disponibles en grains et en poudre : 100 % Arabica / Intense / Décaféiné Données techniques Tension nominale - Puissance Voir la plaquette signalétique à... - Page 74 4219-465-02851 MAN. GAG. MAGENTA Milk 120V EN-FR Rev 01.indd 74 21/01/2021 12:06:48...
- Page 75 4219-465-02851 MAN. GAG. MAGENTA Milk 120V EN-FR Rev 01.indd 75 21/01/2021 12:06:48...
- Page 76 GAGGIA S.p.A. reserves the right to make all changes deemed necessary. GAGGIA S.p.A. se réserve le droit d’apporter toute modification jugée nécessaire. GAGGIA S.p.A. Sede Amministrativa/Administrative Office Via Torretta, 240 40041 Gaggio Montano - Bologna - Italia +39 0534 771111 / Fax +39 0534 31025 Sede Legale/Registered Office Piazza A.
Need help?
Do you have a question about the GAGGIA MAGENTA MILK and is the answer not in the manual?
Questions and answers