Table of Contents
Advertisement
Quick Links
Advertisement
Table of Contents

Subscribe to Our Youtube Channel
Related Manuals for gofanco SwitchBYOD41


Summary of Contents for gofanco SwitchBYOD41
- Page 1 4x1 18G BYOD Presentation Switcher User's Guide P/N: SwitchBYOD41 G4-0083A...
-
Page 2: Important Safety Notices
Thank you for purchasing from gofanco. Our products aim to meet all your connectivity needs wherever you go. For optimum performance and safety, please read the instructions carefully and keep this User's Guide for future reference. If you need more information about our products, please visit www.gofanco.com. -
Page 3: Package Contents
Introduction The 4x1 18G BYOD Presentation Switcher allows switching between 4 sources (1 Wireless Miracast/Airplay, 2 HDMI, 1 USB-C) to display on 1 HDMI display. It's a great tool for homes and offices. Note: Wireless transmission distance will vary due to the environmental conditions. - Page 4 Installation Requirements • HDMI, USB Type-C, Miracast/Airplay capable devices • HDMI display device (SDTV/Monitor, HDTV/ Monitor, projector, etc.) • HDMI cables (not included) • Windows 8.1/10, Mac OS 10.13/10.14, iOS 7 or above (Airplay), Smart View enabled Android 4.0 or above (Miracast)
-
Page 5: Product Layout
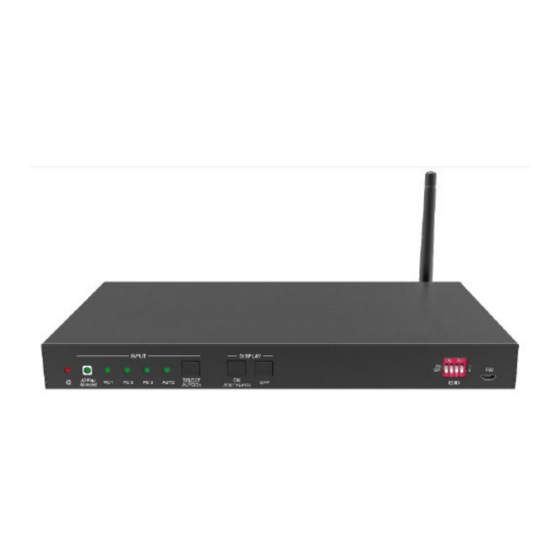
Product Layout Figure 1: Front Panel 1. Power LED Lights up when the switcher is powered on Off - No video signal detected 2. Input LED (x4) Orange LED: Video signal is detected Green LED: The input is the active video source On: Auto switching mode is enabled 3. -
Page 6: Hardware Installation
Hardware Installation Install the included antenna. Connect your source device(s) to the switcher's inputs. Connect your HDMI display to the switcher's HDMI Out connector with an HDMI cable (HDMI cable not included). Plug the included power adapter into the switcher's power jack, then plug the power adapter into a reliable power outlet. - Page 7 Front Panel Controls Manual Device Selection Press the Input Select button to switch between the 4 source inputs, in order Miracast/Airplay, PC1, PC2, and PC3. The Input LED corresponding to the active source input will illuminate Green. Auto Switching Mode Hold down the Input Select button for minimum of 3 seconds to enable auto switching mode.
-
Page 8: Display Controls
Display Controls CEC and RS232 display control functions are set by the user. • Manual Control: Press the DISPLAY ON/OFF buttons on the front panel to simultaneously send CEC and RS232 commands to turn on/off the display device • Auto Control: When detecting a video input signal (5V or TMDS), CEC and RS232 commands are automatically sent to turn on the display device. - Page 9 EDID The Extended Display Identification Data (EDID) is used by the source device to match its video resolution with the connected display. The DIP switches on the front panel can be used to set the EDID to ensure the compatible video resolution.
- Page 10 Miracast/Airplay Connection Windows 10, MacOS/iOS, and Android devices are compatible. Mirroring the device's screen is only display mode supported. Press Input Select button to select the Miracast/Airplay input and the Presentation screen, showing the Wi-Fi SSID (ScreenSharing xxxx...) and Password, will pop up similar to what is shown below.
- Page 11 Windows Press Windows key + P key, then click Connect to a wireless display. Click the SSID (ScreenSharing xxxx...) for screen mirroring. Note: The SSID may be different than that shown in the screen below.
- Page 12 iPhone Connect the iPhone to Wi-Fi. Note: The SSID (ScreenSharing xxxx...) may be different than that shown in the screens below. Slide the iPhone screen to enter Control Center, and click Screen Mirroring, and click the SSID (ScreenSharing xxxx...) for screen mirroring.
- Page 13 Android Scroll the Android screen and click Smart View. Click the SSID (ScreenSharing xxxx...) for screen mirroring. Note: The SSID may be different than that shown in the screen below.
- Page 14 RS232 Control Connect the control PC's RS232 serial port to the Switcher's RS232 port using an RS232 cable (cable not included). RS232 Control Software Work with most serial command and monitoring software such as CommWatch. • Download CommWatch or the serial command software of your choice.
- Page 15 Control Software Interface Set the COM port, Baud rate, data bit, stop bit, and parity. Enter command into the Command Sending Area.
-
Page 16: Source Switching
RS232 Commands Default settings: Baud rate: 9600, Data bit: 8, Stop bit: 1, Parity bit: none. System Control The command's ending mark is <CR> <LF>. Command & Feedback Command Description Example #GET_FIRMWARE_VERSION Get the firmware version @V1.0.0 #FACTORY_RESET Restore to factory defaults @FACTORY_RESET #REBOOT System reboot... - Page 17 CEC / RS232 Function Setting The command's ending mark is <CR> <LF>. Command & Feedback Command Description Example Enable the function of automatically sending CEC commands When detecting video input signal or #SET_SYNCACT_CEC @SYNCACT_CEC 1 not detecting any video signal, the switcher will automatically send the corresponding CEC command to control the display device...
- Page 18 Function Setting The command's ending mark is <CR> <LF>. Command & Feedback Command Description Example Set the number of sending #SET_OFF_CNT 1 @OFF_CNT 1 DISPLAY OFF command to 1 time Set the number of sending #SET_OFF_CNT 2 DISPLAY OFF command to 2 @OFF_CNT 2 times Get the number of sending...
- Page 19 Special Commands Special commands do not need ending mark. Command & Feedback Command Description Example Set the ASCII RS232 command XXXX to be sent to control the third-party device when the DISPLAY ON button is pressed #SET_ON_05_30:1234567 [PARAM1]= 00~06 (Baud Rate) 00 - 115200 01 - 57600 02 - 38400...
-
Page 20: Firmware Upgrade
SEND:41 42 43 44 45 XX XX: Any HEX code (0-9, A-F; up to 20 bytes. It must have a space between the 2 different XX) Firmware Upgrade For firmware information and updates, go to https:// www.gofanco.com/downloads. - Page 21 FAQ & Solutions The display is not clear or stable. 1) Check the cables for proper connection. 2) Try higher quality cables. No image when switching. 1) Please check if there is video signal input from the source device. 2) Check the cables for proper connection. 3) If it's still not working, connect the source device to the TV directly to see if there's a signal.
-
Page 22: Specifications
Specifications HDMI Standard HDMI 2.0b HDCP Compliance HDCP 2.2 4K@60Hz YUV 4:4:4 HDR10, Dolby HDMI Input Resolution Vision USB-C Input Resolution 4K@30Hz YUV 4:4:4 Miracast/Airplay 4K@30Hz YUV 4:4:4 Resolution Wireless Connectivity IEEE 802.11ac Wireless Distance <5 meters Wireless Band 5GHz USB-C Power Charging 60W (max) Input: 100 - 240V, 50/60Hz... - Page 23 Disclaimer The product name and brand name may be registered trademarks of related manufacturers. TM and ® may be omitted on the user's guide. The pictures on the user's guide are just for reference, and there may be some slight differences with the acutal products.
- Page 24 Thank you for choosing gofanco www.gofanco.com...
Need help?
Do you have a question about the SwitchBYOD41 and is the answer not in the manual?
Questions and answers