LulzBot Taz Quick Start Manual
Hide thumbs
Also See for Taz:
- User manual (120 pages) ,
- Quick start manual (9 pages) ,
- Start here manual (8 pages)
Advertisement
3D PRINTER 2 (PEGASUS) - STANDARD PRINTS
3D Printing with the Lulzbot Taz Workhorse
THE 3D PRINTER IS EXTREMELY HOT. DO NOT TOUCH ANY PART OF THE PRINTER ONCE HEATING HAS
STARTED OR WHILE THE PRINTER IS IN MOTION.
BY USING THE EQUIPMENT YOU ARE CONFIRMING THAT:
•
YOU HAVE PERMISSION TO REPRODUCE THE MODEL YOU ARE PRINTING.
•
THE LIBRARY WILL TAKE NO RESPONSIBILITY FOR ANY COPYRIGHT VIOLATIONS YOU MAY INCUR AS A
RESULT OF USING THE ROOM, ITS EQUIPMENT AND/OR SOFTWARE.
IMPORTANT TERMS:
PLA Filament:
The printer's 'ink'.
Filament Support:
Extra filament to hold up or support parts of the print, especially overhanging parts.
Raft:
A layer of filament at the base of your print that helps with stabilization and bed adhesion.
Brim:
Holds down the edges of your print to prevent warping. Brim uses less filament then raft.
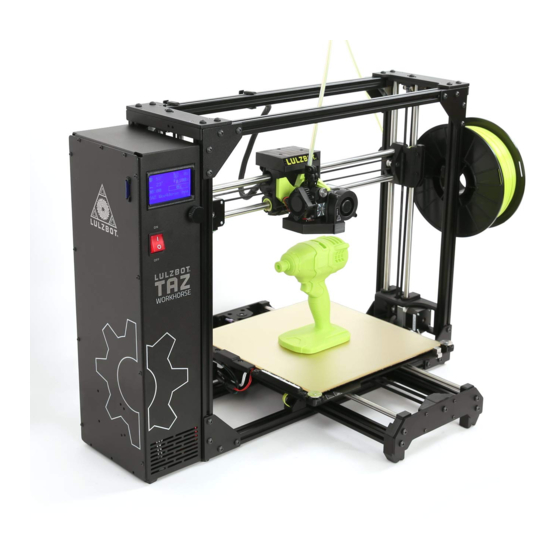
PRINTER PARTS:
Filament
Path
***WARNING***
Slicing:
Power Switch
Extruder Idler
Extruder Idler
Adjustment knob
The process of preparing your 3D model to print.
Tool Head
1
Filament
Holder
Filament
Guide
Tube
Heated Bed
Nozzle
Advertisement
Table of Contents

Related Manuals for LulzBot Taz


Summary of Contents for LulzBot Taz
- Page 1 3D PRINTER 2 (PEGASUS) - STANDARD PRINTS 3D Printing with the Lulzbot Taz Workhorse ***WARNING*** THE 3D PRINTER IS EXTREMELY HOT. DO NOT TOUCH ANY PART OF THE PRINTER ONCE HEATING HAS STARTED OR WHILE THE PRINTER IS IN MOTION.
- Page 2 PREPARING TO PRINT Log in to your booked computer using your library card and PIN. Turn on the 3D printer. Launch Cura Lulzbot Edition. Tip: If you have not selected a 3D print model yet: • Visit www.thingiverse.com to download a model.
- Page 3 After each adjustment made to your 3D model, Cura automatically performs slicing. Check the bottom right corner of Cura for print time and filament usage estimates. When you are ready to print, click on Print via USB and then Start Print.
Need help?
Do you have a question about the Taz and is the answer not in the manual?
Questions and answers