LulzBot TAZ 6 Operation
Hide thumbs
Also See for TAZ 6:
- Start here manual (36 pages) ,
- User manual (93 pages) ,
- Operation manual (3 pages)

Related Manuals for LulzBot TAZ 6


Summary of Contents for LulzBot TAZ 6
- Page 3 It's time for your first 3D print on the LulzBot TAZ 6 desktop 3D printer! Prior to starting this guide, your 3D printer should be fully unboxed, assembled, and ready for operation. When you have finished this Operation Guide, you will have your own 3D printed rocktopus.
-
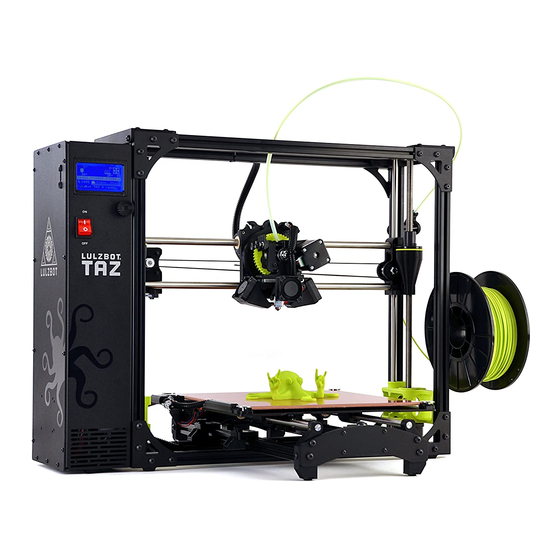
Page 4: Know Your Machine
KNow your MachiNe Graphical LCD SD Card Slot Control Knob Power Switch Extruder USB Port (back) Power Port (back) Rock2pus P.E.I. Print Surface Y-Axis Assembly... - Page 5 Aluminum Frame Smooth Rod Hinged Idler Lead Screw Drive Gear Tool Head LulzBot v2 Hot End Nozzle Filament Reel The Cartesian Coordinate Robot The LulzBot TAZ can move on three linear axes that define its movement, X, Y, and Z.
- Page 6 Edition, the software that will control your 3D printer. Even if you already have Cura installed on your computer, visit LulzBot.com/Cura anyway to get the latest version. Unable to download Cura from the Internet? You can also find download packages on the...
- Page 7 STEP Configure the Software for your LulzBot TAZ Launch Cura LulzBot Edition. Begin the Configuration Wizard to select your machine and under “Select your machine, ” select LulzBot TAZ 6. Click Next >, and then click Finish > to complete the Configuration Wizard. Cura...
- Page 8 STEP Connect and Power On Your LulzBot® TAZ Verify that the power switch is in the off position. If you haven't already, plug the AC power cable into your 3D printer and plug the other end into an AC power outlet.
- Page 9 Plug the square USB connector into your printer and to a computer. Power on your LulzBot TAZ.
- Page 10 LulzBot® TAZ. If the rocktopus model is not present on the virtual print bed, you can download it from LulzBot.com/rocktopus or from the included SD card, then load it using the Load Model button in the main Cura interface.
- Page 11 In Cura, on the left side of the screen under “Material ease of use” select First Run. The “Material” option will change to nGen. Under “Select a quick print profile”, select Standard. Leave all other options off.
- Page 12 STEP Control Your LulzBot® TAZ and Set the Temperature Using your computer, click the Control button found in the left-upper portion of the main Cura interface. A new window called “Printer Interface” will open. The word “Operational” will appear once the machine is connected.
- Page 13 You need to remove the remaining filament left in the tool head from quality assurance before loading new filament for your first print. 230ºC is the required hot end temperature to remove nGen from the tool head. Using the Printer Interface window, raise the hot end temperature up to 230ºC by typing 230 under “Temperature”, then clicking Set in the Printer Interface window.
- Page 14 The hot end is now heating up to 230ºC (446ºF) and can burn your skin. nGen Filament Hot End Very hot! Do not touch!
- Page 15 STEP Lower the Hinged Idler and Remove Loaded Filament Locate the tool head of your LulzBot TAZ. Using the idler retainer, compress the springs and slide up, allowing the hinged idler to move freely. Then, allow the hinged idler to rotate into the open position.
- Page 16 Wait until the status bar of the Printer Interface shows the temperature has reached 230ºC. Once the temperature has reached 230ºC, pinch the nGen filament loaded in the tool head and remove it by pulling up.
- Page 17 STEP Prepare and Load Filament We recommend using the included nGen filament sample for your first rocktopus print. Mount the nGen filament sample on the filament holder, then pass the filament through the filament guide tube so it feeds down into the tool head. Filament Guide Tube nGen Filament STEP...
- Page 18 Locate the feed hole in the extruder body where you removed the loaded filament during Step 6. Filament feeds through this hole and down into the hot end for printing. Feed Hole The hot end is now heating up to 230ºC (446ºF) and can burn your skin.
- Page 19 Make sure the idler retainer is touching the springs so it is out of the way. Push the nGen filament down into the feed hole in the extruder body and through the hot end, until a small amount of filament comes out of the tip of the nozzle. This may require a firm push.
- Page 20 STEP Raise the Hinged Idler Compress the springs with the idler retainer and rotate the hinged idler clockwise into an upright position. Lock the hinged idler into place by sliding the idler retainer back down into the locked position.
- Page 21 STEP Verify Print Extrusion Make sure your LulzBot TAZ is ready for printing by verifying the printer's ability to extrude filament. Using your computer, click the Extrude 10 button in the Printer Interface and watch for filament to feed through the nozzle, towards the print bed.
- Page 22 If you do not see filament coming through the nozzle and the drive gear stops moving, click the Extrude 10 button once more and wait. Repeat as needed until you see consistent and repeatable extrusion. Wait ten seconds for the filament to cool, then remove the extruded filament with the included tweezers.
- Page 23 STEP Start Your First Print Wait! Are you ready to print? Check that your LulzBot TAZ is in a well-ventilated area on a flat and level surface with 30 centimeters (12 inches) of clearance in every direction. Did you make changes to your object after opening the Printer Interface window? If so, you will need to close and re-open the Printer Interface window to incorporate these changes.
- Page 24 Click Print in the Printer Interface window to start your first 3D print, then watch your LulzBot TAZ automatically prepare itself for 3D printing.
- Page 25 Your LulzBot TAZ will first cool down and move to the front of the bed to clean off its nozzle. After cleaning, your LulzBot TAZ will then conduct an automated bed-leveling sequence, heat up to final temperature, and start printing. This process can take up to five minutes.
- Page 26 STEP Cooling and Part Removal After your LulzBot TAZ is finished 3D printing, the print bed will automatically move backwards into the cooling position. Your printer is now actively cooling. Do not attempt to remove your 3D printed object before the print bed moves forward.
- Page 27 Once finished cooling, the print bed will move forward indicating it is now safe to remove your printed rocktopus by lifting gently underneath it with the included blue handled knife. Carefully slide the blade under two or three of the tentacles, then slowly slide the blade under the center until it releases from the print surface.
- Page 28 Congratulations! Now that your LulzBot TAZ is up and running, share your 3D printing skills on social media using #rocktopus. Don't forget to tag us in your post, then follow us for the latest news. You can find LulzBot on Twitter, YouTube, Facebook, Google+, and LinkedIn. Next, join us on the LulzBot Forum at Forum.LulzBot.com!
- Page 29 STEP Your Next Print There is a length of the nGen sample filament remaining in the hot end after your first rocktopus print. If you want to continue printing with the provided sample, proceed to Step 13D. To remove this filament, repeat Step 5 and Step 6 in this guide. If you plan to use a filament other than nGen for your next print, there may be a difference in the temperature required for purging the residual filament in the hot end and the temperature required for 3D printing with the new filament.
- Page 30 PVA glue stick Bridge, PCTPE, 910 Your LulzBot TAZ desktop 3D printer is capable of printing in even more advanced and expert level filament materials including: Conductive PLA, PC-ABS, polycarbonate, PVA, 618 Nylon, 645 Nylon, and more. Plus, we add new materials to our catalog frequently.
- Page 31 Splitting the difference in temperature between the two filaments is important, otherwise you may lower the quality of your next print or even clog the nozzle. Purge the residual filament that remains in the hot end using the Extrude 10 button, as shown in Step 9.
- Page 32 Load Model in the main Cura Interface. Not sure what to print next? Rock on with the rock2pus, which you can download at LulzBot.com/rock2pus With your new object set, re-open the Printer Interface window by clicking Control in the main Cura interface.
- Page 33 Nozzle Wiping Pad A clean metal surface on the nozzle is critical for the automated bed leveling process to be successful. Your LulzBot TAZ has a special wiping sequence in place to repeat the wiping process if the nozzle is not clean enough. The printer will repeatedly wipe and attempt to connect with the self-leveling sensor.
- Page 34 Your LulzBot TAZ has a PEI print surface, which helps printed objects adhere to the bed. Note that the oil on your skin can negatively affect print adhesion. For optimal performance, lightly wipe the print bed with a dry paper towel between prints.
Need help?
Do you have a question about the TAZ 6 and is the answer not in the manual?
Questions and answers