Table of Contents
Advertisement
Quick Links
www.norix.com
TEL 800 234-4900
Assembly Notes: Norix is not responsible for any damage due to improper installation. If your shipment does not match the parts list, please contact Norix Customer Service at 800-234-4900.
Norix reserves the right to modify design specifications at any time without an obligation to owners of previously sold products.
ITEM
QTY
PART NUMBER
A
1
037-T001-XX
B
1
037-T002-XX
C
1
037-T003-XX
D
2
036-T102-XX
E
2
036-T002-XX
F
1
030-T006-XX
G
1
030-T007-XX
H
1
030-T008-XX
J
1
030-T009-XX
K
4
029-T006-XX
L
2
030-T010-XX
M
2
030-T011-XX
N
4
029-T005-XX
P
4
029-T007-XX
Q
20
021-108
Q
20
021-119
R
24
025-011 / 025-030
S
5
025-018
T
40
021-101 / 021-102
T
40
021-116 / 021-007
U
74
026-006 / 025-031
V
25
021-107 / 021-115
V
25
021-077 / 021-062
W
1
071-014
Determine whether bed is to be left or
right hand. See bottom of page 4 for
finished assembly illustrations. Steps 1
thru 4 are the same for either left or
right hand versions.
1. Lay out End Frames and Pans on
sides as shown. Bottom Pan (B) has
holes for Extension, facing upward in
the illustration. Leave (3) holes open
at top of End Frame for attaching
Head/Foot boards in a later step.
Use Screw (T), Lock Washer (R), and
Flat Washer (U) as shown, (2) each per
corner of each pan.
Fasten hardware securely.
Rev. C - 3/20/14
091-752
Parts List
DESCRIPTION
Bunk Pan, KD, Titan 80 X 36
Bunk Pan, KD, Titan, Family Bed Bottom, 80 X 36
Bunk Pan, KD, Titan, Family Bed Extension 83 X 18.5
Steel End Frame, Titan, Family Bed
Steel End Frame Leg, Family Bed Extension
Headboard, Short
Footboard, Short
Headboard, Short, Family Size
Footboard, Short, Family Size
Bracket, Side Rail, Short
Side Rail, Short, HPL
Side Rail, Tall, HPL
Bracket, Side Rail, Tall
Bracket, Titan, Center, HPL Bed Rails
Standard: Screw, 1/4-20 X 3/4" L, BH, Cross, Female
Security: Screw, 1/4-20 X 3/4" L, BH, S-Torx, Female
Washer 5/16 Split (Zinc / Black)
Nut, 1/4-20, Centerlock
Standard: Screw, 5/16-18 X 1.5 L, Btn Hd, Hex Skt Cap (Zinc / Blk)
Security: Screw 5/16-18 X 1.5 L, Btn Hd, Torx Pin (Zinc / Black)
Washer, Flat 11/32 ID X 3/4 OD x .050 (Zinc / Black)
Standard: Screw, 1/4-20 x .75 L Recessed Hex Skt Cap, (Zinc / Blk)
Security: Screw, 1/4-20 x .75 L Torx Pin, (Zinc / Black)
Hex Bit 3/16"
at top for Headboard.
D
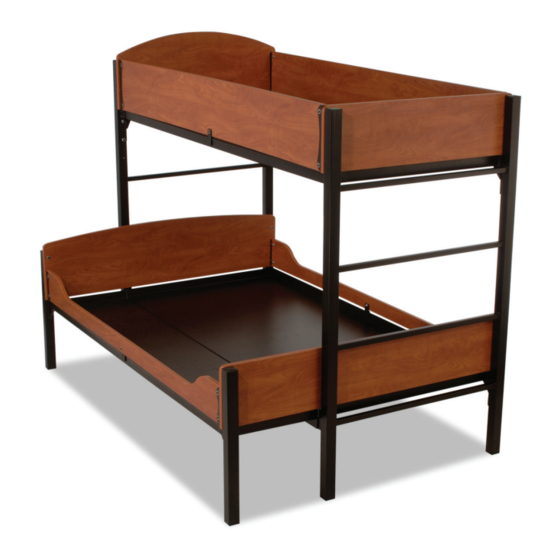
Titan Family Bed
Assembly Instructions
Model Number
TNT1991
Leave (3) open holes
A
Tools Needed
Low RPM Variable Speed Drill
3/16" Hex Driver OR T-40
5/32" Hex Driver OR T-27
Driver Extension
Philips Head Screwdriver
7/16" Wrench
U
R
T
Use 2nd & 3rd
holes from
bottom.
Holes for
Extension.
B
Page 1 of 4
Advertisement
Table of Contents

Related Manuals for norix Titan TNT1991


Summary of Contents for norix Titan TNT1991
- Page 1 TEL 800 234-4900 Assembly Notes: Norix is not responsible for any damage due to improper installation. If your shipment does not match the parts list, please contact Norix Customer Service at 800-234-4900. Norix reserves the right to modify design specifications at any time without an obligation to owners of previously sold products.
- Page 2 2. Set Bed sub-assembly upright. Leave (3) open holes at top for Headboard. 3. Assemble (2) Legs (E) to Bed Extension (C) using (4) Screws (T), Lock Washers (R), and Flat Washers (U). Note (3) holes left open at top of Legs. Fasten hardware securely.
- Page 3 5. Assemble Headboard (F) and (2) Tall Rail Brackets (N) to top bunk using (4) Screws (T). Repeat for Footboard (G). Fasten hardware securely. Not Used 6. Assemble Headboard (H) and (2) Short Rail Brackets (K) to bottom bunk using (6) Screws (T), (2) Lock Washers (R), and (2) Flat Washers (U).
- Page 4 Flat side 8. Assemble (4) Rail Brackets (P) to faces inward. Side Rails and Bunk Pans as shown, using (4) Screws (V), (8) Flat Washers (U), and (4) Female Screws (Q). Note the correct orientation of the Brackets in the detail and cutaway view. Fasten hardware securely.
Need help?
Do you have a question about the Titan TNT1991 and is the answer not in the manual?
Questions and answers