Table of Contents
Advertisement
Quick Links
Advertisement
Chapters
Table of Contents

Related Manuals for Rohde & Schwarz R&S ZVA 8


Summary of Contents for Rohde & Schwarz R&S ZVA 8
- Page 1 Operating Manual Vector Network Analyzers ® R&S ZVA 8 / ZVA 24 1145.1110.08 / 24/26 ® R&S ZVB 4 / ZVB 8 / ZVB 20 1145.1010.04/05/06 / 08/09/10 / 20/21/22 ® R&S ZVT 8 1300.0045.62 Printed in Germany Test and Measurement Division 1145.1084.12-06...
- Page 2 ® R&S is a registered trademark of Rohde & Schwarz GmbH & Co. KG. Trade names are trademarks of the owners. This product includes software developed by the OpenSSL Project for use in the OpenSSL Toolkit (http://www.openssl.org).
- Page 3 Tabbed Divider Overview ® R&S ZVA/ZVB/ZVT Documentation Map What’s New in this Revision Data Sheet Safety Instructions Certificate of Quality EU Certificate of Conformity List of R&S Representatives Glossary of Terms Tabbed Divider Chapter 1: Preparing for Use: R&S ZVA Preparing for Use: R&S ZVB Preparing for Use: R&S ZVT Chapter 2:...
- Page 4 ® R&S ZVA/ZVB/ZVT Documentation Map Help System The help system is embedded in the instrument, offering quick, context-sensitive reference to the information needed for operation and programming. The help contains the complete user documentation for the network analyzer. Three separate help files ZVA.chm, ZVB.chm, and ZVT.chm are provided for the network analyzers R&S ZVA, R&S ZVB, and R&S ZVT, respectively.
- Page 5 What's New in this Revision This manual describes version V1.80 of the ZVA/ZVB/ZVT firmware. Compared to the previous version V1.78, the new firmware provides numerous extensions and improvements. The major new features and bug fixes are listed below. To check your ZVA/ZVB/ZVT firmware version, click Help – About Nwa... New Features in Firmware V1.80 (Compared to V1.78) New measurement mode: Frequency Conversion (option R&S ZVA-K4, including Harmonic Distortion measurements and Mixer Mode)
- Page 6 Improvements in Firmware V1.78 (Compared to V1.77) Performance improvements for very large numbers of simultaneous channels/traces New Features in Firmware V1.77 (Compared to V1.75) New calibration standard: Sliding match. The 7-term calibration types TOM, TRM, TRL, and TNA can be used for an arbitrary number of ports.
- Page 7 Automatic power reduction for Calibration Unit in the initial tab of the System Config dialog GUI improvements Paste marker list for easier data entry in numeric entry bars and dialogs. System files (*.zvx, *.s<n>p, *.csv, *.ck, *.calkit, *.seglist, *.mth, *.limit, *.colorscheme) can be loaded by drag and drop or double-click in the Windows Explorer.
- Page 8 New Features in Firmware V1.50 (Compared to V1.02) Support for new option: Calibration Unit (accessory R&S ZV-Z51) New measurement: x dB compression point New calibration types: TRM, TRL, TNA Arbitrary values for differential and common mode reference impedances (in Measurement Wizard and Balanced and Measured Ports dialog) GUI improvements In the User Interface tab of the System Config.
- Page 9 Limitations The following features are reported in the data sheet and this help system but not available in the current firmware version: Simultaneous measurement of port groups (in dialog Balanced and Measured Ports). 1145.1084.02 RE.9...
- Page 11 EC Certificate of Conformity Certificate No.: 2005-26 This is to certify that: Equipment type Stock No. Designation ZVA24 1145.1110.24 Vector Network Analyzer complies with the provisions of the Directive of the Council of the European Union on the approximation of the laws of the Member States - relating to electrical equipment for use within defined voltage limits (73/23/EEC revised by 93/68/EEC) - relating to electromagnetic compatibility...
- Page 12 EC Certificate of Conformity Certificate No.: 2004-17 This is to certify that: Equipment type Stock No. Designation ZVB4 1145.1010.04/.05/.06 Vector Network Analyzer ZVB8 1145.1010.08/.09/.10 ZVB20 1145.1010.20/.21/.22 complies with the provisions of the Directive of the Council of the European Union on the approximation of the laws of the Member States - relating to electrical equipment for use within defined voltage limits (73/23/EEC revised by 93/68/EEC)
- Page 13 EC Certificate of Conformity Certificate No.: 2005-13 This is to certify that: Equipment type Stock No. Designation ZVT8 1300.0008.08 Network Analyzer complies with the provisions of the Directive of the Council of the European Union on the approximation of the laws of the Member States - relating to electrical equipment for use within defined voltage limits (73/23/EEC revised by 93/68/EEC) - relating to electromagnetic compatibility...
- Page 14 EC Certificate of Conformity Certificate No.: 2005-11 This is to certify that: Equipment type Stock No. Designation ZV-Z51 1164.0515.30/.70 Calibration Unit ZV-Z58 1164.0638.78 Calibration Unit complies with the provisions of the Directive of the Council of the European Union on the approximation of the laws of the Member States - relating to electrical equipment for use within defined voltage limits (73/23/EEC revised by 93/68/EEC)
- Page 15 ® R&S ZVA/ZVB/ZVT Glossary Glossary Active channel: Channel belonging to the active trace. The active channel is highlighted in the channel list below the diagram. The active channel is not relevant in remote control where each channel can contain an active trace. Active marker: Marker that can be changed using the settings of the Marker menu (Delta Mode, Ref.
- Page 16 ® Glossary R&S ZVA/ZVB/ZVT Data trace: Trace filled with measurement data and updated after each sweep (dynamic trace). Diagram area: Rectangular portion of the screen used to display traces. Diagram areas are arranged in windows; they are independent of trace and channel settings. Directivity error: Measurement error caused by a coupler or bridge in the analyzer's source port causing part of the generated signal to leak through the forward path into the receive path instead of being transmitted towards the DUT.
- Page 17 ® R&S ZVA/ZVB/ZVT Glossary Marker: Tool for selecting points on the trace and for numerical readout of measured data. A marker is displayed with a symbol (a triangle, a crossbar or a line) on the trace; its coordinates are shown in the marker info field.
- Page 18 ® Glossary R&S ZVA/ZVB/ZVT Source match error: Measurement error caused by a mismatch of the analyzer's source port causing part of the signal reflected off the DUT to be reflected again off the source port so that it is not measured there.
- Page 19 ® R&S ZVA/ZVB/ZVT Glossary Window: Rectangular portion of the screen showing all diagram areas of a particular setup. Windows are limited by a blue frame with several icons. The analyzer uses standard windows provided by the operating system. 1145.1084.12...
- Page 21 ® R&S ZVA/ZVB/ZVT Preparing for Use Contents of Chapter 1 This chapter gives an overview of the front panel controls and connectors of the R&S ZVA, R&S ZVB, and R&S ZVT vector network analyzers and gives all information that is necessary to put the instruments into operation and connect external devices.
-
Page 23: Table Of Contents
® R&S Contents of Chapter 1 Contents of Chapter 1 1 Preparing for Use ........................1.1 Front Panel Tour..........................1.1 Display............................1.2 Disk Drive ..........................1.2 Setup Keys ..........................1.2 Navigation Keys ........................1.4 Data Entry Keys ........................1.5 Rotary Knob ..........................1.6 STANDBY Key .........................1.6 Test Ports ..........................1.7 USB Connector ........................1.7 Ground Connector........................1.8 Front Panel Jumpers........................1.8... -
Page 24: Contents Of Chapter 1
® Contents of Chapter 1 R&S Windows XP Embedded ........................1.22 Firmware Update ..........................1.22 1145.1090.62 I-1.2... -
Page 25: Preparing For Use
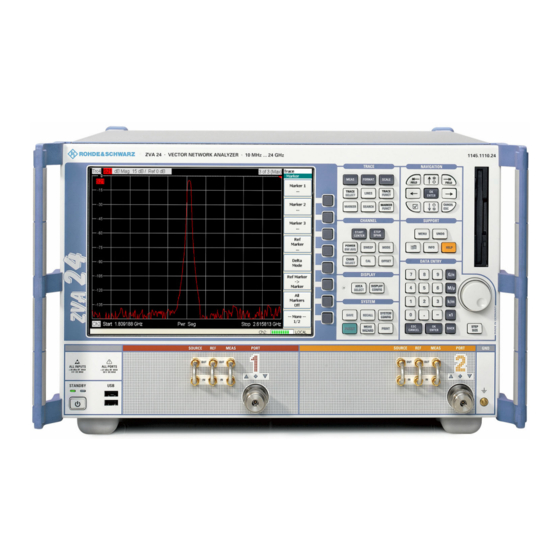
® R&S Front Panel Tour 1 Preparing for Use This chapter gives an overview of the front panel controls and connectors of the ZVA network analyzer and gives all information that is necessary to put the instrument into operation and connect external devices. -
Page 26: Display
® Front Panel Tour R&S Display The analyzer is equipped with a color display providing all control elements for the measurements and the diagram areas for the results. • Refer to section Navigation Tools of the Screen in Chapter 3 to learn how to use menus, keys and softkeys. - Page 27 ® R&S Front Panel Tour • MARKER positions markers on a trace, configures their properties and selects the format of the numerical readout. • SEARCH uses markers to locate specific points on the trace. • MARKER FUNCT(ions) define the sweep range, scale the diagram and introduce an electrical length offset using the active marker.
-
Page 28: Navigation Keys
® Front Panel Tour R&S The SUPPORT keys give access to the functions to reverse operations, retrieve information on the instrument and obtain assistance. • UNDO reverses the previous operation. • INFO calls up a table providing information about the current setup. •... -
Page 29: Data Entry Keys
® R&S Front Panel Tour OK ENTER is used to: • Activate the selected active control element, e.g. a button in a dialog or a link in the Help • Confirm selections and entries made and close dialogs OK ENTER is equivalent to pressing the rotary knob or the OK ENTER key in the DATA ENTRY keypad. -
Page 30: Rotary Knob
® Front Panel Tour R&S µ • In character input fields, the G/n, M/ , k/m keys enter the letters G, M, K, respectively. x1 is equivalent to OK ENTER. It confirms the previous entry and deactivates the input field (closes the input box). BACK deletes the last character before the cursor position or the selected character sequence. -
Page 31: Test Ports
® R&S Front Panel Tour Test Ports N-connectors, numbered 1 to 4 (for four-port instruments). The test ports serve as outputs for the RF stimulus signal and as inputs for the measured RF signals from the DUT (response signals). • With a single test port, it is possible to generate a stimulus signal and measure the response signal in reflection. -
Page 32: Ground Connector
® Front Panel Tour R&S The length of passive connecting USB cables should not exceed 1 m. The maximum current per USB port is 500 mA. Ground Connector Connector providing the ground of the analyzer's supply voltage. Attention! Electrostatic discharge (ESD) may cause damage to the electronic components of the DUT and the analyzer. - Page 33 ® R&S Front Panel Tour Attention! The maximum RF input levels at all front panel jumpers inputs according to the front panel labeling or the data sheet must not be exceeded. In addition, it is important that the signal fed in at the jumper input connectors contains no DC offset, as this may impair the measurements and even cause damage to the instrument.
-
Page 34: Rear Panel Tour
® Rear Panel Tour R&S Rear Panel Tour This section gives an overview of the rear panel controls and connectors of the network analyzer. The rear connectors are described in detail in the annex Hardware Interfaces in the online help system. -
Page 35: Putting The Instrument Into Operation
® R&S Putting the Instrument into Operation Putting the Instrument into Operation This section describes the basic steps to be taken when setting up the analyzer for the first time. Attention! Before turning on the instrument, please make sure that the following conditions are fulfilled: •... -
Page 36: Instrument Setup
® Putting the Instrument into Operation R&S Instrument Setup The network analyzer is designed for use under laboratory conditions, either on a bench top or in a rack. The general ambient conditions required at the operating site are as follows: •... -
Page 37: Mounting In A 19" Rack
® R&S Putting the Instrument into Operation Mounting in a 19" Rack Using the adapter ZZA-611 (order number 1096.3302.00) the instrument can be mounted in 19" racks according to the mounting instructions supplied with the rack adapter. Attention! • Allow for sufficient air supply in the rack. •... -
Page 38: Standby And Ready State
® Putting the Instrument into Operation R&S To turn the power on or off, press the AC power switch to position I (On) or 0 (Off). After power-on, the analyzer is in standby or ready state, depending on the state of the STANDBY toggle switch at the front panel of the instrument when the instrument was switched off for the last time. -
Page 39: Starting The Analyzer, Shutdown
® R&S Starting the Analyzer, Shutdown Starting the Analyzer, Shutdown To start the analyzer, proceed as follows: 1. Make sure that the instrument is connected to the AC power supply and the power switch on the rear panel is in position I (On). 2. -
Page 40: Connecting External Accessories
® Connecting External Accessories R&S Connecting External Accessories The equivalent USB ports on the front and rear panel of the analyzer can be used to connect a variety of accessories: • A mouse simplifies operation of the instrument using the controls and dialogs of the graphical user interface. -
Page 41: Connecting A Printer
® R&S Connecting External Accessories Use the Start – Control Panel – Keyboard or Regional and Language Options menu of Windows XP to configure the keyboard properties. To access Windows XP, press the Windows key on the external keyboard or on the front panel. Operating the analyzer does not require a keyboard. -
Page 42: Connecting A Lan Cable
® Connecting External Accessories R&S Attention! The monitor must be connected while the instrument is switched off (in standby mode). Otherwise correct operation can not be guaranteed. The monitor displays the magnified analyzer screen with all diagram areas, measurement results and control elements. -
Page 43: Test Setups With Two Lan Connections
® R&S Connecting External Accessories Test Setups with Two LAN Connections The two LAN connectors on the rear panel of the analyzer are equivalent. With one LAN connector used to establish a connection to a home/company network, the other one can be used to connect an additional instrument, e.g. -
Page 44: Remote Control In A Lan
® Remote Control in a LAN R&S Remote Control in a LAN A LAN connection is used to integrate the analyzer into a home/company network. This offers several applications: • Transfer data between a controller and the analyzer, e.g. in order run a remote control program. •... -
Page 45: Remote Desktop Connection
® R&S Remote Control in a LAN Manual TCP/IP configuration To disable dynamic TCP/IP configuration and enter the TCP/IP address information manually proceed as follows: 1. Obtain the IP address and subnet mask for the analyzer and the IP address for the local default gateway from your network administrator. - Page 46 ® Windows XP Embedded R&S Windows XP Embedded The analyzer is equipped with a Windows XP Embedded operating system which has been configured according to the instrument's features and needs. Changes in the system configuration can be necessary in order to •...
- Page 47 ® R&S Preparing for Use Contents of Chapter 1 1 Preparing for Use ....................1.1 Front Panel Tour..........................1.1 Display............................1.2 Disk Drive ..........................1.2 Setup Keys ..........................1.2 Navigation Keys ........................1.4 Data Entry Keys ........................1.6 Rotary Knob ..........................1.6 STANDBY Key .........................1.7 Test Ports ..........................1.7 USB Connector ........................1.8 Ground Connector........................1.8 Rear Panel Tour ..........................1.9...
-
Page 49: Preparing For Use
® R&S Front Panel Tour 1 Preparing for Use This chapter gives an overview of the front panel controls and connectors of the ZVB network analyzer and gives all information that is necessary to put the instrument into operation and connect external devices. -
Page 50: Display
® Front Panel Tour R&S Display The analyzer is equipped with a color display providing all control elements for the measurements and the diagram areas for the results. • Refer to section Navigation Tools of the Screen in Chapter 3 to learn how to use menus, keys and softkeys. - Page 51 ® R&S Front Panel Tour • MARKER positions markers on a trace, configures their properties and selects the format of the numerical readout. • SEARCH uses markers to locate specific points on the trace. • MARKER FUNCT(ions) define the sweep range, scale the diagram and introduce an electrical length offset using the active marker.
-
Page 52: Navigation Keys
® Front Panel Tour R&S The SUPPORT keys give access to the functions to reverse operations, retrieve information on the instrument and obtain assistance. • UNDO reverses the previous operation. • INFO calls up a table providing information about the current setup. •... - Page 53 ® R&S Front Panel Tour OK ENTER is used to: • Activate the selected active control element, e.g. a button in a dialog or a link in the Help • Confirm selections and entries made and close dialogs OK ENTER is equivalent to pressing the rotary knob or the OK ENTER key in the DATA ENTRY keypad.
-
Page 54: Data Entry Keys
® Front Panel Tour R&S Data Entry Keys The keys in the DATA ENTRY keypad are used to enter numbers and units. The ESC CANCEL and OK ENTER keys are equivalent to the corresponding keys in the NAVIGATION keypad. The remaining DATA ENTRY keys are only enabled while the cursor is placed on a data input field in a dialog or in the Help navigation pane. -
Page 55: Standby Key
® R&S Front Panel Tour STEP SIZE opens an input box to select the steps (in units of the current physical parameter) between two consecutive values if the rotary knob is turned to increase or decrease numeric values. See Data Entry in Chapter 3. STANDBY Key The STANDBY toggle switch is located in the bottom left corner of the front panel. -
Page 56: Usb Connector
® Front Panel Tour R&S The three LEDs above each test port indicate the connector state: The amber LED is on while the connector is used as a source port. The green LED is on while the connector is used as a bidirectional (source and receive) port. The blue LED is on while the connector is used as a receive port. -
Page 57: Rear Panel Tour
® R&S Rear Panel Tour Rear Panel Tour This section gives an overview of the rear panel controls and connectors of the network analyzer. The rear connectors are described in detail in the annex Hardware Interfaces in the online help system. -
Page 58: Putting The Instrument Into Operation
® Putting the Instrument into Operation R&S Putting the Instrument into Operation This section describes the basic steps to be taken when setting up the analyzer for the first time. Important Note: Before turning on the instrument, please make sure that the following conditions are fulfilled: •... -
Page 59: Instrument Setup
® R&S Putting the Instrument into Operation Instrument Setup The network analyzer is designed for use under laboratory conditions, either on a bench top or in a rack. The general ambient conditions required at the operating site are as follows: •... -
Page 60: Mounting In A 19" Rack
® Putting the Instrument into Operation R&S Mounting in a 19" Rack Using the adapter ZZA-511 (order number 1096.3290.00) the instrument can be mounted in 19" racks according to the mounting instructions supplied with the rack adapter. Attention! • Allow for sufficient air supply in the rack. •... -
Page 61: Standby And Ready State
® R&S Putting the Instrument into Operation To turn the power on or off, press the AC power switch to position I (On) or 0 (Off). After power-on, the analyzer is in standby or ready state, depending on the state of the STANDBY toggle switch at the front panel of the instrument when the instrument was switched off for the last time. -
Page 62: Starting The Analyzer, Shutdown
® Starting the Analyzer, Shutdown R&S Starting the Analyzer, Shutdown To start the analyzer, proceed as follows: 1. Make sure that the instrument is connected to the AC power supply and the power switch on the rear panel is in position I (On). 2. -
Page 63: Connecting External Accessories
® R&S Connecting External Accessories Connecting External Accessories The equivalent USB ports on the front and rear panel of the analyzer can be used to connect a variety of accessories: • A mouse simplifies operation of the instrument using the controls and dialogs of the graphical user interface. -
Page 64: Connecting A Printer
® Connecting External Accessories R&S Use the Start – Control Panel – Keyboard or Regional and Language Options menu of Windows XP to configure the keyboard properties. To access Windows XP, press the Windows key on the external keyboard or on the front panel. Operating the analyzer does not require a keyboard. -
Page 65: Connecting A Monitor
® R&S Connecting External Accessories Connecting a Monitor A standard VGA monitor can be connected to the 15-pole Sub-Min-D MONITOR connector on the rear panel of the analyzer. Attention! The monitor must be connected while the instrument is switched off (in standby mode). -
Page 66: Test Setups With Two Lan Connections
® Connecting External Accessories R&S transfer is still made using the TCP/IP protocol. The IP address information is displayed in the Info – Setup Info dialog. Test Setups with Two LAN Connections The two LAN connectors on the rear panel of the analyzer are equivalent. With one LAN connector used to establish a connection to a home/company network, the other one can be used to connect an additional instrument, e.g. -
Page 67: Remote Control In A Lan
® R&S Remote Control in a LAN Remote Control in a LAN A LAN connection is used to integrate the analyzer into a home/company network. This offers several applications: • Transfer data between a controller and the analyzer, e.g. in order run a remote control program. •... -
Page 68: Remote Desktop Connection
® Remote Control in a LAN R&S Manual TCP/IP configuration To disable dynamic TCP/IP configuration and enter the TCP/IP address information manually proceed as follows: 1. Obtain the IP address and subnet mask for the analyzer and the IP address for the local default gateway from your network administrator. -
Page 69: Windows Xp Embedded
® R&S Windows XP Embedded Windows XP Embedded The analyzer is equipped with a Windows XP Embedded operating system which has been configured according to the instrument's features and needs. Changes in the system configuration can be necessary in order to •... - Page 71 ® R&S Preparing for Use Contents of Chapter 1 1 Preparing for Use ....................1.1 Front Panel Tour..........................1.1 STANDBY Key .........................1.2 USB Connector ........................1.2 Ground Connector........................1.3 Test Ports ..........................1.3 Front Panel Jumpers........................1.4 Rear Panel Tour ..........................1.5 Putting the Instrument into Operation ...................1.6 Unpacking the Instrument and Checking the Shipment............1.6 Instrument Setup........................1.7 Mounting in a 19"...
-
Page 73: Preparing For Use
® R&S Front Panel Tour 1 Preparing for Use This chapter gives an overview of the front panel controls and connectors of the network analyzer and gives all information that is necessary to put the instrument into operation and connect external devices. -
Page 74: Standby Key
® Front Panel Tour R&S STANDBY Key The STANDBY toggle switch is located near the left edge of the front panel. The key serves two main purposes: • Toggle between standby and ready state • Shut down the instrument. USB Connector Double Universal Serial Bus connector of type A (master USB), used to connect e.g a keyboard, mouse or other pointing devices, a printer or an external storage device (USB stick, CD-ROM drive etc.). -
Page 75: Ground Connector
® R&S Front Panel Tour The length of passive connecting USB cables should not exceed 1 m. The maximum current per USB port is 500 mA. Ground Connector Connector providing the ground of the analyzer's supply voltage. Attention! Electrostatic discharge (ESD) may cause damage to the electronic components of the DUT and the analyzer. -
Page 76: Front Panel Jumpers
® Front Panel Tour R&S Attention! The maximum input levels at all test ports according to the front panel labeling or the data sheet must not be exceeded. In addition, the maximum input voltages of the other input connectors at the front and rear panel must not be exceeded. -
Page 77: Rear Panel Tour
® R&S Rear Panel Tour Rear Panel Tour This section gives an overview of the rear panel controls and connectors of the network analyzer. The rear connectors are described in detail in the annex Hardware Interfaces in the online help system. -
Page 78: Putting The Instrument Into Operation
® Putting the Instrument into Operation R&S Attention! The maximum input levels and voltages of the input connectors at the front and rear panel must not be exceeded. The EXT TRIGGER input connector and pin 2 of the USER CONTROL connector must never be used simultaneously as inputs for external trigger signals. -
Page 79: Instrument Setup
® R&S Putting the Instrument into Operation Should the instrument be damaged, immediately notify the forwarder who shipped the instrument to you and keep the container and packing material. Equipment returned or sent in for repair must be packed in the original container or packing with electrostatic protection. -
Page 80: Emi Protective Measures
® Putting the Instrument into Operation R&S EMI Protective Measures In order to avoid electromagnetic interference, the instrument may only be operated when it is closed and with all shielding covers fitted. Only appropriate shielded signal and control cables may be used. Connecting the Instrument to the AC Supply The network analyzer is automatically adapted to the AC supply voltage supplied. -
Page 81: Standby And Ready State
® R&S Putting the Instrument into Operation Standby and Ready State The STANDBY toggle switch is located in the bottom left corner of the front panel. After switching on the AC power, press the STANDBY key briefly to switch the analyzer from the standby to ready state or vice versa. -
Page 82: Starting The Analyzer, Shutdown
® Starting the Analyzer, Shutdown R&S Starting the Analyzer, Shutdown To start the analyzer, proceed as follows: 1. Make sure that the instrument is connected to the AC power supply and the power switch on the rear panel is in position I (On). 2. -
Page 83: Connecting A Mouse
® R&S Connecting External Accessories Connecting a Mouse A USB mouse can be connected to one of the Universal Serial Bus connectors on the front panel or on the rear panel (double USB connectors). It is recommended to use the mouse delivered with the instrument. -
Page 84: Connecting A Monitor
® Connecting External Accessories R&S printer driver is installed. If required, printer driver installation is initiated using Windows XP's Add Printer Wizard. The wizard is self-explanatory. A printer driver needs to be installed only once, even though the printer may be temporarily removed from the analyzer. Printer driver installation A great variety of printer drivers is available on the analyzer. -
Page 85: Test Setups With Two Lan Connections
® R&S Connecting External Accessories establish a LAN connection proceed as follows: 1. Refer to section Assigning an IP Address and learn how to avoid connection errors. 2. Connect an appropriate LAN cable to one of the LAN ports. Use a commercial RJ-45 cable to establish a non-dedicated network connection, or a cross-over RJ-45 cable to establish a dedicated connection between the analyzer and a single PC. -
Page 86: Remote Control In A Lan
® Remote Control in a LAN R&S Advanced TCP/IP Settings dialog. Both instruments must have independent IP addresses; see section Assigning an IP Address below. Contact your LAN administrator for details. Attention! Never use both LAN connectors to connect the analyzer in parallel to the same network as this will result in connection errors. - Page 87 ® R&S Remote Control in a LAN • If the network supports dynamic TCP/IP configuration using the Dynamic Host Configuration Protocol (DHCP), all address information can be assigned automatically. • If the network does not support DHCP, or if the analyzer is set to use alternate TCP/IP configuration, the addresses must be set manually.
-
Page 88: Remote Desktop Connection
® Windows XP Embedded R&S Remote Desktop Connection Remote Desktop is a Windows application which can be used to access and control the analyzer from a remote computer through a LAN connection. While the measurement is running, the analyzer screen contents are displayed on the remote computer, and Remote Desktop provides access to all of the applications, files, and network resources of the analyzer. -
Page 89: Firmware Update
® R&S Firmware Update Firmware Update Upgrade versions of the analyzer firmware are supplied as single setup files *.msi. To perform a firmware update 1. Copy the setup file to any storage medium accessible from the analyzer. This may be the internal hard disk, an external storage medium (USB memory stick, CD-ROM with external drive) or a network connection (LAN, GPIB bus). - Page 91 ® R&S ZVA/ZVB/ZVT Contents of Chapter 2 Contents of Chapter 2 2 Getting Started ..........................2.1 Reflection Measurements........................2.2 Instrument Setup for Reflection Measurements...............2.2 Parameter and Sweep Range Selection..................2.3 Instrument Calibration ......................2.4 Evaluation of Data........................2.6 Saving and Printing Data ......................2.7 Basic Tasks............................2.9 Control via Front Panel Keys ....................2.9 To Access a Particular Menu Command ...
-
Page 93: Getting Started
® R&S ZVA/ZVB/ZVT Reflection Measurements 2 Getting Started The following chapter presents a sample session with a R&S ZVA network analyzer and explains how to solve basic tasks that you will frequently encounter when working with the instrument. Before starting any measurement on your network analyzer, please note the instructions given in Chapter Preparing for Use. -
Page 94: Reflection Measurements
® Reflection Measurements R&S ZVA/ZVB/ZVT Reflection Measurements In a reflection measurement, the analyzer transmits a stimulus signal to the input port of the device under test (DUT) and measures the reflected wave. A number of trace formats allow you to express and display the results. -
Page 95: Parameter And Sweep Range Selection
® R&S ZVA/ZVB/ZVT Reflection Measurements Parameter and Sweep Range Selection After preset the display shows a diagram with a dB Mag scale. The sweep range (scale of the horizontal axis) is equal to the maximum frequency range of the analyzer, and the S-parameter S selected as a measurement parameter. -
Page 96: Instrument Calibration
® Reflection Measurements R&S ZVA/ZVB/ZVT Instrument Calibration The analyzer provides a wide range of sophisticated calibration methods for all types of measurements. Which calibration method is selected depends on the expected system errors, the accuracy requirements of the measurement, on the test setup and on the types of calibration standards available. In the following we assume that the calibration kit ZV-Z21 contains an appropriate male short standard with known physical properties. - Page 97 ® R&S ZVA/ZVB/ZVT Reflection Measurements The next dialog of the calibration wizard shows that only a single calibration standard needs to be measured. 5. Click the box Short (m)... to initiate the measurement of the connected short standard. The analyzer performs a calibration sweep and displays a message box with a progress bar.
-
Page 98: Evaluation Of Data
® Reflection Measurements R&S ZVA/ZVB/ZVT Evaluation of Data The analyzer provides various tools to optimize the display and analyze the measurement data. For instance, you can use markers determine the maximum of the reflection coefficient, and change the display format to obtain information about the phase shift of the reflected wave and the impedance of your DUT. -
Page 99: Saving And Printing Data
® R&S ZVA/ZVB/ZVT Reflection Measurements Refer to section Display Formats and Diagram Types in Chapter 3 to learn more about the diagram properties. Saving and Printing Data The analyzer provides standard functions for saving measurement settings and for printing the results. You can use these functions as if you were working on a standard PC. - Page 100 ® Reflection Measurements R&S ZVA/ZVB/ZVT 5. Press SAVE in the SYSTEM keypad. 6. In the Save As dialog opened, select a file location, format and name and activate Save. The active setup is stored to a file and can be reused in a later session. Proceed as described in section Starting the Analyzer, Shutdown to shut down your analyzer.
-
Page 101: Basic Tasks
® R&S ZVA/ZVB/ZVT Basic Tasks Basic Tasks The following sections describe how to solve basic tasks that you will frequently encounter when working with the instrument. In particular you can learn how to access instrument functions and control dialogs without a mouse and keyboard. Control via Front Panel Keys Although a mouse and external keyboard simplify the operation of the instrument, you can access all essential functions using the keys on the front panel. -
Page 102: To Make A Selection In A Dialog
® Basic Tasks R&S ZVA/ZVB/ZVT 3. As soon as you reach the desired menu command (which must not be one opening a submenu) press OK ENTER or press the rotary knob to initiate an action or open a dialog. After command execution or after closing the dialog, the menu bar is deactivated and the cursor returns to the diagram/softkey area. -
Page 103: Data Entry
® R&S ZVA/ZVB/ZVT Basic Tasks 3. Use the DATA ENTRY keys or the rotary knob to enter characters and numbers. For more details refer to Data Entry. 4. Press OK ENTER, CANCEL ESC or press the rotary knob to close the active dialog. -
Page 104: Using The Analyzer's On-Screen Keyboard
® Basic Tasks R&S ZVA/ZVB/ZVT Using the Analyzer's On-Screen Keyboard The on-screen keyboard allows you to enter characters, in particular letters, without an external keyboard. It is available for all character input fields which have a symbol. Operation with front panel keys 1. -
Page 105: Scaling Diagrams
® R&S ZVA/ZVB/ZVT Basic Tasks The System – External Tools submenu contains a shortcut to Windows XP's on-screen keyboard. Simply click Mouse Keyboard.lnk to open the keyboard. Scaling Diagrams The analyzer provides several alternative tools for setting the sweep range and customizing the diagrams. -
Page 106: Autoscale
® Basic Tasks R&S ZVA/ZVB/ZVT Autoscale The Autoscale function adjusts the scale divisions and the reference value so that the entire trace fits into the diagram area. To access Autoscale, use one of the following methods: Press the SCALE key in the TRACE keypad. Right-click the scale section in the trace list and select Autoscale from the context menu. -
Page 107: Enlarging The Diagram Area
® R&S ZVA/ZVB/ZVT Basic Tasks To set the sweep range use one of the following methods: Define Start and Stop values 1. Create two normal markers, e.g. the markers Mkr 1 and Mkr 2, and place them to the desired start and stop values of the sweep range. - Page 109 ® R&S ZVA/ZVB/ZVT Contents of Chapter 3 Contents of Chapter 3 3 System Overview ....................3.1 Basic Concepts..........................3.1 Global Resources........................3.2 Setups ..........................3.2 Traces, Channels and Diagram Areas..................3.2 Trace Settings........................3.3 Channel Settings......................3.3 Data Flow............................3.4 Screen Elements..........................3.6 Navigation Tools of the Screen ....................3.6 Menu Bar ........................3.7 Menu Structure ......................3.8 Softkey Bar ........................3.8...
- Page 110 ® Contents of Chapter 3 R&S ZVA/ZVB/ZVT Wave Quantities......................3.31 Ratios ...........................3.31 Balance - Unbalance Conversion ..................3.32 Balanced Port Configurations ..................3.33 Mixed Mode Parameters....................3.34 Mixed Mode Parameters for Different Test Setups .............3.34 Calibration Overview........................3.36 Calibration Standards and Calibration Kits ................3.36 Calibration Types ........................3.37 Normalization .......................3.38 Full One-Port Calibration .....................3.38 One-Path Two-Port Calibration..................3.39...
-
Page 111: System Overview
® R&S ZVA/ZVB/ZVT Basic Concepts 3 System Overview The following chapter provides an overview of the analyzer's capabilities and their use. This includes a description of the basic concepts that the analyzer uses to organize, process and display measurement data, of the screen contents, possible measured quantities, calibration methods and typical test setups. For a systematic explanation of all menus, functions and parameters and background information refer to the reference description on the graphical user interface (GUI Reference) in the online help system. -
Page 112: Global Resources
® Basic Concepts R&S ZVA/ZVB/ZVT Global Resources The analyzer provides global settings that are mostly hardware-related and can be used for all measurements, irrespective of the current measurement session or setup. The settings are stored in independent files and do not enter into any of the setup files. The following settings correspond to global resources: •... -
Page 113: Trace Settings
® R&S ZVA/ZVB/ZVT Basic Concepts Trace Settings The trace settings specify the mathematical operations used in order to obtain traces from the measured or stored data. They can be divided into several main groups: • Selection of the measured quantity (S-parameters, wave quantities, ratios, impedances,...) •... -
Page 114: Data Flow
® Data Flow R&S ZVA/ZVB/ZVT After changing the channel settings or selecting another measured quantity, the analyzer needs some time to initialize the new sweep. This preparation period increases with the number of points and the number of partial measurements involved. It is visualized by a Preparing Sweep symbol in the status bar: All analyzer settings can still be changed during sweep initialization. - Page 115 ® R&S ZVA/ZVB/ZVT Data Flow WAVE QUANTITIES POWER POWER CORR. DATA CORR. SYSTEM SYSTEM ERROR ERROR CORR. DATA CORR. RATIOS Channel data flow (for all traces of the channel) OFFSET 2 - PORT 4 - PORT 4 - PORT DEEM- DEEM- EMBED- BEDDING...
-
Page 116: Screen Elements
® Screen Elements R&S ZVA/ZVB/ZVT Screen Elements This section describes the operating concept of the network analyzer, including the alternative navigation tools for mouse and hardkey operation, the trace settings, markers and diagram areas. For a description of the different quantities measured by the analyzer refer to the Measured Quantities section. -
Page 117: Menu Bar
® R&S ZVA/ZVB/ZVT Screen Elements Menu Bar All analyzer functions are arranged in drop-down menus. The menu bar is located across the top of the diagram area: Menus can be controlled in different ways: • With a mouse, like the menus in any Windows application. A left mouse click expands a menu or submenu. -
Page 118: Menu Structure
® Screen Elements R&S ZVA/ZVB/ZVT Menu Structure All menus show an analogous structure. • A menu command with a right arrow expands a submenu with further related settings. Example: Measure expands a submenu to select the quantity to be measured and displayed. •... -
Page 119: Hardkey Bar
® R&S ZVA/ZVB/ZVT Screen Elements Navigation softkey (optional) Softkey no. 8 or softkeys no. 7 and no. 8 are reserved for navigation: • More 1/2 and More 2/2 toggle between two groups of softkeys which belong to the same menu. The softkeys are provided whenever the active menu contains more than 7 commands. -
Page 120: Display Elements In The Diagram Area
® Screen Elements R&S ZVA/ZVB/ZVT Display Elements in the Diagram Area The central part of the screen is occupied by one or several diagram areas. Diagram Areas A diagram area is a rectangular portion of the screen used to display traces. Diagram areas are arranged in windows;... -
Page 121: Title
® R&S ZVA/ZVB/ZVT Screen Elements Title Across the top of the diagram area, an optional title describes the contents of the area. Different areas within a setup are distinguished by area numbers in the upper right corner. Use the context menu or the functions in the Display menu to display, hide or change the title and to add and customize diagram areas. - Page 122 ® Screen Elements R&S ZVA/ZVB/ZVT • Data traces show the current measurement data and are continuously updated as the measurement goes on. Data traces are dynamic traces. • Memory traces are generated by storing the data trace to the memory. It represents the state of the data trace at the moment when it was stored.
-
Page 123: Markers
® R&S ZVA/ZVB/ZVT Screen Elements The settings correspond to the most common commands in the Trace – Trace Select, Trace – Trace Funct, Trace – Meas, Trace – Format and Trace – Scale menus. Markers Markers are tools for selecting points on the trace and for numerical readout of measured data. The analyzer provides three different basic marker types. -
Page 124: Marker Info Field
® Screen Elements R&S ZVA/ZVB/ZVT • Mkr 1 indicates the maximum (minimum) of the peak. • Mkr 2 and Mkr 3 indicate the lower and upper band edge where the trace value has decreased (increased) by a definite Level value. •... -
Page 125: Channel Settings
® R&S ZVA/ZVB/ZVT Screen Elements The table is hidden by default. To display the table double-click the marker info field to open the Marker Properties dialog. Context menu of the marker info field A right mouse click on the marker info field opens a context menu: Movable Marker Info allows the marker info field to be placed to any position in the diagram area. -
Page 126: Context Menus
® Screen Elements R&S ZVA/ZVB/ZVT The settings correspond to the most common commands in the Channel – Channel Select, Channel – Stimulus and Channel – Power Bandwidth Average menus. Context Menus To provide access to the most common tasks and speed up the operation, the analyzer offers context menus (right-click menus) for the following display elements: •... -
Page 127: On-Screen Keyboard
® R&S ZVA/ZVB/ZVT Screen Elements Immediate vs. Confirmed Settings In some dialogs, the settings take effect immediately so that the effect on the measurement is observable while the dialog is still open. This is especially convenient when a numeric value is incremented or decremented, e.g. -
Page 128: Step Size
® Screen Elements R&S ZVA/ZVB/ZVT • Cancel discards the current selection and closes the keyboard. The input field of the calling dialog is left unchanged. The on-screen keyboard allows you to enter characters, in particular letters, without an external keyboard; see Data Entry. To enter numbers and units, you can also use the DATA ENTRY keys on the front panel of the instrument. -
Page 129: Cartesian Diagrams
® R&S ZVA/ZVB/ZVT Screen Elements • Inverted Smith charts are used for the display format Inverted Smith and show a vector like polar diagrams but with grid lines of constant real and imaginary part of the admittance. The analyzer allows arbitrary combinations of display formats and measured quantities (Trace – Measure). -
Page 130: Polar Diagrams
® Screen Elements R&S ZVA/ZVB/ZVT The formulas also hold for real results, which are treated as complex values with zero imaginary part (y = 0). Trace Format Description Formula dB Mag Magnitude of z in dB |z| = sqrt ( x dB Mag(z) = 20 * log|z| dB Lin Mag Magnitude of z, unconverted... -
Page 131: Smith Chart
® R&S ZVA/ZVB/ZVT Screen Elements Circles of equal magnitude Voltage reflection: Voltage reflection: Short-circuited Open-circuited load (Z = 0) load (Z = infinity) Radial lines of Matching equal phase angle impedance (Z = Z Examples for definite magnitudes and phase angles: •... - Page 132 ® Screen Elements R&S ZVA/ZVB/ZVT The basic properties of the Smith chart follow from this construction: • The central horizontal axis corresponds to zero reactance (real impedance). The center of the diagram represents Z/Z = 1 which is the reference impedance of the system (zero reflection). At the left and right intersection points between the horizontal axis and the outer circle, the impedance is zero (short) and infinity (open).
-
Page 133: Inverted Smith Chart
® R&S ZVA/ZVB/ZVT Screen Elements Circles of equal resistance Short-circuited Open-circuited load (Z = 0) load (Z = infinity) Arcs of equal Matching reactance impedance (Z = Z Examples for special points in the Smith chart: • The magnitude of the reflection coefficient of an open circuit (Z = infinity, I = 0) is one, its phase is zero. - Page 134 ® Screen Elements R&S ZVA/ZVB/ZVT The basic properties of the inverted Smith chart follow from this construction: • The central horizontal axis corresponds to zero susceptance (real admittance). The center of the diagram represents Y/Y = 1, where Y is the reference admittance of the system (zero reflection).
-
Page 135: Measured Quantities And Display Formats
® R&S ZVA/ZVB/ZVT Screen Elements Examples for special points in the inverted Smith chart: • The magnitude of the reflection coefficient of a short circuit (Y = infinity, U = 0) is one, its phase is –180 • The magnitude of the reflection coefficient of an open circuit (Y = 0, I = 0) is one, its phase is zero. -
Page 136: Measured Quantities
® Measured Quantities R&S ZVA/ZVB/ZVT Measured Quantities This section gives an overview of the measurement results of the network analyzer and the meaning of the different measured quantities. All quantities can be selected in the Trace – Meas. submenu. The definitions in this and the following sections apply to general n-port DUTs. An analyzer with a smaller number of test ports provides a subset of the n-port quantities. -
Page 137: Multiport Parameters
® R&S ZVA/ZVB/ZVT Measured Quantities • S is the output reflection coefficient, defined as the ratio of the wave quantities b (reverse measurement with matched input, b in the figure above and a = 0) to a , measured at 2,rev PORT 2. -
Page 138: Z-Parameters
® Measured Quantities R&S ZVA/ZVB/ZVT The analyzer converts the measured S-parameters to determine the matched-circuit impedances. Relation with S-parameters It is possible to express the matched-circuit impedances Z in terms of the reflection S-parameters S and vice versa. The reflection parameters are calculated according to: −... - Page 139 ® R&S ZVA/ZVB/ZVT Measured Quantities Meaning of Z-parameters The four 2-port open-circuit Z-parameters can be interpreted as follows: • Z is the input impedance, defined as the ratio of the voltage V to the current I , measured at port 1 (forward measurement with open output, I = 0).
- Page 140 ® Measured Quantities R&S ZVA/ZVB/ZVT Examples: • Y is the input admittance of a 2-port DUT that is terminated at its output with the reference impedance Z (matched -circuit admittance measured in a forward reflection measurement). • The extension of the admittances to more ports and mixed mode measurements is analogous to S-parameters.
-
Page 141: Wave Quantities
® R&S ZVA/ZVB/ZVT Measured Quantities as the assumption of linearity holds, the S-, Z- and Y-parameters are independent of the source power. The network analyzer provides two additional sets of measurement parameters which have a unambiguous meaning even if the DUT is measured outside its linear range: •... -
Page 142: Balance - Unbalance Conversion
® Measured Quantities R&S ZVA/ZVB/ZVT received waves are at different frequencies. • A ratio of two arbitrary waves that is not an element of the S-matrix (e.g. a ratio of the form a is needed. The notation for ratios includes the two waves with their directions and test port numbers. Additionally, the source port must be specified. -
Page 143: Balanced Port Configurations
® R&S ZVA/ZVB/ZVT Measured Quantities Balance-unbalance conversion avoids the disadvantages of real transformers: • There is no need to fabricate test fixtures with integrated baluns for each type of DUT. • The measurement is not impaired by the non-ideal characteristics of the balun (e.g. error tolerances, limited frequency range). -
Page 144: Mixed Mode Parameters
® Measured Quantities R&S ZVA/ZVB/ZVT Mixed Mode Parameters Mixed mode parameters are an extension of normal mode parameters (e.g. S-parameters, impedances and admittances) for balanced measurements. The analyzer can measure mixed mode parameters as soon as a balanced port configuration is selected. Mixed mode parameters are used to distinguish the following three port modes: s: Singe-ended (for unbalanced ports) d: Differential mode (for balanced ports) - Page 145 ® R&S ZVA/ZVB/ZVT Measured Quantities dd11 dc11 cd11 cc11 3. DUT with one balanced and one single-ended port. ss22 sd12 sc12 ds21 dd11 dc11 cs21 cd11 cc11...
-
Page 146: Calibration Overview
® Calibration Overview R&S ZVA/ZVB/ZVT Calibration Overview Calibration is the process of eliminating systematic, reproducible errors from the measurement results (system error correction). The process involves the following stages: 1. A set of calibration standards is selected and measured over the required sweep range. For many calibration types the magnitude and phase response of each calibration standard (i.e. -
Page 147: Calibration Types
® R&S ZVA/ZVB/ZVT Calibration Overview The analyzer provides a large number of predefined cal kits but can also import cal kit files and create new kits: • A selection of predefined kits is available for all connector types. The parameters of these kits are displayed in the Add/Modify Standards dialog, however, it is not possible to change or delete the kits. -
Page 148: Normalization
® Calibration Overview R&S ZVA/ZVB/ZVT Calibration Standards Parameter Error Terms General Application Type Accuracy TRL (2-port) Reflect (at See TOM High, high Reflection and both ports), directivity transmission Through, measurements on DUTs Line with 2 ports, especially for planar circuits. Limited bandwidth. -
Page 149: One-Path Two-Port Calibration
® R&S ZVA/ZVB/ZVT Calibration Overview One-Path Two-Port Calibration A one-path two-port calibration combines a full one-port calibration with a transmission normalization, so it requires a short, an open and a match standard to be connected to a single test port plus a through standard between this calibrated source port and a second load port. -
Page 150: Trm Calibration
® Calibration Overview R&S ZVA/ZVB/ZVT Implicit verification The two one-port standards of the TOM calibration are connected to both ports. Together with the four S-parameters of the through standard, this results in 8 S-parameter measurements. Despite the fact that TOM uses fewer standards than TOSM – the short is missing –, the 3 fully known standards provide more information than necessary. -
Page 151: Tna Calibration
® R&S ZVA/ZVB/ZVT Calibration Overview 2. Determine the length L and L of the air lines from the following conditions in the center of the subranges: = λ (450 MHz)/4 = 16.7 cm; L = λ (2.4 GHz)/4 = 3.1 cm 3. -
Page 152: Automatic Calibration
® Calibration Overview R&S ZVA/ZVB/ZVT Automatic Calibration A Calibration Unit is an integrated solution for automatic system error calibration of vector network analyzers of the R&S ZVAB family. Rohde & Schwarz provides different types of calibration units: • The 4-port calibration units (accessory R&S ZV-Z51, order numbers 1164.0515.30 or 1164.0515.70 for models equipped with 3.5 mm or type N sockets, respectively) are especially suited for R&S ZVB and R&S ZVA vector network analyzers. -
Page 153: Connecting The Calibration Unit To The Network Analyzer
® R&S ZVA/ZVB/ZVT Calibration Overview Attention! Please observe the safety instructions on the technical information provided with the calibration unit to avoid any damage to the unit and the network analyzer. Safety-related aspects of ZV-Z51 connection and operation are also reported in the sections below. Connecting the Calibration Unit to the Network Analyzer The calibration units provide the following connectors: Calibration units R&S ZV-Z51... -
Page 154: Performing An Automatic Calibration
® Calibration Overview R&S ZVA/ZVB/ZVT Performing an Automatic Calibration After connection and initialization, you can use the calibration unit as follows: 1. Connect ports 1 through n (n = 1 to 4, depending on your analyzer model and the number of ports to be calibrated) of the unit to the corresponding ports 1 through n of the analyzer. - Page 155 ® R&S ZVA/ZVB/ZVT Calibration Overview ZV-Z58: Number of ports calibrated Calibration type 1 (port 1 or port 2) Full one port 2 (ports 1 and 2) TOSM 3 (ports 1, 2, and 3 or ports 1, 2, and 4) TOSM 4 (ports 1 to 4) TOSM 5 (ports 1 to 5)
- Page 157 ® R&S ZVA/ZVB/ZVT GUI Reference Contents of Chapter 4 4 GUI Reference ..................... 4.1 Control Menus...........................4.2 Restore .............................4.2 Move ............................4.2 Size............................4.3 Minimize ...........................4.3 Maximize ..........................4.3 Close ............................4.3 Next ............................4.3 File Menu ............................4.4 New ............................4.5 Close ............................4.5 Print ............................4.5 Print Dialog........................4.5 Print Preview ..........................4.6 Page Setup..........................4.7 Page Setup Dialog ......................4.7...
- Page 158 ® GUI Reference R&S ZVA/ZVB/ZVT Aperture........................4.37 SWR ..........................4.38 Lin Mag.........................4.39 Real ..........................4.39 Imag ..........................4.40 Inverted Smith ......................4.40 Unwrapped Phase......................4.40 Scale............................4.41 Autoscale........................4.42 Autoscale All ........................4.42 Scale Div........................4.42 Ref. Value........................4.42 Ref. Position .........................4.43 Ref. Val = Marker ......................4.43 Trace Select ...........................4.43 Next Trace........................4.45 Select Trace .........................4.45 Add Trace........................4.45...
- Page 159 ® R&S ZVA/ZVB/ZVT GUI Reference More Markers .......................4.90 Marker Properties......................4.91 Export Markers......................4.92 Search ............................4.92 Max Search ........................4.93 Min Search ........................4.94 Next Peak........................4.94 Peak Search >......................4.94 < Peak Search......................4.94 Target ...........................4.95 Define Peak........................4.97 Search Range ......................4.97 Marker Tracking ......................4.99 Bandfilter ........................4.99 Marker Funct ........................4.105 Center = Marker ......................4.106 Start = Marker ......................4.107...
- Page 160 ® GUI Reference R&S ZVA/ZVB/ZVT Single (All Chans) ......................4.149 Restart........................4.150 Define Restart ......................4.150 Mode.............................4.150 Port Configuration ......................4.151 Harmonics ........................4.167 Mixer...........................4.172 Virtual Transform......................4.181 Alternate ........................4.190 Spurious Avoidance ....................4.191 ALC (All Chans) ......................4.192 Low Phase Noise .......................4.192 Channel Select ........................4.193 Next Channel ......................4.194 Select Channel ......................4.194 Add Channel + Trace ....................4.195 Add Channel + Trace + Diag.
- Page 161 ® R&S ZVA/ZVB/ZVT GUI Reference Display Config..........................4.246 Softkey Bar ...........................4.246 Hardkey Bar..........................4.247 Title Bar ..........................4.247 Status Bar ..........................4.247 Color Scheme........................4.247 Define User Color Scheme....................4.248 Frequency Info........................4.250 System Menu..........................4.251 System Config ........................4.251 External Power Meters ......................4.254 Add/Modify External Power Meter..................4.256 External Generators ......................4.256 Add/Modify External Generator ....................4.259 Int.
-
Page 163: Gui Reference
® R&S ZVA/ZVB/ZVT Control Menus 4 GUI Reference This chapter explains in detail all functions of the analyzer and their application. It is organized according to the menus/softkey groups of the user interface: All topics in this chapter can be called up directly using the HELP key in the menus or the Help buttons in the dialogs. -
Page 164: Control Menus
® Control Menus R&S ZVA/ZVB/ZVT Control Menus The Control menus provide standard Windows™ functions to control windows. The analyzer provides two types of Control menus with analogous function: • Clicking the icon opens the Control menu for the main application window. To access this icon the Title Bar of the main application window must be open. -
Page 165: Size
® R&S ZVA/ZVB/ZVT Control Menus Size Returns the maximized or minimized active window to its size and position. Restore is available after a Maximize or Minimize command only. This command is unavailable for maximized windows. Minimize Reduces the active window to an icon. Maximize Enlarges the active window to fill the available space. -
Page 166: File Menu
® File Menu R&S ZVA/ZVB/ZVT File Menu The File menu provides standard Windows™ functions to create, save, recall or print setups, to copy the current screen and to shut down the application. Setups A setup comprises a set of diagram areas with all displayed information that can be stored to a NWA setup file (*.zvx). -
Page 167: New
® R&S ZVA/ZVB/ZVT File Menu Creates a new setup and opens a new setup window. The new setup is named Setup<n> where <n> is the current number for all created setups. To open an existing setup, select File – Open / Recall. To rename a setup, use File – Save As. Remote control: MEMory:DEFine "<setup_name>"... -
Page 168: Print Preview
® File Menu R&S ZVA/ZVB/ZVT • Select Printer displays the active printer and printer connection. The printers and printer connections can be selected from the Name drop-down list. • Preferences opens a dialog to select the layout and paper format and specify further printer options. -
Page 169: Page Setup
® R&S ZVA/ZVB/ZVT File Menu Page Setup Selects a printer and a printer connection. This command presents a Page Setup dialog box to specify the printer and its connection. Page Setup Dialog Provides options to specify how the document should be printed. Page Setup is opened by means of the File –... -
Page 170: Print To Clipboard
® File Menu R&S ZVA/ZVB/ZVT • Preview shows the active setup as it would appear when printed. To select the Print Range and start printing, open the Print dialog. To install printers and configure ports use the Control Panel. Remote control: HCOPy:DESTination HCOPy:DEVice:LANGuage HCOPy:ITEM:ALL HCOPy:ITEM... - Page 171 ® R&S ZVA/ZVB/ZVT File Menu • Save in specifies the drive and directory in which the screen contents are stored. The icons to the right of the pull-down list are provided for easy navigation in the file system (place the cursor on the icons to obtain What's this? help).
-
Page 172: Save
® File Menu R&S ZVA/ZVB/ZVT Save Saves and names the active setup. The analyzer opens a standard Windows™ Save As dialog box to select a NWA setup file name (*.zvx) and location for the setup file. Remote control: MMEMory:STORe:STATe 1,"<file_name>" Save As Dialog Specifies the name and location of a particular file (e.g. -
Page 173: Open File Dialog
® R&S ZVA/ZVB/ZVT File Menu Yes overwrites the changes in the opened setup, No closes the message box, leaving the opened setup unchanged. It is possible to create and open several setup files with the same contents but different names or locations. -
Page 174: Trace Menu
® Trace Menu R&S ZVA/ZVB/ZVT Trace Menu The Trace menu provides all trace settings and the functions to select, modify and store different traces. In addition the menu provides the marker, search and limit check functions. Traces A trace is a set of data points that can be displayed together in a diagram area. The trace settings specify the mathematical operations used in order to obtain traces from the collected data. -
Page 175: Measure
® R&S ZVA/ZVB/ZVT Trace Menu Measure The Measure submenu selects the quantity to be measured and displayed. • S11, S12, S21, S22 select the four elements of the standard 2-port scattering matrix (S- parameters). • More S-Parameters opens a dialog to select S-parameters for multiport measurements or mixed mode S-parameters. - Page 176 ® Trace Menu R&S ZVA/ZVB/ZVT Port assignments of the DUT and the analyzer S-parameters S characterize the Device Under Test, so the indices <out> and < in> denote the <out>< in> output and input ports of the DUT. Analogously the waves a and a are referred to as incident waves, and b...
-
Page 177: More S-Parameters
® R&S ZVA/ZVB/ZVT Trace Menu More S-Parameters Opens a dialog to select S-parameters for multiport measurements (including the 2-port S-parameters) or mixed mode S-parameters. The More S-Parameters dialog provides the following settings: • S-Parameter selects the type (left pull-down list) and the port number assignment (right pull- down list) of the S-parameter. -
Page 178: Single-Ended And Mixed Mode Parameters
® Trace Menu R&S ZVA/ZVB/ZVT Single-Ended and Mixed Mode Parameters The analyzer measures single-ended (unbalanced) parameters (S-parameters, impedances, admittances, Z-parameters, Y-parameters) unless a balanced port configuration is selected. In the More S-Parameters dialog and the analogous dialogs for the other quantities, the left parameter selection field shows the parameter type (S, Y, Z) and is disabled (grayed). - Page 179 ® R&S ZVA/ZVB/ZVT Trace Menu b2/a1 Src Port 1, b1/a1 Src Port 1, b2/b1 Src Port 1, b1/b2 Src Port 1 Select predefined complex ratios of the standard 2-port wave quantities a , and b The predefined wave quantities are all obtained with the same test set configuration, port 1 providing the stimulus signal (source port 1, forward measurement if the stimulus signal is fed to the input of the DUT).
- Page 180 ® Trace Menu R&S ZVA/ZVB/ZVT list) of the wave that forms the numerator of the ratio. The input (stimulus) or output (response) port number is selected in the right pull-down list. The range of output and input port numbers depends on the analyzer model. •...
- Page 181 ® R&S ZVA/ZVB/ZVT Trace Menu Combining different detectors The detector setting in the More Ratios menu affects the ratio of a numerator and a denominator wave quantity. This does not place any restriction on the measurement functionality of the analyzer, because ratios can be formed by calculating the numerator and denominator individually and using the trace functions.
- Page 182 ® Trace Menu R&S ZVA/ZVB/ZVT The predefined wave quantities are obtained with different source ports. a1 Src Port 1, b1 Src Port 1 and b1 Src Port 2 are measured at Port 1 of the analyzer. a2 Src Port 2, b2 Src Port 1 and b2 Src Port 2 are measured at Port 2 of the analyzer.
-
Page 183: Impedance
® R&S ZVA/ZVB/ZVT Trace Menu of the dialog are grayed. • Source Port selects one of the available test ports of the analyzer as a source of the stimulus signal. The analyzer places no restriction on the combination of source ports and port numbers of the measured wave quantity, so it is even possible to measure a while the source port is port 1 (e.g. - Page 184 ® Trace Menu R&S ZVA/ZVB/ZVT Z <– S11, Z <– S12, Z <– S21, Z <– S22 Select the 2-port matched-circuit, converted impedances. The parameters describe the impedances of a 2-port DUT, obtained in forward and reverse transmission and reflection measurements: •...
-
Page 185: Admittance
® R&S ZVA/ZVB/ZVT Trace Menu • Balanced and Measured Ports opens the dialog of the same name to define the properties of the test ports. Single-ended (unbalanced) impedance parameters are assigned to the physical test ports of the analyzer. Balanced impedance parameters are assigned to logical test ports. Selecting a balanced port configuration with logical test ports means that the balance- unbalance conversion is switched on and that the analyzer provides mixed mode parameters. - Page 186 ® Trace Menu R&S ZVA/ZVB/ZVT in a short circuit (V = 0). Short-circuit Y-parameters can be selected in the More Y-Parameters dialog. Mixed mode measurements are available for both types of admittance parameters. • Y <– S11, Y <– S12, Y <– S21, Y <– S22 select the forward or reverse matched-circuit admittances of a 2-port DUT.
- Page 187 ® R&S ZVA/ZVB/ZVT Trace Menu More Admittances Opens a dialog to select converted, matched-circuit admittances for more ports or balanced port measurements. The notation for admittance parameters and the functionality of the More Admittances dialog is analogous to the definition of S-parameters. •...
-
Page 188: Z-Parameters
® Trace Menu R&S ZVA/ZVB/ZVT Z-Parameters... Opens the Z-Parameter dialog to select arbitrary open-circuit Z-parameters for different ports or mixed mode measurements. In analogy to the matched-circuit impedances, the open-circuit Z-parameters are available for any combination of input and output ports. Open-circuit Z-parameters can be used as an alternative to S-parameters (or short-circuit Y- parameters) in order to completely characterize a linear n-port network. -
Page 189: Y-Parameters
® R&S ZVA/ZVB/ZVT Trace Menu Remote CALCulate<Ch>:PARameter:MEASure "<Trace_Name>", "Z11" | "Z12" | control: "Z21" | "Z22" Create trace select name measurement parameter: CALCulate<Ch>:PARameter:SDEFine "<Trace_Name>", "Z11" | "Z12" | "Z21" | "Z22" Y-Parameters Opens the Y-Parameter dialog to select arbitrary short-circuit Y-parameters for different ports or mixed mode measurements. -
Page 190: Stability Factors
® Trace Menu R&S ZVA/ZVB/ZVT The port configuration is valid for all traces in the channel The settings made in the Balanced and Measured Ports dialog are channel settings and therefore apply to all traces assigned to the channel (Balanced and Measured Ports is also accessible through Channel –... -
Page 191: Dc Inputs
® R&S ZVA/ZVB/ZVT Trace Menu where denotes the complex conjugate of S. Stability factors are calculated as functions of the frequency or another stimulus parameter. They provide criteria for linear stability of two-ports such as amplifiers. A linear circuit is said to be unconditionally stable if no combination of passive source or load can cause the circuit to oscillate. - Page 192 ® Trace Menu R&S ZVA/ZVB/ZVT • DC MEAS 1V and DC MEAS 10V select the DC voltages fed to the input connectors DC MEAS as measured quantities. • PAE... opens a dialog to select and configure the PAE measurement. All DC and PAE measurements use the input connectors DC MEAS at the rear of the instrument. The measurement results are real-valued and displayed as a function of sweep variable (frequency, internal source power, time).
- Page 193 ® R&S ZVA/ZVB/ZVT Trace Menu The PAE dialog provides the following settings: • Used Test Ports selects the analyzer port providing the input signal a (DUT Input) and the receiver port for the output signal b (DUT Output). • The radio buttons and input fields in the DC Power panel select the test model and the parameters for measuring the DC power P supplied to the DUT.
- Page 194 ® Trace Menu R&S ZVA/ZVB/ZVT Definition: The Power Added Efficiency (PAE) is the ratio of the added RF power generated by an active two-port device (e.g. an amplifier) to the supplied DC power P . The added RF power can be expressed as the difference between the power of the outgoing wave b at the output of the DUT and the power of the incident wave a...
-
Page 195: Power Sensor
® R&S ZVA/ZVB/ZVT Trace Menu V. If R the power consumption of the resistor can be neglected so that P = 1/ R * U(DC MEAS 10 V) * U(DC MEAS 1 V), hence the Constant k must be set equal to 1/ R. The unit field shows the SI unit of an inverse resistance (W/V ). -
Page 196: Format
® Trace Menu R&S ZVA/ZVB/ZVT • Show as selects the physical unit of the displayed trace. It is possible to display the measured Voltage U or convert the wave quantity into an effective power according to P = V /Re(Z ). -
Page 197: Db Mag
® R&S ZVA/ZVB/ZVT Trace Menu • Imag selects a Cartesian diagram to display the imaginary part of a complex measured quantity. • Inverted Smith selects an inverted Smith diagram to display an S-parameter or ratio. • Unwrapped Phase selects a Cartesian diagram with a linear vertical axis to display the phase of the measured quantity in an arbitrary phase range. -
Page 198: Smith
® Trace Menu R&S ZVA/ZVB/ZVT The magnitude of each complex quantity can be displayed on a linear scale or on a logarithmic scale. It is possible to view the real and imaginary parts instead of the magnitude and phase. Both the magnitude and phase are displayed in the polar diagram. -
Page 199: Aperture
® R&S ZVA/ZVB/ZVT Trace Menu Mathematical relations: Delay, Aperture, Electrical Length The group delay is defined as: where = Phase response in radians or degrees rad/deg = Frequency/angular velocity in radians/s f = Frequency in Hz In practice, the analyzer calculates an approximation to the derivative of the phase response, taking a . -
Page 200: Swr
® Trace Menu R&S ZVA/ZVB/ZVT Properties: The delay at each sweep point is computed as: where the aperture f is a finite frequency interval around the sweep point f and the analyzer measures the corresponding phase change Calculation of f and With a given number of aperture steps n the delay at sweep point no. -
Page 201: Lin Mag
® R&S ZVA/ZVB/ZVT Trace Menu Properties: The SWR (or Voltage Standing Wave Ratio, VSWR) is a measure of the power reflected at the input of the DUT. It is calculated from the magnitude of the reflection coefficients S (where i denotes the port number of the DUT) according to: The superposition of the incident and the reflected wave on the transmission line connecting the analyzer and the DUT causes an interference pattern with variable envelope voltage. -
Page 202: Imag
® Trace Menu R&S ZVA/ZVB/ZVT It is possible to view the magnitude and phase of a complex quantity instead of the real and imaginary part. The magnitude can be displayed on a linear scale or on a logarithmic scale. Both the real and imaginary parts are displayed in the polar diagram. -
Page 203: Scale
® R&S ZVA/ZVB/ZVT Trace Menu After changing to the Unwrapped Phase format, use Trace – Scale – Autoscale to re-scale the vertical axis and view the entire trace. Remote control: CALCulate<Ch->Tr>:FORMat UPHase Scale The Scale settings define how the current trace is presented in the diagram selected in the Format submenu. -
Page 204: Autoscale
® Trace Menu R&S ZVA/ZVB/ZVT Autoscale Adjusts the Scale Divisions and the Ref. Value in order to display the entire active trace in the diagram area, leaving an appropriate display margin. • In Cartesian diagrams, the analyzer re-calculates the values of the vertical divisions so that the trace fits onto 80% of the vertical grid. -
Page 205: Ref. Position
® R&S ZVA/ZVB/ZVT Trace Menu Use the paste marker list for convenient entry of the reference value. Remote control: DISPlay:WINDow<Wnd>:TRACe<WndTr>:Y:RLEVel Ref. Position Defines the position of the reference line in a Cartesian diagram. The reference line is indicated by a symbol at the right edge of the diagram area. - Page 206 ® Trace Menu R&S ZVA/ZVB/ZVT • Next Trace selects the next trace as the active trace (disabled if only one trace is defined). • Select Trace opens a box to select an arbitrary trace of the active setup as the active trace (disabled if only one trace is defined).
-
Page 207: Next Trace
® R&S ZVA/ZVB/ZVT Trace Menu In remote control each channel can contain an active trace. The active remote traces and the active manual trace are independent of each other; see Active Traces in Remote Control. Next Trace Selects the next trace in a series of displayed traces as the active trace. This function is disabled if only one trace is defined. -
Page 208: Add Trace + Diag. Area
® Trace Menu R&S ZVA/ZVB/ZVT To create a new trace in a new channel, use the Channel – Channel Select – New Channel function. Remote CALCulate<Ch>:PARameter:SDEFine <Trace Name>, < Meas control: Parameter> DISPlay:WINDow<Wnd>:TRACe<WndTr>:FEED Add Trace + Diag. Area Creates a new trace in a new diagram area and assigns the trace to the current channel. The new trace is created with the trace and channel settings of the former active trace but displayed with another color. -
Page 209: Assign Diag. Area
® R&S ZVA/ZVB/ZVT Trace Menu Assign Channel is disabled if the current setup contains only one channel. To create an additional channel, select Channel – Channel Select – New Channel. Remote CALCulate<Ch>:PARameter:SDEFine <Trace Name>, < Meas control: Parameter> Assign Diag. Area Assigns the active trace to another diagram area. - Page 210 ® Trace Menu R&S ZVA/ZVB/ZVT All existing traces of the current setup are listed in a table with several editable (white) or non-editable (gray) columns. Below the table the Trace Manager provides the following buttons: • Add/Delete... opens a dialog to add a new trace or delete a trace. •...
- Page 211 ® R&S ZVA/ZVB/ZVT Trace Menu and diagram area selected in the drop-down lists. It is possible to create a New channel and/or diagram area for the new trace. • Delete deletes the selected trace, removing it from the list in the Trace Manager and from the screen.
-
Page 212: Trace Funct
® Trace Menu R&S ZVA/ZVB/ZVT • The two radio buttons qualify whether the traces in the table are sorted in ascending or descending order, according to the property selected in the pull-down list. Remote control: No command, display configuration only. Trace Funct The Trace Funct(ions) store traces to the memory and perform mathematical operations on traces Refer to section Trace Types in the System Overview chapter to learn more about data traces,... -
Page 213: Data -> Mem
® R&S ZVA/ZVB/ZVT Trace Menu • Smoothing On activates the smoothing function for the active trace. • Smoothing Aperture... defines how many measurement points are averaged to smooth the trace. • Import/Export Data stores the active trace to a file or loads a memory trace from a file. •... -
Page 214: Math = Data/Mem
® Trace Menu R&S ZVA/ZVB/ZVT Math = Data/Mem Activates the mathematical mode where the active data trace is divided by the last generated memory trace. The division is calculated on a point-to-point basis: Each measurement point of the active trace is divided by the corresponding measurement point of the memory trace. -
Page 215: Mem Dialog
® R&S ZVA/ZVB/ZVT Trace Menu • Data —> Mem opens a dialog to store the active trace to a memory trace. • All Data —> Mem opens a dialog to store all traces in the active setup to memory traces. •... -
Page 216: All Data -> Mem
® Trace Menu R&S ZVA/ZVB/ZVT • Store Trace <trace_name> to contains all memory traces associated with the active data trace. The selected memory trace can be replaced. • Data -> Mem stores the active data trace to the memory trace selected above. If no memory trace is associated with the current trace, then a new memory trace is created. -
Page 217: Math = User Def
® R&S ZVA/ZVB/ZVT Trace Menu • Data & Trace Funct. -> Mem stores the current state of all data traces modified by the trace functions to memory traces. If a trace has no memory trace, then a new memory trace is created. - Page 218 ® Trace Menu R&S ZVA/ZVB/ZVT The number of points belongs to the channel settings. Coupled data and memory traces are always compatible because they have the same channel settings. The analyzer processes only numeric values without units in the mathematical formulas. No consistency check for units is performed.
- Page 219 ® R&S ZVA/ZVB/ZVT Trace Menu Contains operators for arithmetic operations and mathematical functions. The following table lists how the operators act on a complex quantity z = x + jy. +, -, *, / Basic arithmetic operations Grouping parts of an expression linMag |z| = sqrt ( x dBMag...
-
Page 220: Transform
® Trace Menu R&S ZVA/ZVB/ZVT If traces are used as operands, the complex trace data (measurement results) enter into the mathematical expression, irrespective of the current trace format. Result is Wave Quantity in the lower part of the dialog controls the conversion and formatting of the mathematic expression. - Page 221 ® R&S ZVA/ZVB/ZVT Trace Menu Time domain transforms can be calculated in band pass or low pass mode. For the latter the analyzer offers the impulse and step response as two alternative transformation types. A wide selection of windows can be used to optimize the time domain response and suppress sidelobes due to the finite sweep range.
- Page 222 ® Trace Menu R&S ZVA/ZVB/ZVT Gated and ungated state of the frequency domain representation The trace in the frequency domain depends on the state of the Time Gate: • If the gate is disabled, the frequency domain trace corresponds to the sweep results prior to the transformation.
- Page 223 ® R&S ZVA/ZVB/ZVT Trace Menu factor of 2. This increased computation time is usually negligible compared to the sweep times of the analyzer. The following properties of the Chirp z-transformation are relevant for the analyzer settings: • The frequency points must be equidistant. If a Log Frequency or Segmented Frequency sweep is active, the measurement points are interpolated.
- Page 224 ® Trace Menu R&S ZVA/ZVB/ZVT the frequency domain. Use the paste marker list for convenient entry of Start and Stop values. Distance units for transmission and reflection parameters The interpretation of time and distance depends on the measurement type. For reflection measurements, the time axis represents the propagation time of a signal from the source to the DUT and back.
- Page 225 ® R&S ZVA/ZVB/ZVT Trace Menu Define Transform The Define Transform dialog selects the transformation type and the frequency domain window which is applied to the trace in order to optimize its time domain response. • The radio buttons in the Type panel select a band pass or low pass transform. To calculate a low pass transform the sweep points must be on a harmonic grid (otherwise the analyzer will only be able to calculate an approximate result).
- Page 226 ® Trace Menu R&S ZVA/ZVB/ZVT in the sweep range between any set of positive start and stop values. The sweep points must be equidistant. No assumption is made about the measurement point at zero frequency (DC value). The time domain result is complex with a generally undetermined phase depending on the delay of the signal.
- Page 227 ® R&S ZVA/ZVB/ZVT Trace Menu Windows in the Frequency Domain The finite sweep range in a frequency domain measurement with the discontinuous transitions at the start and stop frequency broadens the impulses and causes sidelobes (ringing) in the time domain response.
- Page 228 ® Trace Menu R&S ZVA/ZVB/ZVT The dialog can be used to change the present grid of sweep points, which may or may not be harmonic. • The three buttons in the Set Harmonic Grid... panel provide alternative algorithms for calculation of a harmonic grid, based on the current sweep points. •...
- Page 229 ® R&S ZVA/ZVB/ZVT Trace Menu frequencies, so that the missing values (green and red dots) are obtained without any additional input. The extrapolation is repeated after each sweep. Remote CALCulate<Ch/Tr>:TRANsform:TIME:LPASs KFSTop KDFRequency control: KSDFrequency CALCulate<Ch/Tr>:TRANsform:TIME:LPASs:DCSParam CALCulate<Ch/Tr>:TRANsform:TIME:LPASs:DCSParam:CONTinuous CALCulate<Ch/Tr>:TRANsform:TIME:LPASs:DCSParam:EXTRapolate CALCulate<Ch/Tr>:TRANsform:TIME:LPFRequency Set Harmonic Grid In the Set Harmonic Grid...
- Page 230 ® Trace Menu R&S ZVA/ZVB/ZVT • Keep Frequency Gap and Number of Points means that the number of sweep points and their relative spacing is maintained. The entire set of sweep points is shifted towards lower frequencies so that the stop frequency is decreased. •...
- Page 231 ® R&S ZVA/ZVB/ZVT Trace Menu Grid type: Keep Sweep time Time domain Unambiguous range resolution Stop freq. and no. of points Freq. gap and no. of points Stop freq. and approx. freq. gap Remote CALCulate<Ch/Tr>:TRANsform:TIME:LPASs KFSTop | KDFRequency | control: KSDFrequency Time Gate Switches the time gate defined via Define Time Gate on or off.
- Page 232 ® Trace Menu R&S ZVA/ZVB/ZVT Define Time Gate The Define Time Gate defines the properties of the time gate used to eliminate unwanted responses that appear on the time domain transform. • Start and Stop or Center and Span define the size of the time gate. •...
-
Page 233: Trace Statistics
® R&S ZVA/ZVB/ZVT Trace Menu Maximum Flatness 46 dB 0 dB Maximum attenuation of responses outside the (Bohman) gate span Arbitrary Gate Shape User defined between 0.071 dB Adjustment to individual needs; tradeoff between (Dolph-Chebychev) 10 dB and 120 dB sidelobe suppression and edge steepness Remote CALCulate<Ch/Tr>:FILTer[:GATE]:TIME:STARt... -
Page 234: Statistical Evaluation
® Trace Menu R&S ZVA/ZVB/ZVT • Define Compression Value... sets the compression level (x dB). • Eval Range... opens a dialog to define the range for the statistical and phase evaluation and for the compression point measurement. Statistical Evaluation The first three commands in the Trace Eval submenu display or hide the maximum (Max.), minimum (Min.), the peak-to-peak value (Pk-Pk), arithmetic mean value (Mean), the standard deviation (Std. -
Page 235: El. Length/Phase Delay
® R&S ZVA/ZVB/ZVT Trace Menu El. Length/Phase Delay Displays or hides the phase delay (Delay) and the electrical length (EL) of the trace in the selected evaluation range (Eval Range...). The parameters are only available for trace formats that contain phase information, i.e. -
Page 236: Define Compression Value
® Trace Menu R&S ZVA/ZVB/ZVT Compression point The x-dB compression point of an S-parameter or ratio is the stimulus signal level where the magnitude of the measured quantity has dropped by x dB compared to its value at small stimulus signal levels (small-signal value). -
Page 237: Eval Range
® R&S ZVA/ZVB/ZVT Trace Menu Eval Range Opens a dialog to define the range for the statistical and phase evaluation and for the x-dB compression point measurement. The evaluation range is a continuous interval of the sweep variable. It is possible to select, define and display up to ten different evaluation ranges for each setup. Full Span means that the search range is equal to the sweep range. -
Page 238: Smoothing Aperture
® Trace Menu R&S ZVA/ZVB/ZVT Smoothing Aperture Defines how many measurement points are averaged to smooth the trace if smoothing is switched on. The Smoothing Aperture is entered as a percentage of the total sweep span. An aperture of n % means that the smoothing interval for each sweep point i with stimulus value x equal to [x –... - Page 239 ® R&S ZVA/ZVB/ZVT Trace Menu • Import Complex Data... calls up an Open File dialog to load a memory trace from a trace file. • Export Complex Data... calls up a Save As... dialog to store data or memory traces to a trace file.
- Page 240 ® Trace Menu R&S ZVA/ZVB/ZVT The loaded trace data is used to generate a memory trace which is coupled to the active data trace. Import Data corresponds to a standard Open File dialog with an additional checkbox: • Import Data to New Mem qualifies whether the loaded data overwrite the active memory trace (box unchecked, analogous to Data ->...
- Page 241 ® R&S ZVA/ZVB/ZVT Trace Menu Coupling between the imported memory trace and the active data trace implies that the stimulus values of the imported data and of the active trace must be compatible. Compatibility means that the Sweep Type of the two traces must match; the position and number of the sweep points do not have to be the same.
- Page 242 ® Trace Menu R&S ZVA/ZVB/ZVT single trace (*.s1p) or the complete set of S-parameters of an n-port and use the point as Dec. Separator; see Trace File Formats. • Output Format selects the format for the exported trace data. In the Re/Im format, each complex measurement value is represented by its real and imaginary part.
- Page 243 ® R&S ZVA/ZVB/ZVT Trace Menu Export Complex Data corresponds to a standard Save As... dialog with an additional panel to specify the export Options. The Dec. Separator export option is not available for Mathlab (*.dat) file export. Touchstone files *.s<n>p contain either a single trace (*.s1p) or the complete set of S-parameters of an n-port and use the point as Dec.
- Page 244 ® Trace Menu R&S ZVA/ZVB/ZVT Use the ASCII (*.csv) format if you want to do one of the following: • Import the created file into a spreadsheet application such as Microsoft Excel. • Export an arbitrary number of traces, multiple traces with the same parameter or memory traces.
- Page 245 ® R&S ZVA/ZVB/ZVT Trace Menu • Freq Re(S11) Im(S11) Re(S21) Im(S21) Re(S12) Im(S12) Re(S22) Im(S22) • (all values arranged in 1 line) • 3-port files (*.s3p) • Freq Re(S11) Im(S11) Re(S12) Im(S12) Re(S13) Im(S13) • Re(S21) Im(S21) Re(S22) Im(S22) Re(S23) Im(S23) •...
- Page 246 ® Trace Menu R&S ZVA/ZVB/ZVT Shift Stimulus Value... Shifts the active trace in horizontal direction, leaving the positions of all markers unchanged. The positive or negative offset value for the stimulus variable is entered into an input field. The unit depends on the sweep type. Shift Stimulus Value can be used in Cartesian as well as in polar diagrams.
-
Page 247: Marker
® R&S ZVA/ZVB/ZVT Trace Menu • The Real added constant shifts a real trace in vertical direction, leaving the imaginary part unchanged. • The Imaginary added constant shifts a imaginary trace in vertical direction, leaving the real part unchanged. Shifting the trace by means of constant values is a simple case of trace mathematics. Use the Define Math dialog to define more complicated mathematical operations. -
Page 248: Marker 1/2/3
® Trace Menu R&S ZVA/ZVB/ZVT The Marker menu contains the following functions: • Marker 1/2/3 creates the markers numbered 1, 2, and 3. • Ref. Marker... creates the reference marker which is used to measure relative values and distances. • Delta Mode activates the display of the active marker values relative to the reference marker. -
Page 249: Ref. Marker
® R&S ZVA/ZVB/ZVT Trace Menu Markers are available for all diagram types (Trace – Format). Marker 1/2/3 Creates the markers numbered 1, 2, and 3, respectively, and assigns them to the active trace (toggle function). Marker 1/2/3 opens the numeric entry bar to define the marker position (Stimulus Mkr 1/2/3). The default position is the center of the sweep range. -
Page 250: Delta Mode
® Trace Menu R&S ZVA/ZVB/ZVT Delta Mode Converts the active marker to a delta marker so that its values are measured and indicated relative to the reference marker (toggle function). A sign placed in front of the marker line indicates that the marker is in Delta Mode. -
Page 251: Discrete Marker
® R&S ZVA/ZVB/ZVT Trace Menu • Markers on the other traces which have no corresponding master marker are removed but remember their properties and can be re-activated after the coupling is released. • The remaining markers on the other traces become slave markers and are moved to the position of the corresponding master markers. -
Page 252: More Markers
® Trace Menu R&S ZVA/ZVB/ZVT All marker formats are available irrespective of the measured quantity. The output values are calculated by a simple conversion of a complex measurement result, where the marker format defines the conversion rules. This flexibility in the calculation must be kept in mind when interpreting the results and physical units displayed;... -
Page 253: Marker Properties
® R&S ZVA/ZVB/ZVT Trace Menu Marker Properties... Opens a dialog to define the properties of all markers of the active trace. In the left part the dialog contains four input fields and drop-down lists to select a marker and define the basic properties of a selected marker which is switched on in the Mode panel. -
Page 254: Export Markers
® Trace Menu R&S ZVA/ZVB/ZVT CALCulate<Ch/Tr>:MARKer<Mk>:TYPE NORMal | FIXed CALCulate<Ch/Tr>:MARKer<Mk>:DELTa[:STATe] ON CALCulate<Ch/Tr>:MARKer<Mk>:MODE CONTinuous | DISCrete CALCulate<Ch/Tr>:MARKer<Mk>:COUPled[:STATe] ON Export Markers... Calls up a Save As... dialog to store the current marker values to a marker file. The analyzer uses a simple ASCII format to export marker values. By default, the marker file extension is *.txt. -
Page 255: Max Search
® R&S ZVA/ZVB/ZVT Trace Menu • Max Search sets the active marker to the absolute maximum in the search range. • Min Search sets the active marker to the absolute minimum in the search range. • Next Peak sets the active marker to the next maximum or minimum in the search range, depending on the current search criterion. -
Page 256: Min Search
® Trace Menu R&S ZVA/ZVB/ZVT Remote control: CALCulate<Ch/Tr>:MARKer<Mk>:FUNCtion:EXECute MAXimum CALCulate<Ch/Tr>:MARKer<Mk>:FUNCtion:RESult? Min Search Sets the active marker to the absolute minimum in the search range, i.e. to the smallest of all response values. If a complex trace format (e.g. a polar diagram) is active, the marker is set to the measurement point with the minimum magnitude. -
Page 257: Target
® R&S ZVA/ZVB/ZVT Trace Menu Remote control: CALCulate<Ch/Tr>:MARKer<Mk>:FUNCtion:EXECute LPEak CALCulate<Ch/Tr>:MARKer<Mk>:FUNCtion:RESult? Target Opens a submenu to search for a specific value on the trace. • Target Search activates the search for the target value. • Target Search > activates the search for the target value to the right of the active marker. •... - Page 258 ® Trace Menu R&S ZVA/ZVB/ZVT Target Search > Activates the search to the right of the active marker position and sets the active marker to the defined target value. The target search range is between the active marker position and the end (Stop) of the sweep range.
-
Page 259: Define Peak
® R&S ZVA/ZVB/ZVT Trace Menu Search Range... Opens the Search Range Dialog to confine the target search to a subrange of the sweep. Define Peak Opens a dialog to define the peak type to be searched for. It is possible to select the peak type up to ten times for each trace and assign the selection to the markers no. - Page 260 ® Trace Menu R&S ZVA/ZVB/ZVT It is possible to define up to ten different search ranges for each setup and assign them to the markers no. 1 to 10. The input fields in the Search Range dialog are used to select the markers and define the associated search ranges: •...
-
Page 261: Marker Tracking
® R&S ZVA/ZVB/ZVT Trace Menu Use the paste marker list for convenient entry of Start and Stop values. Remote control: CALCulate<Ch/Tr>:MARKer<Mk>:FUNCtion:DOMain:USER CALCulate<Ch/Tr>:MARKer<Mk>:FUNCtion:DOMain:USER:STARt CALCulate<Ch/Tr>:MARKer<Mk>:FUNCtion:DOMain:USER:STOP Marker Tracking Causes the active minimum/maximum or target search of the active marker to be repeated after each sweep: When tracking mode is active the marker typically changes its horizontal and its vertical position as the measurement goes on. - Page 262 ® Trace Menu R&S ZVA/ZVB/ZVT • A bandpass region contains a local maximum around which the magnitude of the trace falls off by more than a specified x dB Bandwidth. • A bandstop region contains a local minimum around which the magnitude of the trace increases by more than a specified x dB Bandwidth.
- Page 263 ® R&S ZVA/ZVB/ZVT Trace Menu • Bandpass Search Ref to Marker activates the search for a bandpass region in the active trace, starting at the position of the active marker. Bandfilter mode can be selected for a broad range of measured quantities (Trace – Measure), provided that the display format is dB Mag.
- Page 264 ® Trace Menu R&S ZVA/ZVB/ZVT Bandstop Search Activates the search for a bandstop region on the active trace and activates bandfilter Tracking. A bandstop region is the lowest peak (local minimum) in the search range with a minimum excursion that is specified by means of the x dB Bandwidth parameter.
- Page 265 ® R&S ZVA/ZVB/ZVT Trace Menu Tracking is a toggle function: Selecting the function repeatedly switches the tracking mode on and off. Remote control: CALCulate<Ch/Tr>:MARKer<Mk>:FUNCtion:EXECute BFILter CALCulate<Ch/Tr>:MARKer<Mk>:SEARch:TRACking x dB Bandwidth Opens the numeric entry bar for the minimum excursion of the bandpass and bandstop peaks. •...
- Page 266 ® Trace Menu R&S ZVA/ZVB/ZVT Search range properties In contrast to the marker properties defined in the Marker and Search menus, the ten search ranges are valid for the entire setup. This means that, once defined, each of them can be used for any trace in the setup, irrespective of the channel that the trace belongs to.
-
Page 267: Marker Funct
® R&S ZVA/ZVB/ZVT Trace Menu • Upper Band Edge is the closest frequency above the center frequency where the trace is equal to the center value minus n dB. • The Quality Factor is the ratio between the Center frequency and the 3-dB Bandwidth; it does not depend on the selected x dB Bandwidth. -
Page 268: Center = Marker
® Trace Menu R&S ZVA/ZVB/ZVT The functions in the upper section are also provided in the Search submenu: • Max Search sets the active marker to the absolute maximum in the search range. • Min Search sets the active marker to the absolute minimum in the search range. •... -
Page 269: Start = Marker
® R&S ZVA/ZVB/ZVT Trace Menu Remote control: CALCulate<Ch/Tr>:MARKer<Mk>:FUNCtion:CENTer Start = Marker Sets the beginning (start) of the sweep range equal to the stimulus value of the active marker, leaving the end (stop) value unchanged. The active marker appears at the left edge of the diagram. Remote control: CALCulate<Ch/Tr>:MARKer<Mk>:FUNCtion:STARt Stop = Marker Sets the end (stop) of the sweep range equal to the stimulus value of the active marker, leaving the... -
Page 270: Zero Delay At Marker
® Trace Menu R&S ZVA/ZVB/ZVT Zero Delay at Marker Corrects the measurement result by adding or subtracting a constant group delay. This function must be applied to a trace which is displayed in group delay format. The trace is shifted in vertical direction so that the delay at the marker position vanishes. -
Page 271: Show Limit Line
® R&S ZVA/ZVB/ZVT Trace Menu • Show Limit Line displays or hides the limit line associated to the active trace. • Limit Check On activates or deactivates the limit check. • Fail Beep On activates or deactivates the acoustic signal indicating a limit excess. •... -
Page 272: Limit Check
® Trace Menu R&S ZVA/ZVB/ZVT Display of the limit line and limit check are independent of each other: Hiding the limit line does not switch off the limit check. Remote control: CALCulate<Ch/Tr>:LIMit:DISPlay[:STATe] ON | OFF Limit Check On Switches the limit check of the active trace on or off. A checkmark appears next to the menu item when the limit check is enabled. -
Page 273: Fail Beep
® R&S ZVA/ZVB/ZVT Trace Menu Limit check and display of the limit lines are independent of each other: With disabled limit check, the limit line can still be displayed, however, no display elements indicating a limit excess will appear. Limits are checked at the actual measurement points, whereas a limit failure is indicated for the trace segments on both sides of a failed point. - Page 274 ® Trace Menu R&S ZVA/ZVB/ZVT The Define Limit Line dialog contains a table to edit the individual segments of the limit line; see below. The active trace is indicated in the title bar of the dialog. The three buttons below the table extend or shorten the segment list.
- Page 275 ® R&S ZVA/ZVB/ZVT Trace Menu To import a limit line file (*.limit) you can also use the Windows Explorer and simply double-click the file or drag and drop the file into the NWA application. You have to switch on the limit check separately.
- Page 276 ® Trace Menu R&S ZVA/ZVB/ZVT response variable. • Definition of an offset for response and stimulus values in analogy to the Properties of Imported Segments dialog. • Delete the selected segments. • Merge the selected segments to a single new segment. The start and stop values of the new segment are given by the start values of the first selected segment and the stop value of the last selected segment.
- Page 277 ® R&S ZVA/ZVB/ZVT Trace Menu The dialog assigns common properties to all limit line segments generated by the imported trace. • Offsets contains two input fields to define constant offset values for all imported segments. The Response offset shifts all segments in vertical direction, the Stimulus offset shifts them in horizontal direction.
-
Page 278: Horizontal Line
® Trace Menu R&S ZVA/ZVB/ZVT TTL Out Pass 1/2 Assigns the active trace to the low-voltage (3.3 V) TTL output signals at the USER CONTROL connector. To select TTL Out Pass 1 / 2, the limit check of the active trace must be switched on. •... - Page 279 ® R&S ZVA/ZVB/ZVT Trace Menu • Pressing Horizontal Line for a first time shows the line for the active trace and opens the numeric entry bar to define its position (response value). The (rounded) position is displayed near the left edge of the screen. •...
-
Page 280: Channel Menu
® Channel Menu R&S ZVA/ZVB/ZVT Channel Menu The Channel menu provides all channel settings and the functions to activate, modify and store different channels. Channels A channel contains hardware-related settings to specify how the network analyzer collects data. The channel settings can be divided into three main groups: •... - Page 281 ® R&S ZVA/ZVB/ZVT Channel Menu • Start is the lowest value of the sweep variable (e.g. the lowest frequency measured) and corresponds to the left edge of the Cartesian diagram. • Stop is the highest value of the sweep variable (e.g. the highest frequency measured) and corresponds to the right edge of the Cartesian diagram.
-
Page 282: Stimulus And Sweep Types
® Channel Menu R&S ZVA/ZVB/ZVT Stimulus and Sweep Types The function and input values of the Start, Stop, Center and Span softkeys depend on the sweep type: Sweep type Start [dimension] Stop [dimension] Center [dimension] Span [dimension] Equivalent hotkey (press twice) (press twice) Lin. -
Page 283: Cw Frequency
® R&S ZVA/ZVB/ZVT Channel Menu the other softkeys are not active as the first trigger event is the one immediately after the beginning of the sweep which starts after the entry of the Stop value. The behavior is thus analogous to the Time sweep type. The selected sweep range applies to all source ports and (in the case of a frequency sweep) to all receiver ports of the analyzer. -
Page 284: Power
® Channel Menu R&S ZVA/ZVB/ZVT • Restart Average starts a new average cycle, clearing all previous results and thus eliminating their effect on the new cycle. The new cycle is started as fast as possible; an ongoing sweep is terminated immediately. Remote control DIAGnostic:SERVice:RFPower... - Page 285 ® R&S ZVA/ZVB/ZVT Channel Menu The Step Attenuators dialog consists of a non-editable column listing the received waves b1 to bn (Port #) and a column to enter the attenuation for each wave (Attenuation). n is equal to the total number of test ports of the analyzer.
-
Page 286: Step Atten. B2
® Channel Menu R&S ZVA/ZVB/ZVT Configuration dialog. • A port and stimulus-dependent correction factor p introduced by a generator (source) power corr calibration. • The port-specific generator step attenuator setting a step If everything is expressed in dB units, the output power p at each port must be equal to the sum of the channel power and all port and stimulus-dependent correction factors: Slope... -
Page 287: Meas. Bandwidth
® R&S ZVA/ZVB/ZVT Channel Menu | DRECeiver, <attenuation> Meas. Bandwidth Sets the measurement bandwidth of the IF filter. Step Atten. b2 opens a submenu (and displays a range of softkeys) to directly select bandwidths between 10 Hz and 1 MHz: Fine Adjust... -
Page 288: Average Factor
® Channel Menu R&S ZVA/ZVB/ZVT The characteristics of the high selectivity filter makes it particularly suitable for isolating unexpected spurious responses or known mixer products. Remote control: [SENSe<Ch>:]BANDwidth|BWIDth[:RESolution] [SENSe<Ch>:]BANDwidth|BWIDth[:RESolution]:SELect Average Factor Opens the numeric entry bar to define the number of consecutive sweeps to be averaged. An average over several sweeps reduces the influence of random effects in the measurement and therefore minimizes the noise level. -
Page 289: Power Bandwidth Average
® R&S ZVA/ZVB/ZVT Channel Menu Power Bandwidth Average The Power Bandwidth Average menu defines the power of the internal signal source, sets the step attenuators and the IF bandwidths, and configures the sweep average. • Power defines the power of the internal signal source. •... -
Page 290: Receiver Step Attenuators
® Channel Menu R&S ZVA/ZVB/ZVT Output power at the test ports Power sets the output power at the test port that supplies the stimulus for the active channel. The channel power can be varied over a wide dynamic range. This leaves enough flexibility to include an attenuation or gain in the test setup. - Page 291 ® R&S ZVA/ZVB/ZVT Channel Menu ZVA24, ZVA24-B31 ZVA24-B32 ZVA24-B33 ZVA24-B34 receiver • Refer to the data sheet for detailed ordering information and technical specifications. Attenuation factors for the received waves and the generated waves serve different purposes: • Received wave factors are used to adjust the received signal levels to the input level range of the analyzer in order to avoid damage to the instrument, e.g.
-
Page 292: Step Atten. B2
® Channel Menu R&S ZVA/ZVB/ZVT Remote INPut<Pt>:ATTenuation control: [SENSe<Ch>:]POWer:ATTenuation ARECeiver | BRECeiver | CRECeiver | DRECeiver, <attenuation> Step Atten. b2 Opens the numeric entry bar to set the attenuation for the received wave b2. This function is available only if a receiver step attenuator is installed at port 2. The attenuation is used to adjust the received signal level at port 2 to the input level range of the analyzer in order to avoid damage to the instrument, e.g. - Page 293 ® R&S ZVA/ZVB/ZVT Channel Menu Fine Adjust... opens a dialog to modify the selected measurement bandwidth and the selectivity of the IF filter. • Bandwidth shows the last IF filter bandwidth selected. The arrow buttons increment and decrement the bandwidth in 1-2-5 steps for each decade. Entered values between the steps will be rounded up, values exceeding the maximum bandwidth rounded down.
-
Page 294: Average Factor
® Channel Menu R&S ZVA/ZVB/ZVT The characteristics of the high selectivity filter makes it particularly suitable for isolating unexpected spurious responses or known mixer products. Remote control: [SENSe<Ch>:]BANDwidth|BWIDth[:RESolution] [SENSe<Ch>:]BANDwidth|BWIDth[:RESolution]:SELect Average Factor Opens the numeric entry bar to define the number of consecutive sweeps to be averaged. An average over several sweeps reduces the influence of random effects in the measurement and therefore minimizes the noise level. -
Page 295: Sweep
® R&S ZVA/ZVB/ZVT Channel Menu Sweep The Sweep submenu defines the scope of measurement in the current channel. This includes the sweep type with various parameters, the trigger conditions and the periodicity of the measurement. Sweeps A sweep is a series of consecutive measurements taken over a specified sequence of stimulus values. It represents the basic measurement cycle of the analyzer. -
Page 296: Sweep Type
® Channel Menu R&S ZVA/ZVB/ZVT Sweep Type The Sweep Type submenu defines the sweep variable (frequency/power/time) and the position of the sweep points across the sweep range. • Lin. Frequency is the default sweep type. The stimulus frequency is swept in equidistant steps over the continuous frequency range. - Page 297 ® R&S ZVA/ZVB/ZVT Channel Menu Remote control: [SENSe<Ch>:]SWEep:TPYE LINear [SENSe<Ch/Tr>:]FUNCtion[:ON] "XFRequency:..." Log. Frequency In a Log. Frequency sweep the stimulus frequency is swept on a logarithmic scale over the continuous frequency range. The frequency range (sweep range) is defined with the Stimulus settings. The sweep points are calculated from the Span and the specified Number of Points (n >...
- Page 298 ® Channel Menu R&S ZVA/ZVB/ZVT segments and defined in the Define Segments dialog. The segment list must contain at least 2 distinct frequency points before a Segmented Frequency sweep can be started. Instrument settings such as the internal generator power, the measurement (IF) bandwidth, the selectivity of the measurement filter, the frequency band of the local oscillator, and the measurement time can be set independently for the individual segments.
- Page 299 ® R&S ZVA/ZVB/ZVT Channel Menu Generator power The power range defined for a power sweep replaces the internal generator power setting in the Power Bandwidth Averagesubmenu. The power corresponds to the actual output power at the test port that supplies the stimulus for the active channel.
- Page 300 ® Channel Menu R&S ZVA/ZVB/ZVT Sweep time The minimum sweep time depends on the number of measurement points, the measurement bandwidth, the delay time before each partial measurement and the number of partial measurements required for each measurement point. The analyzer estimates this time, taking into account the current measurement settings.
- Page 301 ® R&S ZVA/ZVB/ZVT Channel Menu Channel - Stimulus - Stop; see Stimulus and Sweep Types. The time interval between two consecutive measurements depends on the trigger settings. Any trigger mode is allowed. The frequency (CW) and internal generator power (Source Power) is fixed and entered into a field which pops up as soon as CW Mode is activated.
- Page 302 ® Channel Menu R&S ZVA/ZVB/ZVT The Define Segments dialog contains a table to edit the individual segments of the sweep range. Sweep segments must not overlap, however, two adjacent segments can have one common point; see Columns in the Define Limit Line table. Below the table, three groups of controls provide additional settings.
- Page 303 ® R&S ZVA/ZVB/ZVT Channel Menu • Points is the number of sweep points in the segment. A single segment can consist of only one point, however, the entire sweep range must contain at least 2 distinct frequency points. If Points is set to 1, then the Stop frequency is set equal to the Start frequency. •...
- Page 304 ® Channel Menu R&S ZVA/ZVB/ZVT • Name adds a column to assign a name to each segment. A segment name is a string that may contain letters, numbers and special characters. • Power defines the internal source Power for each individual sweep segment. •...
- Page 305 ® R&S ZVA/ZVB/ZVT Channel Menu Points in inactive sweep segments (i.e. segments that are not switched On in the segment table) are not shown. The table provides a check of the settings made and can not be edited. • Import Segment List... calls up an Open File dialog to load a sweep segment list from a sweep segment file.
-
Page 306: Number Of Points
® Channel Menu R&S ZVA/ZVB/ZVT The sweep segment file actually contains more columns listing all channel settings of the individual sweep segments. The headings of the additional columns read: µ Source Power [dBm]; IF Bandwidth [Hz]; enIF Selectivity; en IF Sideband; Meas Delay [ boSweep Time Auto;... -
Page 307: Sweep Time
® R&S ZVA/ZVB/ZVT Channel Menu and the Number of Points can vary as the Stimulus Step Size is changed. The Span is reduced as little as possible so that the condition Stimulus Step Size = (Stop – Start) / (Number of Points –... -
Page 308: Trigger
® Channel Menu R&S ZVA/ZVB/ZVT Remote control: [SENSe<Ch>:]SWEep:TIME:AUTO [SENSe<Ch>:]SWEep:TIME [SENSe<Ch>:]SWEep:DWELl Trigger The Trigger submenu selects the source of the trigger signal and provides additional Trigger Settings. Trigger system of the analyzer The trigger system is used to synchronize the analyzer's actions with events that can be provided by an internal or external signal or user-generated (Manual Trigger). - Page 309 ® R&S ZVA/ZVB/ZVT Channel Menu Free Run In Free Run mode a new measurement is started immediately without waiting for a trigger event and without fixed time reference. The Trigger Settings are not valid. Free Run means that a measurement in Continuous Sweep mode is repeated as fast as possible. Remote control: TRIGger[:SEQuence]:SOURce IMMediate External Trigger In External trigger mode the measurement is triggered by a low-voltage (3.3 V) external TTL signal...
- Page 310 ® Channel Menu R&S ZVA/ZVB/ZVT To continue, click OK and select any other trigger or sweep type (e.g. CW Mode). Remote control: TRIGger[:SEQuence]:SOURce TIMer TRIGger[:SEQuence]:TIMer Manual Trigger In Manual trigger mode the trigger signal is generated on pressing the Manual Trigger softkey.
-
Page 311: Single (All Chans)
® R&S ZVA/ZVB/ZVT Channel Menu Triggered Meas. Sequence Selects the measurement cycle or sequence of actions to be triggered. • Sweep means that each trigger event starts an entire sweep, according to the current sweep configuration. • Sweep Segment means that each trigger event starts the next sweep segment within the current sweep. -
Page 312: Restart
® Channel Menu R&S ZVA/ZVB/ZVT repeating the current sweep. • In single sweep mode, the measurement is stopped after the number of sweeps selected in the Define Restart dialog. Press Single to activate the single sweep mode and start a single sweep sequence. To start further sweep sequences press Restart. -
Page 313: Port Configuration
® R&S ZVA/ZVB/ZVT Channel Menu • Port Config... calls up a dialog to define the properties of the test ports, the source and the receiver. • Harmonic Distortion opens a submenu providing arbitrary harmonic measurements. • Mixer Mode opens a submenu to control the measurement of the mixing products generated by an external mixer that is supplied with two independent RF signals. - Page 314 ® Channel Menu R&S ZVA/ZVB/ZVT The table in the Port Configuration dialog contains the individual test port properties. Each table row corresponds to one logical or physical port; the number of rows is equal to the number of test ports of the analyzer.
- Page 315 ® R&S ZVA/ZVB/ZVT Channel Menu define the reference impedances at the ports. The dialog contains the following additional controls: • If Same Connector Type at All Ports is active, the connector types at all ports (but not their gender) are always adjusted to the current selection in the Connector column. •...
- Page 316 ® Channel Menu R&S ZVA/ZVB/ZVT The default values for the balanced port reference impedances are derived from the default reference = 50 ): impedance of the physical analyzer ports (Z • The default value for the differential mode is Z = 100 = 2*Z •...
- Page 317 ® R&S ZVA/ZVB/ZVT Channel Menu Reference impedance settings The default reference impedance for a physical port is equal to the reference impedance of the connector type assigned to the port but can be defined as an arbitrary complex value (renormalization of port impedances).
- Page 318 ® Channel Menu R&S ZVA/ZVB/ZVT excluded from the measurement, it can still be used as a receive port. On the other hand, an excluded port (Meas = Off) can still be used as an RF signal source. The source must be switched on to perform a system error correction or a source power calibration for the source port.
- Page 319 ® R&S ZVA/ZVB/ZVT Channel Menu • Slope defines a linear factor to modify the port-specific source power as a function of the stimulus frequency. The value can be set for frequency sweeps only. Impact of the Slope The channel power pb is defined by the following sweep settings: •...
- Page 320 ® Channel Menu R&S ZVA/ZVB/ZVT Most of the settings in this section require option ZVA-K4, Arbitrary Generator and Receiver Frequencies. This option is available for ZVT network analyzers only. • LO a/b switch the two Local Oscillator amplifiers at the port on (box checked) or off. Both LOs must be switched on to perform a system error correction.
- Page 321 ® R&S ZVA/ZVB/ZVT Channel Menu [SENSe<Ch>:]FREQuency:STOP? [SENSe<Ch>:]SWEep:CW|FIXed? [SENSe<Ch>:]CORRection:POWer[:STATe] [SENSe<Ch>:]POWer:ATTenuation [SENSe<Ch>:]POWer:IFGain:MEASure Converted Frequency In the Source and Receiver sections of the Port Configuration table, it is possible to convert the source and receiver frequency ranges (for frequency sweeps) or CW frequencies (for power, time and CW Mode sweeps) in order to perform measurements on frequency-converting DUTs.
- Page 322 ® Channel Menu R&S ZVA/ZVB/ZVT [SENSe<Ch>:]FREQuency:CONVersion:ARBitrary Port-Specific Power In the Source section of the Port Configuration table, it is possible to define a port-specific source power range (for power sweeps) or fixed power (for frequency and CW sweeps). The port power is first set to either the channel power p plus an offset or to a constant value.
- Page 323 ® R&S ZVA/ZVB/ZVT Channel Menu Displayed Columns Opens a dialog to customize the Port Configuration table and display or hide columns. • (Un)checking Logical Port, Source or Receiver displays (removes) the corresponding sections in (from) the Port Configuration table. • (Un)checking one of the second-level boxes displays (removes) the corresponding column in (from) the Port Configuration table.
- Page 324 ® Channel Menu R&S ZVA/ZVB/ZVT Measurements do not necessarily require all of the physical and logical ports of the network analyzer. To save measurement time, it is recommended to define the ports that are actually used in the current test setup (Define Measured Ports). Unused ports will not be considered for the calculation of mixed mode, Z- and Y-parameters.
- Page 325 ® R&S ZVA/ZVB/ZVT Channel Menu The port configurations are arranged in a scrollable list and selected with a mouse click. The resulting port number assignment is shown on the left-hand side of the Balanced and Measured Ports dialog and in the Port Configuration dialog. Predefined Configurations The number of type of predefined configurations depends on the port number of the analyzer.
- Page 326 ® Channel Menu R&S ZVA/ZVB/ZVT Def. Balanced Port The Def. Balanced Port tab of the Balanced and Measured Ports dialog defines new balanced port configurations and reference impedances for common and differential mode. In principle, it is possible to combine any pair of two physical analyzer ports. An n-port analyzer supports a maximum of n/2 (n even) or (n –...
- Page 327 ® R&S ZVA/ZVB/ZVT Channel Menu • The default value for the differential mode is Z = 100 = 2*Z • The default value for the common mode is Z = 25 Remote control: SOURce<Ch>:LPORt<log_port> <phys_port1>,<phys_port2> SENSe:LPORT<log_port>:ZCOMmon <real> [,<imaginary] SENSe:LPORT<log_port>:ZDIFferent <real> [,<imaginary] Dissolve Bal.
- Page 328 ® Channel Menu R&S ZVA/ZVB/ZVT The measured ports are indicated in the first column of the Port Configuration table (Meas). The ports can be either source ports or receive ports. • Port Configuration shows the current physical and balanced ports. •...
-
Page 329: Harmonics
® R&S ZVA/ZVB/ZVT Channel Menu Always select the balanced port configuration before defining port groups. When a new balanced port is created, the analyzer deactivates Simultaneous Measurement of Port Group and deletes all existing port groups. Remote control: SOURce<Ch>:GROup<group_no> <log_port1>,<log_port2> SOURce<Ch>:GROup<group_no>:CLEar [ALL] Harmonics The Harmonics submenu controls the measurement of arbitrary harmonics or ratios between harmonics... - Page 330 ® Channel Menu R&S ZVA/ZVB/ZVT • 3rd Harmonic Port 1 to Port 2... activates the measurement of the third harmonic at port 2 with port 1 as source port. • More Harmonics opens a dialog for higher harmonics and arbitrary source and receive ports. •...
- Page 331 ® R&S ZVA/ZVB/ZVT Channel Menu More Harmonics... Opens a dialog for higher harmonics and arbitrary source and receive ports. • The Source port provides the stimulus signal at the fundamental frequency. • The receive port (Harmonics Measured at:) measures the signal at n times the fundamental frequency where n is the Harmonic Order.
- Page 332 ® Channel Menu R&S ZVA/ZVB/ZVT Calculation of the Relative Trace To obtain the relative trace the analyzer must measure the fundamental signal in addition to the active harmonic. In a frequency sweep the two measurements require different sweep ranges so that the fundamental is measured in a new channel.
- Page 333 ® R&S ZVA/ZVB/ZVT Channel Menu Harmonic Power Cal Opens a dialog to perform a power calibration of the signal source and of the receiver. A power calibration ensures accurate levels at the input of the DUT (source power calibration) and an accurate power measurement of the harmonic (receiver calibration).
-
Page 334: Mixer
® Channel Menu R&S ZVA/ZVB/ZVT • Ext. Power Meter Config... opens the System Configuration – External Power Meters dialog for adding and configuring external power meters. • Take Cal Sweep in the two numbered panels start the calibration sweeps for the source and receiver calibaration, respectively. - Page 335 ® R&S ZVA/ZVB/ZVT Channel Menu Mixer Measurements RF mixers convert an RF signal at one frequency into a signal at another frequency. The frequency that is to be shifted is applied at the RF input and the frequency shifting signal (from a local oscillator, LO) is applied to the RF mixer's LO port, resulting in an output signal at the mixer's Intermediate Frequency (IF) port.
- Page 336 ® Channel Menu R&S ZVA/ZVB/ZVT Define Mixer Meas... Opens a configuration dialog for the mixer input signals. In the upper part the Define Mixer Measurement dialog shows a diagram with the RF and LO signals, the mixing product (IF), and the current frequency and power ranges for all signals. Below the dialog provides the following control elements: •...
- Page 337 ® R&S ZVA/ZVB/ZVT Channel Menu • The RF signal is the stimulus signal that the analyzer generates with the current channel settings. After a reset the frequency and power of the RF signal is as defined in the Channel – Stimulus menu.
- Page 338 ® Channel Menu R&S ZVA/ZVB/ZVT • RF signal: Fixed port number (1), power sweep range (or fixed power, if the LO signal is swept), CW frequency. • LO signal: Signal source (analyzer port or external generator), fixed power (or power sweep range, if the RF signal is at a fixed power), CW frequency.
- Page 339 ® R&S ZVA/ZVB/ZVT Channel Menu The diagram contains the mixer signal diagram and the following control elements: • The RF Power radio button groups specify how the power for each signal is defined. The roles of the mixer input signals RF and LO are interchangeable: One signal is at the analyzer's channel power (Sweep or CW, the signal is swept if a power sweep is active;...
- Page 340 ® Channel Menu R&S ZVA/ZVB/ZVT • Fixed Frequency defines the frequency to be assigned to the signal with Fixed frequency definition. • Conversion selects the frequency of the signal with Auto frequency definition, see background information below. Conversion formulas The IF signal can be at the sum or at the difference of the RF and LO frequencies. •...
- Page 341 ® R&S ZVA/ZVB/ZVT Channel Menu Receiver power calibration for the IF signal. No external device is needed. The receiver (port 2) is calibrated at the IF frequency using the source signal from port 1 (red) calibrated in the first step. Source power calibration for the LO signal, provided by an external generator.
- Page 342 ® Channel Menu R&S ZVA/ZVB/ZVT • Config Ext. Power Meters... opens the System Configuration – External Power Meters dialog for adding and configuring external power meters. • Take Cal Sweep in the three numbered panels start the calibration sweeps for the RF source, IF receiver, and the LO source, respectively.
-
Page 343: Virtual Transform
® R&S ZVA/ZVB/ZVT Channel Menu Virtual Transform The Virtual Transform submenu defines virtual networks to be added to/removed from the measurement circuit for a DUT with single ended or balanced ports. The submenu is available for analyzer models with arbitrary numbers of ports. Embedding a DUT into a matching network To be integrated in application circuits, high-impedance components like Surface Acoustic Wave (SAW) filters are often combined with a matching network. - Page 344 ® Channel Menu R&S ZVA/ZVB/ZVT Deembedding a DUT Deembedding and embedding are inverse operations: A deembedding problem is given if an arbitrary real network connected to the DUT is to be virtually removed in order to obtain the characteristics of the DUT alone.
- Page 345 ® R&S ZVA/ZVB/ZVT Channel Menu Port Overview Provides an overview of analyzer ports with their reference impedances and transformation networks for (de-)embedding. Each row in the Port Overview table corresponds to one logical or physical analyzer port; the number of rows in the different columns is equal to the number of balanced ports or physical test ports of the analyzer.
- Page 346 ® Channel Menu R&S ZVA/ZVB/ZVT The different steps for deembedding and embedding are carried out in the following order: This means that the real networks are removed before virtual networks are added. For a a single balanced port with all (de-)embedding networks enabled, the 4 (de-)embedding steps are carried out in the following order: Initial situation: DUT embedded in 2-port and 4-port networks (only 1 port shown) 2.
- Page 347 ® R&S ZVA/ZVB/ZVT Channel Menu • Renormalization of the physical port impedances affects e.g. S-parameters and wave quantities in Power representation. • Renormalization of the balanced port impedances affects all measured quantities (Trace – Measure) that the analyzer provides for balanced ports. The default reference impedance of a physical port is equal to the reference impedance of the ).
- Page 348 ® Channel Menu R&S ZVA/ZVB/ZVT Single Port Embedding/Deembedding Selects a 2-port transformation network for single port (de-)embedding, defines its parameters, assigns it to a physical port and enables (de-)embedding. Single port (de-)embedding can be used for balanced (logical) as well as for single ended (physical) ports. The two dialogs for deembedding and embedding are identical except for their inverse effect.
- Page 349 ® R&S ZVA/ZVB/ZVT Channel Menu • An inductor L connected in series with a resistor. The 2-port transformation networks comprise all possible combinations of 2 basic blocks, where one block represents a serial, the other a shunt element. In the default setting the resistors are not effective, since the serial Rs are set to 0 , the shunt Rs are set to 10 M .
- Page 350 ® Channel Menu R&S ZVA/ZVB/ZVT Balanced Port Embedding/Deembedding Selects a 4-port transformation network for balanced port (de-)embedding, defines its parameters, assigns it to a physical port and enables (de-)embedding. The two dialogs for deembedding and embedding are identical except for their inverse effect. The dialogs are available only after a balanced port configuration has been defined.
- Page 351 ® R&S ZVA/ZVB/ZVT Channel Menu • A capacitor C connected in parallel with a resistor. • An inductor L connected in series with a resistor. The transformation networks comprise various combinations of 3 basic circuit blocks, where two blocks represent serial elements, the third a shunt element. In the default setting the resistors are not effective, since the serial Rs are set to 0 , the shunt Rs are set to 10 M .
-
Page 352: Alternate
® Channel Menu R&S ZVA/ZVB/ZVT Remote CALCulate<Ch>:TRANsform:VNETwork:BALanced... control: MMEMory:LOAD:VNETworks<Ch>:BALanced:DEEMbedding<Log_pt> '<file_name>', PMAIn, PSECondary MMEMory:LOAD:VNETworks<Ch>:BALanced:EMBedding<Log_pt> '<file_name>', PMAIn, PSECondary Alternate Activates or deactivates the operating mode where the analyzer performs only one partial measurement per sweep. • In normal sweep mode (Alternate disabled), the analyzer completes the necessary sequence of partial measurements at each sweep point and obtains the result (measurement point) before proceeding to the next sweep point. -
Page 353: Spurious Avoidance
® R&S ZVA/ZVB/ZVT Channel Menu Triggered Meas. Alternate On Alternate Off Sequence Sweep Trigger event starts n partial sweeps over all Trigger event starts m complete measurements at sweep points. consecutive sweep points. Sweep Segment Trigger event starts n partial sweeps over the Trigger event starts complete measurements at all next segment. -
Page 354: Alc (All Chans)
® Channel Menu R&S ZVA/ZVB/ZVT receiver mixer of the analyzer port 1, where a small fraction of the mixer product RF + 2*IF can be reflected back towards the DUT. If this spurious wave a' passes the DUT, then it is received as b' port 2, together with the wanted signal b LO >... -
Page 355: Channel Select
® R&S ZVA/ZVB/ZVT Channel Menu Channel Select The Channel Select submenu provides functions to create and delete channels and select a channel as the active channel. • Next Channel selects the next channel as the active channel (disabled if only one channel is defined). -
Page 356: Next Channel
® Channel Menu R&S ZVA/ZVB/ZVT monitor channel activity using OUTPut<Ch>:UPORt[:VALue] <numeric_value> command and the output signals at pins 8 to 11 of the USER CONTROL connector. Next Channel Selects the next channel in a list of defined channels as the active channel. This function is disabled if the current setup contains only one channel. -
Page 357: Add Channel + Trace
® R&S ZVA/ZVB/ZVT Channel Menu Add Channel + Trace Creates a new channel and a new trace, which is displayed in the active diagram area. The new channel settings (including a possible channel calibration) are identical to the previous channel settings; the trace is created with the trace settings of the former active trace but displayed with another color. -
Page 358: Channel Manager
® Channel Menu R&S ZVA/ZVB/ZVT Channel Manager Opens a dialog to perform the actions in the Channel Select menu systematically and rename channels. All existing channels of the current setup are listed in a table; see below. Below the table the Trace Manager provides the following buttons: •... - Page 359 ® R&S ZVA/ZVB/ZVT Channel Menu • Start Cal opens a submenu to select a new calibration and start the calibration wizard. • Repeat Previous Cal reopens the wizard to repeat and optimize the previous calibration. • Correction Off activates or deactivates the system error correction in the active channel. •...
-
Page 360: Start Cal
® Channel Menu R&S ZVA/ZVB/ZVT Start Cal The Start Cal submenu selects the calibrated ports and the calibration type. The calibration types depend on the number of test ports of the analyzer. For a four-port unit: • One-Port P1 and One Port P2 open submenus to select a one-port calibration at test ports PORT 1 and PORT 2, respectively. - Page 361 ® R&S ZVA/ZVB/ZVT Channel Menu One Port P1, One Port P2 Opens a submenu to select a one-port calibration at test ports PORT 1 or PORT 2. The two submenus are identical: One-port calibrations can be performed automatically or manually. •...
- Page 362 ® Channel Menu R&S ZVA/ZVB/ZVT Two-port calibrations can be performed automatically or manually. • Calibration Unit starts an automatic tow-port TOSM calibration. This function is enabled while the Calibration Unit is connected. The following menu commands calls up the start dialog of the calibration wizard to start a manual calibration: •...
-
Page 363: Guided Calibration
® R&S ZVA/ZVB/ZVT Channel Menu [SENSe<Ch>:]CORRection:COLLect:METHod:DEFine "<cal_name>", TOSM, <port_no>, <port_no>, <port_no> Four Port P1 P2 P3 P4 Opens a submenu to select a four-port TOSM calibration at test ports PORT 1 to PORT 4: Four-port calibrations can be performed automatically or manually. •... - Page 364 ® Channel Menu R&S ZVA/ZVB/ZVT A successful calibration will supersede the previous calibration, discarding all previous system error correction data. To keep older correction data you can transfer them into a Cal Pool using the Calibration Manager. The system error correction data determined in a calibration procedure are stored on the analyzer. You read these correction...
- Page 365 ® R&S ZVA/ZVB/ZVT Channel Menu To perform a system error correction, the physical port must be available as a source and receive port. This condition is met if it is selected as a measured port in the Balanced and Measured Ports dialog (Meas is on). •...
- Page 366 ® Channel Menu R&S ZVA/ZVB/ZVT the calibration standards is mismatched. A standard is assumed to be mismatched if it is described by S-parameter data (*.snp file) with a reflection factor > –30 dB. Remote control: [SENSe<Ch>:]CORRection:COLLect:CONNection<port_no> [SENSe<Ch>:]CORRection:CKIT:<conn_type>:SELect "<Ckit_Name>" Compile Calibrations The second dialog of the calibration wizard appears for user-defined (Other...) calibrations only.
- Page 367 ® R&S ZVA/ZVB/ZVT Channel Menu • > Next opens the Measure Standards dialog. If one of the calibration kits is described by dummy kit parameters or typical values, the analyzer displays a notice box. Remote [SENSe<Ch>:]CORRection:COLLect:METHod:DEFine control: "<cal_name>", REFLshort | FOPort | FRTRans | OPTPort | TOSM | TOM ETOM ETSM, <port_no>[,<port_no>][,<port_no>][,<port_no>]...
- Page 368 ® Channel Menu R&S ZVA/ZVB/ZVT Measure Standards The last dialog of the calibration wizard is used to perform the necessary measurements of standards and to calculate the correction data. Measure Standards displays the list of measured standards compiled in the previous dialogs. The list is complete: All standards must be measured to perform the selected calibrations.
-
Page 369: Repeat Previous Cal
® R&S ZVA/ZVB/ZVT Channel Menu of the calibration sweep and the result can be monitored in the diagram. In case of an error (e.g. if the measurement result shows that the calibration standard was not connected properly), Abort Sweep immediately terminates the sweep. After completing the sweep the analyzer generates a short sound and a green checkmark appears in the checkbox. -
Page 370: Recall Last Cal Set
® Channel Menu R&S ZVA/ZVB/ZVT Additional conditions for repeating a calibration Changing the channel settings can cause incompatibilities between the current instrument state and the previous calibration. In particular the following conditions must be met: • The configuration of all ports needed must be correct (see Select Connector– Physical Port Number #). -
Page 371: Power Calibration
® R&S ZVA/ZVB/ZVT Channel Menu Power Calibration The Power Calibration submenu configures and starts a source or receiver power calibration. • Source Power Cal... opens the configuration dialog for a source power calibration. • Receiver Power Cal... opens the configuration dialog for a receiver power calibration. Power correction data can be stored to a cal group and applied to several channels;... - Page 372 ® Channel Menu R&S ZVA/ZVB/ZVT Calibration procedure The source power calibration requires an external power meter, to be connected via GPIB bus, USB or LAN interface. The power sensor can be connected directly at the reference plane or to any other point in the test setup where the signal power is known to be proportional to the power at the reference plane.
- Page 373 ® R&S ZVA/ZVB/ZVT Channel Menu External Generators dialog before they appear in the list. • Take Cal Sweep initiates a calibration sweep for the selected source. The progress of the sweep is monitored in the calibration sweep diagram. After the necessary calibrations have been completed, a message in the trace list indicates the status of the power calibration.
- Page 374 ® Channel Menu R&S ZVA/ZVB/ZVT The dialog provides the following control elements: • Port n Cal Power (where n is the calibrated source port selected in the Source Power Cal dialog) shows the target power of the calibration (Cal Power) and the Cal Power Offset. Both parameters can be adjusted in the Port n Cal Power dialog, to be opened via Modify Cal Power...
- Page 375 ® R&S ZVA/ZVB/ZVT Channel Menu Port n Cal Power The Port n Cal Power dialog defines the target power for the source power calibration. The settings are port-specific. The Port n Cal Power settings serve two different purposes: • Port Power Offset defines a port-specific offset to the channel power. The actual output power at the port is equal to the channel power P (Channel –...
- Page 376 ® Channel Menu R&S ZVA/ZVB/ZVT Purpose of a receiver power calibration A receiver power calibration ensures that the power readings at a specified input port of the analyzer agree with the source power level calibrated at an arbitrary reference plane. Typically, the reference plane is at the input of the receiver so that the calibration eliminates frequency response errors in the calibrated receiver.
-
Page 377: Status Messages For Power Calibration
® R&S ZVA/ZVB/ZVT Channel Menu Generators (Gen 1, Gen 2, ...) must be configured explicitly in the System Configuration – External Generators dialog before they appear in the list. Behind the source, a message indicates the status of the power calibration. •... -
Page 378: Interpolation And Extrapolation
® Channel Menu R&S ZVA/ZVB/ZVT Interpolation and Extrapolation The analyzer can interpolate and extrapolate power correction data so that a source or receiver power calibration can be reused after a change of the frequency sweep range: • At new sweep points within the calibrated sweep range, interpolation is applied to calculate the correction data. - Page 379 ® R&S ZVA/ZVB/ZVT Channel Menu The Calibration Manager dialog contains three main panels: • Calibration State lists all channels and their current calibration state. • Calibration Pool contains a list of all stored correction data sets. • Calibration Properties displays the basic channel settings and the, the System Error Correction Data, and the Power Correction Data available for the channel selection in the Calibration State panel.
-
Page 380: Calibration Kits
® Channel Menu R&S ZVA/ZVB/ZVT The buttons in the upper half of the dialog are used to modify the Cal Pool and apply pool data to channels: • Copy >> copies the correction data (Channel Cal) of the selected channel to the cal pool, generating a new pool member (cal group). - Page 381 ® R&S ZVA/ZVB/ZVT Channel Menu The Calibration Kits dialog contains a series of buttons, each of them opening a dialog: • Import Kit imports a cal kit file containing the parameters for a new calibration kit. It is possible to load several kits, so the analyzer asks whether to set the imported calibration kit active. •...
- Page 382 ® Channel Menu R&S ZVA/ZVB/ZVT • Dummy parameters (labelled Dummy Kit) describe an idealized calibration kit for each connector type. Make sure to use universal or individual parameter sets if you need to obtain high-precision results. The precision of the calibration kit parameters determine the accuracy of the system error correction and of the measurements.
- Page 383 ® R&S ZVA/ZVB/ZVT Channel Menu and phase response. • To export cal kit data, the analyzer uses a specific binary file format *.calkit. • Three different import file formats are supported: ZVA-specific binary cal kit files (*.calkit), ZVR-specific binary cal kit files (*.ck), cal kit files in an Agilent-specific ASCII format (*.csv). By default cal kit files are stored in the C:\Rohde&Schwarz\NWA\Calibration\Kits directory.
- Page 384 ® Channel Menu R&S ZVA/ZVB/ZVT In its upper part the Add Calibration Kit dialog contains several controls to do the following: • Select a predefined or user-defined Connector Type. • Insert the (unique) Name of the new kit and assign a Label. •...
- Page 385 ® R&S ZVA/ZVB/ZVT Channel Menu In the dialog, it is possible to select one of the calibration kits in use (Kit Name) and select either all or a single standard to be copied. A calibration kit may only contain a single standard of each type. Select Calibration Kit to View / Modify Displays a list of calibration kits to be modified.
- Page 386 ® Channel Menu R&S ZVA/ZVB/ZVT The table shows the imported and user-defined calibration kits with their name, connector type and label (if defined). OK deletes the selected kit. Predefined kits cannot be deleted. Connector Types Displays and modifies the list of available connector types. This dialog is opened from the Calibration Kits dialog (Connector Types...
- Page 387 ® R&S ZVA/ZVB/ZVT Channel Menu type, provided that they are derived from a circuit model (Add/Modify Standard dialog). • The calculation of the (default) reference impedances for balanced ports (Def. Balanced Port tab of the Balanced and Measured Ports dialog). •...
- Page 388 ® Channel Menu R&S ZVA/ZVB/ZVT Impact of offset model parameters The offset model parameters are used for the calculation of the S-parameters for the calibration standards associated with the connector type, provided that they are derived from a circuit model (Add/Modify Standard dialog).
- Page 389 ® R&S ZVA/ZVB/ZVT Channel Menu • Select a standard Type and its Gender (for polarized/not sexless connector types and if the port assignment is not restricted) and assign a Label. • Restrict Port Assignment • Select S-Params From Qualify whether the standard is described by a Circuit Model from which the analyzer can calculate the S-parameters or by a table of measured or simulated S-parameters stored in a Touchstone file.
- Page 390 ® Channel Menu R&S ZVA/ZVB/ZVT Port assignment and gender The standards are handled differently, depending on their port assignment: • If the port assignment is not restricted, the gender belongs to the definition of polarized standards. When the connector type and calibration kit is selected in the calibration wizard, the analyzer checks whether the kit contains the necessary standard types and whether the standards have the right gender.
- Page 391 ® R&S ZVA/ZVB/ZVT Channel Menu The default delay is 0 s, the default step width is 1 ns, corresponding to a step width of 299.792 mm for the electrical length. The relations hold for one-port and 2-port standards. • is the Characteristic Impedance of thestandard. If the standard is terminated with Z , then its input impedance is also equal to Z is not necessarily equal to the reference impedance of...
- Page 392 ® Channel Menu R&S ZVA/ZVB/ZVT The circuit model for the load consists of capacitance C which is connected in parallel to an inductance L and a resistance R, both connected in series. • R is the constant resistive contribution. It is possible to select a special value (Open for , Match for the reference impedance that the inductance coefficients are irrelevant, Short for 0 of the current connector type) or set any resistance R.
-
Page 393: Channel - Offset
® R&S ZVA/ZVB/ZVT Channel Menu Standard Type Characteristics Ideal Standard Offset Model Load (Dummy Model Parameters) Match Matched broadband termination (one-port) (reference impedance of the connector type) Sliding match One-port standard with variable load – – – parameters (sliding load), unspecified length and zero loss. - Page 394 ® Channel Menu R&S ZVA/ZVB/ZVT If a dispersive connector type (i.e. a waveguide; see Offset Model dialog) is assigned to a test port that is related to a particular quantity, then the phase of the quantity is corrected using both the (constant) specified length offset parameter and the dispersion effects due to the connector.
-
Page 395: Electrical Length
® R&S ZVA/ZVB/ZVT Channel Menu • Delay defines a delay time between the test ports and the reference plane. • Auto Length determines a length offset with the condition that the phase response of the measured quantity is minimized. The Zero Delay at Marker function overwrites the Offset parameters. Remote control [SENSe<Ch>:]CORRection:OFFSet<port_no>[:STATe] <numeric (for Reset... -
Page 396: Delay
® Channel Menu R&S ZVA/ZVB/ZVT The Mechanical Length dialog contains the three editable columns Mech. Length, Permittivity ( ) and Velocity Fact. The velocity factor is 1/sqrt( ) and is a measure for the velocity of light in a dielectric with permittivity relative to the velocity of light in the vacuum (velocity factor <... -
Page 397: Auto Length
® R&S ZVA/ZVB/ZVT Channel Menu Auto Length Adds an electrical length offset to the active test port with the condition that the residual delay of the active trace (defined as the negative derivative of the phase response) is minimized across the entire sweep range. -
Page 398: Display Menu
® Display Menu R&S ZVA/ZVB/ZVT Display Menu The Display menu provides all display settings and the functions to activate, modify and arrange different diagram areas. Diagram Areas A diagram area is a rectangular portion of the screen used to display traces. Diagram areas are arranged in windows;... - Page 399 ® R&S ZVA/ZVB/ZVT Display Menu The analyzer provides several tools to activate a diagram area: • A left mouse click on a point in the diagram activates the diagram including the last active trace in the diagram. • Next Diag. Area and Previous Diag. Area activate the next/previous diagram including the last active trace in the diagram.
-
Page 400: Next Diag. Area
® Display Menu R&S ZVA/ZVB/ZVT Next Diag. Area Selects the next diagram area as the active diagram area. This function is disabled if the current setup contains only one diagram area. The order of the diagram areas is given by the diagram numbers displayed in the upper right corner. -
Page 401: Delete Diag Area
® R&S ZVA/ZVB/ZVT Display Menu Delete Diag Area Deletes the current diagram area including all traces displayed in the diagram area. Delete Diag Area is disabled if the setup contains only one diagram area: In manual control, each setup must contain at least one diagram area with one channel and one trace. -
Page 402: Maximize
® Display Menu R&S ZVA/ZVB/ZVT To vary the size and position of the diagram areas, drag and drop the separating frames, use the Split Manager or the functions of the Window menu. Remote control: No command, display configuration only. Maximize Maximizes all diagram areas of the active setup to occupy the whole window, placing the active diagram area on top. -
Page 403: Dual Split
® R&S ZVA/ZVB/ZVT Display Menu A double-click into any point in the diagram area is equivalent to the Maximize function. To view all traces in a common, maximized diagram area, select Overlay all. Remote control: DISPlay:WINDow<Wnd>:MAXimize ON | OFF Dual Split Splits the window horizontally into two diagram areas and distributes the traces among the two areas, separating diagrams with different trace Format and Channel settings (e.g. -
Page 404: Quad Split
® Display Menu R&S ZVA/ZVB/ZVT If less than three traces are available, some diagram areas are empty and display No Trace. To vary the size and position of the diagram areas, drag and drop the separating frames, use the Split Manager or the functions of the Window menu. Remote control: No command, display configuration only. -
Page 405: Split Manager
® R&S ZVA/ZVB/ZVT Display Menu To vary the size and position of the diagram areas, drag and drop the separating frames, use the Split Manager or the functions of the Window menu. Remote control: No command, display configuration only. Split Manager Opens a dialog to arrange the diagram areas in the active window. - Page 406 ® Display Menu R&S ZVA/ZVB/ZVT Stack Tile Horizontally Tile Vertically 1145.1084.12 4.244...
-
Page 407: Title
® R&S ZVA/ZVB/ZVT Display Menu Rows and Columns (2 | 1): the 3rd trace is displayed in overlay mode. Remote control: No command, display configuration only. Title Opens a dialog to opens a dialog to define a title and display it in one of the diagram areas. •... -
Page 408: Display Config
® Display Config R&S ZVA/ZVB/ZVT Display Config The Display Config submenu configures the screen by showing or hiding controls and information elements and controls the appearance of the individual diagrams. The Display Config menu contains the following functions: • Softkey Bar shows or hides the softkey bar at the right edge of the screen. •... -
Page 409: Hardkey Bar
® R&S ZVA/ZVB/ZVT Display Config Hardkey Bar Shows or hides the hardkey bar (front panel key bar) at the right edge of the screen (to the left of the softkey bar). The hardkey bar represents the most commonly used front panel keys of the analyzer. Clicking a key symbol executes the action of the corresponding key. -
Page 410: Define User Color Scheme
® Display Config R&S ZVA/ZVB/ZVT The following Predefined Schemes are optimized for the analyzer screen and for color hardcopies, respectively: • Dark Background sets a black background color. The traces and information elements in the diagram areas are displayed in different colors. This setting is usually suitable for observing results on the analyzer screen. - Page 411 ® R&S ZVA/ZVB/ZVT Display Config The following control elements change the current color scheme: • The screen element to be modified is selected from the Element drop-down list. The list contains the background and all traces, text elements and lines in the diagrams. •...
-
Page 412: Frequency Info
® Display Config R&S ZVA/ZVB/ZVT • Save... opens a Save As... dialog to select a color scheme file and save the current settings. Color scheme files are non-editable files with the extension *ColorScheme; the default directory is C:\Rohde&Schwarz\NWA\ColorSchemes. • Recall... opens an Open File... dialog to load and apply a color scheme saved before. To recall a color scheme file (*.ColorScheme) you can also use the Windows Explorer and simply double-click the file or drag and drop the file into the NWA application. -
Page 413: System Menu
® R&S ZVA/ZVB/ZVT System Menu System Menu The System menu provides functions to return to a defined instrument state, reverse operations, access service functions and define various system-related settings. The System menu contains the following functions: • System Config opens a dialog to define various system-related settings. •... - Page 414 ® System Menu R&S ZVA/ZVB/ZVT The System Config dialog is divided into the following tabs: • User Interface The two check boxes in the Messages panel switch the acoustic messages on or off. Alarm sounds are generated when the analyzer generates a notice/status message or a warning. The settings for the alarms are also valid if the instrument is remote-controlled.
- Page 415 ® R&S ZVA/ZVB/ZVT System Menu • Channel Bits Sets a channel-dependent four-bit binary value to control four independent output signals at the USER CONTROL connector (lines 8, 9, 10, 11). The output signals are 3.3 V TTL signals which can be used to differentiate between up to 16 independent analyzer states. For an application example refer to the detailed remote control description.
-
Page 416: External Power Meters
® System Menu R&S ZVA/ZVB/ZVT External Power Meters Configures external power meters with their connection type and device address. The analyzer supports external R&S NRP-Z sensors as power meters, to be connected via USB interface (the supported types comprise NRP-Z21, NRP-Z11, NRP-Z22, NRP-Z23, NRP-Z24, NRP-Z51, NRP-Z52, NRP-Z55, NRP- Z91). - Page 417 ® R&S ZVA/ZVB/ZVT System Menu The External Power Meters dialog provides two tables and some additional buttons. • The upper table (Found:) shows all power meters that the analyzer detects to be on line (i.e. connected and switched on). All power meters in the table must have been configured previously, however, they can be deleted in the lower table.
-
Page 418: Add/Modify External Power Meter
® System Menu R&S ZVA/ZVB/ZVT Add/Modify External Power Meter Selects and configures an external power meter. The USB power meters supported at present are configured automatically, all input fields except the optional Name field are disabled. A particular driver and serial number can be selected via remote control. - Page 419 ® R&S ZVA/ZVB/ZVT System Menu • Power calibration: An external generator can provide the reference signal for a source or receiver calibration. A typical example is a receiver power calibration using a measured wave Configured external generators can be selected as additional sources in the More Wave Quantities,More Ratios, Port Configuration,and in the power calibration dialogs.
- Page 420 ® System Menu R&S ZVA/ZVB/ZVT programming interface between the hardware and the analyzer's application environment. The External Generators dialog provides two tables and some additional buttons. • The upper table (Found:) shows all generators that the analyzer detects to be on-line (i.e. connected and switched on).
-
Page 421: Add/Modify External Generator
® R&S ZVA/ZVB/ZVT System Menu Add/Modify External Generator Selects and configures an external generator. The following control elements select the generator type and its connection: • Name is an optional, arbitrary name associated with the generator. Names appear in the generator lists in the External Generators tab and in the selection dialogs for source signals (measurements and power calibration). -
Page 422: Int. Reference
® System Menu R&S ZVA/ZVB/ZVT connector in order to switch the generator to the next point in the list. Afterwards the analyzer waits for the next EXT GEN BLANK signal. If the number of sweep points exceeds the maximum number of entries in the list (depending on the generator type), the analyzer must interrupt the sweep in order to send a new list and complete the stimulus information. -
Page 423: Gpib Address
® R&S ZVA/ZVB/ZVT System Menu GPIB Address Opens the numeric entry bar to define the analyzer's GPIB address. The GPIB address must be in the range between 0 and 30. Remote control: SYSTem:COMMunicate:GPIB[:SELF]:ADDRess Service Function... Opens a dialog to access the service functions of the instrument. Service functions are password- protected and should be used by a R&S service representative only. -
Page 424: Redo
® System Menu R&S ZVA/ZVB/ZVT Redo Reverses the action of the Undo command. If Undo was not used before, Redo is disabled (grayed). External Tools Opens a submenu with various demo setups and editing tools: • Mouse Keyboard.lnk: Opens Windows XP's on-screen keyboard. •... - Page 425 ® R&S ZVA/ZVB/ZVT System Menu The measurement comprises the following stages: Select the test setup Choose the single-ended or balanced ports of the analyzer according to the port configuration of your DUT and connect the DUT to the selected analyzer ports. This dialog corresponds to the Predefined Configs tab of the Balanced and Measured Ports dialog.
- Page 426 ® System Menu R&S ZVA/ZVB/ZVT 5. Select the measurement bandwidth and source power Choose a typical measurement bandwidth and one of two typical source power values. A smaller measurement bandwidth increases the dynamic range but slows down the measurement. A smaller source power protects the input port of the analyzer from being overdriven if an active DUT with high gain is measured.
-
Page 427: Info Menu
® R&S ZVA/ZVB/ZVT Info Menu Info Menu The Info menu gives access to information about the instrument and its operation. All functions are primarily intended for error diagnostic and service purposes. Many Info dialogs also display two softkeys to Print the contents or Close the dialog. The Info menu contains the following functions: •... -
Page 428: Window Menu
® Window Menu R&S ZVA/ZVB/ZVT Window Menu The Window menu provides standard Windows™ functions to arrange different windows on the screen. Windows A window is a rectangular portion of the screen showing all diagram areas of a particular setup. Windows are limited by a blue frame with several icons. The analyzer uses standard windows provided by the operating system. -
Page 429: Close
® R&S ZVA/ZVB/ZVT Window Menu Close Closes an opened setup window. The analyzer suggests to save changes to the setup before closing it. If a setup is closed without saving, all changes made since the last time it was saved are lost. This command is equivalent to File –... -
Page 430: Help Menu
® Help Menu R&S ZVA/ZVB/ZVT Help Menu The Help menu provides assistance with the network analyzer and its operation. The Help menu contains the following functions: • Help Topics opens this help system. • About Nwa... opens a dialog to retrieve information about the network analyzer and the current firmware version. - Page 431 ® R&S ZVA/VB/ZVT Remote Control Contents of Chapter 5 5 Remote Control ....................5.1 Special Terms and Notation ......................5.1 Remote Control: Introduction ......................5.3 GPIB Explorer ..........................5.3 Switchover to Remote Control ....................5.5 Setting the Device Address......................5.6 Return to Manual Operation.....................5.7 Messages ..........................5.7 GPIB Bus Interface Messages..................5.7 RSIB Interface Messages ....................5.7 Device Messages (Commands and Device Responses) ..........5.8...
- Page 432 ® Remote Control R&S ZVA/ZVB/ZVT Serial Poll ........................5.25 Parallel Poll ........................5.25 Query of an Instrument Status..................5.25 Error Queue .........................5.26 Reset Values of the Status Reporting System...............5.26 Special Remote Control Features....................5.27 Traces, Channels, and Diagram Areas..................5.27 Active Traces in Remote Control ...................5.28 1145.1084.12 I-5.2...
-
Page 433: Remote Control
® R&S ZVA/ZVB/ZVT Special Terms and Notation 5 Remote Control This chapter provides instructions on how to set up the analyzer for remote control, a general introduction to remote control of programmable instruments, the description of the analyzer's remote control concept. For reference information about all remote control commands implemented by the instrument, complemented by comprehensive program examples, refer to the SCPI Reference chapter. - Page 434 ® Special Terms and Notation R&S ZVA/ZVB/ZVT • NAN (Not A Number) is generally used to represent missing data, e.g. if a portion of a trace has not been acquired yet. It is also returned after invalid mathematical operations such as division by zero.
-
Page 435: Remote Control: Introduction
® R&S ZVA/ZVB/ZVT Remote Control: Introduction Remote Control: Introduction The instrument is equipped with different interfaces for remote control: • A GPIB bus interface according to standard IEC 625.1/IEEE 488.1. The GPIB bus connector for direct connection to a controller is located on the rear panel of the instrument. •... - Page 436 ® Remote Control: Introduction R&S ZVA/ZVB/ZVT The following options are provided: • NT named pipe (not supported at present) • GPIB address (for connection to controllers equipped with a National Instrument GPIB interface using the GPIB bus connector) • RSIB address (for LAN connection, requires an appropriate IP or local host address; see LAN Connection sections in Chapter 1) •...
-
Page 437: Switchover To Remote Control
® R&S ZVA/ZVB/ZVT Remote Control: Introduction Refer to the GPIB explorer's help system for more information. Switchover to Remote Control On power-up, the instrument is always in the manual operating state and can be operated via the front panel controls. The instrument is switched to remote control as soon as it receives a command from the controller. -
Page 438: Setting The Device Address
® Remote Control: Introduction R&S ZVA/ZVB/ZVT • Go to Local switches the instrument to local state. • Display On/Off switches the display on or off. Display On/Off states Switching on the display means that the analyzer shows the measurement screen with the current setups, diagram areas and traces without leaving the remote state. -
Page 439: Return To Manual Operation
® R&S ZVA/ZVB/ZVT Remote Control: Introduction Return to Manual Operation Return to manual operation can be initiated via the front panel or via remote control. • Manually: Press the Local softkey in the remote screen. • Via GPIB bus: CALL IBLOC(device%) •... -
Page 440: Device Messages (Commands And Device Responses)
® Remote Control: Introduction R&S ZVA/ZVB/ZVT Device Messages (Commands and Device Responses) Device messages are transferred via the data lines of the GPIB bus, the "ATN" control line not being active. The ASCII character set is used. A distinction is made according to the direction in which device messages are transferred: •... -
Page 441: Device-Specific Commands
® R&S ZVA/ZVB/ZVT Remote Control: Introduction Device-Specific Commands Device-specific commands are of hierarchical structure. The different levels are represented by combined headers. Headers of the highest level (root level) have only one key word. This key word denotes a complete command system. Example: This keyword denotes the command system SENSe. -
Page 442: Structure Of A Command Line
® Remote Control: Introduction R&S ZVA/ZVB/ZVT The key words feature a long form and a short form. Either the short form or the long form can be entered; other abbreviations are not permitted. Example: TRIGger:SOURce EXTernal TRIG:SOUR EXT The short form is marked by upper case letters, the long form corresponds to the complete word. -
Page 443: Responses To Queries
® R&S ZVA/ZVB/ZVT Remote Control: Introduction CALL IBWRT(device%, "TRIG:SOUR EXT; TIM 0.1") However, a new command line always begins with the complete path. Example: CALL IBWRT(device%, "TRIG:SOUR EXT ") CALL IBWRT(device%, "TRIG:THR LOW ") Responses to Queries A query is defined for each setting command unless explicitly specified otherwise. It is formed by adding a question mark to the associated setting command. -
Page 444: Boolean Parameters
® Remote Control: Introduction R&S ZVA/ZVB/ZVT Example: Setting command: SENSe:FREQuency:STARt MINimum The query SENSe:FREQuency:STARt? returns 300000 (the exact value depends on the analyzer model). The following special values can be used: • MIN/MAX MINimum and MAXimum denote the minimum and maximum value of a range of numeric values. -
Page 445: Block Data Format
® R&S ZVA/ZVB/ZVT Remote Control: Introduction Block Data Format Block data are a transmission format which is suitable for the transmission of large amounts of data. A command using a block data parameter with definite length has the following structure: Example: HEADer:HEADer #45168xxxxxxxx The hash symbol # introduces the data block. -
Page 446: Command Processing
® Command Processing R&S ZVA/ZVB/ZVT Command Processing Command ProcessingThe block diagram below shows how GPIB bus commands are serviced in the instrument. The individual components work independently and simultaneously. They communicate with each other by means of so-called "messages". Input Unit The input unit receives commands character by character from the GPIB bus and collects them in the input buffer. -
Page 447: Data Set And Instrument Hardware
® R&S ZVA/ZVB/ZVT Command Processing commands. This means that new commands can already be serviced while the hardware is still being set ("overlapping execution"). Data Set and Instrument Hardware The expression "instrument hardware" denotes the part of the instrument fulfilling the actual instrument function –... - Page 448 ® Command Processing R&S ZVA/ZVB/ZVT they have been received. In order to make sure that commands are actually carried out in a certain order, each command must be sent in a separate command line, that is to say, with a separate IBWRT()–call. The analyzer provides only one command, INITiate<Ch>[:IMMediate], that has been implemented for overlapped execution.
- Page 449 ® R&S ZVA/ZVB/ZVT Status Reporting System Status Reporting System The status reporting system stores all information on the present operating state of the instrument, and on errors which have occurred. This information is stored in the status registers and in the error queue. Both can be queried via GPIB bus (STATus...
-
Page 450: Status Reporting System
® Status Reporting System R&S ZVA/ZVB/ZVT 1145.1084.12 5.18... -
Page 451: Structure Of An Scpi Status Register
® R&S ZVA/ZVB/ZVT Status Reporting System Structure of an SCPI Status Register Each standard SCPI register consists of 5 parts which each have a width of 16 bits and have different functions. The individual bits are independent of each other, i.e. each hardware status is assigned a bit number which is valid for all five parts. -
Page 452: Contents Of The Status Registers
® Status Reporting System R&S ZVA/ZVB/ZVT • EVENt The EVENt part indicates whether an event has occurred since the last reading, it is the "memory" of the condition part. It only indicates events passed on by the transition filters. It is permanently updated by the instrument. -
Page 453: Stb And Sre
® R&S ZVA/ZVB/ZVT Status Reporting System The status registers below belong to the device-dependent SCPI register model: • The STATus:OPERation register contains conditions which are part of the instrument's normal operation. • The STATus:QUEStionable register indicates whether the data currently being acquired is of questionable quality. -
Page 454: Esr And Ese
® Status Reporting System R&S ZVA/ZVB/ZVT Related common commands The IST flag is queried using the command *IST?. The PPE can be set using *PRE and read using command *PRE?. ESR and ESE The Event Status Register (ESR) indicates general instrument states. It is linked to the Event Status Enable (ESE) register on a bit-by-bit basis. -
Page 455: Application Of The Status Reporting System
® R&S ZVA/ZVB/ZVT Status Reporting System queried using commands STATus:QUEStionable:LIMit<1|2>:CONDition? STATus:QUEStionable:LIMit1 also STATus:QUEStionable:LIMit<1|2>[:EVENt]? summary register of the lower-level STATus:QUEStionable:LIMit2 register. The bits in the STATus:QUEStionable:LIMit1 register are defined as follows: Bit No. Meaning LIMit2 Register summary This bit is set if a bit is set in the STATus:QUEStionable:LIMit2 register and the associated ENABle bit is set to 1. Failed Limit Check for Trace no. -
Page 456: Service Request
® Status Reporting System R&S ZVA/ZVB/ZVT Service Request The measuring device can send a service request (SRQ) to the controller. Usually this service request causes an interrupt, to which the control program can react appropriately. Initiating an SRQ As shown in the graphical overview, an SRQ is initiated if one or several of bits 2, 3, 4, 5 or 7 of the status byte are set and enabled in the SRE. -
Page 457: Serial Poll
® R&S ZVA/ZVB/ZVT Status Reporting System Serial Poll In a serial poll, the controller queries the STatus Bytes of the devices in the bus system one after another. The query is made via interface messages, so it is faster than a poll by means of *STB?. Serial poll procedure The serial poll method is defined in IEEE 488.1 and used to be the only standard possibility for different instruments to poll the status byte. -
Page 458: Error Queue
® Status Reporting System R&S ZVA/ZVB/ZVT Bits Weight Example: The decimal value 40 = 32 + 8 indicates that bits no. 3 and 5 in the status register (e.g. the QUEStionable status summary bit and the ESB bit in the STatus Byte) are set. Queries are usually used after an SRQ in order to obtain more detailed information on the cause of the SRQ. -
Page 459: Special Remote Control Features
® R&S ZVA/ZVB/ZVT Special Remote Control Features Special Remote Control Features The functionality of the network analyzer's remote control commands has been defined in close analogy to the menu commands and control elements of the graphical user interface (GUI). The basic concepts of setups, traces, channels, and diagram areas remain valid in remote control. -
Page 460: Active Traces In Remote Control
® Special Remote Control Features R&S ZVA/ZVB/ZVT Display the generated trace (identified by its name Ch4Tr1) in diagram area no. 2 (window suffix 2), assigning the trace number 9 (trace suffix 9) to it. Active Traces in Remote Control In manual control there is always exactly one active trace, irrespective of the number of channels and traces defined. - Page 461 ® R&S ZVA/ZVB/ZVT Command Reference Contents of Chapter 6 6 Command Tables ....................6.1 Common Commands ........................6.1 SCPI Command Tables ........................6.2 Detailed Command Reference ......................6.50 CALCulate ..........................6.50 CONFigure ...........................6.130 CONFigure:CHANnel<Ch>....................6.130 CONTrol..........................6.131 DIAGnostic ...........................6.132 DIAGnostic:SERVice......................6.132 DISPlay..........................6.133 DISPlay..........................6.145 FORMat..........................6.156 HCOPy...
- Page 463 ® R&S ZVA/ZVB/ZVT Common Commands 6 Command Tables This chapter lists all common commands and SCPI commands implemented by the analyzer. Common Commands Common commands are taken from the IEEE 488.2 (IEC 625-2) standard. These commands have the same effect on different devices. The headers of these commands consist of "*" followed by three letters.
- Page 464 ® SCPI Command Tables R&S ZVA/ZVB/ZVT SCPI Command Tables COMMAND PARAMETERS UNIT COMMENT ABORt no query COMMAND PARAMETERS UNIT COMMENT CALCulate<1...4> :DATA FDATA | SDATA | MDATA | SCORR1 | SCORR2 | SCORR3 | SCORR4 | SCORR5 | SCORR6 | SCORR7 | SCORR8 | SCORR9 | SCORR10 | SCORR11 |SCORR12 | SCORR13 | SCORR14 | SCORR15...
- Page 465 ® R&S ZVA/ZVB/ZVT SCPI Command Tables COMMAND PARAMETERS UNIT COMMENT CALCulate<1...4> :FORMat MLINear | MLOGarithmic | PHASe | UPHase | POLar | SMITh | ISMith | GDELay | REAL | IMAGinary | SWR | COMPlex | MAGNitude for compatibility with ZVR COMMAND PARAMETERS UNIT...
- Page 466 ® SCPI Command Tables R&S ZVA/ZVB/ZVT COMMAND PARAMETERS UNIT COMMENT CALCulate<1..4> :LIMit :DATA <numeric_value>.. :DELete :ALL no query :DISPlay [:STATe] <Boolean> :RDOMain :COMPlex S | SINV | Y | Z | YREL | ZREL no query :FORMat COMPlex | MAGNitude | PHASe | no query REAL | IMAGinary | SWR | GDELay | L | C...
- Page 467 ® R&S ZVA/ZVB/ZVT SCPI Command Tables COMMAND PARAMETERS UNIT COMMENT CALCulate<1..4> :MARKer<1…10> [:STATe] <Boolean> :AOFF no query :MODE CONTinuous | DISCrete :BWIDth <numeric_value> :COUPled [:STATe] <Boolean> :DELTa [:STATe] <Boolean> :REFerence [:STATe] <Boolean> <numeric_value> Hz | S | dBm | m query only :TYPE NORMal | FIXed...
- Page 468 ® SCPI Command Tables R&S ZVA/ZVB/ZVT COMMAND PARAMETERS UNIT COMMENT :FUNCtion [:SELect] MAXimum | MINimum | RPEak | LPEak | NPEak | TARGet | LTARget | RTARget | BFILter for compatibility with ZVR :BWIDth <numeric_value> :MODE BPASs | BSTop | BPRMarker | BSRMarker :TARGet <numeric_value>...
- Page 469 ® R&S ZVA/ZVB/ZVT SCPI Command Tables COMMAND PARAMETERS UNIT COMMENT CALCulate<1..4> :PARameter :CATalog? query only :DEFine <string>, no query S11 | S12 | S13 | S14 | S21 | S22 | S23 | S24 | S31 | S32 | S33 | S34 | S41 | S42 | S43 | S44 | A | B | C | D | R1 | R2 | R3 | R4 | AB | AC | AD |...
- Page 470 ® SCPI Command Tables R&S ZVA/ZVB/ZVT COMMAND PARAMETERS UNIT COMMENT CALCulate<1..4> :TRANsform :COMPlex S | Y | Z :TIME :CENTer <numeric_value> s | m :DCHebyshev <numeric_value> :LPASs KFSTop | KDFRequency | KSDFRequency :DCSParam <numeric_value> :CONTinuous <Boolean> :EXTRapolate no query :LPFRequency no query :METHod CHIRp...
- Page 471 ® R&S ZVA/ZVB/ZVT SCPI Command Tables COMMAND PARAMETERS UNIT COMMENT :SENDed :DEEMbedding<1...2> :PARameters :C<1|2> CSL | LSC | CSC | SLC | SCL | SCC [,<numeric_value>] :L<1|2> CSL | LSC | LSL | SLC | SCL | SLL [,<numeric_value>] :R<1|2> CSL | LSC | CSC | LSL | SLC | SCL | SCC | SLL [,<numeric_value>]...
- Page 472 ® SCPI Command Tables R&S ZVA/ZVB/ZVT COMMAND PARAMETERS UNIT COMMENT DIAGnostic :ALC :DMODe :MSTImulus <numeric_value> Hz | S | dBm | m :POINts <numeric_value> :RTIMe <numeric_value> :SETTings :CMODe LOVershoot | FSETtling [:STATe] <Boolean> :SERVice :FUNCtion <numeric_value>,<numeric_value>.. with query :SFUNction <string> with query :RFPower <...
- Page 473 ® R&S ZVA/ZVB/ZVT SCPI Command Tables COMMAND PARAMETERS UNIT COMMENT DISPlay :ANNotation :FREQuency [:STATe] <Boolean> :CMAP<1...28> :MARKer [:STATe] <Boolean> :RGB <numeric_value>, <numeric_value>, <numeric_value> [,SOLid | DASHed | DOTTed | DDOTted | DDDotted, <numeric_value>] :TRACe :COLor <Boolean> [:STATe] [:WINDow<1...5>] <Boolean> :MAXimize <Boolean>...
- Page 474 ® SCPI Command Tables R&S ZVA/ZVB/ZVT COMMAND PARAMETERS UNIT COMMENT HCOPy :DESTination <string> no query :DEVice :LANGuage WMF | EWMF | EMF | BMP | PNG | [:IMMediate] no query :ITEM :ALL no query :LOGO [:STATe] <Boolean> :TIME [:STATe] <Boolean> :MLISt [:STATe] <Boolean>...
- Page 475 ® R&S ZVA/ZVB/ZVT SCPI Command Tables COMMAND PARAMETERS UNIT COMMENT MEMory :CATalog? query only :DEFine <setup_name> no query :DELete :ALL no query [:NAME] <setup_name> no query :SELect <setup_name> no query 1145.1084.12 6.13...
- Page 476 ® SCPI Command Tables R&S ZVA/ZVB/ZVT COMMAND PARAMETERS UNIT COMMENT MMEMory :CATalog? [<directory_name>] query only :CDIRectory [<directory_name>]<directory_name > :COPY no query <file_name>,<file_name> :DATA <file_name>[,<block>] :DELete no query <file_name>[,FORCe] :CORRection no query <file_name> :LOAD :CKIT no query <file_name> :SDATa no query <conn_name>,<calkit_name>, MMTHrough | MFTHrough | FFTHrough |...
- Page 477 ® R&S ZVA/ZVB/ZVT SCPI Command Tables COMMAND PARAMETERS UNIT COMMENT OUTPut<1..2> :ATTenuation <numeric_value> :DPORt PORT1 | PORT2 | PORT3 | PORT4 :UPORt [:VALue] <Binary> COMMAND PARAMETERS UNIT COMMENT PROGram [:SELected] :NAME PROG :EXECute <cmd_name> no query :WAIT COMMAND PARAMETERS UNIT COMMENT [SENSe<1..4>] :AVERage...
- Page 478 ® SCPI Command Tables R&S ZVA/ZVB/ZVT COMMAND PARAMETERS UNIT COMMENT :CORRection :CDATa <string>, <numeric_value>,<numeric_value>, <block> | <numeric_value>... :DATA <string>, <block> | <numeric_value>... :CONNection <connector_name>[,TEM | WGUide, GENDer | NGENder, <numeric_value>,<numeric_value>] :DELete <connector_name> no query [:STATe] <Boolean> :COLLect [:ACQuire] THRough | OPEN1 | OPEN2 | no query OPEN12 | SHORT1 | SHORT2 | MATCH1 | MATCH2 |...
- Page 479 ® R&S ZVA/ZVB/ZVT SCPI Command Tables COMMAND PARAMETERS UNIT COMMENT :SAVE REFL | RSHort | FOPort | no query FRTRans | OPTPort | :DEFault no query TOSM | TOM | TRM | TRL | TNA | :SELected no query ETOM | ETSM, :DEFault no query <numeric_value>...
- Page 480 ® SCPI Command Tables R&S ZVA/ZVB/ZVT COMMAND PARAMETERS UNIT COMMENT :MMTHrough <string>, <string>, <numeric_value>, <numeric_value>, <numeric_value>, <numeric_value> :MFTHrough <string>, <string>, <numeric_value>, <numeric_value>, <numeric_value>, <numeric_value> :FFTHrough <string>, <string>, <numeric_value>, <numeric_value>, <numeric_value>, <numeric_value> :MMLine<1> <string>, <string>, <numeric_value>, <numeric_value>, <numeric_value>, <numeric_value> :MFLine<1> <string>, <string>, <numeric_value>, <numeric_value>,...
- Page 481 ® R&S ZVA/ZVB/ZVT SCPI Command Tables COMMAND PARAMETERS UNIT COMMENT :MFSNetwork <string>, <string>, <numeric_value>, <numeric_value>, <numeric_value>, <numeric_value>, <numeric_value>, <numeric_value>, <numeric_value>, OPEN | SHORT :FFSNetwork <string>, <string>, <numeric_value>, <numeric_value>, <numeric_value>, <numeric_value>, <numeric_value>, <numeric_value>, <numeric_value>, OPEN | SHORT :MOPen <string>, <string>, <numeric_value>, <numeric_value>, <numeric_value>, <numeric_value>,...
- Page 482 ® SCPI Command Tables R&S ZVA/ZVB/ZVT COMMAND PARAMETERS UNIT COMMENT [SENSe<1...4>] :CORRection :CKIT :N<50|75> :MREFlect <string>, <string>, <numeric_value>, <numeric_value>, <numeric_value>, <numeric_value>, <numeric_value>, <numeric_value>, <numeric_value>, OPEN | SHORT :FREFlect <string>, <string>, <numeric_value>, <numeric_value>, <numeric_value>, <numeric_value>, <numeric_value>, <numeric_value>, <numeric_value>, OPEN | SHORT :MMTCh <string>, <string>,...
- Page 483 ® R&S ZVA/ZVB/ZVT SCPI Command Tables COMMAND PARAMETERS UNIT COMMENT :SMA :SELect <string> :MMTHrough <string>, <string>, <numeric_value>, <numeric_value>, <numeric_value>, <numeric_value> :MFTHrough <string>, <string>, <numeric_value>, <numeric_value>, <numeric_value>, <numeric_value> :FFTHrough <string>, <string>, <numeric_value>, <numeric_value>, <numeric_value>, <numeric_value> :MMLine<1> <string>, <string>, <numeric_value>, <numeric_value>, <numeric_value>, <numeric_value>...
- Page 484 ® SCPI Command Tables R&S ZVA/ZVB/ZVT COMMAND PARAMETERS UNIT COMMENT :MMSNetwork <string>, <string>, <numeric_value>, <numeric_value>, <numeric_value>, <numeric_value>, <numeric_value>, <numeric_value>, <numeric_value>, OPEN | SHORT :MFSNetwork <string>, <string>, <numeric_value>, <numeric_value>, <numeric_value>, <numeric_value>, <numeric_value>, <numeric_value>, <numeric_value>, OPEN | SHORT :FFSNetwork <string>, <string>, <numeric_value>, <numeric_value>, <numeric_value>, <numeric_value>,...
- Page 485 ® R&S ZVA/ZVB/ZVT SCPI Command Tables COMMAND PARAMETERS UNIT COMMENT [SENSe<1...4>] :CORRection :CKIT :SMA :FSHort <string>, <string>, <numeric_value>, <numeric_value>, <numeric_value>, <numeric_value>, <numeric_value>, <numeric_value>, <numeric_value>, <numeric_value> :MREFlect <string>, <string>, <numeric_value>, <numeric_value>, <numeric_value>, <numeric_value>, <numeric_value>, <numeric_value>, <numeric_value>, OPEN | SHORT :FREFlect <string>, <string>, <numeric_value>, <numeric_value>,...
- Page 486 ® SCPI Command Tables R&S ZVA/ZVB/ZVT COMMAND PARAMETERS UNIT COMMENT :PC<7|35|292> :SELect <string> :MMTHrough <string>, <string>, <numeric_value>, <numeric_value>, <numeric_value>, <numeric_value> :MFTHrough <string>, <string>, <numeric_value>, <numeric_value>, <numeric_value>, <numeric_value> :FFTHrough <string>, <string>, <numeric_value>, <numeric_value>, <numeric_value>, <numeric_value> :MMLine<1> <string>, <string>, <numeric_value>, <numeric_value>, <numeric_value>, <numeric_value>...
- Page 487 ® R&S ZVA/ZVB/ZVT SCPI Command Tables COMMAND PARAMETERS UNIT COMMENT :MMSNetwork <string>, <string>, <numeric_value>, <numeric_value>, <numeric_value>, <numeric_value>, <numeric_value>, <numeric_value>, <numeric_value>, OPEN | SHORT :MFSNetwork <string>, <string>, <numeric_value>, <numeric_value>, <numeric_value>, <numeric_value>, <numeric_value>, <numeric_value>, <numeric_value>, OPEN | SHORT :FFSNetwork <string>, <string>, <numeric_value>, <numeric_value>, <numeric_value>, <numeric_value>,...
- Page 488 ® SCPI Command Tables R&S ZVA/ZVB/ZVT COMMAND PARAMETERS UNIT COMMENT [SENSe<1...4>] :CORRection :CKIT :PC<7|35|292> :FSHort <string>, <string>, <numeric_value>, <numeric_value>, <numeric_value>, <numeric_value>, <numeric_value>, <numeric_value>, <numeric_value>, <numeric_value> :MREFlect <string>, <string>, <numeric_value>, <numeric_value>, <numeric_value>, <numeric_value>, <numeric_value>, <numeric_value>, <numeric_value>, OPEN | SHORT :FREFlect <string>, <string>, <numeric_value>, <numeric_value>,...
- Page 489 ® R&S ZVA/ZVB/ZVT SCPI Command Tables COMMAND PARAMETERS UNIT COMMENT :USER<1|2> :SELect <string> :MMTHrough <string>, <string>, <numeric_value>, <numeric_value>, <numeric_value>, <numeric_value> :MFTHrough <string>, <string>, <numeric_value>, <numeric_value>, <numeric_value>, <numeric_value> :FFTHrough <string>, <string>, <numeric_value>, <numeric_value>, <numeric_value>, <numeric_value> :MMLine<1> <string>, <string>, <numeric_value>, <numeric_value>, <numeric_value>, <numeric_value>...
- Page 490 ® SCPI Command Tables R&S ZVA/ZVB/ZVT COMMAND PARAMETERS UNIT COMMENT :MMSNetwork <string>, <string>, <numeric_value>, <numeric_value>, <numeric_value>, <numeric_value>, <numeric_value>, <numeric_value>, <numeric_value>, OPEN | SHORT :MFSNetwork <string>, <string>, <numeric_value>, <numeric_value>, <numeric_value>, <numeric_value>, <numeric_value>, <numeric_value>, <numeric_value>, OPEN | SHORT :FFSNetwork <string>, <string>, <numeric_value>, <numeric_value>, <numeric_value>, <numeric_value>,...
- Page 491 ® R&S ZVA/ZVB/ZVT SCPI Command Tables COMMAND PARAMETERS UNIT COMMENT :FOPen <string>, <string>, <numeric_value>, <numeric_value>, <numeric_value>, <numeric_value>, <numeric_value>, <numeric_value>, <numeric_value>, <numeric_value> :MSHort <string>, <string>, <numeric_value>, <numeric_value>, <numeric_value>, <numeric_value>, <numeric_value>, <numeric_value>, <numeric_value>, <numeric_value> :OSHort <string>, <string>, <numeric_value>, <numeric_value>, <numeric_value>, <numeric_value>, <numeric_value>, <numeric_value>, <numeric_value>, <numeric_value>...
- Page 492 ® SCPI Command Tables R&S ZVA/ZVB/ZVT COMMAND PARAMETERS UNIT COMMENT :FSHort <string>, <string>, <numeric_value>, <numeric_value>, <numeric_value>, <numeric_value>, <numeric_value>, <numeric_value>, <numeric_value>, <numeric_value> :MREFlect <string>, <string>, <numeric_value>, <numeric_value>, <numeric_value>, <numeric_value>, <numeric_value>, <numeric_value>, <numeric_value>, OPEN | SHORT :FREFlect <string>, <string>, <numeric_value>, <numeric_value>, <numeric_value>, <numeric_value>, <numeric_value>, <numeric_value>,...
- Page 493 ® R&S ZVA/ZVB/ZVT SCPI Command Tables COMMAND PARAMETERS UNIT COMMENT :MOPen <string>[, <string>, <string>, <numeric_value>, <numeric_value>, <numeric_value>, <numeric_value>, <numeric_value>, <numeric_value>, <numeric_value>, <numeric_value>, <numeric_value>, <numeric_value>, <numeric_value>, <numeric_value>, <numeric_value>, OPEN | SHORT | MATCH | <numeric_value>] :FOPen <string>[, <string>, <string>, <numeric_value>, <numeric_value>, <numeric_value>, <numeric_value>, <numeric_value>,...
- Page 494 ® SCPI Command Tables R&S ZVA/ZVB/ZVT COMMAND PARAMETERS UNIT COMMENT :MSHort <string>[, <string>, <string>, <numeric_value>, <numeric_value>, <numeric_value>, <numeric_value>, <numeric_value>, <numeric_value>, <numeric_value>, <numeric_value>, <numeric_value>, <numeric_value>, <numeric_value>, <numeric_value>, <numeric_value>, OPEN | SHORT | MATCH | <numeric_value>] :FSHort <string>[, <string>, <string>, <numeric_value>, <numeric_value>, <numeric_value>, <numeric_value>, <numeric_value>,...
- Page 495 ® R&S ZVA/ZVB/ZVT SCPI Command Tables COMMAND PARAMETERS UNIT COMMENT :OSHort <string>[, <string>, <string>, <numeric_value>, <numeric_value>, <numeric_value>, <numeric_value>, <numeric_value>, <numeric_value>, <numeric_value>, <numeric_value>, <numeric_value>, <numeric_value>, <numeric_value>, <numeric_value>, <numeric_value>, OPEN | SHORT | MATCH | <numeric_value>] :MOSHort <string>[, <string>, <string>, <numeric_value>, <numeric_value>, <numeric_value>, <numeric_value>, <numeric_value>,...
- Page 496 ® SCPI Command Tables R&S ZVA/ZVB/ZVT COMMAND PARAMETERS UNIT COMMENT :MMTCh <string>[, <string>, <string>, <numeric_value>, <numeric_value>, <numeric_value>, <numeric_value>, <numeric_value>, <numeric_value>, <numeric_value>, <numeric_value>, <numeric_value>, <numeric_value>, <numeric_value>, <numeric_value>, <numeric_value>, OPEN | SHORT | MATCH | <numeric_value>] :FMTCh <string>[, <string>, <string>, <numeric_value>, <numeric_value>, <numeric_value>, <numeric_value>, <numeric_value>,...
- Page 497 ® R&S ZVA/ZVB/ZVT SCPI Command Tables COMMAND PARAMETERS UNIT COMMENT :MREFlect <string>[, <string>, <string>, <numeric_value>, <numeric_value>, <numeric_value>, <numeric_value>, <numeric_value>, <numeric_value>, <numeric_value>, <numeric_value>, <numeric_value>, <numeric_value>, <numeric_value>, <numeric_value>, <numeric_value>, OPEN | SHORT | MATCH | <numeric_value>] :FREFlect <string>[, <string>, <string>, <numeric_value>, <numeric_value>, <numeric_value>, <numeric_value>, <numeric_value>,...
- Page 498 ® SCPI Command Tables R&S ZVA/ZVB/ZVT COMMAND PARAMETERS UNIT COMMENT :MSMatch <string>[, <string>, <string>, <numeric_value>, <numeric_value>] :FSMatch <string>[, <string>, <string>, <numeric_value>, <numeric_value>] :MMATten <string>[, <string>, <string>, <numeric_value>, <numeric_value>] :MFATten <string>[, <string>, <string>, <numeric_value>, <numeric_value>] :FFATten <string>[, <string>, <string>, <numeric_value>, <numeric_value>] COMMAND PARAMETERS UNIT...
- Page 499 ® R&S ZVA/ZVB/ZVT SCPI Command Tables COMMAND PARAMETERS UNIT COMMENT :MMSNetwork <string>[, <string>, <string>, <numeric_value>, <numeric_value>, <numeric_value>, <numeric_value>, <numeric_value>, <numeric_value>, <numeric_value>, <numeric_value>, <numeric_value>, <numeric_value>, <numeric_value>, <numeric_value>, <numeric_value>, OPEN | SHORT | MATCH | <numeric_value>] :MFSNetwork <string>[, <string>, <string>, <numeric_value>, <numeric_value>, <numeric_value>, <numeric_value>, <numeric_value>,...
- Page 500 ® SCPI Command Tables R&S ZVA/ZVB/ZVT COMMAND PARAMETERS UNIT COMMENT :MMTHrough <string>[, <string>, <string>, <numeric_value>, <numeric_value>, <numeric_value>, <numeric_value>, <numeric_value>] :MFTHrough <string>[, <string>, <string>, <numeric_value>, <numeric_value>, <numeric_value>, <numeric_value>, <numeric_value>] :FFTHrough <string>[, <string>, <string>, <numeric_value>, <numeric_value>, <numeric_value>, <numeric_value>, <numeric_value>] COMMAND PARAMETERS UNIT COMMENT [SENSe<1...4>] :CORRection...
- Page 501 ® R&S ZVA/ZVB/ZVT SCPI Command Tables COMMAND PARAMETERS UNIT COMMENT [SENSe<1...4>] :CORRection :EDELay<1...2> :AUTO ONCE no query :DIELectric <numeric_value> :DISTance <numeric_value> :ELENgth <numeric_value> [:TIME] <numeric_value> :OFFSet<1...2> :STATe <Boolean> :POWer<1...2> :ACQuire AWAVe | BWAVe | no query B1 | B2 | B3 | B4 [,<numeric_value>, PORT | GENerator, <numeric_value>]...
- Page 502 ® SCPI Command Tables R&S ZVA/ZVB/ZVT COMMAND PARAMETERS UNIT COMMENT [SENSe<1..4>] :FREQuency :CENTer <numeric_value> :SPAN <numeric_value> :STARt <numeric_value> :STOP <numeric_value> :MODE CW | FIXed | SWEep | SEGMent [:CW] <numeric_value> :FIXED <numeric_value> :CONVersion FUNDamental | HARMonic | MIXer | ARBitrary | SHARmonic | THARmonic for compatibility with ZVR :ARBitrary...
- Page 503 ® R&S ZVA/ZVB/ZVT SCPI Command Tables COMMAND PARAMETERS UNIT COMMENT [SENSe] :ROSCillator [:SOURce] INTernal | EXTernal :EXTernal :FREQuency <numeric_value> 1145.1084.12 6.41...
- Page 504 ® SCPI Command Tables R&S ZVA/ZVB/ZVT COMMAND PARAMETERS UNIT COMMENT [SENSe<1..4>] :SEGMent<1...50> :DEFine <numeric_value>, <numeric_value>, <numeric_value>, <numeric_value>, dBm, <numeric_value> | AUTO, <numeric_value>, for compatibility with ZVR <numeric_value>, [POSitive | NEGative | AUTO], [NORMal | HIGH], [LNOise | LDIStortion | AUTO | CHANnel] :SELect SWTime | DWELl :CLEar...
- Page 505 ® R&S ZVA/ZVB/ZVT SCPI Command Tables COMMAND PARAMETERS UNIT COMMENT [SENSe<1..4>] :SWEep :COUNt <numeric_value> :DWELl <numeric_value> :DETector :TIME <numeric_value> :POINts <numeric_value> :SPACing LINear | LOGarithmic :SRCPort <numeric_value> :STEP <numeric_value> :TIME <numeric_value> :AUTO <Boolean> :TYPE LINear | LOGarithmic | POWer | CW | POINt | SEGMent COMMAND PARAMETERS UNIT...
- Page 506 ® SCPI Command Tables R&S ZVA/ZVB/ZVT COMMAND PARAMETERS UNIT COMMENT [SENSe<1..4>] :LOMeasure<1...2> [:STATe] <Boolean> :LOReference<1...2> [:STATe] <Boolean> COMMAND PARAMETERS UNIT COMMENT [SENSe<1..4>] :COUPle ALL | NONE COMMAND PARAMETERS UNIT COMMENT [SENSe<1..4>] :LPORt<1…1> :ZCOMmon <numeric_value> [,<numeric_value>] ,OHM :ZDIFferent <numeric_value> [,<numeric_value>] ,OHM COMMAND PARAMETERS UNIT...
- Page 507 ® R&S ZVA/ZVB/ZVT SCPI Command Tables COMMAND PARAMETERS UNIT COMMENT SOURce<1...4> :POWer<1...2> :CORRection [:ACQuire] PORT | GENerator | no query A1 | A2 | A3 | A4 | ESRC1 | ESRC2 [,<numeric_value>] :COLLect [:ACQuire] ASENsor | BSENsor no query :VERification [:STATe] <Boolean>...
- Page 508 ® SCPI Command Tables R&S ZVA/ZVB/ZVT COMMAND PARAMETERS UNIT COMMENT [:LEVel] [:IMMediate] [:AMPLitude] <numeric_value> :CAMPLitude :A<1|2> <numeric_value> :OFFSet <numeric_value>, ONLY | CPADd :PHASe <numeric_value> :SLOPe <numeric_value> dB/GHz :STARt <numeric_value> :STOP <numeric_value> :FREQuency [:CW] <numeric_value> :FIXED <numeric_value> :CONVersion :ARBitrary :EFRequency <Boolean>, <numeric_value>, <numeric_value>, <numeric_value>,...
- Page 509 ® R&S ZVA/ZVB/ZVT SCPI Command Tables COMMAND PARAMETERS UNIT COMMENT :QUEStionable [:EVENt?] query only :CONDition? query only :ENABle 0...65535 :PTRansition 0...65535 :NTRansition 0...65535 :LIMit<1|2> [:EVENt?] query only :CONDition? query only :ENABle 0...65535 :PTRansition 0...65535 :NTRansition 0...65535 :QUEue [:NEXT?] query only 1145.1084.12 6.47...
- Page 510 ® SCPI Command Tables R&S ZVA/ZVB/ZVT COMMAND PARAMETERS UNIT COMMENT SYSTem :COMMunicate :GPIB [:SELF] :ADDRess 0...30 :RTERminator LFEoi | EOI :RDEVice :GENerator<1…11> :DEFine <string>, <string>, <string>, <string> [,ON | OFF,ON | OFF] :DELete no query :PMETer<1…12> :DEFine <string>, <string>, <string>, <string> :DELete no query :DATA...
- Page 511 ® R&S ZVA/ZVB/ZVT SCPI Command Tables COMMAND PARAMETERS UNIT COMMENT TRACe :COPY <string> | no query MDATA1 | MDATA2 | MDATA3 | MDATA4 | MDATA5 | MDATA6 | MDATA7 | MDATA8, <string> | CH1DATA | CH2DATA | CH3DATA | CH4DATA :MATH <string>...
- Page 512 ® CALCulate R&S ZVA/ZVB/ZVT Detailed Command Reference CALCulate This subsystem provides access to the results of a measurement. The trace data is transferred in either ASCII or block data (REAL) format, depending on the FORMat[:DATA] setting. If the block data format is used, it is recommended to select EOI as receive terminator (SYSTem:COMMunicate:GPIB[:SELF]:RTERminator EOI).
- Page 513 ® R&S ZVA/ZVB/ZVT CALCulate Source match 3 (S33) SCORr14 SCORr15 Reflection tracking 3 (S33) Isolation 3 (S31) SCORr16 SCORr17 Load match 3 (S31) Transmission tracking 3 (S13) SCORr18 SCORr19 Isolation 1 (S13) Load match 1 (S13) SCORr20 SCORr21 Transmission tracking 1 (S13) Isolation 3 (S32)
- Page 514 ® CALCulate R&S ZVA/ZVB/ZVT CALCulate<Ch/Tr>:DATA:STIMulus? Reads the stimulus values of the active data or memory trace. <Ch/Tr> Channel number used to identify the active trace. Parameters – Range [def. unit] The data is transferred in the data format defined via FORMat[:DATA].
- Page 515 ® R&S ZVA/ZVB/ZVT CALCulate CALCulate<Ch/Tr>:DLINe:STATe <Boolean> Switches the horizontal line on or off. <Ch/Tr> Channel number used to identify the active trace. <Boolean> ON | OFF - Horizontal line on or off. *RST value SCPI, Command Types Device-specific, command or query. Example: See CALC:DLIN.
- Page 516 ® CALCulate R&S ZVA/ZVB/ZVT CALCulate<Ch/Tr>:FILTer[:GATE]:TIME:DCHebyshev <numeric_value> Sets the sideband suppression for the Dolph-Chebyshev time gate. The command is only available if a Dolph-Chebyshev time gate active (CALCulate<Ch/Tr>:FILTer[:GATE]:TIME:WINDow DCHebyshev). <Ch/Tr> Channel number used to identify the active trace <numeric_value> Sideband suppression Range [def.
- Page 517 ® R&S ZVA/ZVB/ZVT CALCulate Range [def. unit] 2E-012 s to 200 s. The increment (parameters UP or DOWN) is 0.1 ns. [s] *RST value 5E-009 s SCPI, Command Confirmed, command or query Types Example: See CALCulate<Ch/Tr>:FILTer[:GATE]:TIME:CENTer CALCulate<Ch/Tr>:FILTer[:GATE]:TIME:STARt <numeric_value> Defines the start time of the time gate. <Ch/Tr>...
- Page 518 ® CALCulate R&S ZVA/ZVB/ZVT CALCulate<Ch/Tr>:FILTer[:GATE]:TIME:STOP <numeric_value> Defines the stop time of the time gate. <Ch/Tr> Channel number used to identify the active trace <numeric_value> Stop time of the time gate. Range [def. unit] –99.999999999998 s to +100 s. The increment (parameters UP or DOWN) is 0.1 ns.
- Page 519 ® R&S ZVA/ZVB/ZVT CALCulate SCPI, Command Confirmed (with some device-specific parameters), command or Types query Example: See CALCulate<Ch/Tr>:FILTer[:GATE]:TIME:DCHebychev CALCulate<Ch/Tr>:FORMat... This subsystem determines a post-processing of the measured data in order to obtain various display formats. CALCulate<Ch/Tr>:FORMat MLINear | MLOGarithmic | PHASe | UPHase | POLar | SMITh | ISMith | GDELay | REAL | IMAGinary | SWR | COMPlex | MAGNitude Defines how the measured result at any sweep point is post-processed and presented in the graphical display.
- Page 520 ® CALCulate R&S ZVA/ZVB/ZVT Assume that the result at a sweep point is given by the complex quantity z = x + jy. The meaning of the parameters is as follows (see also table in CALCulate<Ch/Tr>:MARKer<Mk>:FORMat description): Calculate the magnitude of z, to be displayed in a Cartesian diagram MLINear with a linear scale MLOGarithmic...
- Page 521 ® R&S ZVA/ZVB/ZVT CALCulate CALCulate<Ch>:FSIMulator:BALun:DMCircuit:BPORt2:PARameters:C <Capacitance> Defines the serial capacitance for the matching network. <Ch> Channel number. <Capacitance> Serial capacitance for logical port no. 2. Range [def. unit] –1 mF to 1 mF [F (farad)]. The increment (parameters UP or DOWN) is 1E-015 F.
- Page 522 ® CALCulate R&S ZVA/ZVB/ZVT CALCulate<Ch>:FSIMulator:BALun:DZConversion:BPORt2:ZCOMmon[:R] <Impedance> Defines the common mode impedance for the balanced port no. 2. <Ch> Channel number. <Impedance> Common mode impedance. The increment (parameters UP or DOWN) is 1 Ω. 0 Ω to 3.4028234664E+032 MΩ [Ω (Ohm)] Range [def.
- Page 523 ® R&S ZVA/ZVB/ZVT CALCulate CALCulate<Ch/Tr>:LIMit... This subsystem defines the limit lines and controls the limit check. CALCulate<Ch/Tr>:LIMit:CONTrol[:DATA] <numeric_value>,<numeric_value>{,<numeric_value>,<numeric_value>} Defines the stimulus values of the limit line and/or creates new limit line segments. Rules for creating segments The following rules apply to an active trace with n existing limit line segments: An odd number of values is rejected;...
- Page 524 ® CALCulate R&S ZVA/ZVB/ZVT Example: *RST; CALC:LIM:CONT 1 GHZ, 2 GHZ Define an upper limit line segment in the stimulus range between 1 GHz and 2 GHz, using default response values. CALC:LIM:DISP ON Show the limit line segment in the active diagram. CALCulate<Ch/Tr>:LIMit:CONTrol:DOMain FLIN | FLOG | FSEG | FSINgle | TLIN | TLOG | PLIN | PLOG | PSINgle Deletes the existing limit line and (re-)defines the physical units of the stimulus values of the limit line.
- Page 525 ® R&S ZVA/ZVB/ZVT CALCulate CALCulate<Ch/Tr>:LIMit:CONTrol:SHIFt <numeric_value> Shifts the limit line in horizontal direction. <Ch/Tr> Channel number used to identify the active trace. <numeric_value> Amount that the limit line is shifted. Almost no restriction for limit segments; see Rules for Limit Line Range [def.
- Page 526 ® CALCulate R&S ZVA/ZVB/ZVT Example: *RST; CALC:LIM:CONT 1 GHZ, 1.5 GHZ Define an upper limit line segment in the stimulus range between 1 GHz and 1.5 GHz, using default response values. CALC:LIM:DATA 1,1500000000, 2000000000,2,3 Define an upper limit line segment in the stimulus range between 1.5 GHz and 2 GHz, assigning response values of +2 dBm and +3 dBm.
- Page 527 ® R&S ZVA/ZVB/ZVT CALCulate CALCulate<Ch/Tr>:LIMit:FAIL? Returns a 0 or 1, to indicate whether the LIMit test has failed or not. <Ch/Tr> Channel number used to identify the active trace. Response 0 | 1 - 0 represents pass, 1 represents fail. *RST value SCPI, Command Confirmed, query only.
- Page 528 ® CALCulate R&S ZVA/ZVB/ZVT *RST value – The response value of a segment that is created implicitly, e.g. an upper limit line segment, is –20 dB. SCPI, Command Confirmed, with query. Types Example: CALC:LIM:LOW -10, 0, 0, -10 Define the following lower and (default) upper limit line segments: CALC:LIM:DISP ON Show the limit line segments in the active diagram.
- Page 529 ® R&S ZVA/ZVB/ZVT CALCulate CALCulate<Ch/Tr>:LIMit:LOWer:SHIFt <numeric_value> Shifts all lower and upper limit line segments assigned to the active trace in vertical direction. This command is identical with CALCulate<Ch/Tr>:LIMit:UPPer:SHIFt. <Ch/Tr> Channel number used to identify the active trace. <numeric_value> Response offset value for all limit line segments. Range [def.
- Page 530 ® CALCulate R&S ZVA/ZVB/ZVT CALCulate<Ch/Tr>:LIMit:RDOMain:COMPlex S | SINV | Y | Z | YREL Deletes the existing limit line and (re-)defines the physical units of the response values of the limit line. The units of the stimulus values are defined via CALCulate<Ch/Tr>:LIMit:CONTrol:DOMain. This command is complemented by CALCulate<Ch/Tr>:LIMit:RDOMain:FORMat and CALCulate<Ch/Tr>:LIMit:RDOMain:SPACing.
- Page 531 ® R&S ZVA/ZVB/ZVT CALCulate CALCulate<Ch/Tr>:LIMit:RDOMain:SPACing LINear | LOGarithmic | dB | SIC Deletes the existing limit line and (re-)defines the physical units of the response values of the limit line. The units of the stimulus values are defined via CALCulate<Ch/Tr>:LIMit:CONTrol:DOMain. This command is complemented by CALCulate<Ch/Tr>:LIMit:RDOMain:COMPlex and CALCulate<Ch/Tr>:LIMit:RDOMain:FORMat.
- Page 532 ® CALCulate R&S ZVA/ZVB/ZVT Example: CALC:LIM:DATA 1,1500000000, 2000000000,2,3 Define an upper limit line segment (segment no. 1) in the stimulus range between 1.5 GHz and 2 GHz, assigning response values of +2 dBm and +3 dBm. :CALC:LIM:SEGM:AMPL:STAR 5; STOP 5; CALC:LIM:SEGM:TYPE LMIN Change the segment to a lower limit line segment with a constant response value of +5 dB.
- Page 533 ® R&S ZVA/ZVB/ZVT CALCulate To define the stimulus values of several limit line segments with a single command, use CALCulate<Ch/Tr>:LIMit:CONTrol[:DATA]. <Ch/Tr> Channel number used to identify the active trace. <Seg> Segment number <numeric_value> Frequency, power or time value, to be defined in accordance with the domain setting (CALCulate<Ch/Tr>:LIMit:CONTrol:DOMain).
- Page 534 ® CALCulate R&S ZVA/ZVB/ZVT CALCulate<Ch/Tr>:LIMit:SEGMent<Seg>:STIMulus:STOP <numeric_value> Changes the stop stimulus value (i.e. the largest or smallest stimulus value) of a limit line segment. A segment must be created first to enable this command (e.g CALC:LIM:DATA). To define the stimulus values of several limit line segments with a single command, use CALCulate<Ch/Tr>:LIMit:CONTrol[:DATA].
- Page 535 ® R&S ZVA/ZVB/ZVT CALCulate Example: *RST; CALC:LIM:UPP 1 GHZ, 2 GHZ Define an upper limit line segment in the stimulus range between 1 GHz and 2 GHz, using default response values. CALC:LIM:SEG:TYPE LMIN Turn the defined limit line segment into a lower limit line segment. CALCulate<Ch/Tr>:LIMit:SOUNd[:STATe] Switches the acoustic signal (fail beep) on or off.
- Page 536 ® CALCulate R&S ZVA/ZVB/ZVT CALCulate<Ch/Tr>:LIMit:TTLout<Output_no>[:STATe] <Boolean> Switches the TTL pass/fail signals on or off. The signals are applied to the USER CONTROL connector as long as the active trace <Ch/Tr> is within limits. <Ch/Tr> Channel number used to identify the active trace. <Output_no>...
- Page 537 ® R&S ZVA/ZVB/ZVT CALCulate <Ch/Tr> Channel number used to identify the active trace. <numeric_value> Pair(s) of response values. Range [def. unit] Almost no restriction for limit segments; see Rules for Limit Line Definition. [dB] *RST value – The response value of a segment that is created implicitly, e.g. an lower limit line segment, is –20 dB.
- Page 538 ® CALCulate R&S ZVA/ZVB/ZVT Example: CALC:LIM:UPP:FEED 1 GHZ, 10 Use the stimulus values of the active trace, shifted by 1 GHz to the right and increased by 10 dB, to create an upper limit line. CALC:LIM:UPP:SHIF 3; CALC:LIM:CONT:SHIF 1 GHz Shift the limit line by an additional 3 dB in vertical and by 1 GHz in horizontal direction.
- Page 539 ® R&S ZVA/ZVB/ZVT CALCulate Use CALCulate<Ch/Tr>:LIMit:STATe to switch on or off the entire limit check, including upper and lower limit lines. <Ch/Tr> Channel number used to identify the active trace. <Boolean> ON | OFF - Limit check on or off. *RST value SCPI, Confirmed, command or query.
- Page 540 ® CALCulate R&S ZVA/ZVB/ZVT CALCulate<Ch/Tr>:MARKer<Mk>:AOFF Removes all markers from all traces of the active setup. The removed markers remember their properties (stimulus value, format, delta mode, number) when they restored (CALC<Ch/Tr>:MARK<Mk> ON). The marker properties are definitely lost if the associated trace is deleted.
- Page 541 ® R&S ZVA/ZVB/ZVT CALCulate <Center_Stimulus> Stimulus frequency at the center of the bandpass/bandstop region (the stimulus value of marker no. 4). <Q> Quality factor, i.e. the ratio between the center frequency and the 3-dB bandwidth <Loss> Loss at the center of the bandpass/bandstop region (the response value of marker no.
- Page 542 ® CALCulate R&S ZVA/ZVB/ZVT Example: Suppose that the active setup contains two traces Trc1 and Trc2, assigned to channels no. 1 and 2, respectively (see example for CALCulate<Ch>:PARameter:SELect). :CALC1:PAR:SEL 'TRC1'; CALC1:MARK1 ON; MARK2 ON Select Trc1 as the active trace and create the two markers no. 1 and 2. The default position for both markers is the center of the sweep range.
- Page 543 ® R&S ZVA/ZVB/ZVT CALCulate Parameters See list of parameters below. *RST value DEF – This means the format of the trace no. <Ch/Tr> (MLOG after *RST); see CALCulate<Ch/Tr>:FORMat. SCPI, Device-specific, command or query Command Types Example: Suppose that the active setup contains an active trace no. 1 (see example for CALCulate<Ch>:PARameter:SELect).
- Page 544 ® CALCulate R&S ZVA/ZVB/ZVT Range [def. 0.01 dB to 100.00 dB, the increment (UP. DOWN) is 0.3 dB. [dB] unit] *RST value 3 dB. SCPI, Device-specific, command or query. Command Types Example: See CALCulate<Ch/Tr>:MARKer<Mk>:BWIDth. CALCulate<Ch/Tr>:MARKer<Mk>:FUNCtion:BWIDth:MODE BPASs | BSTop | BPRMarker | BSRMarker Selects the bandfilter search mode.
- Page 545 ® R&S ZVA/ZVB/ZVT CALCulate CALCulate<Ch/Tr>:MARKer<Mk>:FUNCtion:DELTa[:STATe] <Boolean> Switches the delta mode for marker <Mk> on trace no. <Ch/Tr> on or off. Note: This command is the ZVR-compatible equivalent of CALCulate<Ch/Tr>:MARKer<Mk>:DELTa[:STATe]. <Ch/Tr> Channel number used to identify the active trace. <Mk> Marker number in the range 1 to 10. <Boolean>...
- Page 546 ® CALCulate R&S ZVA/ZVB/ZVT CALCulate<Ch/Tr>:MARKer<Mk>:FUNCtion:DOMain:USER:STARt <numeric_value> Defines start value search range selected with CALCulate<Ch/Tr>:MARKer<Mk>:FUNCtion:DOMain:USER <numeric_value>. <Ch/Tr> Channel number used to identify the active trace. <Mk> Marker number in the range 1 to 10. <numeric_value> Beginning of the search range. Range [def. unit] Maximum allowed sweep range, depending on the instrument model and on the sweep type.
- Page 547 ® R&S ZVA/ZVB/ZVT CALCulate Parameters See list of parameters below. *RST value – SCPI, Device-specific, no query. Command Types Example: Suppose that the active setup contains an active trace no. 1 (see example for CALCulate<Ch>:PARameter:SELect). CALC:MARK ON Create marker 1 and assign it to trace no. 1. CALC:MARK:FUNC:EXEC MAX;...
- Page 548 ® CALCulate R&S ZVA/ZVB/ZVT CALCulate<Ch/Tr>:MARKer<Mk>:FUNCtion[:SELect] MAXimum | MINimum | RPEak | LPEak | NPEak | TARGet | LTARget | RTARget | BFILter Selects a search mode for marker no. <Mk>, which can then be initiated using one of the CALCulate<Ch/Tr>:MARKer<Mk>:SEARch..., CALCulate<Ch/Tr>:MARKer<Mk>:MAXimum or CALCulate<Ch/Tr>:MARKer<Mk>:MINimum functions.
- Page 549 ® R&S ZVA/ZVB/ZVT CALCulate CALCulate<Ch/Tr>:MARKer<Mk>:FUNCtion:STARt Sets the beginning (start) of the sweep range equal to the stimulus value of the marker <Mk> on trace no. <Ch/Tr>. <Ch/Tr> Channel number used to identify the active trace. <Mk> Marker number in the range 1 to 10. Range [def.
- Page 550 ® CALCulate R&S ZVA/ZVB/ZVT CALCulate<Ch/Tr>:MARKer<Mk>:FUNCtion:TARget <numeric_value> Defines the target value for the target search of marker no. <Mk>, which can be activated using CALCulate<Ch/Tr>:MARKer<Mk>:FUCTion:EXECute TARGet. Note: This command is the ZVR-compatible equivalent of CALCulate<Ch/Tr>:MARKer<Mk>:TARget. <Ch/Tr> Channel number used to identify the active trace. <Mk>...
- Page 551 ® R&S ZVA/ZVB/ZVT CALCulate CALCulate<Ch/Tr>:MARKer<Mk>:MODE CONTinuous | DISCrete Sets marker no. <Mk> to continuous or discrete mode. The marker doesn't have to be created before (CALCulate<Ch/Tr>:MARKer<Mk>[:STATe] ON), the mode can be assigned in advance. <Ch/Tr> Channel number used to identify the active trace. <Mk>...
- Page 552 ® CALCulate R&S ZVA/ZVB/ZVT CALCulate<Ch/Tr>:MARKer<Mk>:REFerence:X <numeric_value> Defines the stimulus (in Cartesian diagrams: x-axis) value of the reference marker, which can (but doesn't have to) be displayed using CALCulate<Ch/Tr>:MARKer<Mk>:REFerence[:STATe] ON. <Ch/Tr> Channel number used to identify the active trace. <Mk> Marker number in the range 1 to 10. This numeric suffix is ignored and may be set to any value.
- Page 553 ® R&S ZVA/ZVB/ZVT CALCulate Example: Suppose that the active setup contains an active trace no. 1 (see example for CALCulate<Ch>:PARameter:SELect). CALC:MARK:REF ON Create the reference marker and display it in the center of the sweep range. CALC:MARK:REF:Y? Query the measurement value at the reference marker position. CALCulate<Ch/Tr>:MARKer<Mk>:SEARch[:IMMediate] Initiates search...
- Page 554 ® CALCulate R&S ZVA/ZVB/ZVT CALCulate<Ch/Tr>:MARKer<Mk>:SEARch:NEXT Selects a search mode for marker no. <Mk> and initiates a search for the next highest or lowest value among valid peaks. marker must created before using CALCulate<Ch/Tr>:MARKer<Mk>[:STATe] ON. Note: This command is the ZVR-compatible equivalent of CALCulate<Ch/Tr>:MARKer<Mk>:FUNCtion:EXECute NPEak.
- Page 555 ® R&S ZVA/ZVB/ZVT CALCulate Command Types Example: Suppose that the active setup contains an active trace no. 1 (see example for CALCulate<Ch>:PARameter:SELect). CALC:MARK ON; FUNC:EXEC MAXimum Create marker no. 1 and assign them to trace no. 1. Activate a maximum search for marker no. 1. CALC:MARK:SEAR:TRAC ON Enable the tracking mode for the created marker.
- Page 556 ® CALCulate R&S ZVA/ZVB/ZVT Example: CALC:MARK ON Create marker no. 1 and display it in the center of the sweep range. :CALC:MARK:TARG -10; FUNC:EXEC TARG Define a target search value of –10 dB and start the target search. CALC:MARK:X? Query the stimulus value corresponding to the target search result.
- Page 557 ® R&S ZVA/ZVB/ZVT CALCulate Example: Suppose that the active setup contains an active trace no. 1 (see example for CALCulate<Ch>:PARameter:SELect) and the sweep range for a frequency sweep starts at 1 GHz. CALC:MARK ON Create marker no. 1 and display it in the center of the sweep range.
- Page 558 ® CALCulate R&S ZVA/ZVB/ZVT CALCulate<Ch/Tr>:MATH[:EXPRession][:DEFine] <expression> Defines a simple mathematical relation between traces. To calculate and display the new mathematical trace, the mathematical mode must be switched on (CALCulate<Ch/Tr>:MATH:STATe ON). This command places some restrictions on the mathematical expression and the operands. Use CALCulate<Ch/Tr>:MATH[:EXPRession]:SDEFine to define general expressions.
- Page 559 ® R&S ZVA/ZVB/ZVT CALCulate Example: *RST; CALC:MATH:MEM Copy the current state of the default trace Trc1 to a memory trace named 'Mem2[Trc1]'. The memory trace is not displayed. CALC:MATH:SDEF 'Trc1 / Mem2[Trc1]' Define a mathematical trace, dividing the data trace by the stored memory trace.
- Page 560 ® CALCulate R&S ZVA/ZVB/ZVT Types Example: *RST; CALC:MATH:MEM Copy the current state of the default trace Trc1 to a memory trace named 'Mem2[Trc1]'. The memory trace is not displayed. CALC:MATH:FUNC DIV Define a mathematical trace, dividing the data trace by the stored memory trace.
- Page 561 ® R&S ZVA/ZVB/ZVT CALCulate CALCulate<Ch/Tr>:MATH:STATe <Boolean> Activates or deactivates the mathematical mode where the mathematical trace defined via CALCulate<Ch/Tr>:MATH[:EXPRession]:SDEFine is calculated and displayed instead of the active data trace. command valid mathematical traces calculated CALCulate<Ch/Tr>:MATH:FUNCtion. <Ch/Tr> Channel number used to identify the active trace. <Boolean>...
- Page 562 ® CALCulate R&S ZVA/ZVB/ZVT Example: *RST; SWE:TYPE POW Reset the instrument, activate a power sweep, and select a wave quantity a1 for the trace Trc1. CALC:PAR:SDEF 'Trc1', 'a1' Select a wave quantity a1 for the trace Trc1. DISP:WIND:TRAC:FEED 'Trc1' Display the generated trace in the active window. CALC:MATH:SDEF 'StimVal ()';...
- Page 563 ® R&S ZVA/ZVB/ZVT CALCulate Example: CALC4:PAR:SDEF 'Ch4Tr1', 'S11' Create channel 4 and a trace named Ch4Tr1 to measure the input reflection coefficient S11. CALC4:PAR:CAT? Query the traces assigned to channel 4. If Ch4Tr1 is the only trace assigned to channel 4, the response is 'CH4TR1,S11'. CALCulate<Ch>:PARameter:DEFine <'string>', S11 | ...
- Page 564 ® CALCulate R&S ZVA/ZVB/ZVT The measurement parameter is selected by means of the following keywords (the selection depends on the number of test ports of the analyzer, e.g. S44 is not available on 2-port analyzers): S11 | S12 | S13 | S14 | S21 | S22 | S23 | S24 S-parameters | S31 | S32 | S33 | S34 | S41 | S42 | S43 | A | B | C | D...
- Page 565 ® R&S ZVA/ZVB/ZVT CALCulate Note: To create a new trace and at the same time assign the attributes, use CALCulate<Ch>:PARameter:SDEFine. To display the trace, create a window (DISPlay:WINDow<Wnd>[:STATe] ON) and assign the trace to this window (DISPlay:WINDow<Wnd>:TRACe:FEED); see example below. Traces must be selected to become active traces;...
- Page 566 ® CALCulate R&S ZVA/ZVB/ZVT '<string>' Trace name, e.g. 'Trc4'. See Rules for trace names in the Trace Manager description. 'S11', ... Measurement parameter (string variable); see list of parameters below. *RST value – SCPI, Device-specific, no query. CALCulate<Ch>:PARameter:MEASure? Command '<Trc_name>' queries the measurement parameter of the trace. Types CALCulate<Ch>:PARameter:CATalog? returns a list of all defined traces.
- Page 567 ® R&S ZVA/ZVB/ZVT CALCulate 'b2D1/a1D1' | ... Ratio of wave quantities with port numbers and source port numbers 'b02D1/a01D1' | ... (D<no> for drive port). The strings SAM, RMS, PEAK appended to the 'b2D1/a1D1SAM' | wave quantities denote a normal (sample), RMS or peak detector. 'b2D1/a1D1RMS' | 'b2D1/a1D1PEAK' | ...
- Page 568 ® CALCulate R&S ZVA/ZVB/ZVT CALCulate<Ch/Tr>:STATistics... This subsystem evaluates and displays statistical and phase information of the trace. CALCulate<Ch/Tr>:STATistics:DOMain:USER <numeric_value> Selects evaluation ranges configured with CALCulate<Ch/Tr>:STATistics:DOMain:USER:STARt CALCulate<Ch/Tr>:STATistics:DOMain:USER:STOP commands. <Ch/Tr> Channel number used to identify the active trace. If unspecified the numeric suffix is set to 1. <numeric_value>...
- Page 569 ® R&S ZVA/ZVB/ZVT CALCulate <numeric_value> Stop value of the evaluation range. Range [def. unit] –999.999999999 GHz to 1000 GHz. [Hz] *RST value Highest frequency of the analyzer, depending on the analyzer model. SCPI, Command Device-specific, command or query. Types Example: See CALCulate<Ch/Tr>:STATistics:DOMain:USER CALCulate<Ch/Tr>:STATistics:NLINear:COMP:LEVel <numeric_value>...
- Page 570 ® CALCulate R&S ZVA/ZVB/ZVT Example: *RST; SWE:TYPE POW Select a power sweep with default CW frequency and sweep range. CALC:STAT:NLIN:COMP:LEV 2 Define a compression value of 2 dB. CALC:STAT:NLIN:COMP:RES? Query the compression point results <Cmp_In>, <Cmp_Out>. An execution error message (error no. –200) is returned if no compression point is found..
- Page 571 ® R&S ZVA/ZVB/ZVT CALCulate CALCulate<Ch/Tr>:STATistics[:STATe] <Boolean> Displays or hides all statistical results in the diagram area of trace no. <Ch/Tr>. <Ch/Tr> Channel number used to identify the active trace. <Boolean> ON | OFF - Statistical info field on or off. *RST value SCPI, Command Device-specific, command or query.
- Page 572 ® CALCulate R&S ZVA/ZVB/ZVT SCPI, Command Types Device-specific, command or query. Example: See CALCulate<Ch/Tr>:STATistics:SMOothing:APERture CALCulate<Ch/Tr>:TRANsform... This subsystem converts measured data from one representation to another and controls the transformation into the time domain (with option ZVAB-K2, Time Domain). CALCulate<Ch/Tr>:TRANsform:COMPlex S | Y | Z Converts S-parameters into matched-circuit (converted) Y-parameters or Z-parameters and vice versa, assuming that port no.
- Page 573 ® R&S ZVA/ZVB/ZVT CALCulate CALCulate<Ch/Tr>:TRANsform:TIME:CENTer <numeric_value> Defines the center time of the diagram in time domain. <Ch/Tr> Channel number used to identify the active trace <numeric_value> Center time of the diagram in time domain Range [def. unit] -99.99999999999 s to +99.99999999999 s. The increment (parameters UP or DOWN) is 0.1 ns.
- Page 574 ® CALCulate R&S ZVA/ZVB/ZVT Parameters KFSTop – Keep stop frequency and number of points KDFRequency – Keep frequency gap and number of points KSDFRequency – Keep stop frequency and approximate frequency gap *RST value – SCPI, Command Device-specific, no query (the command causes an event) Types Example: See CALCulate<Ch/Tr>:TRANsform:TIME[:TYPE]...
- Page 575 ® R&S ZVA/ZVB/ZVT CALCulate CALCulate<Ch/Tr>:TRANsform:TIME:LPASs:DCSParam:CONTinuous <Boolean> Determines whether continuous extrapolation for the DC value is enabled. <Ch/Tr> Channel number used to identify the active trace <Boolean> ON – Continuous extrapolation enabled OFF – Continuous extrapolation disabled *RST value OFF [–] SCPI, Command Device-specific, command or query Types...
- Page 576 ® CALCulate R&S ZVA/ZVB/ZVT CALCulate<Ch/Tr>:TRANsform:TIME:SPAN <numeric_value> Defines the time span of the diagram in time domain. <Ch/Tr> Channel number used to identify the active trace <numeric_value> Time span of the diagram in time domain. Range [def. unit] 2E-012 s to 200 s. The increment (parameters UP or DOWN) is 0.1 ns.
- Page 577 ® R&S ZVA/ZVB/ZVT CALCulate SCPI, Confirmed, command or query Command Types Example: *RST; CALC:TRAN:TIME:STAT? Reset the instrument, activating a frequency sweep, and query whether the default trace is displayed in the time domain. The response is 0. CALCulate<Ch/Tr>:TRANsform:TIME:STIMulus STEP | IMPulse Selects the type of stimulus to be simulated in the low pass transformation process.
- Page 578 ® CALCulate R&S ZVA/ZVB/ZVT <Ch/Tr> Channel number used to identify the active trace Parameters BPASs – Band pass impulse (only impulse response; a step response CALCulate<Ch/Tr>:TRANsform:TIME:STIMulus STEP is automatically changed to impulse response) LPASs – Low pass (impulse or step response, depending on CALCulate<Ch/Tr>:TRANsform:TIME:STIMulus setting) *RST value BPASs...
- Page 579 ® R&S ZVA/ZVB/ZVT CALCulate SCPI, Device-specific, command or query Command Types Example: *RST; CALC:TRAN:TIME:STAT ON Reset the instrument, activating a frequency sweep, and enable the time domain transformation for the default trace. CALC:TRAN:TIME:XAX DIST Convert the x-axis scaling to distance units. CALCulate_TRANsform_VNETworks CALCulate<Ch>:TRANsform:VNETworks...
- Page 580 ® CALCulate R&S ZVA/ZVB/ZVT CSSL Serial Cs, C1, C2 R1, R2, R3 shunt L LSSC Serial Ls, R1, R2, R3 L1, L2 shunt C CSSC Serial Cs, C1, C2, C3 R1, R2, R3 – shunt C LSSL Serial Ls, – R1, R2, R3 L1, L2, L3 shunt L...
- Page 581 ® R&S ZVA/ZVB/ZVT CALCulate Shunt R1, R2 serial Shunt C1, C2 R1, R2 – serial Shunt – R1, R2 L1, L2 serial CALCulate<Ch>:TRANsform:VNETworks:BALanced:DEEMbedding<Log_pt>:PA Rameters:C<no> STSC | SCST | CSSL | LSSC | CSSC | SLCS | SCLS | SCCS,<numeric_value> Specifies the capacitance values C1, C2, C3 in the different circuit models for balanced port deembedding.
- Page 582 ® CALCulate R&S ZVA/ZVB/ZVT CALCulate<Ch>:TRANsform:VNETworks:BALanced:DEEMbedding<Log_pt>:PA Rameters:L<no> STSL | SLST | CSSL | LSSC | LSSL | SLCS | SCLS | SLLS,<numeric_value> Specifies the inductance values L1, L2, L3 in the different circuit models for balanced port deembedding. <Ch> Channel number <Log_pt>...
- Page 583 ® R&S ZVA/ZVB/ZVT CALCulate 10 MΩ for all resistances connected in parallel with a capacitance SCPI, Command Device-specific, command or query. In the query form, the Types <numeric_value> parameter must be omitted. The command returns the resistance value for the specified circuit model. Example: *RST;...
- Page 584 ® CALCulate R&S ZVA/ZVB/ZVT SCPI, Command Device-specific, command or query. Types Example: CALCulate<Ch>:TRANsform:VNETworks:BALanced:DEEMbedding[:STATe] CALCulate<Ch>:TRANsform:VNETworks:BALanced:EMBedding<Log_pt>:PARa meters:C<no> STSC | SCST | CSSL | LSSC | CSSC | SLCS | SCLS | SCCS,<numeric_value> Specifies the capacitance values C1, C2, C3 in the different circuit models for balanced port embedding.
- Page 585 ® R&S ZVA/ZVB/ZVT CALCulate *RST value – (see command type description below) <numeric_value> Inductance L<no> for the specified circuit model. –12 Range [def. unit] –1H to 1 H [H]. The increment is 1 pH (10 –9 *RST value 1 nH (10 SCPI, Command Device-specific, command or query.
- Page 586 ® CALCulate R&S ZVA/ZVB/ZVT CALCulate<Ch>:TRANsform:VNETworks:BALanced:EMBedding<Log_pt>[:STA Te] <Boolean> Enables or disables the embedding function for balanced ports. It is allowed to change the circuit model and its parameters while embedding is enabled. <Ch> Channel number <Log_pt> Logical port number <Boolean> ON – Embedding active OFF –...
- Page 587 ® R&S ZVA/ZVB/ZVT CALCulate <no> Number of capacitance in circuit model. If unspecified the numeric suffix is set to 1. Range [def. unit] 1 to 2 [–] The number of capacitances depends on the selected circuit model. Parameters Possible circuit models (character data); see circuit models. *RST value –...
- Page 588 ® CALCulate R&S ZVA/ZVB/ZVT CALCulate<Ch>:TRANsform:VNETworks:SENDed:DEEMbedding<Ph_pt>:PARa meters:R<no> CSL | LSC | CSC | LSL | SLC | SCL | SCC | SLL,<numeric_value> Specifies the resistance values R1, R2, R3 in the different circuit models for single ended port deembedding. <Ch> Channel number. <Ph_pt>...
- Page 589 ® R&S ZVA/ZVB/ZVT CALCulate 2.2 kΩ and enable deembedding. CALCulate<Ch>:TRANsform:VNETworks:SENDed:DEEMbedding<Ph_pt>:TNDef inition FIMPort | CSL | LSC | CSC | LSL | SLC | SCL | SCC | SLL Selects the circuit model for single ended port deembedding. <Ch> Channel number. <Ph_pt>...
- Page 590 ® CALCulate R&S ZVA/ZVB/ZVT CALCulate<Ch>:TRANsform:VNETworks:SENDed:EMBedding<Ph_pt>:PARamet ers:L<no> CSL | LSC | LSL | SLC | SCL | SLL,<numeric_value> Specifies the inductance values L1, L2, L3 in the different circuit models for single ended port embedding. <Ch> Channel number. <Ph_pt> Physical port number <no>...
- Page 591 ® R&S ZVA/ZVB/ZVT CALCulate Types <numeric_value> parameter must be omitted. The command returns the resistance value for the specified circuit model. Example: *RST; CALC:TRAN:VNET:SEND:EMB:PAR:R1? CSL; R2? CSL Query the default resistances for the Serial C, shunt L circuit model. The response is 10000000; 0. CALC:TRAN:VNET:SEND:EMB:PAR:R2 CSL, 2.2E+3 Increase the resistance R2 to 2.2 kΩ.
- Page 592 ® CONFigure R&S ZVA/ZVB/ZVT CONFigure CONFigure:CHANnel<Ch>... This subsystem creates and deletes channels and assigns names to channels. The commands are device-specific. CONFigure:CHANnel<Ch>:CATalog? Returns the numbers and names of all channels in the current setup. <Ch> Channel number. This parameter is ignored because the command returns all channels.
- Page 593 ® R&S ZVA/ZVB/ZVT CONTrol... CONFigure:CHANnel<Ch>[:STATe] <Boolean> Creates deletes channel <Ch> selects active channel. CONFigure:CHANnel<Ch>:NAME defines the channel name. A channel created with CONFigure:CHANnel<Ch>[:STATe] ON can be configured but has no trace assigned so that no measurement can be initiated. Use CALCulate<Ch>:PARameter:SDEFine "<Trace_name>,"<Parameter>"...
- Page 594 ® DIAGnostic R&S ZVA/ZVB/ZVT A simple application consists of selecting the channel numbers as parameters for CONTrol:AUXiliary:C[:DATA] and monitor the activity of up to 16 different channels at the USER CONTROL connector; see example below. You can also use the USER CONTROL output signals as channel-dependent trigger signals for external devices.
- Page 595 ® R&S ZVA/ZVB/ZVT DISPlay... DIAGnostic:ALC:SETTings[:STATe] ON | OFF Enables or disables the Automatic Level Control for all channels. <Ch> Channel number. <Boolean> ON | OFF - ALC on or off. *RST value SCPI, Command Types Device-specific, command or query. Example: DIAG:ALC:SETT OFF Disable the ALC function.
- Page 596 ® DISPlay... R&S ZVA/ZVB/ZVT DISPlay:ANNotation:FREQuency[:STATe] <Boolean> Shows or hides all frequency stimulus values in the diagrams. <Boolean> ON | OFF - Show or hide stimulus values. *RST value SCPI, Command Confirmed, command or query Types Example: *RST; DISP:ANN:FREQ OFF Create diagram area no. 1 (with default trace) and hide the frequency stimulus values.
- Page 597 ® R&S ZVA/ZVB/ZVT DISPlay... <trace_width> Optional trace width, only for traces (<Element> > 12). Range [def. unit] 1 to 20 [–] *RST values *RST does not affect the color settings; see also description of the Preset command. SCPI, Confirmed (with device-specific numeric suffix and parameters), Command command or query.
- Page 598 ® DISPlay... R&S ZVA/ZVB/ZVT Horizontal Line / Vertical Range Lines Diagram Title Limit Fail Trace Color Limit Line Type Off Limit Line Type Upper Limit Line Type Lower Trace 1 Trace 2 Trace 3 Trace 4 Trace 5 Trace 6 Trace 7 Trace 8 Trace 9...
- Page 599 ® R&S ZVA/ZVB/ZVT DISPlay... Trace 13 Trace 14 Trace 15 Trace 16 DISPlay:CMAP<Element>:TRACe:COLor[:STATe] <Boolean> Defines the trace color schemes in different diagram areas. <Element> Numeric suffix, not used in this command. Implemented for compatibility with DISPlay:CMAP<Element>:RGB. <Boolean> OFF – Independent color scheme in new diagram area. Moved traces change their color.
- Page 600 ® DISPlay... R&S ZVA/ZVB/ZVT DISPlay:WINDow<Wnd>:MAXimize <Boolean> Maximizes all diagram areas in the active setup or restores the previous display configuration. <Wnd> Number of the diagram area to become the active diagram area. DISPlay:WINDow<Wnd>:MAXimize acts on all diagrams of the current setup, however, the diagram no. <Wnd> is displayed on top of the others.
- Page 601 ® R&S ZVA/ZVB/ZVT DISPlay... DISPlay:WINDow<Wnd>:TITLe:DATA '<string>' Defines a title for diagram area <Wnd>. <Wnd> Number of the diagram area. String variable for the title. The length of the title is practically '<string>' unlimited but should be kept short enough to be displayed in the diagrams.
- Page 602 ® DISPlay... R&S ZVA/ZVB/ZVT Command Types Example: CALC4:PAR:SDEF 'Ch4Tr1', 'S11' Create channel 4 and a trace named Ch4Tr1 to measure the input reflection coefficient S11. DISP:WIND2:STAT ON Create diagram area no. 2. DISP:WIND2:TRAC9:FEED 'CH4TR1' Display the generated trace in diagram area no. 2, assigning the trace number 9 to it.
- Page 603 ® R&S ZVA/ZVB/ZVT DISPlay... DISPlay:WINDow<Wnd>:TRACe<WndTr>:X:OFFSet <numeric_value> Shifts the trace <WndTr> in horizontal direction, leaving the positions of all markers unchanged. <Wnd> Number of an existing diagram area (defined by means of DISPlay:WINDow<Wnd>:STATe ON). <WndTr> Existing trace number, assigned by means of DISPlay:WINDow<Wnd>:TRACe<WndTr>:FEED.
- Page 604 ® DISPlay... R&S ZVA/ZVB/ZVT Example: *RST; :DISP:WIND:TRAC:X:OFFS 1MHZ; :DISP:WIND:TRAC:Y:OFFS 10 Create the default trace and shift it horizontally by 1 MHz, vertically by 10 dB. DISP:WIND:TRAC:Y:OFFS? Query all response offset values. The response is 10,0,0,0. DISPlay:WINDow<Wnd>:TRACe<WndTr>:Y[:SCALe]:AUTO ONCE Displays the entire trace <WndTr> in the diagram area, leaving an appropriate display margin. <Wnd>...
- Page 605 ® R&S ZVA/ZVB/ZVT DISPlay... SCPI, Command Confirmed, with query. Types Example: CALC4:PAR:SDEF 'Ch4Tr1', 'S11' Create channel 4 and a trace named Ch4Tr1 to measure the input reflection coefficient S11. DISP:WIND2:STAT ON Create diagram area no. 2. DISP:WIND2:TRAC9:FEED 'CH4TR1' Display the generated trace in diagram area no. 2, assigning the trace number 9 to it.
- Page 606 ® DISPlay... R&S ZVA/ZVB/ZVT DISPlay:WINDow<Wnd>:TRACe<WndTr>:Y[:SCALe]:RPOSition <numeric_value> Sets the point on the y-axis to be used as the reference position as a percentage of the length of the y- axis. The reference position is the point on the y-axis which should equal the RLEVel. <Wnd>...
- Page 607 ® R&S ZVA/ZVB/ZVT DISPlay... Inductance H, MH, UH, NH, PH, FH Capacitance F, MF, UF, NF, PF, FF Dimensionless UNIT, MUNIT, UUNIT, NUNIT, PUNIT, FUNIT WINDow DISPlay... This subsystem controls the selection and presentation of graphical and trace information on the screen.
- Page 608 ® DISPlay... R&S ZVA/ZVB/ZVT *RST value *RST does not affect the color settings; see also description of the Preset command. SCPI, Device-specific, command or query Command Types Example: See DISPlay:CMAP<Element>:RGB. DISPlay:CMAP<Element>:RGB <red>, <green>, <blue> [,<trace_style>, <trace_width>] Defines the color of all display elements based on the Red/Green/Blue color model. <Element>...
- Page 609 ® R&S ZVA/ZVB/ZVT DISPlay... Change the marker colors: Mkr 1 turns red, Mkr 2 turns green. The numeric suffixes <Element> denote the following display elements: <Element> Display Element Background Text Selected Text Grid Reference Line Same Color for all Markers Horizontal Line / Vertical Range Lines Diagram Title Limit Fail Trace Color...
- Page 610 ® DISPlay... R&S ZVA/ZVB/ZVT Trace 5 Trace 6 Trace 7 Trace 8 Trace 9 Trace 10 Trace 11 Trace 12 Trace 13 Trace 14 Trace 15 Trace 16 DISPlay:CMAP<Element>:TRACe:COLor[:STATe] <Boolean> Defines the trace color schemes in different diagram areas. <Element> Numeric suffix, not used in this command.
- Page 611 ® R&S ZVA/ZVB/ZVT DISPlay... Example: *RST; DISP:CMAP13:RGB 1,0,0 Create diagram area no. 1 (with default trace showing the S- parameter S ) and color the trace red. DISP:CMAP:TRAC:COL OFF; DISP:WIND2:STAT ON Select independent color schemes for new diagram areas. Create a new diagram area no.
- Page 612 ® DISPlay... R&S ZVA/ZVB/ZVT SCPI, Command Device-specific, command or query (returns whether or not a Types particular diagram area exists). Example: CALC4:PAR:SDEF 'Ch4Tr1', 'S11' Create channel 4 and a trace named Ch4Tr1 to measure the input reflection coefficient S11. DISP:WIND2:STAT ON Create diagram area no.
- Page 613 ® R&S ZVA/ZVB/ZVT DISPlay... DISPlay:WINDow<Wnd>:TRACe<WndTr>:DELete Releases the assignment between a trace and a diagram area, as defined by means of DISPlay:WINDow<Wnd>:TRACe<WndTr>:FEED <Trace_Name> and expressed by the <WndTr> suffix. The trace itself is not deleted; this must be done via CALCulate<Ch>:PARameter:DELete <Trace_Name>.
- Page 614 ® DISPlay... R&S ZVA/ZVB/ZVT Create channel 4 and a trace named Ch4Tr1 to measure the input reflection coefficient S11. DISP:WIND2:STAT ON Create diagram area no. 2. DISP:WIND2:TRAC9:FEED 'CH4TR1' Display the generated trace in diagram area no. 2, assigning the trace number 9 to it. DISPlay:WINDow<Wnd>:TRACe<WndTr>:X:OFFSet <numeric_value>...
- Page 615 ® R&S ZVA/ZVB/ZVT DISPlay... <Phase> Multiplied phase factor, optional for setting command but returned by query Range [def. unit] –3.4*10 deg to +3.4*10 deg [deg] *RST value 0 deg <Real>, Real and imaginary part of added complex constant, optional for <Imaginary>...
- Page 616 ® DISPlay... R&S ZVA/ZVB/ZVT DISPlay:WINDow<Wnd>:TRACe<WndTr>:Y[:SCALe]:PDIVision <numeric_value> Sets the value between two grid graticules (value “per division”) for a particular displayed trace. When a new PDIVision value is entered, the current RLEVel is kept the same, while the top and bottom scaling is adjusted for the new PDIVision value.
- Page 617 ® R&S ZVA/ZVB/ZVT DISPlay... Types Example: CALC4:PAR:SDEF 'Ch4Tr1', 'S11' Create channel 4 and a trace named Ch4Tr1 to measure the input reflection coefficient S11. DISP:WIND2:STAT ON Create diagram area no. 2. DISP:WIND2:TRAC9:FEED 'CH4TR1' Display the generated trace in diagram area no. 2, assigning the trace number 9 to it.
- Page 618 ® FORMat... R&S ZVA/ZVB/ZVT Units for DISPlay... Commands The DISPlay... subsystem contains commands to define particular points in the diagram, e.g. to set the scale or a reference value. This requires the entry of a numeric value and a physical unit, depending on the parameter type displayed.
- Page 619 ® R&S ZVA/ZVB/ZVT HCOPy... FORMat[:DATA] ASCii | REAL [,<length>] Selects the format for numeric data transferred to and from the analyzer. The format setting is only valid for commands and queries whose description states that the response is formatted as described by FORMat[:DATA]. In particular, it affects trace data transferred by means of the commands in the TRACe:...
- Page 620 ® HCOPy:DESTination <string> | 'MMEM' R&S ZVA/ZVB/ZVT SCPI, Confirmed, command or query. Command Types Example: MMEM:NAME 'C:\Screenshots\PLOT1.BMP' Define printer file name (without creating file), assuming that .BMP is the current file format (see HCOPy:DEVice:LANGuage). HCOP:DEST 'MMEM'; HCOP Select 'Print to file' and create the printer file specified before. HCOPy:DEVice:LANGuage EMF | WMF | EWMF | BMP | JPG | PNG Selects a file format for printer files.
- Page 621 ® R&S ZVA/ZVB/ZVT HCOPy:DESTination <string> | 'MMEM' Example: COP:DEST '<Printer_name>' Select the printer for the output of screen data. HCOP Start printing. HCOPy:ITEM:ALL Selects the complete screen contents to be printed, including the logo (HCOPy:ITEM:LOGO), time (HCOPy:ITEM:TIME), and the marker list (HCOPy:ITEM:MLISt). *RST value After a reset, the complete information is printed;...
- Page 622 ® HCOPy:DESTination <string> | 'MMEM' R&S ZVA/ZVB/ZVT SCPI, Command Device-specific, command or query Types Example: COP:ITEM:ALL Select the complete information to be printed. HCOP:ITEM:MLISt ON; HCOP Include the marker list in the printed output and start printing. HCOPy:ITEM:TIME[:STATe] <Boolean> Qualifies whether or not the printed output contains the current date and time. <Boolean>...
- Page 623 ® R&S ZVA/ZVB/ZVT HCOPy:DESTination <string> | 'MMEM' Example: COP:PAGE:MARG:LEFT 10; RIGHT 10 Set an left and a right margin of 1 cm. HCOPy:PAGE:MARGin:RIGHt <numeric_value> Defines the distance between the right edge of the page and the right edge of the printed information. <numeric_value>...
- Page 624 ® INITiate<Ch>... R&S ZVA/ZVB/ZVT HCOPy:PAGE:WINDow ACTive | ALL | SINGle Defines the number of diagram areas per printed page. ACTive Print only active diagram area. ALL | All diagram areas are printed on one page. SINGle One diagram area per page. *RST value SCPI, Command Types Confirmed, command or query...
- Page 625 ® R&S ZVA/ZVB/ZVT INPut... CALCulate<Ch>:DATA:NSWeep? SDATa, <history_count>. In contrast to all other commands of the analyzer, INITiate<Ch>[:IMMediate] has been implemented for overlapped execution; see Command Synchronization. <Ch> Channel number. If the channel number does not exist the analyzer returns an error message. *RST value –...
- Page 626 ® INSTrument... R&S ZVA/ZVB/ZVT Example: INP2:ATT 10 Set the step attenuator for the wave received at port 2 and for all channels to 10 dB. The waves at the other test ports are not affected. INSTrument... This subsystem identifies and selects particular resources (SCPI: logical instruments) of the analyzer. INSTrument:NSELect <Ch>...
- Page 627 ® R&S ZVA/ZVB/ZVT MEMory... INSTrument[:SELect] CHANNEL1 | CHANNEL2 | CHANNEL3 | CHANNEL4 Selects a channel <Ch> as active channel. To select a channel number > 4 use the generalized command INSTrument:NSELect <Ch>. Parameters Number of the channel to be activated. The channel must be created before using CONFigure:CHANnel<Ch>:STATe Range [def.
- Page 628 ® MEMory... R&S ZVA/ZVB/ZVT MEMory:DEFine '<setup_name>' Creates a new setup <setup_name> using default settings for the traces, channels and diagram areas. The created setup becomes the active setup. '<setup_name>' String parameter to specify the name of the created setup. *RST value –...
- Page 629 ® R&S ZVA/ZVB/ZVT MMEMory... MMEMory... The MMEMory system provides mass storage capabilities for the analyzer. Internal and external mass storage The mass storage of the analyzer may be internal or external. The internal mass storage device can be any section of the internal hard disk (mapped to drive C:\). The external mass storage device can be a floppy disk inserted into the drive at the front panel of the instrument, which is mapped to drive a:\ (see MMEMory:MSIS), a USB memory stick connected to one of the USB ports (mapped to any free drive letter) or a network connection.
- Page 630 ® MMEMory... R&S ZVA/ZVB/ZVT Example: MMEM:CAT? Response: 2056878, 809734144, zvb_quickstart.pdf, , 2056878, MMEMory:CATalog:ALL? [<directory_name>] Returns the contents of the current or of a specified directory and all subdirectories. Use MMEMory:CATalog? to query the contents of the current directory. '<directory_name>' String parameter to specify the directory. If the directory is omitted, the command queries the contents of the current directory, to be queried with MMEMory:CDIRectory? Response...
- Page 631 ® R&S ZVA/ZVB/ZVT MMEMory... MMEMory:COPY '<file_source>','<file_destination>' Copies an existing file to a new file. '<file_source>', String parameters to specify the name of the file to be copied '<file_destination>' and the name of the new file. *RST value – SCPI, Command Confirmed, no query.
- Page 632 ® MMEMory... R&S ZVA/ZVB/ZVT MMEMory:DELete:CORRection <file_name>' Deletes a system error correction data set stored in the cal pool (cal group file). '<file_name>' String parameter to specify the name of the cal group file to be deleted. Cal group files must have the extension *.cal. The directory path must not be specified;...
- Page 633 ® R&S ZVA/ZVB/ZVT MMEMory... MMEMory:LOAD:CKIT:SDATa '<conn_name>', '<ckit_name>', MMTHrough | MFTHrough | FFTHrough | MMLine | MFLine | FFLine | MMATten | MFATten | FFATten | MMSNetwork | MFSNetwork | FFSNetwork | MOPen | FOPen | MSHort | FSHort | MOSHort | FOSHort | MREFlect | FREFlect | MMTCh | FMTCh | MSMatch | FSMatch, '<stdlabel_name>', '<file_name>' [,<port1_no>][,<port2_no>] Loads cal kit data for a specific connector type, cal kit, and calibration standard from a specified Touchstone file, assigning a label for the cal data.
- Page 634 ® MMEMory... R&S ZVA/ZVB/ZVT 'ZV-Z21 typical' denotes the cal kit ZV-Z21 typical. MMEMory:LOAD:CMAP '<file_name>' Loads a color scheme from a specified NWA color scheme file. '<file_name>' String parameter to specify the name and directory of the cal kit file to be loaded.
- Page 635 ® R&S ZVA/ZVB/ZVT MMEMory... Example: MMEM:STOR:CORR 1,'Calgroup1.cal' Copy the current correction data set of channel 1 to a cal group file Calgroup1.cal. CONF:CHAN2:STAT ON; :MMEM:LOAD:CORR 2,'Calgroup1.cal' Apply the stored correction data to channel 2. MMEM:LOAD:CORR:RES 2,'Calgroup1.cal' Undo the previous action: Resolve the link, causing channel 2 to use its previous correction data.
- Page 636 ® MMEMory... R&S ZVA/ZVB/ZVT SCPI, Device-specific, no query. Command Types Example: Assume that the current setup contains two traces named Trc1 and Trc2, respectively, and that limit lines have been defined for Trc1. MMEM:STOR:LIM 'TRC1', 'C:\Rohde&Schwarz\NWA\LIMitLines\Lim_Trc1.limit' Store the limit line definition of Trc1 to a limit line file.
- Page 637 ® R&S ZVA/ZVB/ZVT MMEMory... MMEMory:LOAD:STATe <numeric_value>,'<file_name>' Loads configuration data from a specified setup file and sets the analyzer to the corresponding instrument state. <numeric_value> 1 (the <numeric_value> is used for compatibility with the SCPI standard but is ignored). <file_name> String parameter to specify the name and directory of the setup file to be loaded.
- Page 638 ® MMEMory... R&S ZVA/ZVB/ZVT Example: Assume that the current setup contains a trace named Trc1. :MMEM:STOR:TRAC 'TRC1', 'C:\Rohde&Schwarz\NWA\Traces\Trc1.s1p' Store the current trace data of Trc1 to a trace file. MMEM:LOAD:LIM 'TRC2', 'C:\Rohde&Schwarz\NWA\Traces\Trc1.s1p' Load previously created trace file create a memory trace assigned to Trc2. MMEMory:LOAD:VNETworks<Ch>:BALanced:DEEMbedding<Log_pt>...
- Page 639 ® R&S ZVA/ZVB/ZVT MMEMory... MMEMory:LOAD:VNETworks<Ch>:BALanced:EMBedding<Log_pt> '<file_name>', PMAin | PSECondary Loads data from a specified Touchstone file defining the characteristics of the current embedded balanced port circuit model. A balanced port circuit model involving file import must be selected before using the command. <Ch>...
- Page 640 ® MMEMory... R&S ZVA/ZVB/ZVT SCPI, Device-specific, no query. Command Types Example: CALC:TRAN:VNET:SEND:DEEM:TND FIMP Select the Serial .s2p data, shunt L circuit model. MMEM:LOAD:VNET:SEND:DEEM2 'C:\Rohde&Schwarz\NWA\VNETWORKS\Test.s2p' Load a Touchstone file and assign it to the physical port no. 2. MMEMory:LOAD:VNETworks<Ch>:SENDed:EMBedding<Ph_pt> '<file_name>' Loads data from a specified two-port (*.sp2) Touchstone file defining the characteristics of the current embedded single ended port circuit model.
- Page 641 ® R&S ZVA/ZVB/ZVT MMEMory... Example: MMEM:MDIR 'C:\Documents and Settings\NetworkService\Application Data' Create the specified directory. MMEMory:MOVE '<file_source>','<file_destination>' Copies an existing file to a new file. '<file_source>', String parameters to specify the name of the file to be copied '<file_destination>' and the name of the new file. *RST value –...
- Page 642 ® MMEMory... R&S ZVA/ZVB/ZVT MMEMory:RDIRectory '<directory_name>' Removes an existing directory from the mass memory storage system. '<directory_name>' String parameter to specify the directory. *RST value – SCPI, Command Device-specific, no query. Types Example: MMEM:RDIR 'C:\Documents and Settings\NetworkService\Application Data' Removes the specified directory. MMEMory:STORe:CKIT '<kit_name>', '<file_name>' Stores the data of a calibration kit to a specified file.
- Page 643 ® R&S ZVA/ZVB/ZVT MMEMory... MMEMory:STORe:CMAP '<file_name>' Stores a color scheme to a specified NWA color scheme file. '<file_name>' String parameter to specify the name and directory of the cal kit file to be created. If no path is specified the analyzer uses the current directory, to be queried with MMEMory:CDIRectory?.
- Page 644 ® MMEMory... R&S ZVA/ZVB/ZVT Command Types Example: See MMEMory:LOAD:LIMit. MMEMory:STORe:SEGMent <Ch>,'<file_name>' Saves the sweep segment definition of a specified channel to a sweep segment file. Sweep segments are defined using the [SENSe<Ch>:]SEGMent<Seg>... commands. <Ch> Channel number. '<file_name>' String parameter to specify the name and directory of the created sweep segment file.
- Page 645 ® R&S ZVA/ZVB/ZVT OUTPut<Pt>... MMEMory:STORe:TRACe '<trc_name>','<file_name>'[,UNFormatted | FORMatted] Stores the trace data of a specified trace to a trace file. Traces are created using the CALCulte<Ch>:PARameter:SDEFine... command. *.s<n>p Touchstone files (<n> = 2, 3,, 4) are intended for a complete set of <n>-port S- parameters.
- Page 646 ® OUTPut<Pt>... R&S ZVA/ZVB/ZVT Example: CALC4:PAR:SDEF 'Ch4Tr1', 'A1' Create channel 4 and a trace named Ch4Tr1 to measure the wave quantity a1. CALC4:PAR:SEL 'Ch4Tr1' Select Ch4Tr1 as the active trace. OUTP4:DPOR PORT2 Select drive port 2 for the active trace. OUTPut<Ch>:UPORt[:VALue] <numeric_value>...
- Page 647 ® R&S ZVA/ZVB/ZVT PROGram... Range [def. unit] #B0000 to #B1111 (for setting command), 0 to 15 (query) [–] The transferred values correspond to the following states of the USER CONTROL connector: #B0000 – no signal at any of the four pins 8, 9, 10, 11 #B0001 –...
- Page 648 ® PROGram... R&S ZVA/ZVB/ZVT Example: PROG:SEL:NAME PROG Selects general program execution on the analyzer. MMEM:CDIR 'C:\Program Files\Rohde&Schwarz\Network Analyzer\Bin' Go to the program directory. PROG:EXEC 'iecwin32.exe' Start the application iecwin32. PROG:EXEC:WAIT Lock command execution and manual control of the analyzer until iecwin32 is paused or stopped.
- Page 649 ® R&S ZVA/ZVB/ZVT SENSe SENSe [SENSe<Ch>:]AVERage [SENSe<Ch>:]AVERage... This subsystem sets sweep averaging parameters. The sweep average is a noise-reduction technique which consists of calculating each measurement point as an average of the same measurement point over several consecutive sweeps. [SENSe<Ch>:]AVERage:CLEar Starts a new average cycle, clearing all previous results and thus eliminating their effect on the new cycle.
- Page 650 ® SENSe R&S ZVA/ZVB/ZVT [SENSe<Ch>:]AVERage[:STATe] <Boolean> Enable or disable the sweep average. <Ch> Channel number. <Boolean> ON | OFF - Enables or disables the automatic calculation of the sweep average over the specified number of sweeps ([SENSe<Ch>:]AVERage:COUNt). *RST value SCPI, Confirmed, command or query Command Types...
- Page 651 ® R&S ZVA/ZVB/ZVT SENSe [SENSe<Ch>:]CORRection... This subsystem controls system error correction and recording of correction data. [SENSe<Ch>:]CORRection:CDATa 'DIRECTIVITY' | 'SRCMATCH' | 'REFLTRACK' | 'ISOLATION' | 'LOADMATCH' | 'TRANSTRACK' | 'G11' | ... 'G22' | 'H11' | ... | 'H22', <port1_no>, <port2_no> Writes or reads system error correction data for a specific channel <Ch>, calibration method ([SENSe<Ch>:]CORRection:COLLect:METHod:DEFine), port...
- Page 652 ® SENSe R&S ZVA/ZVB/ZVT Example: See [SENSe<Ch>:]CORRection:COLLect:SAVE:SELected:DEFault. The different calibration types of the analyzer provide the following error terms: Calibration Parameters in Available error type [SENSe<Ch>:]CORRection:COLLect:METHod:DEFin terms (depending on port numbers) One-port REFL, RSHort 'REFLTRACK' normalizatio n (reflection) using an open or a short standard...
- Page 653 ® R&S ZVA/ZVB/ZVT SENSe Depending on the standard type, only a subset of the parameters may be used; see table below. <Ch> Channel number. This suffix is ignored because calibration kits are channel-independent. <std_type> Standard type. For reflection standards, the first character denotes the gender, e.g.: FOPEN, MOPEN: Open (f) or Open (m) standard.
- Page 654 ® SENSe R&S ZVA/ZVB/ZVT <Ch> Channel number. This suffix is ignored because calibration kits are channel-independent. <conn_type> Connector type, one of the following identifiers: N50, N75: N 50 Ω or N 75 Ω connectors PC7, PC35, PC292: PC 7, PC 3.5 or 2.92 mm connectors USER<no>: User-defined connectors UserConn1, UserConn2, SMA: User-defined connector type SMA...
- Page 655 ® R&S ZVA/ZVB/ZVT SENSe <Max_Freq> Max. frequency for which the circuit model Default unit is Hz is valid <El_Length> Electrical length (offset parameter) of the Default unit is m standard <Loss> Loss (offset parameter) of the standard To be specified without unit (implicit unit is dB)
- Page 656 ® SENSe R&S ZVA/ZVB/ZVT MSHort | FSHort Short (m) or short (f) '<Ckit_Name>' <L3> complete parameter list with inductance coefficients, OPEN | SHORT OSHort | MOSHort | Offset short (sexless) or '<Ckit_Name>' <L3> FOSHort offset short (m) or offset complete parameter list with short inductance coefficients,...
- Page 657 ® R&S ZVA/ZVB/ZVT SENSe *RST value – (A *RST does not change the assignment between connector types and calibration kits.) SCPI, Device-specific, command or query Command Types Example: MMEM:LOAD:CKIT 'C:\Rohde&Schwarz\NWA\Calibration\Kits\New_kit.calkit Load previously created file New_kit.calkit from the default cal kit directory. ORR:CKIT:N50:SEL 'New_kit' Assign the imported kit to the N 50 Ω...
- Page 658 ® SENSe R&S ZVA/ZVB/ZVT Example: CORR:CKIT:INST 'C:\Rohde&Schwarz\NWA\Calibration\Kits\ZCAN.ck' Load the previously created ZVR cal kit file ZCAN.ck from the default cal kit directory. MMEM:STOR:CKIT 'ZCAN', 'C:\Rohde&Schwarz\NWA\Calibration\Kits\ZCAN.calkit' Store the imported cal kit data to a NWA cal kit file ZCAN.calkit (assuming that the cal kit name stored in ZCAN.ck reads ZCAN).
- Page 659 ® R&S ZVA/ZVB/ZVT SENSe [SENSe<Ch>:]CORRection:COLLect[:ACQuire]:RSAVe <Boolean> Activates or deactivates the calibration mode where the raw measurement data of the standards is stored after the calibration is completed. The setting is valid for the current calibration, where it overwrites global setting ([SENSe<Ch>:]CORRection:COLLect[:ACQuire]:RSAVe:DEFault).
- Page 660 ® SENSe R&S ZVA/ZVB/ZVT <Ch> Channel number of the calibrated channel. Parameters Standard types: Through, Open, Short, Match, Symmetric Network (NET), Attenuation (ATT), Reflect, Sliding Match (SLIDe), Line. <port_no> Port numbers of the analyzer. For a transmission standard (through, line, attenuation, symmetric network) the input and output port numbers must be specified, for reflection standards, only one port number is required.
- Page 661 ® R&S ZVA/ZVB/ZVT SENSe [SENSe<Ch>:]CORRection:COLLect:AUTO:PORTs '<file_name>',<analyzer_port_no>,<cal_unit_port_no>{,<analyzer_port_no>,<cal _unit_port_no>} Selects and initiates a one-port, two-port, three-port or four-port automatic calibration at arbitrary analyzer and calibration unit ports. Use the simplified command [SENSe<Ch>:]CORRection:COLLect:AUTO if you only connect matching pairs of analyzer and calibration unit ports. <Ch>...
- Page 662 ® SENSe R&S ZVA/ZVB/ZVT <port_no> Port numbers of the analyzer. Note: If the analyzer is set to use the same connectors at all ports ([SENSe<Ch>:]CORRection:COLLect:CONNection<port_no> :PORTs ALL), then a change of a connector type is valid for all ports. The gender of the connectors can still be different. Parameters Connector type and gender of the connectors (omitted for query).
- Page 663 ® R&S ZVA/ZVB/ZVT SENSe [SENSe<Ch>:]CORRection:COLLect:DELete ['<cal_name>'] Deletes system error correction data generated and stored previously. <Ch> Channel number of the calibrated channel. '<cal_name>' Name of the calibration (string parameter) defined together with calibration type [SENSe<Ch>:]CORRection:COLLect:METHod:DEFine. If nothing is specified the analyzer deletes the last system error correction stored by means of [SENSe<Ch>:]CORRection:COLLect:SAVE.
- Page 664 ® SENSe R&S ZVA/ZVB/ZVT [SENSe<Ch>:]CORRection:COLLect:METHod:DEFine '<cal_name>', REFL | RSHort | FOPort | FRTRans | OPTPort | TOSM | TOM | TRM | TRL | TNA | ETOM | ETSM, <port_no>[,<port_no>][,<port_no>][,<port_no>] Selects a one-port, two-port, three-port or four-port calibration type at arbitrary analyzer ports. <Ch>...
- Page 665 ® R&S ZVA/ZVB/ZVT SENSe Example: CORR:COLL:METH REFL1 Select a one-port normalization at port 1 as calibration type. CORR:COLL OPEN1 Measure an open standard connected to port 1 and store the measurement results of this standard. CORR:COLL:SAVE Calculate the system error correction data and apply them to the active channel.
- Page 666 ® SENSe R&S ZVA/ZVB/ZVT Example: CORR:COLL:METH REFL1 Select a one-port normalization at port 1 with an open standard as calibration type. CORR:COLL:SAVE:DEF Calculate a dummy system error correction for the normalization at port 1. The dummy system error correction provides the reflection tracking error term 'SCORR3'.
- Page 667 ® R&S ZVA/ZVB/ZVT SENSe The main purpose of the default correction data set is to provide a dummy system error correction which you can replace with your own, external correction data. You may have acquired the external data in a previous session or even on an other instrument. If you want to use the external correction data on the analyzer, simply generate the default data set corresponding to your port configuration and calibration type and overwrite the default data.
- Page 668 ® SENSe R&S ZVA/ZVB/ZVT Range [def. unit] Ref. impedance: 1µΩ to 1000 MΩ Cutoff frequency: 0 Hz to 1000 GHz *RST value – SCPI, Command Device-specific, command or query Types Example: CORR:CONN 'USERCON',TEM,GEND,1.00000,50 Define a TEM type connector type names USERCON. CORR:CONN? 'USERCON' Query the properties of the configured connector type.
- Page 669 ® R&S ZVA/ZVB/ZVT SENSe Range [def. The error terms consist of dimensionless complex numbers. The unit] parameters must be transferred in full length and have the following meaning: 'SCORR1' – Directivity at port 1 'SCORR2' – Source match at port 1 'SCORR3' –...
- Page 670 ® SENSe R&S ZVA/ZVB/ZVT TOSM TOSM 'SCORR1' to 'SCORR12' (at present the isolation terms 'SCORR4' and 'SCORR10' are not included) TOM, TRM, TOM | TRM | TRL | TNA | ETOM | ETSM 'DIRECTIVITY', TRL, TNA, 'SRCMATCH', 'REFLTRACK', Enhanced, 'LOADMATCH', Enhanced 'TRANSTRACK' (for reading and...
- Page 671 ® R&S ZVA/ZVB/ZVT SENSe [SENSe<Ch>:]CORRection:EDELay<port_no>:DISTance <length> Defines the offset parameter for test port <port_no> as a mechanical length. <Ch> Channel number of the offset-corrected channel <port_no> Port number of the analyzer <length> Mechanical length Range [def. –3.402823466E+038 m to +3.4028234664E+038 m. In contrast to the unit] electrical length ([SENSe<Ch>:]CORRection:EDELay<port_no>:ELENgth), the distance...
- Page 672 ® SENSe R&S ZVA/ZVB/ZVT [SENSe<Ch>:]CORRection:EDELay<port_no>[:TIME] <delay> Defines the offset parameter for test port <port_no> as a delay time. <Ch> Channel number of the offset-corrected channel <port_no> Port number of the analyzer <delay> Delay Range [def. -3.40282346638529E+038 s to +3.40282346638529E+038 s. In contrast unit] to the electrical length ([SENSe<Ch>:]CORRection:EDELay<port_no>:ELENgth), the delay time...
- Page 673 ® R&S ZVA/ZVB/ZVT SENSe [SENSe<Ch>:]CORRection:POWer<port_no>:ACQuire AWAVe | BWAVe | B1 | B2 [,<cal_port>, PORT | GENerator, <source_no>] Selects the wave quantity and the source for the receiver power calibration, starts the calibration sweep, and applies the receiver power correction. The command triggers an event and has no query form. The calibrated waves and the used source are not shown in the Receiver Power Cal dialog.
- Page 674 ® SENSe R&S ZVA/ZVB/ZVT Example: *RST; CORR:POW:ACQ AWAVe,1,PORT,1 Perform a receiver power calibration of the wave a using port 1 as a source port, assuming that the transmitted source power a is correct. No external cabling is needed. CORR:POW:AWAV? Check whether the calibration is applied (the response is 1). CALC:PAR:MEAS 'TRC1', 'A1' Select a as a measured quantity for the default trace.
- Page 675 ® R&S ZVA/ZVB/ZVT SENSe '<wave_string>' Identifier for the calibrated wave: • 'A<n>' or 'AWAV<n>' denote correction data for the reference wave a<n>, where <n> corresponds to the port number. • 'B<n>' or 'BWAV<n>' denote correction data for the reference wave b<n>. <block>...
- Page 676 ® SENSe R&S ZVA/ZVB/ZVT [SENSe<Ch>:]CORRection:POWer<port_no>[:STATe] <Boolean> Enables or disables the receiver power calibration for channel <Ch> and for the received waves b . The command disabled unless received waves have been power calibrated ([SENSe<Ch>:]CORRection:POWer<port_no>:ACQuire BWAVe,...). <Ch> Calibrated channel number <port_no> Calibrated port number <Boolean>...
- Page 677 ® R&S ZVA/ZVB/ZVT SENSe [SENSe<Ch>:]FREQuency... This subsystem sets frequency-related parameters, especially the measurement and display ranges for the different sweep types, and controls the frequency-converting measurement modes (harmonic distortion, mixer mode, etc.). The frequency ranges for the different instrument models are listed below: ZVA8 ZVA24 Start, Stop...
- Page 678 ® SENSe R&S ZVA/ZVB/ZVT [SENSe<Ch>:]FREQuency:CONVersion FUNDamental | HARMonic | SHARmonic | THARmonic | MIXer Enables the measurement of a harmonic or the fundamental signal for channel <Ch>. Enabling a harmonics measurement also resets the measured quantity; see program example below. <Ch>...
- Page 679 ® R&S ZVA/ZVB/ZVT SENSe [SENSe<Ch>:]FREQuency:CONVersion:ARBitrary <numerator>, <denominator>, <offset>, CW | FIXed | SWEep Defines the receiver frequency for frequency-converting measurements. The receiver frequency is either a range (for frequency sweeps) or a CW frequency (for power, time and CW Mode sweeps). The receiver frequency is valid for all ports.
- Page 680 ® SENSe R&S ZVA/ZVB/ZVT [SENSe<Ch>:]FREQuency:CONVersion:AWReceiver[:STATe] <Boolean> Qualifies whether a waves are measured at the source or at the receiver frequency. The setting is relevant for all frequency-converting measurements. <Ch> Channel number. <Boolean> OFF - Measurement at source frequency ON - Measurement at receiver frequency *RST value SCPI, Command Types Device-specific, command or query.
- Page 681 ® R&S ZVA/ZVB/ZVT SENSe [SENSe<Ch>:]FREQuency:CONVersion:HARMonic:RPORt <port_no> Selects the receive port for the harmonic measurement. <Ch> Channel number. <port_no> Integer port number. Range [def. unit] Depending on the analyzer model [–]. *RST value SCPI, Command Types Device-specific, command or query. Example: See [SENSe<Ch>:]FREQuency:CONVersion [SENSe<Ch>:]FREQuency:CONVersion:HARMonic:SPORt <port_no>...
- Page 682 ® SENSe R&S ZVA/ZVB/ZVT <Ch> Channel number. If unspecified the numeric suffix is set to 1. <center_frequency> Center frequency of the sweep. Range [def. unit] Depending on the instrument model [Hz]. The increment (parameters UP or DOWN) is 0.1 kHz. *RST value Center of the analyzer's maximum frequency range: (f SCPI, Command...
- Page 683 ® R&S ZVA/ZVB/ZVT SENSe Example: *RST; FREQ:STAR 0.5E+9; STOP 1E+9 Reset the analyzer (activating a frequency sweep) and set the sweep range between 1 GHz and 1.1 GHz. FREQ:CONV:HARM:ORD 4; SPOR 1; RPOR 2 Configure a 4 harmonic measurement with source port 1 and receive port 2.
- Page 684 ® SENSe R&S ZVA/ZVB/ZVT *RST value The default frequency/frequency range corresponds to the sweep range or CW frequency of the analyzer, i.e. <numerator> = <denominator> = 1 <offset> = 0 Hz Sweep type SWEep – A frequency sweep is active, the command defines a Parameters frequency range.
- Page 685 ® R&S ZVA/ZVB/ZVT SENSe [SENSe<Ch>:]FREQuency:CONVersion:HARMonic:RELative <Boolean> Enables or disables the relative harmonic measurement where the harmonic is divided by the fundamental wave. With enabled relative measurement the analyzer creates a new channel and a new (mathematical) trace; see program example for [SENSe<Ch>:]FREQuency:CONVersion. <Ch>...
- Page 686 ® SENSe R&S ZVA/ZVB/ZVT [SENSe<Ch>:]FREQuency:CONVersion:MIXer:FFIXed <fixed_frequency> Defines a fixed frequency, to be assigned either to the RF, the LO, or the IF signal ([SENSe<Ch>:]FREQuency:CONVersion:MIXer:FIXed RF | LO | IF). <Ch> Channel number. If unspecified the numeric suffix is set to 1. <fixed_frequency>...
- Page 687 ® R&S ZVA/ZVB/ZVT SENSe Example: See SENSe<Ch>:]FREQuency:CONVersion:MIXer:FFIXed [SENSe<Ch>:]FREQuency:CONVersion:MIXer:IFFixed <fixed_frequency> Defines a fixed frequency and assigns it to the IF signal (for alternative commands see example below). <Ch> Channel number. <fixed_frequency> Fixed frequency. Range [def. unit] Depending on the instrument model [Hz]. The increment (parameters UP or DOWN) is 0.1 kHz.
- Page 688 ® SENSe R&S ZVA/ZVB/ZVT <fixed_frequency> Fixed frequency. Range [def. unit] Depending on the instrument model [Hz]. The increment (parameters UP or DOWN) is 0.1 kHz. *RST value Minimum of the analyzer's frequency range, f SCPI, Command Device-specific, command or query. Types Example: *RST;...
- Page 689 ® R&S ZVA/ZVB/ZVT SENSe Example: *RST; FREQ:CONV:MIX:RFF 1 GHz Reset the analyzer and specify a fixed frequency of 1 GHz, to be assigned to the RF signal. FREQ:CONV:MIX:FFIX?; FIX? Query the fixed frequency and the signal assignment using the alternative commands. The response is 1000000000;RF. [SENSe<Ch>:]FREQuency:CONVersion:MIXer:TFRequency DCLower | DCUPper | UCONversion | BAND1 | BAND2 Selects the frequency conversion mode of the IF signal.
- Page 690 ® SENSe R&S ZVA/ZVB/ZVT [SENSe<Ch>:]FREQuency:CW|FIXed <CW_frequency> Defines the fixed (Continuous Wave, CW) frequency for all sweep types operating at fixed frequency (power sweep, time sweep, CW mode sweep). The two command forms FREQ:CW and FREQ:FIX are equivalent. equivalent [SENSe<Ch>:]FREQuency:CW|FIXed SOURce<Ch>:FREQuency<Pt>:CW|FIXed. Source and receiver frequency are equal; the four commands overwrite each other.
- Page 691 ® R&S ZVA/ZVB/ZVT SENSe SWEep Linear or logarithmic frequency sweep, depending on the selected spacing ([SENSe<Ch>:]SWEep:SPACing LINear | LOGarithmic). The frequency range is set via [SENSe<Ch>:]FREQuency:STARt etc. SEGMent Segmented frequency sweep. The sweep range is composed of several continuous frequency ranges or single frequency points defined by means of the commands in the [SENSe<Ch>:]SEGMent<Seg>...
- Page 692 ® SENSe R&S ZVA/ZVB/ZVT [SENSe<Ch>:]FREQuency:SPAN <span> Defines the width of the measurement and display range for a frequency sweep. <Ch> Channel number. <span> Frequency span of the sweep. Range [def. unit] Depending on the instrument model [Hz]. The increment (parameters UP or DOWN) is 0.1 kHz. *RST value Maximum frequency range of the analyzer: f SCPI, Command...
- Page 693 ® R&S ZVA/ZVB/ZVT SENSe [SENSe<Ch>:]FREQuency:STOP <stop_frequency> Defines the stop frequency for a frequency sweep which is equal to the right edge of a Cartesian diagram. <Ch> Channel number. <stop_frequency> Stop frequency of the sweep. Range [def. unit] Depending on the instrument model [Hz]. The increment (parameters UP or DOWN) is 0.1 kHz.
- Page 694 ® SENSe R&S ZVA/ZVB/ZVT *RST value "XFR:S21" ' SCPI, Confirmed, command or query Command Types Example: CALC4:PAR:SDEF "Ch4Tr1", "S11" Create channel 4 and a trace named Ch4Tr1 to measure the input reflection coefficient S11. CALC4:PAR:SEL "Ch4Tr1" Select Ch4Tr1 as the active trace. SENS4:FUNC? Check (query) the sweep type and measurement parameter of the active trace.
- Page 695 ® R&S ZVA/ZVB/ZVT SENSe [SENSe<Ch>:]LO... This subsystem controls the Local Oscillator (LO) amplifiers for the reference and measurement channels. Command tree: [SENSe<Ch>:]LO... :LOMeasure :LOReference [SENSe<Ch>:]LOMeasure<Pt>[:STATe] <Boolean> Switches the Local Oscillator amplifier for the measurement channel b on or off. <Ch> Channel number.
- Page 696 ® SENSe R&S ZVA/ZVB/ZVT [SENSe<Ch>:]LPORt<log_port>:ZCOMmon <real>[, <imaginary>] Specifies the complex common mode reference impedance for the balanced (logical) port numbered <log_port>. <Ch> Channel number. If unspecified the numeric suffix is set to 1. <log_port> Logical port number. The logical ports must be defined using SOURce<Ch>:LPORt<log_port>...
- Page 697 ® R&S ZVA/ZVB/ZVT SENSe Example: *RST; CALC:PAR:DEL 'TRC1' Reset the analyzer and delete the (default) trace for channel no. 1. SOUR:LPOR1 1,2 Combine the physical ports no. 1 and 2 to define the balanced (logical) port no. 1. LPOR1:ZDIF 27, 2 Specify a complex differential mode reference impedance of 27Ω...
- Page 698 ® SENSe R&S ZVA/ZVB/ZVT [SENSe<Ch/Tr>:]PAE:EXPRession C10 | C1 | K101 | CK11 Selects the test model for the PAE measurement. <Ch/Tr> Channel number used to identify the active trace. The DC power is equal to the constant c ([SENSe<Ch/Tr>:]PAE:C) times the DC voltage measured at the DC input DC MEAS 10 V.
- Page 699 ® R&S ZVA/ZVB/ZVT SENSe [SENSe<Ch>:]PORt<phys_port>:ZREFerence <real>[, <imaginary>] Specifies the complex reference impedance for the physical port numbered <phys_port>. <Ch> Channel number. If unspecified the numeric suffix is set to 1. <phys_port> Physical port number. The number of ports depends on the analyzer model.
- Page 700 ® SENSe R&S ZVA/ZVB/ZVT [SENSe<Ch>:]ROSCillator:EXTernal:FREQuency <numeric_value> Specifies or queries the frequency of the external reference oscillator. <Ch> Channel number. This suffix is ignored in the ROSCillator subsystem and can be set to any value. <numeric_value> Frequency of the external reference clock signal. The frequency must be 10 MHz;...
- Page 701 ® R&S ZVA/ZVB/ZVT SENSe [SENSe<Ch>:]POWer:IFGain<Pt>:MEASure AUTO | LNOise | LDIStortion Selects the IF gain in the measurement channel b. <Ch> Channel number. <Pt> Test port number of the analyzer. Parameters AUTO – Adaptive Gain Control according to the RF input level LNOise –...
- Page 702 ® SENSe R&S ZVA/ZVB/ZVT Example: SEGM:INS 1MHZ, 1.5MHZ, 111, -21DBM, 0.5S, 0, 10KHZ Create a sweep segment with a sweep range between 1.0 MHz and 1.5 MHz. SEGM2:ADD Create a second sweep segment. The frequency range of the second segment will be between 1.5 MHz and the maximum frequency of the analyzer.
- Page 703 ® R&S ZVA/ZVB/ZVT SENSe [SENSe<Ch>:]SEGMent<Seg>:BWIDth[:RESolution]:CONTrol <Boolean> Qualifies whether or not the Meas. Bandwidth can be set independently for each sweep segment. <Ch> Channel number 1. <Seg> Sweep segment number. <Boolean> ON: The bandwidth can be set independently for each sweep segment. OFF: The bandwidth in all sweep segments is equal to the bandwidth for unsegmented sweeps set via SENSe<Ch>:BWIDth[:RESolution].
- Page 704 ® SENSe R&S ZVA/ZVB/ZVT <Seg> Sweep segment number. NORMal Use IF filter with normal selectivity and short settling time. HIGH Use IF filter with higher selectivity but larger settling time. *RST value NORMal SCPI, Command Device-specific, command or query Types Example: SEGM:ADD Create a new sweep segment no.
- Page 705 ® R&S ZVA/ZVB/ZVT SENSe Example: SEGM:ADD Create a new sweep segment no. 1 in channel no. 1 using default settings. SEGM OFF Disable the measurement in the created sweep segment. SEGM:COUN? Query the number of segments. [SENSe<Ch>:]SEGMent<Seg>:DEFine <Start>,<Stop>,<Points>,<Power>,<Time>|<Point Delay>,<Unused>,<Meas. Bandwidth>[,<LO>,<Selectivity>] Re-defines a sweep segment with specific channel settings (Insert New Segment).
- Page 706 ® SENSe R&S ZVA/ZVB/ZVT sweep time setting in the segment, which is equivalent to the minimum sweep time possible. <Point Delay> Delay for each partial measurement in the segment. See [SENSe<Ch>:]SEGMent<Seg>:SWEep:DWELl. In the setting [SENSe<Ch>:]SEGMent<Seg>:INSert:SELect SWTime, this parameter is replaced by <Time>. Range [def.
- Page 707 ® R&S ZVA/ZVB/ZVT SENSe DWELl Use meas. delay. *RST value SWTime SCPI, Command Device-specific, command or query. Types Example: SEGM:DEF:SEL DWEL Select the meas. delay to determine the sweep time in a new sweep segment. SEGM:DEF 1MHZ, 1.5MHZ, 111, -21DBM, 0.01S, 0, 10KHZ Create a sweep segment with a sweep range between 1.0 MHz and 1.5 MHz and a meas.
- Page 708 ® SENSe R&S ZVA/ZVB/ZVT [SENSe<Ch>:]SEGMent:DELete:ALL Deletes sweep segments channel (Del. Segments). [SENSe<Ch>:]SEGMent<Seg>:DELete deletes a single segment. <Ch> Channel number. *RST value – SCPI, Command Device-specific, no query. Types Example: SEGM:ADD Create a new sweep segment no. 1 in channel no. 1 using default settings and thus NORMal selectivity.
- Page 709 ® R&S ZVA/ZVB/ZVT SENSe *RST value – SCPI, Command Device specific, query only. Types Example: SEGM:INS 1MHZ, 1.5MHZ, 111, -21DBM, 0.5S, 0, 10KHZ Create a sweep segment with a sweep range between 1.0 MHz and 1.5 MHz. SEGM:FREQ:SPAN? Query the span of the created segment. The response is 5.0000000000E+005.
- Page 710 ® SENSe R&S ZVA/ZVB/ZVT SCPI, Command Device-specific, command or query Types Example: SEGM:INS 1MHZ, 1.5MHZ, 111, -21DBM, 0.5S, 0, 10KHZ Create a sweep segment with a sweep range between 1.0 MHz and 1.5 MHz. SEGM:FREQ:STOP? Query the stop frequency of the created segment. The response is 1.5000000000E+006.
- Page 711 ® R&S ZVA/ZVB/ZVT SENSe Range [def. unit] –40 dBm to +10 dBm. The exact range depends on the analyzer model; refer to the data sheet [dBm]. UP and DOWN increment/decrement the source power in 1-dB steps. <Time> Duration of the sweep in the segment. See [SENSe<Ch>:]SEGMent<Seg>:SWEep:TIME.
- Page 712 ® SENSe R&S ZVA/ZVB/ZVT [SENSe<Ch>:]SEGMent<Seg>:INSert:SELect SWTime | DWELl Defines whether the sweep time of a new segment, i.e. numeric parameter no. 5 of the command [SENSe<Ch>:]SEGMent<Seg>:INSert, is entered as a segment sweep time or as a meas. delay. <Ch> Channel number 1. <Seg>...
- Page 713 ® R&S ZVA/ZVB/ZVT SENSe [SENSe<Ch>:]SEGMent<Seg>:OVERlap <Boolean> Queries whether the analyzer supports overlapping sweep segments. <Ch> Channel number 1. <Seg> Sweep segment number. <Boolean> ON | OFF: No effect. *RST value OFF. If used as a query, the command returns the information that overlapping sweep segments are not supported (OFF).
- Page 714 ® SENSe R&S ZVA/ZVB/ZVT *RST value –10 dBm. SCPI, Command Device-specific, command or query Types Example: SEGM:ADD Create a new sweep segment no. 1 in channel no. 1 using default settings and thus –10 dBm internal source power. SEGM:POW -20 Decrease the power to –20 dBm.
- Page 715 ® R&S ZVA/ZVB/ZVT SENSe Example: SEGM:ADD Create a new sweep segment no. 1 in channel no. 1 using default settings and thus –10 dBm internal source power. SEGM:POW -20 Decrease the power to –20 dBm. SEGM:POW:CONT OFF Couple the powers in all segments and reset the power in segment no. 1 to the initial value.
- Page 716 ® SENSe R&S ZVA/ZVB/ZVT Range [def. unit] 1 to 2147483647. [1] 1 is allowed if start and stop frequencies are equal. *RST value SCPI, Command Device-specific, command or query Types Example: SEGM:ADD Create a new sweep segment no. 1 in channel no. 1 using default settings and thus 51 sweep points.
- Page 717 ® R&S ZVA/ZVB/ZVT SENSe SCPI, Command Device-specific, command or query Types Example: SEGM:ADD Create a new sweep segment no. 1 in channel no. 1 using default settings and thus –10 dBm internal source power. SEGM:SWE:TIME 0.1 Increase the segment sweep time to 0.1 s. [SENSe<Ch>:]SEGMent<Seg>:SWEep:TIME:CONTrol <Boolean>...
- Page 718 ® SENSe R&S ZVA/ZVB/ZVT [SENSe<Ch>:]SEGMent<Seg>:SWEep:DWELl <numeric_value> Defines the delay time for each partial measurement in sweep segment no. <Seg> (Meas. Delay). If coupling of the segments is switched on ([SENSe<Ch>:]SEGMent<Seg>:SWEep:DWELl:CONTrol ON) the delay is valid for all sweep segments in the current channel. <Ch>...
- Page 719 ® R&S ZVA/ZVB/ZVT SENSe Example: SEGM:ADD Create a new sweep segment no. 1 in channel no. 1 using default settings and thus 0 s meas. delay. SEGM:SWE:DWELl 0.1 Increase the meas. delay to 0.1 s. SEGM:SWE:DWELl:CONT OFF Couple the meas. delay in all segments and reset the delay in segment no.
- Page 720 ® SENSe R&S ZVA/ZVB/ZVT Example: *RST; CALC:PAR:MEAS 'TRC1', 'a1D1RMS' Select the wave quantity a1 for the default trace and activate the RMS detector. SWE:DET:TIME 1 Specify an observation time of 1 s at each sweep points. [SENSe<Ch>:]SWEep:DWELl <delay> Defines the Meas. Delay time for each partial measurement. Setting a delay disables the automatic calculation of the (minimum) sweep time;...
- Page 721 ® R&S ZVA/ZVB/ZVT SENSe Example: FUNC "XFR:POW:S12" Activate a frequency sweep and select the S-parameter S12 as measured parameter for channel and trace no. 1. SWE:TIME? Query total sweep time. SWE:POIN 2010 Multiply the (default) number of points by 10. SWE:TIME? Query total sweep time again.
- Page 722 ® SENSe R&S ZVA/ZVB/ZVT 1 ... Test port number of the analyzer, 1 to 2, 3 or 4, depending on the analyzer model. *RST value 1 (test port 1) SCPI, Command Device-specific, with query. Types Example: CALC4:PAR:SDEF "Ch4Tr1", "A1" Create channel 4 and a trace named Ch4Tr1 to measure the wave quantity a1.
- Page 723 ® R&S ZVA/ZVB/ZVT SENSe [SENSe<Ch>:]SWEep:TIME <duration> Sets the duration of the sweep (Sweep Time). Setting a duration disables the automatic calculation of the (minimum) sweep time; see [SENSe<Ch>:]SWEep:TIME:AUTO. Note: The sweep duration is ignored for the sweep types Time and CW Mode. <Ch>...
- Page 724 ® SENSe R&S ZVA/ZVB/ZVT Example: SWE:TIME 1 Set a total sweep time of 1 s. SWE:TIME:AUTO? A query returns the value 1. [SENSe<Ch>:]SWEep:TYPE LINear | LOGarithmic | SEGMent | POWer | CW Selects the sweep type, i.e. the sweep variable (frequency/power/time) and the position of the sweep points across the sweep range.
- Page 725 ® R&S ZVA/ZVB/ZVT SOURce<Ch>:... SOURce<Ch>:... This subsystem controls the frequency and power of the internal signal source, configures and starts the source power calibration, and provides output port settings. Note: The SOURce<Ch>:POWer... subsystem comprises port-specific and general settings. Port- specific settings are valid for the port specified by the numeric suffix <Pt> (...:POWER<Pt>:...). General settings are valid for all test ports of the analyzer;...
- Page 726 ® SOURce<Ch>:... R&S ZVA/ZVB/ZVT SOURce<Ch>:FREQuency<Pt>:CONVersion:ARBitrary:IFRequency <numerator>, <denominator>, <offset>, CW | FIXed | SWEep Defines the port-specific source frequency for frequency-converting measurements. The source frequency is either a range (for frequency sweeps) or a CW frequency (for power, time and CW Mode sweeps).
- Page 727 ® R&S ZVA/ZVB/ZVT SOURce<Ch>:... SOURce<Ch>:]FREQuency:CONVersion:MIXer:FUNDamental RF | LO Selects the mixer input signal which is at the fundamental power (channel power, to be defined by means SOURce<Ch>:POWer<Pt>:STARt, SOURce<Ch>:POWer<Pt>:STOP, SOURce<Ch>:POWer<Pt>[:LEVel][:IMMediate][:AMPlitude]). <Ch> Channel number. Parameters RF – mixer input signal LO – local oscillator signal *RST value SCPI, Command Types Device-specific, command or query.
- Page 728 ® SOURce<Ch>:... R&S ZVA/ZVB/ZVT <log_port1>, First and last logical port number in the port group. The port group <log_port2> contains all port with numbers between <log_port1> and <log_port2>. The command generates an error message if only one parameter is transferred. Both parameters must be omitted if the command is used as a query.
- Page 729 ® R&S ZVA/ZVB/ZVT SOURce<Ch>:... SOURce<Ch>:LPORt<log_port> <phys_port1>,<phys_port2> Defines a balanced port numbered <log_port>, combining two physical ports <phys_port1> and <phys_port2>. A balanced port configuration generally introduces a new set of mixed mode measured quantities. Therefore the traces must be redefined as a balanced port is created. The easiest way to avoid any inconsistencies is to delete all traces of the active channel before defining a balanced port.
- Page 730 ® SOURce<Ch>:POWer... R&S ZVA/ZVB/ZVT SOURce<Ch>:LPORt<log_port>:CLEar [ALL] Dissolves a balanced port numbered <log_port> or all balanced ports. <Ch> Channel number. <log_port> Logical port number used to number balanced ports. If unspecified the numeric suffix is set to 1. Range [def. Range according to the current port configuration unit] (SOURce<Ch>:LPORt<log_port>).
- Page 731 ® R&S ZVA/ZVB/ZVT SOURce<Ch>:POWer... SCPI, Command Confirmed, command or query Types Example: FUNC "XFR:POW:RAT B1, A2" Activate a frequency sweep and select the ratio B1/A2 as measured parameter for channel and trace no. 1. SOUR:POW -6 Set the internal source power for channel 1 to -6 dBm. SOUR:POW2:SLOP 10 Set the power slope factor for the wave transmitted at port 2 to 10 dB/GHz.
- Page 732 ® SOURce<Ch>:POWer... R&S ZVA/ZVB/ZVT SOURce<Ch>:POWer<Pt>[:LEVel][:IMMediate]:SLOPe <numeric_value> Defines a linear factor to modify the internal source power at port <Pt> as a function of the stimulus frequency. The value can be set for frequency sweeps only. <Ch> Channel number. <Pt> Test port number of the analyzer. <numeric_value>...
- Page 733 ® R&S ZVA/ZVB/ZVT SOURce<Ch>:POWer... <numeric_value> Start power of the sweep. Range [def. unit] –40 dBm to +9.99 dBm. The exact range depends on the analyzer model; refer to the data sheet [dBm]. UP and DOWN increment/decrement the source power in 1-dB steps. *RST value –25 dBm SCPI, Command...
- Page 734 ® SOURce<Ch>:POWer:CORRection... R&S ZVA/ZVB/ZVT <numeric_value> Stop power of the sweep. Range [def. unit] –39.99 dBm to +10 dBm. The exact range depends on the analyzer model; refer to the data sheet [dBm]. UP and DOWN increment/decrement the source power in 1-dB steps. *RST value 0 dBm SCPI, Command...
- Page 735 ® R&S ZVA/ZVB/ZVT SOURce<Ch>:POWer:CORRection... <port_number> Analyzer port number of generator number, if PORT or GENerator is the first parameter. Range [def. unit] 1 to port number of the analyzer/number of external generators [–] *RST values – (for all parameters) SCPI, Command Device-specific, no query Types Example:...
- Page 736 ® SOURce<Ch>:POWer:CORRection... R&S ZVA/ZVB/ZVT Example: SOUR:POW3:CORR:COLL BSEN Perform a source power calibration for port 3 using power meter no. 2. SOUR:POW:CORR:PMET:ID 2, Select power meter no. 2. SOUR:POW:CORR:ACQ PORT,3 Perform a source power calibration for port 3 using the previously selected power meter no.
- Page 737 ® R&S ZVA/ZVB/ZVT SOURce<Ch>:POWer:CORRection... SOURce<Ch>:POWer<Pt>:CORRection:COLLect:AVERage:NTOLerance <tolerance> Specifies the maximum deviation of the measured power from the target power of the calibration. <Ch> Calibrated channel number <Pt> Calibrated port number. This parameter is ignored; the tolerance value is valid for all sources. <tolerance>...
- Page 738 ® SOURce<Ch>:POWer:CORRection... R&S ZVA/ZVB/ZVT Example: *RST; :SWE:POIN 10 Reset the instrument and reduce the number of sweep points to 10. SOUR:POW:CORR:ACQ PORT,1 Perform a source power calibration using port 1 as a source port. SOUR:POW:CORR:DATA? 'A1' Query the correction values. The analyzer returns 10 comma- separated real numbers.
- Page 739 ® R&S ZVA/ZVB/ZVT SOURce<Ch>:POWer:CORRection... SOURce<Ch>:POWer<Pt>:CORRection:MIXer:LO[:ACQuire] Starts the LO source calibration (3 power calibration step for mixer measurements), stores and applies calibration data. external power meter selected SOURce<Ch>:POWer<Pt>:CORRection:PMETer:ID. The LO source calibration is independent of the RF source and IF receiver calibration; see description of the mixer calibration procedure.
- Page 740 ® SOURce<Ch>:POWer:CORRection... R&S ZVA/ZVB/ZVT Example: Set up a mixer measurement; see e.g. example for [SENSe<Ch>:]FREQuency:CONVersion:MIXer:TFRequency. SOUR:POW:CORR:PMET:ID 1 Select power meter no. 1 (previously configured in the External Power Meters dialog and properly connected) for the RF source calibration. SOUR:POW:CORR:MIX:RF Start the RF source calibration. Change the test setup for the IF receiver calibration (see mixer calibration procedure).
- Page 741 ® R&S ZVA/ZVB/ZVT SOURce<Ch>:POWer:CORRection... SCPI, Command Device-specific, command or query Types Example: See SOURce<Ch>:POWer<Pt>:CORRection[:ACQuire]. SOURce<Ch>:POWer<Pt>:CORRection:PMETer:ID <pmeter_no> Selects an external power meter for the source power calibration. The command cannot be used unless a power meter is connected via GPIB bus, USB or LAN interface and configured in the External Power Meters dialog.
- Page 742 ® SOURce<Ch>:POWer... R&S ZVA/ZVB/ZVT SOURce<Ch>:POWer... This subsystem controls the power of the internal signal source and provides output port settings. Note: The SOURce<Ch>:POWer... subsystem comprises port-specific and general settings. Port-specific settings are valid for the port specified by the numeric suffix <Pt> (...:POWER<Pt>:...).
- Page 743 ® R&S ZVA/ZVB/ZVT SOURce<Ch>:POWer... SOURce<Ch>:POWer<Pt>[:LEVel][:IMMediate]:OFFSet <numeric_value>, ONLY | CPADd Defines a port-specific source power or a power offset relative to the channel power (SOURce<Ch>:POWer<Pt>[:LEVel][:IMMediate][:AMPlitude]). An additional Cal Power Offset can be defined via SOURce<Ch>:POWer<Pt>:CORRection:LEVel:OFFSet. <Ch> Channel number. <Pt> Test port number of the analyzer. <numeric_value>...
- Page 744 ® SOURce<Ch>:POWer... R&S ZVA/ZVB/ZVT SOURce<Ch>:POWer<Pt>:PERManent[:STATe] <Boolean> Defines whether the source power is permanently on. <Ch> Channel number. <Pt> Test port number of the analyzer. <Boolean> ON - Power at port <Pt> is permanently on OFF - Power is only on for the partial measurements that require the port as a drive port.
- Page 745 ® R&S ZVA/ZVB/ZVT SOURce<Ch>:POWer... Note: If the start power entered is greater than the current stop power (SOURce<Ch>:POWer<Pt>:STOP), the stop power is set to the start power plus the minimum power span of 0.01 dB. SOURce<Ch>:POWer<Pt>:STATe <Boolean> Turns the RF source power at a specified test port on or off. <Ch>...
- Page 746 ® STATus... R&S ZVA/ZVB/ZVT Note: If the stop power entered is greater than the current start power (SOURce<Ch>:POWer<Pt>:STARt), the start power is set to the stop power minus the minimum power span of 0.01 dB. STATus... This subsystem controls the Status Reporting System. Note that *RST does not influence the status registers.
- Page 747 ® R&S ZVA/ZVB/ZVT STATus... STATus:QUEStionable:ENABle Sets the enable mask which allows true conditions in the EVENt part of the QUEStionable register to be reported in the summary bit. If a bit is 1 in the enable register and its associated event bit transitions to true, a positive transition will occur in the summary bit (bit 3 of the STatus Byte).
- Page 748 ® STATus... R&S ZVA/ZVB/ZVT <NRf> 0 to 65535 (decimal representation) – (see also Reset Values of the Status Reporting System) *RST value SCPI, Command Types Confirmed, command or query Example: STAT:QUES:PTR 1024 Set bit no. 10 of the QUEStionable:PTRansition register STATus:QUEStionable:LIMit<1|2>:CONDition? Returns the contents of the CONDition part of the QUEStionable:LIMit<1|2>...
- Page 749 ® R&S ZVA/ZVB/ZVT STATus... Example: STAT:OPER? Query the EVENt part of the OPERation register to check whether an event has occurred since the last reading. STATus:QUEStionable:LIMit<1|2>:NTRansition Sets the negative transition filter. Setting a bit causes a 1 to 0 transition in the corresponding bit of the associated condition register to cause a 1 to be written in the associated bit of the corresponding event register.
- Page 750 ® SYSTem... R&S ZVA/ZVB/ZVT Example: STAT:QUE? Query the oldest entry in the error queue. 0,"No error" is returned if the error queue is empty. SYSTem... This subsystem collects the functions that are not related to instrument performance, such as function for general housekeeping and function related to global configurations.
- Page 751 ® R&S ZVA/ZVB/ZVT SYSTem... SYSTem:COMMunicate:RDEVice:GENerator<gen_no>:DEFine '<gen_name>', '<driver>', '<interface>', '<address>'[, <fast_sweep>, <10_MHz_Ref>] Configures an external generator and adds it to the list of available generators. <gen_no> Number of the configured generator. Generators must be numbered in ascending order, starting with 1. If a number is re-used, the previous generator configuration is overwritten.
- Page 752 ® SYSTem... R&S ZVA/ZVB/ZVT SCPI, Device-specific, no query Command Types Example: See SYSTem:COMMunicate:RDEVice:GENerator<gen_no>:DEFine SYSTem:COMMunicate:RDEVice:PMETer<pmeter_no>:DEFine '<pmeter_name>', '<driver>', '<interface>', '<address>' Configures an external power meter and adds it to the list of available power meters. <pmeter_no> Number of the configured power meter. Power meters must be numbered in ascending order, starting with 1.
- Page 753 ® R&S ZVA/ZVB/ZVT SYSTem... SYSTem:COMMunicate:RDEVice:PMETer<pmeter_no>:DELete Clears the configuration table for external power meters. <pmeter_no> Number of the configured power meter. This number is ignored, the command clears all entries in the configuration table. SCPI, Device-specific, no query Command Types Example: See SYSTem:COMMunicate:RDEVice:PMETer<pmeter_no>:DEFine SYSTem:DATA:SIZE ALL | AUTO Defines the block size for the data transfer between the instrument hardware and the software.
- Page 754 ® SYSTem... R&S ZVA/ZVB/ZVT *RST value – *RST does not affect the color settings; see also description of the Preset command. SCPI, Command Device-specific, command or query Types Example: SYST:DISP:COL LBAC Select a light background, e.g. to generate color hardcopies. SYSTem:DISPlay:UPDate <Boolean>...
- Page 755 ® R&S ZVA/ZVB/ZVT SYSTem... SYSTem:ERRor:ALL? Queries and at the same time deletes all entries in the error queue. The entries consist of an error number and a short description of the error. Positive error numbers are instrument-dependent. Negative error numbers are reserved by the SCPI standard; see section Error Messages.
- Page 756 ® SYSTem... R&S ZVA/ZVB/ZVT SYSTem:PRESet Performs a preset of all instrument settings (i.e. all open setups) or of the active setup, depending on the SYSTem:PRESet:SCOPe settings. The command is equivalent to *RST and to the action of the PRESET key on the front panel. *RST value –...
- Page 757 ® R&S ZVA/ZVB/ZVT SYSTem... SCPI, Command Confirmed, no query Types Example: INIT:CONT OFF Activate single sweep mode. SYST:SETT:UPD ONCE Update the settings made during the current single sweep period. SYSTem:SOUNd:ALARm[:STATe] <Boolean> Switches alarm sounds on or off. <Boolean> OFF - Alarm sounds switched off ON - Alarm sounds switched on *RST value SCPI, Command Types...
- Page 758 ® TRACe... R&S ZVA/ZVB/ZVT TRACe... This subsystem handles active trace data and trace data stored in the analyzer's internal memory. Trace data is transferred in either ASCII or block data (REAL) format, depending on the FORMat[:DATA] setting. If the block data format is used, it is recommended to select EOI as receive terminator (SYSTem:COMMunicate:GPIB[:SELF]:RTERminator EOI).
- Page 759 ® R&S ZVA/ZVB/ZVT TRACe... *RST value – SCPI, Command Device-specific, no query Types Example: SWE:POIN 20 Create a trace with 20 sweep points, making the created trace the active trace of channel 1 (omitted optional mnemonic SENSe1). TRAC:COPY "Mem_Pt20",CH1DATA Copy the current state of the created trace to a memory trace named "Mem_Pt20".
- Page 760 ® TRACe... R&S ZVA/ZVB/ZVT *RST value – SCPI, Command Confirmed, no query Types Example: *RST; SWE:POIN 20 Create a trace with 20 sweep points, making the created trace the active trace of channel 1 (omitted optional mnemonic SENSe1). TRAC:COPY "Mem_Pt20",CH1DATA Copy the current state of the created trace to a memory trace named "Mem_Pt20".
- Page 761 ® R&S ZVA/ZVB/ZVT TRACe... SCPI, Command Confirmed, no query Types Example: *RST; SWE:POIN 20 Create a trace with 20 sweep points, making the created trace the active trace of channel 1 (omitted optional mnemonic SENSe1). CALC:MATH:SDEF 'Trc1 / 2'; CALC:MATH:STAT ON Define a mathematical trace, dividing the data trace by 2.
- Page 762 ® TRIGger<Ch>... R&S ZVA/ZVB/ZVT TRACe[:DATA]:STIMulus[:ALL]? CH1DATA | CH2DATA | CH3DATA | CH4DATA | CH1MEM | CH2MEM | CH3MEM | CH4MEM | MDATA1 | MDATA2 | MDATA3 | MDATA4 | MDATA5 | MDATA6 | MDATA7 | MDATA8 Returns the stimulus values of the active data trace or memory trace (see trace names). To read the stimulus values of an arbitrary data or memory trace, use CALCulate<Ch/Tr>:DATA:STIMulus? <Response>...
- Page 763 ® R&S ZVA/ZVB/ZVT TRIGger<Ch>... TRIGger<Ch>[:SEQuence]:LINK 'POINT' | 'SWEEP' | 'PPOINT' | 'SEGMENT' Selects the Triggered Meas. Sequence. The identifier for the sequence is a string variable. <Ch> Channel number. 'SWEep' | Trigger event starts an entire sweep. 'SEGMent' | Trigger event starts a sweep segment, if segmented frequency sweep is active (see example below).
- Page 764 ® TRIGger<Ch>... R&S ZVA/ZVB/ZVT MANual Trigger signal generated by pressing the Manual Trigger softkey. *RST value IMMediate SCPI, Confirmed, command or query. Command Types Example: TRIG:SOUR MAN Activate manual trigger mode. The analyzer starts the next sweep when the Manual Trigger softkey is pressed. TRIGger<Ch>[:SEQuence]:TIMer <numeric_value>...
- Page 765 ® R&S ZVA/ZVB/ZVT Program Examples Contents of Chapter 7 7 Program Examples....................1 Traces ..............................1 Calibration............................2 Modeling a Max Hold Function ......................4 1145.1084.12 I-7.1...
- Page 767 ® R&S ZVA/ZVB/ZVT Program Examples Program Examples This chapter contains detailed program examples on the following subjects: • Traces, Channels and Diagram Areas • Calibration The syntax and use of all SCPI commands is described in the SCPI Reference chapter. For a general introduction to remote control of the analyzer refer to chapter Remote Control.
- Page 768 ® Program Examples R&S ZVA/ZVB/ZVT // Select active traces for the new created channels 1 - 4 :CALCulate1:PARameter:SELect 'Trc1' :CALCulate2:PARameter:SELect 'Trc2' :CALCulate3:PARameter:SELect 'Trc3' :CALCulate4:PARameter:SELect 'Trc4' // Create diagrams 1 - 4 :DISPlay:WINDow1:STATe ON :DISPlay:WINDow2:STATe ON :DISPlay:WINDow3:STATe ON :DISPlay:WINDow4:STATe ON // Assign trace 'Trc1' - 'Trc4' to a window = diagram area 1 - 4 :DISPlay:WINDow1:TRACe1:FEED 'Trc1' :DISPlay:WINDow2:TRACe1:FEED 'Trc2' :DISPlay:WINDow3:TRACe1:FEED 'Trc3'...
- Page 769 ® R&S ZVA/ZVB/ZVT Program Examples // Don't save the cal standard measurements with apply cal, i.e. with the commands // :SENSE1:CORRECTION:COLLECT:SAVE or // :SENSe1:CORRection:COLLect:SAVE:SELected // Instead, use the global, chanel-independent setting: :SENSe:CORRection:COLLect:ACQuire:RSAVe:DEFault OFF // Full one port = OSM // Select cal procedure :SENSe1:CORRection:COLLect:METHod:DEFine 'Test SFK OSM 1', FOPORT, 1 // Measure Standards...
- Page 770 ® Program Examples R&S ZVA/ZVB/ZVT :MMEMORY:STORE:CORRection 1, 'OSM1 TOSM12.cal' // load cal file from calibration file pool :MMEMORY:LOAD:CORRection 1, 'OSM1 TOSM12.cal' Modeling a Max Hold Function The following example shows you how to emulate a max hold function. // Reset the analyzer *RST :DISPlay:WINDow1:TITLe:DATA 'Max Hold Function Emulation' // Create a trace with the last extremum as memory trace.
- Page 771 ® R&S ZVA/ZVB/ZVT HW Interfaces Contents of Chapter 8 8 Maintenance, Hardware Interfaces ..............8.1 Maintenance............................8.1 Storing and Packing .........................8.1 Front Panel Connectors........................8.2 Test Ports ..........................8.2 USB Connector ........................8.2 Ground Connector........................8.3 Rear Panel Connectors ........................8.4 AUX ............................8.4 LAN1 / LAN 2 ...........................8.4 USB ............................8.4 10 MHz REF..........................8.5 DC MEAS ..........................8.5...
-
Page 773: Maintenance, Hardware Interfaces
® R&S ZVA/ZVB/ZVT Maintenance 8 Maintenance, Hardware Interfaces This chapter contains maintenance instructions and provides a detailed description of the hardware interfaces and connectors of the instrument. For a graphical overview of the front panel and rear panel connectors and their use refer to chapter Preparing for Use: Maintenance The network analyzer does not require any special maintenance. -
Page 774: Front Panel Connectors
® Front Panel Connectors R&S ZVA/ZVB/ZVT Front Panel Connectors Test Ports N-connectors, numbered 1 to 4 (for four-port instruments). The test ports serve as outputs for the RF stimulus signal and as inputs for the measured RF signals from the DUT (response signals). •... -
Page 775: Ground Connector
® R&S ZVA/ZVB/ZVT Front Panel Connectors Ground Connector Connector providing the ground of the analyzer's supply voltage. Caution! Electrostatic discharge (ESD) may cause damage to the electronic components of the DUT and the analyzer. Use the wrist strap and cord supplied with the instrument to connect yourself to the GND connector. -
Page 776: Rear Panel Connectors
® Rear Panel Connectors R&S ZVA/ZVB/ZVT Rear Panel Connectors Coaxial bidirectional auxiliary connector that can be wired as needed. The AUX connector is not fitted on standard instruments. Pin No. Name Input (I) or Voltage Range Function Output (O) or Bidirectional (B) Center conductor AUX I or O or B... -
Page 777: 10 Mhz Ref
® R&S ZVA/ZVB/ZVT Rear Panel Connectors The length of passive connecting USB cables should not exceed 1 m. The maximum current per USB port is 500 mA. Pin No. Name Input (I) or Voltage Range Function Output (O) or Bidirectional (B) +5.2VD –... -
Page 778: Port Bias
® Rear Panel Connectors R&S ZVA/ZVB/ZVT Pin No. Name Input (I) or Function Output (O) GNDA Analog ground GNDA Analog ground DCMEAS1VPOS Positive 1 V or 10 V DC input DCMEAS10VPOS (see data sheet) DCMEAS1VNEG Positive 1 V or 10 V DC input DCMEAS10VNEG (see data sheet) PORT BIAS... -
Page 779: Cascade
® R&S ZVA/ZVB/ZVT Rear Panel Connectors Pin No. Name Input (I) or Voltage Range Function Output (O) 75 Ω shielded Red signal 75 Ω shielded GREEN Green signal 75 Ω shielded BLUE Blue signal – – – GNDA – Analog ground GNDA –... -
Page 780: Ext Trigger
® Rear Panel Connectors R&S ZVA/ZVB/ZVT Pin No. Name Input (I) or Function Output (O) DRIVE PORT 2 Test port 2 is source port (drive port) DRIVE PORT 3 Test port 3 is source port (drive port) DRIVE PORT 4 Test port 4 is source port (drive port) GNDD Digital ground... - Page 781 ® R&S ZVA/ZVB/ZVT Rear Panel Connectors Always use a shielded cable to connect the GPIB bus interfaces. Characteristics of the interface • 8-it parallel data transfer • Bidirectional data transfer • Three-line handshake • High data transfer rate of max. 1 MByte/s •...
-
Page 782: Interface Functions
® Rear Panel Connectors R&S ZVA/ZVB/ZVT NRFD (Not Ready For Data):active LOW signals that one of the connected devices is not ready for data transfer. NDAC (Not Data Accepted):active LOW signals that the instrument connected is accepting the data on the data bus. The analyzer provides the following functions to communicate via GPIB bus: •... -
Page 783: Instrument Messages
® R&S ZVA/ZVB/ZVT Rear Panel Connectors Addressed Commands Addressed commands are encoded in the range 00 through 0F hex. They are only effective for instruments addressed as listeners. Command QuickBASIC Effect on the instrument command IBTRG (device%) Triggers a previously active device function (e.g. a sweep). The effect of the (Group Execute command is the same as with that of a pulse at the external trigger signal input. - Page 784 ® Rear Panel Connectors R&S ZVA/ZVB/ZVT Status word ibsta All functions send back a status word that provides information on the status of the RSIB interface. The following bits are defined: Description name code 8000 This bit is set if an error occurs during a function call. If this bit is set, iberr contains an error code which specifies the error.
-
Page 785: Description Of Interface Functions
® R&S ZVA/ZVB/ZVT Rear Panel Connectors Overview of Interface Functions The library functions are adapted to the interface functions of National Instruments for GPIB programming. The functions supported by the libraries are listed in the following table. Function Description RSDLLibfind() Provides a handle for access to a device. - Page 786 ® Rear Panel Connectors R&S ZVA/ZVB/ZVT Parameter: Device handle String sent to the device. Example: RSDLLibwrt(ud, "SENS:FREQ:STAR?", ibsta, iberr, ibcntl) This function allows to send setting and query commands to the measuring instruments. Whether the data is interpreted as a complete command can be set using the function RSDLLibeot(). RSDLLilwrt This function sends Cnt bytes to a device with the handle ud.
- Page 787 ® R&S ZVA/ZVB/ZVT Rear Panel Connectors VB format: Function RSDLLibrd (ByVal ud%, ByVal Rd$, ibsta%, iberr%, ibcntl&) As Integer C format: short WINAPI RSDLLibrd( short ud, char far *Rd, short far *ibsta, short far *iberr, unsigned long far *ibcntl ) C format (Unix): short RSDLLibrd( short ud, char *Rd, short *ibsta, short *iberr, unsigned long *ibcntl Parameter:...
- Page 788 ® Rear Panel Connectors R&S ZVA/ZVB/ZVT File into which the read data is written. file Example: RSDLLibrdf (ud, "c:\db.sav", ibsta, iberr, ibcntl) The file name may as well include a drive or path specification. RSDLLibtmo This function defines the timeout for a device. The default value for the timeout is set to 5 seconds. VB format: Function RSDLLibtmo (ByVal ud%, ByVal tmo%, ibsta%, iberr%, ibcntl&) As Integer C format:...
- Page 789 ® R&S ZVA/ZVB/ZVT Rear Panel Connectors next access to the instrument by means of one of the functions of the library the instrument is switched again to the REMOTE state. RSDLLibeot This function enables or disables the END message after write operations. VB format: Function RSDLLibeot (ByVal ud%, ByVal v%, ibsta%, iberr%, ibcntl&) As Integer C format:...
- Page 790 ® Rear Panel Connectors R&S ZVA/ZVB/ZVT RSDLLibonl This function switches the device to 'online' or 'offline' mode. When it is switched to ‘offline’ mode, the interface is released and the device handle becomes invalid. By calling RSDLLibfind again, the communication is set up again. VB format: Function RSDLLibonl (ByVal ud%, ByVal v%, ibsta%, iberr%, ibcntl&) As Integer C format:...
- Page 791 ® R&S ZVA/ZVB/ZVT Rear Panel Connectors Reference to an integer value in which the library returns the result status of the SRQ bit. 0 - No SRQ has occurred during the timeout 1 - SRQ has occurred during the timeout Beispiel: RSDLLWaitSrq( ud, result, ibsta, iberr, ibcntl );...
- Page 793 ® R&S ZVA/ZVB/ZVT Measurement Examples Contents of Chapter 9 9 Measurement Examples ..................9.1 Simple Measurement Tasks ......................9.1 Screen Control .........................9.1 Display Configuration .......................9.2 Data Transfer ...........................9.2 Setting up a Sweep ........................9.3 Optimization............................9.5 Optimizing the Measurement Speed..................9.5 Calibrating a Measurement Channel ..................9.6 Trace Evaluation..........................9.8 Time Domain Measurements ....................9.8 Trace Statistics.........................9.8...
-
Page 795: Simple Measurement Tasks
® R&S ZVA/ZVB/ZVT Simple Measurement Tasks 9 Measurement Examples This chapter provides examples for typical measurement tasks to be performed on the network analyzer: To make yourself familiar with the instrument, use the simple measurement examples outlined in the Getting Started chapter. For a systematic explanation of all menus, functions and parameters and background information refer to the Manual Control reference. -
Page 796: Display Configuration
® Simple Measurement Tasks R&S ZVA/ZVB/ZVT Display Configuration The analyzer provides various tools that you can use to customize the diagram areas and control elements. The following examples show how to change the display colors. To select or define a color scheme for the diagrams and their display elements... 1. -
Page 797: Setting Up A Sweep
® R&S ZVA/ZVB/ZVT Simple Measurement Tasks 4. Select a File name and click Save to store the data to the disk and close the Save As dialog. The default extension for setup files (*.zvx) is appended automatically. To load a setup stored on a floppy disk... 1. - Page 798 ® Simple Measurement Tasks R&S ZVA/ZVB/ZVT To Set up a Segmented Frequency Sweep... 1. Press the Sweep key in the Channel keypad or click Channel - Sweep to access the Sweep submenu. 2. Click Define Segments to call up the dialog defining the individual sweep segments. Proceed as described in Define Segments to customize your sweep range.
-
Page 799: Optimization
® R&S ZVA/ZVB/ZVT Optimization To Set up a CW Mode Sweep... 1. Press the Sweep key in the Channel keypad or click Channel - Sweep to access the Sweep submenu. 2. Click Sweep Type - CW Mode. 3. In the CW Mode entry bar opened, enter the fixed stimulus frequency (CW Frequency) and the internal generator power (Source Power) for the sweep. -
Page 800: Calibrating A Measurement Channel
® Optimization R&S ZVA/ZVB/ZVT sweep is performed at maximum speed without delay. Avoid delay times between the end of the measurement sequence and the next trigger event: 2. If you don't need a special trigger mode, click Channel – Sweep – Trigger and make sure that Free Run is selected. - Page 801 ® R&S ZVA/ZVB/ZVT Optimization channel and close the calibration wizard. 7. Replace the last measured standard with your DUT and perform calibrated measurements without changing the channel settings used for calibration. You can also access manual calibration from the Measurement Wizard. To perform an automatic calibration...
-
Page 802: Trace Evaluation
® Trace Evaluation R&S ZVA/ZVB/ZVT Trace Evaluation Time Domain Measurements With option ZVAB-K2, Time Domain, you can view the measurement results as a function of time. To set up a time domain measurement... 1. Reset the analyzer to ensure that the following operating mode is set: Sweep Type: Lin. Frequency, Trace - Meas.: S21, Trace - Format: dB Mag. -
Page 803: Balanced Measurements
® R&S ZVA/ZVB/ZVT Balanced Measurements 4. Click Trace – Measure and select an S-Parameter or a Ratio to be measured. 5. Click Trace – Format and ensure that the trace format is dB Mag. 6. Click Trace Funct – Trace Statistics – Compression Point to activate the compression point evaluation. -
Page 804: Network (De-)Embedding
® Balanced Measurements R&S ZVA/ZVB/ZVT 4. Select Logical Port # 2 and assign the two remaining Physical Port Numbers, e.g. 3 and 4. 5. Assign the appropriate differential and common mode reference impedances to logical port no. 2 and Click Define. The Def Balanced Port tab shows the balanced port configuration: 6. - Page 805 ® R&S ZVA/ZVB/ZVT Balanced Measurements network inserted between port 1 of the analyzer and the DUT. You can also assign two-port networks to balanced ports; see Combination of 2-Port and 4-Port (De-)Embedding Networks. To remove a real transformation network from a single-ended port... Suppose that your 2-port DUT has a real, known 2-port transformation network at port 1.
- Page 806 ® Balanced Measurements R&S ZVA/ZVB/ZVT (*.s4p) Touchstone file. 6. If you wish to define the added network by an equivalent circuit, select the circuit type and adjust the parameters R, C, and L displayed in the right half of the dialog. 7.
-
Page 807: Frequency-Converting Duts
® R&S ZVA/ZVB/ZVT Frequency-Converting DUTs Frequency-Converting DUTs The analyzer provides a wide range of measurement modes for frequency-converting DUTs. Frequency-converting measurements require option R&S ZVA-K4 (Frequency Conversion, for R&S ZVA and R&S ZVT network analyzers) or option R&S ZVB-K3 (Mixer and Harmonics, for R&S ZVB network analyzers). - Page 809 ® R&S ZVA/ZVB/ZVT Index Index Bandfilter ..............4.99 Bandpass Search Ref to Marker ........4.99 Bandpass Search Ref to Max ........4.99 Bandstop Search Ref to Marker........4.99 Bandstop Search Ref to Min .........4.99 *CLS ................5.26 Bandwidth............4.121, 4.127 Basic Concepts ..............3.1 Block data format ............5.11 Boolean parameter ............5.11 Brace ................6.1 [SENSe<Ch>...
- Page 810 ® Index R&S ZVAZVA/ZVB/ZVT Execution overlapping ............5.14 sequential ..............5.14 Data entry ..............2.11 Data Flow S-parameters ............3.4 wave quantities ............3.4 Data Flow............... 3.4 File menu ...............4.4 Data processing ............. 3.4 Data set ............... 5.14 Fixed Marker ..............6.77 Fixture simulator ............6.58 Data trace ..............
- Page 811 ® R&S ZVA/ZVB/ZVT Index K-factor ................ 4.28 Multiport................4.13 Multiport................4.26 Multiport parameters .............3.27 Limit line..............4.108 Limit line ..............6.61 Lin. Frequency ........... 6.257, 9.3 NAN (not a number) .............5.11 Line (standard) ............3.37 NAN ................6.1 Linear 2-port Navigation tools (screen) ..........3.6 stability..............
- Page 812 ® Index R&S ZVAZVA/ZVB/ZVT Program Examples ............1 SCPI Status Register ...........5.17 Proportionality Constant ..........4.29 Screen elements.............3.6 PTR ................5.17 Search ................4.92 Search .................6.77 Search Range ..............6.77 Segmented Frequency........4.133, 4.139 Segmented Frequency ...........9.3 Select Instrument Port ..........4.29 Query ..............5.7, 5.8 Selectivity QUEStionable register Define Segments ..........4.139...
- Page 813 ® R&S ZVA/ZVB/ZVT Index System Configuration ..........4.251 Upper limit ..............4.108 Upper/lower case ............6.1 Target Search ............. 6.77 Target Value ..............6.77 View menu..............4.246 Text parameter ............5.11 Virtual Transform ............4.180 Threshold ..............6.77 Virtual Transform ............6.117 Through (standard) ............3.37 Title ................
Need help?
Do you have a question about the R&S ZVA 8 and is the answer not in the manual?
Questions and answers