Advertisement
Air-powered 3-in-1 Flooring Stapler/Nailer
058-8198-6
Owner's Manual
Parts Missing or Damaged? Questions? Toll-Free Help Line – 1-800-689-9928
IMPORTANT: Ensure that all users have read all safety rules and operating instructions
carefully before using this product. Keep this Owner's Manual in a safe place for future
reference.
Advertisement

Related Manuals for MasterCraft 058-8198-6


Summary of Contents for MasterCraft 058-8198-6
- Page 1 Air-powered 3-in-1 Flooring Stapler/Nailer 058-8198-6 Owner’s Manual Parts Missing or Damaged? Questions? Toll-Free Help Line – 1-800-689-9928 IMPORTANT: Ensure that all users have read all safety rules and operating instructions carefully before using this product. Keep this Owner’s Manual in a safe place for future...
-
Page 2: Table Of Contents
Table of Contents Page Specifications ................................2 Important Safety Instructions............................3 Know Your Nailer ................................. 5 Before You Start ................................6 Operating Instructions..............................9 Maintenance................................11 Troubleshooting................................12 Exploded View ................................14 Parts List..................................15 Warranty ..................................16 Specifications Magazine capacity ....................... 60 staples/120 nails T&... -
Page 4: Specifications
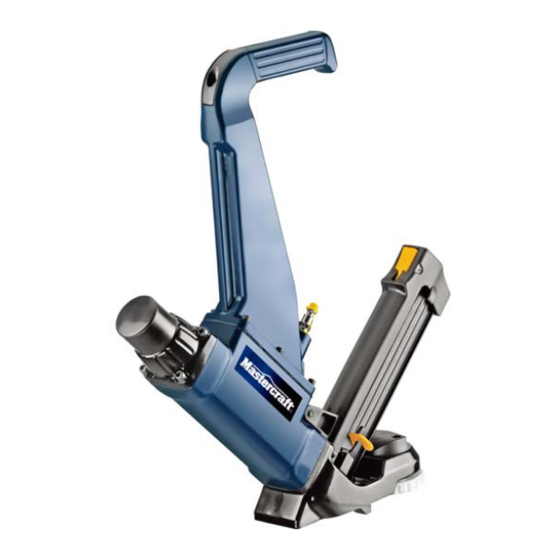
13. DO NOT DISCONNECT OR RECONNECT THE AIR HOSE WITH THE TRIGGER DEPRESSED. The nailer may fire when it is re-connected to the air supply. 14. DISCONNECT THE TOOL FROM THE AIR SUPPLY HOSE AND TURN OFF THE COMPRESSOR before performing any maintenance, loading fasteners, or changing accessories, and when the tool is not in use, when it is being handed to another person, and when it is left unattended. - Page 5 Know Your Air-powered Flooring Stapler/Nailer Magazine Magazine pusher latch Hammer striking area – Whack cap D. Spacer Wheel for depth control E. 1/4” (7 mm) NPT attachment knob Standard Equipment Tool Lubricating Oil ¼” NPT (male) connector M3 (3 mm) hex wrench M4 (4 mm) hex wrench Safety Glasses Mallet...
-
Page 7: Before You Start
Do not drive a fastener on top of an existing fastener. Types of Fasteners This Mastercraft® Air-powered Flooring Stapler/Nailer accepts the following size & type of fasteners: Flooring Staples: 15.5 gauge - 12.7 mm crown, length from 38 mm (1 1/2’’) —50 mm (2’’) T &... - Page 8 Before You Start - Loading Fasteners Always disconnect the tool from the compressed air source before loading or changing fasteners. Do not point the tool toward yourself the operator or other people while loading or changing fasteners. Do not hold the tool with the trigger depressed while loading or changing fasteners.
-
Page 9: Operating Instructions
Operating Instructions Using the Air-powered Flooring — Stapler/Nailer The safety nose must be in contact with the workpiece before activating the tool. Do not operate the tool if there are no fasteners loaded. Doing so may damage the tool. Do not fire fasteners into the air. - Page 10 Picture 2 For best results with tongue and groove flooring, the distance between the bottom of the Spacer Wheel and the tip of the Drive Guide should be the same as the distance between the top surface of the floor and the top of the step (tongue).
- Page 11 Verify that the floorboard is pushed snugly against the adjacent flooring or the wall using the small raised fence on the base of the stapler. SUFFICIENT FORCE IS REQUIRED TO COMPLETELY DRIVE A SINGLE STAPLE/NAIL/CLEAT FLUSH WITH ONE STRIKE OF THE MALLET. Ensure that the force of the hammer blow to the nailer is sufficient.
-
Page 12: Maintenance
Maintenance Disconnect the tool from the air compressor before adjusting, clearing jams, servicing and maintenance, and reloading, and when it is not in use. Repairs must be performed by a qualified service technician. Tools or Maximum service interval Maintenance Description materials Each use, or required... -
Page 13: Troubleshooting
Troubleshooting If any of the following problems appears while operating the tool, stop using the tool immediately, or serious personal injury could result. Only authorized service centre should perform repairs on this tool. Disconnect the electrical plug and disconnect any tools from air supply before attempting any adjustment. - Page 14 1. Replace the bumper or pusher spring. 1. The bumper is worn or the spring is Have the tool serviced by a qualified damaged. service technician. 2. There is dirt in the front plate. 2. Clean the drive channel on the front 3.
-
Page 15: Exploded View
Exploded View... -
Page 16: Parts List
Parts List Description Description Description Description Whack cap Piston sleeve Latch Compressed spring Screw M6*25 Main piston Magazine cover Steel ball Dw=4 O-ring 25*3.55 Bolt M5*18 Roll pin 4*20 Rubber piece Cylinder cover Bump E-ring d=3 Nut M5 Bolt M4*20 Cylinder seat Spring pin Bolt M5*25... -
Page 17: Warranty
MASTERCRAFT® LIMITED WARRANTY This MASTERCRAFT® product is guaranteed for a period of three (3) years from the date of original retail purchase against defects in materials and workmanship. Subject to the conditions and limitations described below, this product, if returned to us with proof of purchase within the stated warranty period and if covered under this warranty, will be repaired or replaced (with the same model, or one of equal value or specification), at our option.
Need help?
Do you have a question about the 058-8198-6 and is the answer not in the manual?
Questions and answers