
Related Manuals for iWave Zynq Ultrascale+ MPSoC Pico ITX


Summary of Contents for iWave Zynq Ultrascale+ MPSoC Pico ITX
- Page 1 Zynq Ultrascale+ MPSoC Pico ITX Single Board Computer iW-RainboW-G36S iW-RainboW-G36S Quick Start Guide Quick Start Guide R1.0 R1.0...
- Page 2 Disclaimer iWave Systems reserves the right to change details in this publication including but not limited to any Product specification without notice. No warranty of accuracy is given concerning the contents of the information contained in this publication. To the extent...
-
Page 3: Sbc Overview
It provides the instructions for setting-up the Single Board Computer from the packed box. SBC Overview The iW-RainboW-G36S Zynq Ultrascale+ MPSoC Pico ITX SBC is an Off-the-self board which contains all necessary interfaces & on-board connectors required for a complete embedded application. -
Page 4: Environmental Compliance
Safety Environmental Compliance iW-RainboW-G36S Zynq Ultrascale+ MPSoC SBC is designed by using RoHS and REACH compliant components and manufactured on lead free production process. ESD Protection This SBC is ESD sensitive. Handle the product only in accordance with the installation instructions given in the manual. -
Page 5: Quick Start Steps
Quick Start Steps Step 1 - Unpacking Remove the SBC from antistatic cover and place it above the ESD free area. Use anti-static pad/mat with proper grounding to place the SBC. Don't touch inside surface of the circuit board. Avoid using board in extreme dust, humidity and temperature conditions. -
Page 6: Optional Accessories
Step 2 - What's Inside The Box ? Make sure that, below deliverables are received without any physical damage. Optional Accessories Enclosure 12V,5A Power Supply FAN with Heat Sink... - Page 7 Step 3 - Read DVD Contents Given DVD contains below deliverable folders. 1. Binaries 2. Documents 3. Source Code Delivery binaries are available in Binaries folder and Source code files are available in Source Code folder. Also Documents folder contains Hardware User Guide, Software User Guide, Software Release Note and Quick Start Guide (this guide).
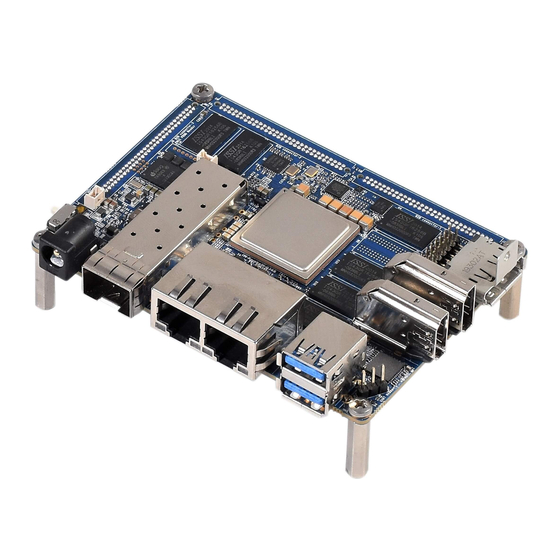
- Page 8 Step 4 - Quick View-SBC Top View 01. PL DDR4 RAM 09. Dual USB 3.0 Connector 02. Zynq US+ MPSoC 10. Dual Gigabit Ethernet Jack 03. PS DDR4 RAM 11. SFP+ Connector 04. JTAG Header 12. Power IN Jack 05. Display Port Connector 13.
- Page 9 Step 5 - Quick View-SBC Bottom View 17. Board to Board Connector 1 18. Board to Board Connector 2 19. Board to Board Connector 3 20. eMMC 21. SIM Connector 22. Wi-Fi/BT Module 23. M.2 Key B Connector...
- Page 10 Step 6 - Setting Up Fan & Heat Sink Mounting Before powering ON the Board, heat sink and fan should be mounted on top of Zynq US+ MPSoC as shown in below image.
-
Page 11: Debug Port Setting
Debug Port Setting Connect TypeA end of TTL-232R-RPI cable to PC and 3 pin (100mil) Berg house end of TTL-232R-RPI cable to SBC's Debug UART Connector (J14) as shown below. Install the driver for Debug Port in Host PC/Laptop using the below link. - Page 12 Warning : 1. Do not try to connect any other power supply other than supplied along with the SBC. 2. Contact iWave if power status LED is not glowing or PS Error status LEDs are glowing.
- Page 13 PC/Laptop which is connected to the SBC. Press any key in terminal immediately to see the command prompt of the Boot loader or wait until OS boots. iWave supports below mentioned Operating System Release for iW-RainboW-G36S Zynq Ultrascale+ MPSoC SBC. Linux 4.19.0 (or higher) After OS boots, Login prompt being displayed in the debug terminal.
- Page 14 Step 8 - System Enclosure Quick view 01. Power IN Jack 05. WLAN Antenna 02. SFP+ Connector 06. HDMI OUT Connector 03. Dual Gigabit Ethernet Magjack 07. HDMI IN Connector 04. Dual USB Connector 08. Display Port...
- Page 15 System Enclosure Setting Follow below steps for iWave’s system Enclosure setting Step - 1 Step - 2 Step - 3...
- Page 16 Other Products Product Name: Zynq 7000 SODIMM SOM Processor: Xilinx Zynq 7000 SoC RAM: 512MB DDR3* Application: Industrial Automation, Industrial Equipments, Machine Vision, Control & Measurement, Scientific & Medical Instruments. Product Name: Zynq US+ MPSoC (4/5/7-EV/EG/CG) SOM Processor: Xilinx’s Zynq US+ MPSoC...
-
Page 17: Need More Help
Systems Technologies Pvt. Ltd. No. 7/B, 29th Main, BTM Layout 2nd Stage, Bangalore - 560 076, India. Warranty & RMA Warranty support for Hardware: 1 Year from iWave or iWave's EMS partner. For warranty terms, go through below web link, http://www.iwavesystems.com/support/warranty.html For Return Merchandise Authorization (RMA), below web link, http://www.iwavesystems.com/support/rma.html...
Need help?
Do you have a question about the Zynq Ultrascale+ MPSoC Pico ITX and is the answer not in the manual?
Questions and answers