Table of Contents
Advertisement
Quick Links
Installing flat panels on
the ML20 wall mount
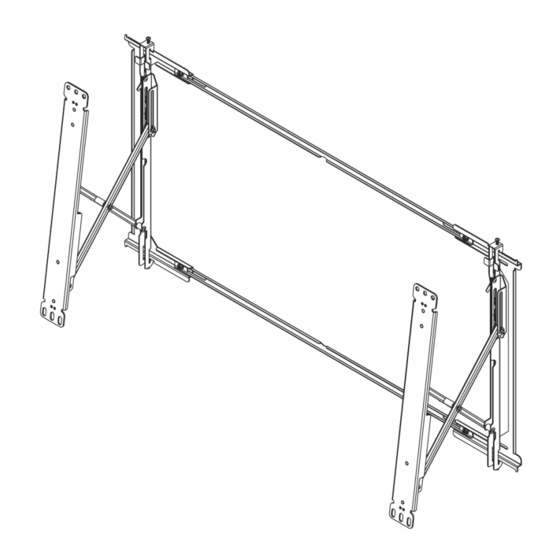
The ML20 is a full-service video wall mount that can accommodate the FHD493-XE and FHD553-XE flat
panels in landscape orientation.
The modular mount system features a pull-out mechanism that provides rear screen access, and the
ability to adjust the X, Y, and Z axis alignment.
Features
Use the ML20 wall mounts to hang and adjust the flat panels, and to access the rear of the panels.
•
Modular mount for large video wall display configurations.
•
Adjustments of panels for optimal gaps.
•
Spring-loaded mechanisms secure displays.
•
Pull-out/prop-open mechanism provides quick service access.
Installing Flat Panels on the ML20 Wall Mount Instruction Sheet
020-102525-01 Rev. 1 (02-2017)
Copyright
2017 Christie Digital Systems USA Inc. All rights reserved.
©
1
Advertisement
Table of Contents

Related Manuals for Christie ML20


Summary of Contents for Christie ML20
- Page 1 X, Y, and Z axis alignment. Features Use the ML20 wall mounts to hang and adjust the flat panels, and to access the rear of the panels. • Modular mount for large video wall display configurations.
-
Page 2: Safety Warnings And Cautions
• Always handle the screen from its sides. • Christie products must be installed and serviced by Christie qualified technicians. Caution! Failure to comply with the following could result in minor or moderate injury. • Do not over-tighten hardware. -
Page 3: Required Parts
5/16” (8 mm) bit for concrete and cinder block walls • 5/32” (4 mm) bit for wood stud walls • Level Installing Flat Panels on the ML20 Wall Mount Instruction Sheet 020-102525-01 Rev. 1 (02-2017) Copyright 2017 Christie Digital Systems USA Inc. All rights reserved. ©... -
Page 4: Related Documentation
1. Measure the width and height of the display panel. 2. Locate the center of the bottom left display. 55" panel 49" panel Installing Flat Panels on the ML20 Wall Mount Instruction Sheet 020-102525-01 Rev. 1 (02-2017) Copyright 2017 Christie Digital Systems USA Inc. All rights reserved. - Page 5 2. Drill a 5/32" (4 mm) diameter hole 2.5" (64 mm) deep and install a #14 x 2.5" wood screw, leaving a 6mm (1.4") gap from the plywood. 3. Hang the wall mount on the center screw. Installing Flat Panels on the ML20 Wall Mount Instruction Sheet 020-102525-01 Rev. 1 (02-2017) Copyright 2017 Christie Digital Systems USA Inc.
- Page 6 6. Tighten the four #14 x 2.5" wood screws so that the wall plate is firmly attached, but do not over-tighten. Never tighten in excess of 80 in-lbs (9Nm). Installing Flat Panels on the ML20 Wall Mount Instruction Sheet 020-102525-01 Rev. 1 (02-2017) Copyright 2017 Christie Digital Systems USA Inc.
- Page 7 1. Loosen the security screws. 2. Turn the height adjustment screw clockwise to raise a side. 3. Turn the height adjustment screw counter-clockwise to lower a side. Installing Flat Panels on the ML20 Wall Mount Instruction Sheet 020-102525-01 Rev. 1 (02-2017) Copyright 2017 Christie Digital Systems USA Inc.
- Page 8 1. Turn the adjustment wheel clockwise to move the corner out from the wall mount. 2. Turn the adjustment wheel counter-clockwise to move the corner towards the wall mount. Installing Flat Panels on the ML20 Wall Mount Instruction Sheet 020-102525-01 Rev. 1 (02-2017) Copyright 2017 Christie Digital Systems USA Inc.
- Page 9 LCD panels above it. To avoid damaging the LCD panel always release both locking tabs at the same time and move the panel forwards evenly. Installing Flat Panels on the ML20 Wall Mount Instruction Sheet 020-102525-01 Rev. 1 (02-2017) Copyright 2017 Christie Digital Systems USA Inc.
-
Page 10: Technical Support
Europe, Middle East, and Africa: +44 (0) 1189 778111 or Support.EMEA@christiedigital.com • Asia Pacific: +65 6877-8737 or Support.APAC@christiedigital.com Installing Flat Panels on the ML20 Wall Mount Instruction Sheet 020-102525-01 Rev. 1 (02-2017) Copyright 2017 Christie Digital Systems USA Inc. All rights reserved.
Need help?
Do you have a question about the ML20 and is the answer not in the manual?
Questions and answers