Table of Contents
Advertisement
Quick Links
Installing flat panels on
the MPL15 wall mount
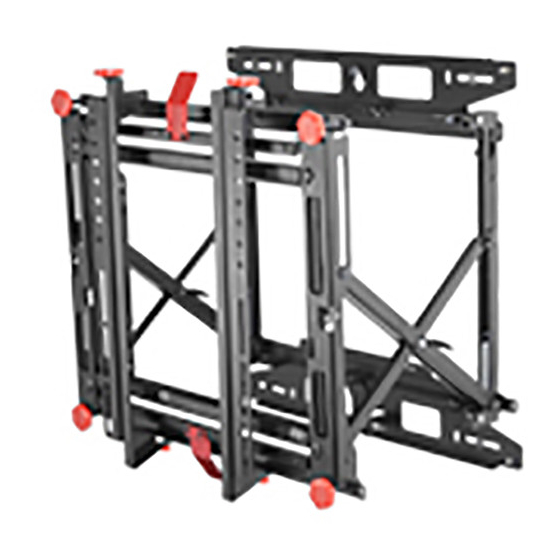
The MPL15 (DS-VW775) is a full-service video wall mount that can accommodate tiled LCD panels with
up to a 400 x 400 mm VESA pattern in portrait and landscape orientation.
The modular mount system features a pull-out mechanism that provides rear screen access, and the
ability to adjust the X, Y, and Z axis alignment, and is designed for home and public use. The
maximum load for the mount is 57 kg (125 lb).
Features
Use the wall mounts to hang and adjust the flat panels, and to access the rear of the panels.
•
Modular mount for large video wall display configurations.
•
Spring-loaded mechanisms secure displays.
•
Pop-out mechanism provides quick service access.
Installing Flat Panels on the MPL15 Wall Mount Instruction Sheet
020-102543-04 Rev. 1 (08-2018)
Copyright
2018 Christie Digital Systems USA, Inc. All rights reserved.
©
1
Advertisement
Table of Contents

Subscribe to Our Youtube Channel
Related Manuals for Christie MPL15


Summary of Contents for Christie MPL15
- Page 1 Installing flat panels on the MPL15 wall mount The MPL15 (DS-VW775) is a full-service video wall mount that can accommodate tiled LCD panels with up to a 400 x 400 mm VESA pattern in portrait and landscape orientation. The modular mount system features a pull-out mechanism that provides rear screen access, and the ability to adjust the X, Y, and Z axis alignment, and is designed for home and public use.
-
Page 2: Safety Warnings And Cautions
• Always handle the display panel from the sides or handles. • Christie products must be installed and serviced by Christie qualified technicians. • Before drilling holes locate electrical, gas, and water lines. • Only install the product on recommended surfaces. -
Page 3: Required Parts
• 4mm pin hex wrench • Pencil • Drill • 3/8" socket • Socket wrench Installing Flat Panels on the MPL15 Wall Mount Instruction Sheet 020-102543-04 Rev. 1 (08-2018) Copyright 2018 Christie Digital Systems USA, Inc. All rights reserved. ©... -
Page 4: Installing The Wall Mount
(Y). 5. Install the screw for the center notches as appropriate for the mounting surface. 6. Install all wall mounts in the bottom row. Installing Flat Panels on the MPL15 Wall Mount Instruction Sheet 020-102543-04 Rev. 1 (08-2018) Copyright 2018 Christie Digital Systems USA, Inc. - Page 5 7. Tighten the four #14 x 2.5" wood screws so that the wall plate is firmly attached, but do not over-tighten. Never tighten in excess of 80 in-lbs (9Nm). Installing Flat Panels on the MPL15 Wall Mount Instruction Sheet 020-102543-04 Rev. 1 (08-2018) Copyright 2018 Christie Digital Systems USA, Inc.
- Page 6 The extenders increase the depth of the panel and bracket by 20 mm. 1. Using the hex key provided, install the screw (part G) connecting the top hole of the extender to the adapter bracket. Installing Flat Panels on the MPL15 Wall Mount Instruction Sheet 020-102543-04 Rev. 1 (08-2018) Copyright 2018 Christie Digital Systems USA, Inc.
- Page 7 Use the height adjustment screw to move the display panel up and down. 1. To raise a side, turn the height adjustment screw clockwise. 2. To lower a side, turn the height adjustment screw counter-clockwise. Installing Flat Panels on the MPL15 Wall Mount Instruction Sheet 020-102543-04 Rev. 1 (08-2018) Copyright 2018 Christie Digital Systems USA, Inc.
- Page 8 1. To move the corner out from the wall mount, turn the adjustment wheel clockwise. 2. To move the corner towards the wall mount, turn the adjustment wheel counter-clockwise. Installing Flat Panels on the MPL15 Wall Mount Instruction Sheet 020-102543-04 Rev. 1 (08-2018) Copyright 2018 Christie Digital Systems USA, Inc.
- Page 9 Turn the red adjustment knob in the bottom center of the mount. To move the display panel to the right, turn the knob clockwise. To move the display panel to the left, turn the knob counterclockwise. Installing Flat Panels on the MPL15 Wall Mount Instruction Sheet 020-102543-04 Rev. 1 (08-2018) Copyright 2018 Christie Digital Systems USA, Inc.
- Page 10 1. Remove the security screws from the sides of the wall mount. To access the locking tabs for a mount, it may be necessary to extend the adapter brackets of the display panel above it. Installing Flat Panels on the MPL15 Wall Mount Instruction Sheet 020-102543-04 Rev. 1 (08-2018) Copyright 2018 Christie Digital Systems USA, Inc.
-
Page 11: Technical Support
Europe, Middle East, and Africa: +44 (0) 1189 778111 or Support.EMEA@christiedigital.com • Asia Pacific: +65 6877-8737 or Support.APAC@christiedigital.com Installing Flat Panels on the MPL15 Wall Mount Instruction Sheet 020-102543-04 Rev. 1 (08-2018) Copyright 2018 Christie Digital Systems USA, Inc. All rights reserved.
Need help?
Do you have a question about the MPL15 and is the answer not in the manual?
Questions and answers