
Related Manuals for HIKVISION DS-KD9203-FE6


Summary of Contents for HIKVISION DS-KD9203-FE6
- Page 1 DS-KD9203-FE6 Video Intercom Face Recognition Door Station with 4.3-inch Screen User Manual...
- Page 2 WITHOUT LIMITATION, MERCHANTABILITY, SATISFACTORY QUALITY, OR FITNESS FOR A PARTICULAR PURPOSE. THE USE OF THE PRODUCT BY YOU IS AT YOUR OWN RISK. IN NO EVENT WILL HIKVISION BE LIABLE TO YOU FOR ANY SPECIAL, CONSEQUENTIAL, INCIDENTAL, OR INDIRECT DAMAGES,...
- Page 3 Video Intercom Face Recognition Door Station with 4.3-inch Screen User Manual CONNECTION WITH THE USE OF THE PRODUCT, EVEN IF HIKVISION HAS BEEN ADVISED OF THE POSSIBILITY OF SUCH DAMAGES OR LOSS. YOU ACKNOWLEDGE THAT THE NATURE OF INTERNET PROVIDES FOR...
- Page 4 Video Intercom Face Recognition Door Station with 4.3-inch Screen User Manual Symbol Conventions The symbols that may be found in this document are defined as follows. Symbol Description Indicates a hazardous situation which, if not avoided, will or Danger could result in death or serious injury. Indicates a potentially hazardous situation which, if not Caution avoided, could result in equipment damage, data loss,...
- Page 5 Video Intercom Face Recognition Door Station with 4.3-inch Screen User Manual Safety Instruction Warning • All the electronic operation should be strictly compliance with the electrical safety regulations, fire prevention regulations and other related regulations in your local region. • Please use the power adapter, which is provided by normal company.
- Page 6 Video Intercom Face Recognition Door Station with 4.3-inch Screen User Manual • Please use the provided glove when open up the device cover, avoid direct contact with the device cover, because the acidic sweat of the fingers may erode the surface coating of the device cover. •...
- Page 7 Video Intercom Face Recognition Door Station with 4.3-inch Screen User Manual Regulatory Information FCC Information Please take attention that changes or modification not expressly approved by the party responsible for compliance could void the user’s authority to operate the equipment. FCC compliance: This equipment has been tested and found to comply with the limits for a Class B digital device, pursuant to part 15 of the FCC Rules.
- Page 8 Video Intercom Face Recognition Door Station with 4.3-inch Screen User Manual EU Conformity Statement This product and - if applicable - the supplied accessories too are marked with "CE" and comply therefore with the applicable harmonized European standards listed under the EMC Directive 2014/30/EU, the RoHS Directive 2011/65/EU 2012/19/EU (WEEE directive): Products marked with this symbol cannot be disposed of as unsorted municipal waste in the...
-
Page 9: Table Of Contents
Video Intercom Face Recognition Door Station with 4.3-inch Screen User Manual Contents 1 Appearance ....................1 2 Terminal and Wiring Description ..............4 2.1 Terminal Description ..................4 2.2 Wiring Description .................... 5 2.2.1 Door Lock Wiring ..................5 2.2.2 Exit Button Wiring ..................6 2.2.3 Alarm Input Device Wiring ............... - Page 10 Video Intercom Face Recognition Door Station with 4.3-inch Screen User Manual 5.2.4 Unlock by Face ..................14 6 Configuration via Client Software ............. 15 6.1 Edit Network Parameters ................15 6.2 Add Device ...................... 15 6.2.1 Add Online Device .................. 15 6.2.2 Add Device by IP Address ...............
- Page 11 Video Intercom Face Recognition Door Station with 4.3-inch Screen User Manual 6.6.8 Permission Settings ................. 39 6.7 Video Intercom Settings .................. 40 6.7.1 Receive Call from Door Station ............... 40 6.7.2 Live View via Door Station ..............41 6.7.3 Release Notice ..................41 6.7.4 Search Video Intercom Information ............
-
Page 12: Appearance
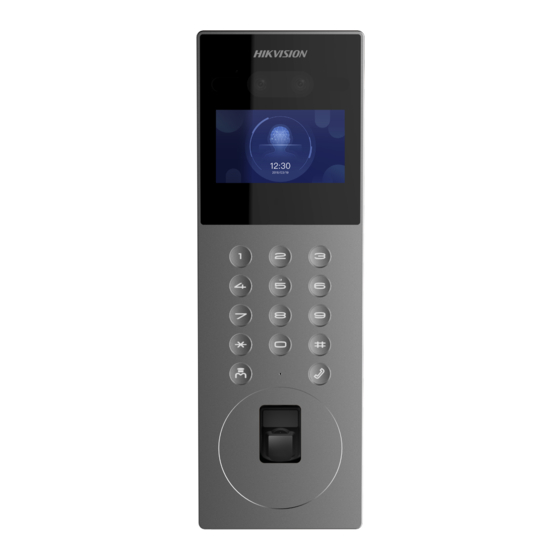
Video Intercom Face Recognition Door Station with 4.3-inch Screen User Manual 1 Appearance Door Station without Fingerprint Module Figure 1-1 Appearance of Door Station without Fingerprint Module Table 1-1 Description Description Camera IR Supplement Light Screen Loudspeaker Buttons... - Page 13 Video Intercom Face Recognition Door Station with 4.3-inch Screen User Manual Description Microphone Card Reading Area TAMPER Door Station with Fingerprint Module Figure 1-2 Appearance of Door Station with Fingerprint Module Table 1-2 Description Description Camera IR Supplement Light Screen...
- Page 14 Video Intercom Face Recognition Door Station with 4.3-inch Screen User Manual Description Loudspeaker Buttons Microphone Card Reading Area/ Fingerprint Recognition Module TAMPER...
-
Page 15: Terminal And Wiring Description
Video Intercom Face Recognition Door Station with 4.3-inch Screen User Manual 2 Terminal and Wiring Description 2.1 Terminal Description Figure 2-1 Terminal Description Table 2-1 Description Name Terminal Description Network Interface ANALOG Analog Signal Input Network Signal Input ALARM IN SEN1 Door Contact Input 1 SEN2... -
Page 16: Wiring Description
Video Intercom Face Recognition Door Station with 4.3-inch Screen User Manual Name Terminal Description DOOR Door Lock Relay Output 1(Normally Close) COM1 Common Interface 1 Door Lock Relay Output 1(Normally Open) Grounding Door Lock Relay Output 2(Normally Close) COM2 Common Interface 2 Door Lock Relay Output 2(Normally Open) Grounding... -
Page 17: Exit Button Wiring
Video Intercom Face Recognition Door Station with 4.3-inch Screen User Manual Figure 2-2 Door Lock Wiring Note • Terminal NC1/COM1 is set as default for accessing electric bolt. Terminal NO1/ COM1 is set as default for accessing electric strike. • To connect electric lock in terminal NO2/COM2/NC2, it is required to set the output of terminal NO2/COM2/NC2 to be electric lock with iVMS-4200 Client Software. -
Page 18: Alarm Input Device Wiring
Video Intercom Face Recognition Door Station with 4.3-inch Screen User Manual 2.2.3 Alarm Input Device Wiring Figure 2-4 Alarm Input Device Wiring 2.2.4 Door Contact Wiring Wire the SEN1/SEN2 terminal with door contact. Here takes SEN1 for example. Figure 2-5 Door Contact Wiring... -
Page 19: Installation
Video Intercom Face Recognition Door Station with 4.3-inch Screen User Manual 3 Installation Note • Make sure the device in the package is in good condition and all the assembly parts are included. • The power supply the door station supports is 12 VDC. Please make sure your power supply matches your door station. -
Page 20: Flush Mounting With Gang Box
Video Intercom Face Recognition Door Station with 4.3-inch Screen User Manual Note • The dimension of the gang box is 364 mm (W) × 118 mm (H) × 40 mm (D). • The installation hole should be bigger than the actual size. The suggested dimension of the installation hole is 364.3 mm (W) ×... - Page 21 Video Intercom Face Recognition Door Station with 4.3-inch Screen User Manual Figure 3-2 Flush Mounting with Gang Box...
-
Page 22: Activation
Video Intercom Face Recognition Door Station with 4.3-inch Screen User Manual 4 Activation 4.1 Activate Device Locally You are required to activate the device first by settings a strong password for it before you can use the device. Steps 1. Power on the device to enter the activation page automatically. 2. - Page 23 Video Intercom Face Recognition Door Station with 4.3-inch Screen User Manual 5. Click OK to activate the device. Note • When the device is not activated, the basic operation and remote operation of device cannot be performed. • You can hold the Ctrl or Shift key to select multiple devices in the online devices, and click the Activate button to activate devices in batch.
-
Page 24: Local Operation
Video Intercom Face Recognition Door Station with 4.3-inch Screen User Manual 5 Local Operation 5.1 Video Intercom Operation 5.1.1 Call Resident The door station can work as main/sub door station, and outer door station, which correspond to different calling resident modes respectively. Call Resident from Main/Sub Door Station Press call button to enter the calling page. -
Page 25: Unlock By Swiping Card
Video Intercom Face Recognition Door Station with 4.3-inch Screen User Manual Note The default common password is 123456. Unlock by Public Password Note Make sure you have created the public password via iVMS-4200 Client Software remotely. Press call button to enter the calling page. Enter 【# + Public Password + #】to unlock the door. -
Page 26: Configuration Via Client Software
Video Intercom Face Recognition Door Station with 4.3-inch Screen User Manual 6 Configuration via Client Software 6.1 Edit Network Parameters To operate and configure the device via LAN (Local Area Network), you need connect the device in the same subnet with your PC. You can edit network parameters via iVMS-4200 client software. -
Page 27: Add Device By Ip Address
Video Intercom Face Recognition Door Station with 4.3-inch Screen User Manual Figure 6-1 Add to the Client 6.2.2 Add Device by IP Address Steps 1. Click +Add to pop up the adding devices dialog box. 2. Select IP/Domain as Adding Mode. 3. -
Page 28: Remote Configuration
Video Intercom Face Recognition Door Station with 4.3-inch Screen User Manual You can add many devices at once whose IP addresses are among the IP segment. Steps 1. Click +Add to pop up the dialog box. 2. Select IP Segment as Adding Mode. 3. - Page 29 Video Intercom Face Recognition Door Station with 4.3-inch Screen User Manual Figure 6-3 General Time Click Time to enter the device time settings page. Figure 6-4 Synchronize Time Select Time Zone or Enable NTP. Click Save to save the time settings. •...
- Page 30 Video Intercom Face Recognition Door Station with 4.3-inch Screen User Manual • Check the checkbox of Enable NTP to enable NTP. • Enter the server address, NTP port, and synchronization interval. • DST • Check the checkbox of Enable DST to enable DST. •...
- Page 31 Video Intercom Face Recognition Door Station with 4.3-inch Screen User Manual Note • Click Restore Default Settings, all default settings, excluding network parameters, will be restored. • Click Restore All, all default settings, including network parameters, will be restored. The device will be reset to inactivated status.
- Page 32 Video Intercom Face Recognition Door Station with 4.3-inch Screen User Manual Figure 6-6 User Page Note • The new password and confirm password should be identical. • After editing the password of device, click refresh button from the device list, the added device will not be there. You should add the device again with new password to operate the remote configuration.
-
Page 33: Video Intercom
Video Intercom Face Recognition Door Station with 4.3-inch Screen User Manual Figure 6-7 RS-485 Settings Note For indoor station and master station, there are 3 choices for the working mode: transparent channel, disable, and custom. 6.3.2 Video Intercom Click Video Intercom to enter the Video Intercom Settings page. Device ID Configuration Steps 1. - Page 34 Video Intercom Face Recognition Door Station with 4.3-inch Screen User Manual Note The device type select Door Station as default. You can select Outer Door Station to change the device type. 3. Click Save to enable the device number configuration. Note •...
- Page 35 Video Intercom Face Recognition Door Station with 4.3-inch Screen User Manual Steps 1. Click Permission Password to enter the settings page. 2. Select Type of the password. 3. Edit the password. 4. Click Save to enable the settings. Access Control and Elevator Before You Start •...
- Page 36 Video Intercom Face Recognition Door Station with 4.3-inch Screen User Manual Figure 6-10 Access Control and Elevator 2. Set the Access Control parameters. 1) Select the door No. 2) Set the Door-unlocked Duration. 3) Optional: Enable Upload Alarm for Not-Closed Door. 4) Click Save to enable the settings.
- Page 37 Video Intercom Face Recognition Door Station with 4.3-inch Screen User Manual Note • The door-unlocked duration ranges from 1 s to 255 s. • If you check Upload Alarm for Not-Closed Door, an alarm will be triggered automatically if the door is not locked in the configured duration. •...
- Page 38 Video Intercom Face Recognition Door Station with 4.3-inch Screen User Manual Note • For door station, there are 4 I/O input terminals. By default, Terminal 1 and 2 correspond to Door Status. Terminal 3 and 4 correspond to interfaces of Door Switch.
-
Page 39: Network Settings
Video Intercom Face Recognition Door Station with 4.3-inch Screen User Manual Note • Up to 5 pictures can be added. Picture formats requires JPG. The size of the pictures should be less than 1MB. The switching duration of the picture ranges from 1 to 10 seconds. - Page 40 Video Intercom Face Recognition Door Station with 4.3-inch Screen User Manual Before You Start On the linked devices network configuration page, you can configure the network parameters of master stations, SIP servers and management centers of the same LAN. The devices can be linked to the door station and realize the linkage between these devices.
- Page 41 Video Intercom Face Recognition Door Station with 4.3-inch Screen User Manual After configuring the FTP parameters, the captured pictures of door station will be uploaded to the FTP server automatically. Steps 1. Click FTP to enter the FTP parameters settings page. Figure 6-14 FTP Settings 2.
-
Page 42: Video Display Settings
Video Intercom Face Recognition Door Station with 4.3-inch Screen User Manual Note • The default port No. is 21. • To enable anonymity or not is according to whether the FTP server enables anonymity. Advanced Settings Steps 1. Click Advanced Settings to enter the advanced network settings page. Figure 6-15 Advanced Settings 2. - Page 43 Video Intercom Face Recognition Door Station with 4.3-inch Screen User Manual Figure 6-16 Video Parameters 2. Select the Camera No. 3. Select the video standard (PAL and NTSC can be selected). 4. Optional: Enable WDR mode. 5. Set the Brightness, Contrast, Saturation and Sharpness of the video. 6.
-
Page 44: Device Management
Video Intercom Face Recognition Door Station with 4.3-inch Screen User Manual Figure 6-17 Video & Audio 2. Set the parameters. 3. Click Save. Note It's suggested to keep the default settings to ensure the video/image quality. 6.4 Device Management Device management includes device activation, adding device, editing device, and deleting device, and so on. -
Page 45: Modify And Delete Organization
Video Intercom Face Recognition Door Station with 4.3-inch Screen User Manual 4. Optional: You can add multiple levels of organizations according to the actual needs. 1) You can add multiple levels of organizations according to the actual needs. 2) Then the added organization will be the sub-organization of the upper-level organization. - Page 46 Video Intercom Face Recognition Door Station with 4.3-inch Screen User Manual Note The Person No. will be generated automatically and is editable. 2. Set basic person information. 1) Enter basic information: name, gender, tel, birthday details, effective period and email address. Note The length of person name should be less than 15 characters.
-
Page 47: Modify And Delete Person
Video Intercom Face Recognition Door Station with 4.3-inch Screen User Manual 2) Click OK to save the settings. 5. Click Add to save the settings. 6.6.2 Modify and Delete Person Select the person and click Edit to open the editing person dialog. To delete the person, select a person and click Delete to delete it. -
Page 48: Change Person To Other Organization
Video Intercom Face Recognition Door Station with 4.3-inch Screen User Manual If the added device has been configured with person information (including person details, fingerprint, issued card information), you can get the person information from the device and import to the client for further operation. Steps Note This function is only supported by the device the connection mothod of which is... -
Page 49: Issue Card In Batch
Video Intercom Face Recognition Door Station with 4.3-inch Screen User Manual Enter the context of your task here (optional). Steps 1. Enter your first step here. Enter the result of your step here (optional). Example Enter an example that illustrates the current task (optional). What to do next Enter the tasks the user should do after finishing this task (optional). -
Page 50: Permission Settings
Video Intercom Face Recognition Door Station with 4.3-inch Screen User Manual 2. Click Settings. Figure 6-19 Card Settings 3. Select Card Type and Card No. Type. 4. Click OK to save the settings. Result After issuing the card to the person, the person and card information will display in the Person(s) with Card Issued list. -
Page 51: Video Intercom Settings
Video Intercom Face Recognition Door Station with 4.3-inch Screen User Manual 1) Enter the Name of the permission. 2) Select the Template of the schedule. 3) Check the person to Selected according to your needs. 4) Check the device to Selected according to your needs. 4. -
Page 52: Live View Via Door Station
Video Intercom Face Recognition Door Station with 4.3-inch Screen User Manual • Click to adjust the volume of the loudspeaker. • Click to adjust the volume of the microphone. • Click Hang Up to hang up the dialog. • Click to open the door remotely. -
Page 53: Search Video Intercom Information
Video Intercom Face Recognition Door Station with 4.3-inch Screen User Manual 4. Edit the Subject, Type and Information. 5. Click View to select the picture. 6. Click Send. Note • Up to 63 characters are allowed in the Subject field. •... - Page 54 Video Intercom Face Recognition Door Station with 4.3-inch Screen User Manual Click ˅ to unfold the drop-down list and select the device type as Indoor Station, Door Station, Outer Door Station or Analog Indoor Station. Or select All Devices to search logs with all device types. Start Time/End Time Click the time icon to specify the start time and end time of a time period to search the logs.
-
Page 55: Communication Matrix And Device Command
A. Communication Matrix and Device Command Communication Matrix Scan the following QR code to get the device communication matrix. Note that the matrix contains all communication ports of Hikvision access control and video intercom devices. Figure A-1 QR Code of Communication Matrix Device Command Scan the following QR code to get the device common serial port commands. - Page 56 Video Intercom Face Recognition Door Station with 4.3-inch Screen User Manual Figure A-2 Device Command...
- Page 57 UD17876B...
Need help?
Do you have a question about the DS-KD9203-FE6 and is the answer not in the manual?
Questions and answers