Soyer BMK-12W Quick Start Manual
Stud welder
Hide thumbs
Also See for BMK-12W:
- Operating instructions manual (81 pages) ,
- Operating instructions manual (68 pages)

Related Manuals for Soyer BMK-12W


Summary of Contents for Soyer BMK-12W
- Page 1 Stud Welding – Practical Knowledge Quick Start Guide – BMK-12W Stud Welder Keep this quick start guide in a safe place and ensure that all users are familiar with the contents.
- Page 2 The data in this documentation have been verified regularly and necessary corrections will be incorporated in future impressions. Any suggestions for improvement will be appreciated We hope you enjoy using the BMK-12W SOYER stud welder as much as we enjoyed developing it. Date of issue: 01.09.2008...
-
Page 3: Table Of Contents
Stud welding – Practical knowledge: BMK-12W Table of contents Front and rear view of stud welder _________________________________ 4 Quick start-up instructions for single components ___________________ 6 2.1. Start-up _________________________________________________________ 6 2.2. Operating modes / Parameters ______________________________________ 9 2.3. Standard stud chucks ____________________________________________ 11 2.4. -
Page 4: Front And Rear View Of Stud Welder
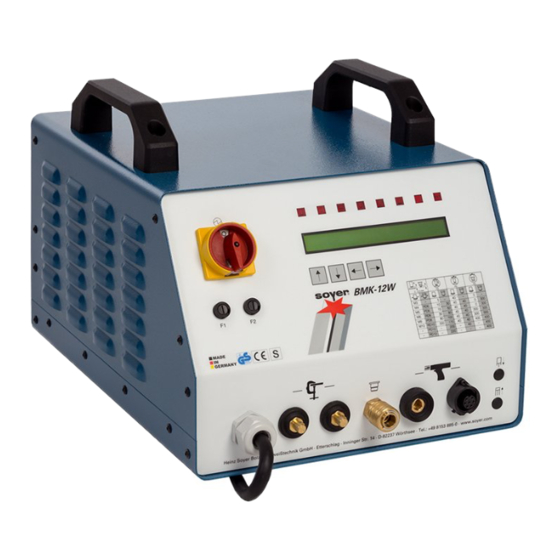
Stud welding – Practical knowledge: BMK-12W 1. Front and rear view of stud welder Front view of BMK-8U / BMK-12 W (above illustration of BMK-12W corresponds to BMK-8U) • Fuse element F1 • Main switch (to switch stud welder on) •... - Page 5 Stud welding – Practical knowledge: BMK-12W 20/21 Rear view of BMK-8U / BMK-12 W 15-pole connecting socket / feeder interface (OPTION) The feeder interface serves to connect the feeder control to the stud welding device 9-pole connecting socket / CNC interface (OPTION)
-
Page 6: Quick Start-Up Instructions For Single Components
Ensure a tight fit of connection cables! Please note: The GW-1 or GW-2 SOYER tool and gear wagon is the optimum solution for the proper installation of the stud welder (accessories – must be ordered separately). If required, connect gas supply. - Page 7 Stud welding – Practical knowledge: BMK-12W If required, prepare ground connection (please use protective goggles). Earth connection points at the workpiece must be blank. If necessary, grind the surface of contact areas to clean bright metal. Attach the earth clamps to the workpiece. Always attach both earth clamps (arc blow!).
- Page 8 Stud welding – Practical knowledge: BMK-12W Switch stud welder on by means of the mains switch. The stud welder carries out a self test. Please observe the safety instructions. Select parameters in accordance with your welding task. Page - 8...
-
Page 9: Operating Modes / Parameters
Stud welding – Practical knowledge: BMK-12W 2.2. Operating modes / Parameters Press the function key "arrow right" or "arrow left" (3 or 4) to select the parameters. Only the parameter designation which is flashing on the display can be set by means of the function keys (1 or Overview –... - Page 10 Stud welding – Practical knowledge: BMK-12W Explanations of parameters: • MCTIME Main current time MCTIME is the most important parameter for the welding operation. • You can change the value for the main current time from 1 - 1000 ms in 1 ms-steps by pressing either function key "arrow up"...
-
Page 11: Standard Stud Chucks
Stud welding – Practical knowledge: BMK-12W 2.3. Standard stud chucks Please note: Standard drawn arc chucks are available in the following different sizes: M6, M8, M10 and M12. When using smaller studs, please use a special stud chuck with setscrew. -
Page 12: Basic Setting Of The Stud Chuck With Adjusting Screw
Stud welding – Practical knowledge: BMK-12W 2.4. Basic setting of the stud chuck with adjusting screw • The standard stud chuck is suitable for being installed in the PH-3N, PK-3 and PK-0K welding guns. • For different stud diameters, different stud chucks are required. -
Page 13: Start-Up Of Ph-3N Welding Gun
Stud welding – Practical knowledge: BMK-12W 2.5. Start-up of PH-3N welding gun Please note: The PH-3N welding gun is only suitable for stud sizes M3 - RD12! Tip: The PH-3N welding gun is provided with a standard gas shroud. We recommend the application of shielding gas to prevent pore formation and to optimise the formation of bulges. - Page 14 Stud welding – Practical knowledge: BMK-12W How to correct the stud protrusion Insert the stud into the chuck and push it firmly until it comes to a stop. Use Allen wrench (size 3) to loosen the four Allen screws. Move support until the required stud protrusion of about 1,5 –...
- Page 15 Stud welding – Practical knowledge: BMK-12W To adjust and check the height of lift, please select the operating mode “Lift Test”. • Position welding gun on the workpiece • Press push button. The gun lifts the chuck with weld stud away from the workpiece.
-
Page 16: Welding Operation Using Ceramic Ferrules
Stud welding – Practical knowledge: BMK-12W 2.6. Welding operation using ceramic ferrules The PH-3N welding gun can also be provided with a ceramic ferrule chuck. The procedural method is same for both welding with shielding gas and ceramic ferrules. For ceramic ferrule welding, however, equip the welding gun with a ceramic ferrule before starting to weld. - Page 17 Stud welding – Practical knowledge: BMK-12W Ensure stud protrusion is set between 1.5 mm – 3 mm The stud must protrude for about 1.5 - 3 mm from the ceramic ferrule! Switch stud welder on by means of the mains switch.
- Page 18 Stud welding – Practical knowledge: BMK-12W Please ensure that the welding parameters are set in accordance with the respective stud diameter. If required, check and adjust welding parameters accordingly. Position welding gun vertically on the workpiece (at a 90- degree angle to the workpiece).
-
Page 19: Start-Up Of Pk-3 Welding Gun
Stud welding – Practical knowledge: BMK-12W 2.7. Start-up of PK-3 welding gun Please note: The PK-3 welding gun is suitable for stud sizes M3 - M10! The illustrations below show how to install the stud chuck. Ensure depth of immersion / stud protrusion is set between 1.5 mm and 3 mm. - Page 20 Stud welding – Practical knowledge: BMK-12W How to correct the stud protrusion Insert the stud into the chuck and push it firmly until it comes to a stop. Use Allen wrench (size 3) to loosen the four Allen screws. Move support until the required stud protrusion of about 2 mm is obtained.
- Page 21 Stud welding – Practical knowledge: BMK-12W Adjusting and checking the height of lift The height of lift is the distance for which the stud is lifted from the workpiece during the welding process. This distance is required for igniting the arc. The height of lift should amount to approx.
- Page 22 Stud welding – Practical knowledge: BMK-12W Position welding gun vertically on the workpiece (at a 90- degree angle to the workpiece). Check once again the selected parameters. Release welding process by pressing the push button. During the welding process, keep gun steady. After having...
-
Page 23: Start-Up Of Pk-0K Welding Gun
Stud welding – Practical knowledge: BMK-12W 2.8. Start-up of PK-0K welding gun Please note: The PK-0K welding gun is only suitable for stud sizes M3 - M8! For this welding gun, use the standard chuck with adjusting screw, having a length of 45 mm. - Page 24 Stud welding – Practical knowledge: BMK-12W Hand-tighten sleeve nut by means of SW 14 socket wrench. Ensure stud protrusion is set between 1.5 mm – 3 mm The stud must protrude for about 1.5 - 3 mm from the support tube! Switch stud welder on by means of the mains switch.
- Page 25 Stud welding – Practical knowledge: BMK-12W Adjusting and checking the height of lift The height of lift is the distance for which the stud is lifted from the workpiece during the welding process. This distance is required for igniting the arc. The height of lift should amount to approx.
-
Page 26: Welding Parameters
The parameters depend on the size of the studs and the material properties. The values indicated in the tables are standard values which only apply to studs supplied by SOYER. The parameters may vary depending on the type of workpiece, the workpiece thickness, the surface condition of the workpiece and on environmental conditions (e.g. -
Page 27: Important Wear And Spare Parts
Stud welding – Practical knowledge: BMK-12W 4. Important wear and spare parts Please find below an overview of the most important gun wear parts. 4.1. Wear parts list for PH-3N welding gun For a complete spare parts list, please refer to the corresponding documents. - Page 28 Stud welding – Practical knowledge: BMK-12W F01190 0,025 F01191 0,028 F01192 0,03 Standard-Bolzenhalter Standard stud chuck F01193 0,045 Adapterstück F02123 0,025 Adapter piece M10 Schutzgasglocke Messing F02477 0,183 Gas shroud, brass SGL-2 F01160 0,033 F01163 0,033 F01167 0,034 F01171 0,034...
- Page 29 Stud welding – Practical knowledge: BMK-12W Bolzenschweißen mit Gewindebolzen und Keramikring Stud welding with threaded studs and ceramic ferrule Keramikringhalter F03768 0,013 Ceramic ferrule holder Keramikringhalter F03769 KR8-10 Ceramic ferrule 0,013 holder Keramikringhalter F03770 KR12 Ceramic ferrule 0,018 holder Stativgrundplatte für Keramikring...
-
Page 30: Wear Parts List For Pk-3 Welding Gun
Stud welding – Practical knowledge: BMK-12W 4.2. Wear parts list for PK-3 welding gun For a complete spare parts list, please refer to the corresponding documents. Pos. Gewicht Abbildung Artikel Nr. Menge Bezeichnung in kg Weight Illustration Ref. Order code... -
Page 31: Wear Parts List For Pk-0K Welding Gun
Stud welding – Practical knowledge: BMK-12W 4.3. Wear parts list for PK-0K welding gun For a complete spare parts list, please refer to the corresponding documents. Pos. Gewicht Abbildung Artikel Nr. Menge Bezeichnung in kg Weight Illustration Order code Quantity Designation Ref. -
Page 32: Helpful Standards
Stud welding – Practical knowledge: BMK-12W 5. Helpful standards Drawn arc stud welding DVS 0902 information sheet Capacitor discharge stud welding with tip ignition DVS 0903 information sheet Notes on practical application – Arc Stud Welding DVS 0904 information sheet Source: DVS-Verlag GmbH, Düsseldorf, Tel: 0211/15 91 - 0... -
Page 33: Helpful Hints
Stud welding – Practical knowledge: BMK-12W 6. Helpful hints To protect the BMK-12W stud welder from wear and tear and to efficiently use it, take a look at the following field-tested tips: • Ensure all surfaces are free from scales, paint, rust and oil •... - Page 34 Stud welding – Practical knowledge: BMK-12W Mit Sicherheit die bessere Verbindung! Heinz Soyer Bolzenschweißtechnik GmbH Etterschlag Inninger Straße 14 D-82237 Wörthsee - Germany Tel.: ++49-(0) 81 53 / 8 85-0 Fax: ++49-(0) 81 53 / 80 30 Internet: www.soyer.de Zertifizierter Sicherheit geprüft...
Need help?
Do you have a question about the BMK-12W and is the answer not in the manual?
Questions and answers