
Related Manuals for Soyer SRM EcoWeld BMK-20i


Summary of Contents for Soyer SRM EcoWeld BMK-20i
- Page 1 Operating Instructions Stud Welding Device BMK-20i GB: English ersion Read these operating instructions before starting any work! Doc.ID: P00265 Date of issue: 06.2021 www.soyer.com...
- Page 3 PH-2L Stud welding gun PH-4L Operating Instructions Document no.: P00265, 06-2021, translation of the original German manual (German: P00165) All information contained in this document is the property of Heinz Soyer Bolzenschweißtechnik GmbH. Revision status Document created / modified Editor...
-
Page 4: Table Of Contents
Cleaning the welding gun ..................... 36 Description of the PH-2L and PH-4L stud welding guns ..........37 Description of the PH-2L stud welding gun ................37 Technical data of the PH-2L stud welding gun ..............38 Operating instructions BMK-20i | Heinz Soyer Bolzenschweißtechnik... - Page 5 Welding defects and their causes ..................73 Maintenance and repair ...................... 77 Service ..........................77 Spare and conversion parts ....................78 15.1 Spare and conversion parts for drawn arc welding with ceramic ferrules ......78 Warranty conditions ......................79 Operating instructions BMK-20i | Heinz Soyer Bolzenschweißtechnik...
-
Page 6: General Information
The following terms in these instructions are used with registered trademarks: ® SRM stands for magnetic field stud welding and refers to ® SRM Technology welding or stud welding in a radially symmetrical magnetic field. ®: SOYER Developments/technologies of Soyer GmbH. Operating instructions BMK-20i | Heinz Soyer Bolzenschweißtechnik... -
Page 7: Abbreviations And Definitions
The devices are designed and constructed in accordance with the generally accepted codes of practice. Please note that significant changes to the device will cause the declaration of conformity to become void. Furthermore, the manufacturer's warranty may be rendered invalid. Operating instructions BMK-20i | Heinz Soyer Bolzenschweißtechnik... - Page 8 EMC Directive (2014/30/EU) Applied harmonised EN 60 974-1:2018 + A1:2019 standards, in particular EN 60 974-10:2016 Applied national standards DGUV Regulation 1 Date 01 February 2021 Producer’s signature ____________________ Signer’s function Managing Director Operating instructions BMK-20i | Heinz Soyer Bolzenschweißtechnik...
-
Page 9: Manufacturer
DIN EN IEC 60974-9 Arc welding equipment - Installation and use Technical Bulletin DVS 0904 Instruction for practice - Arc stud welding Operating instructions BMK-20i | Heinz Soyer Bolzenschweißtechnik... -
Page 10: Important Safety Instructions
Do not touch or open, danger to unauthorised persons. Danger to persons with medical implants such as pacemakers. The information sign is not a warning sign. It indicates important and useful information on the subject. Operating instructions BMK-20i | Heinz Soyer Bolzenschweißtechnik... -
Page 11: General Safety Instructions
Starting the device with faulty protective devices is not permitted. Faulty protective devices must be repaired or replaced immediately. Unintentional operation by third parties must be prevented. Operating instructions BMK-20i | Heinz Soyer Bolzenschweißtechnik... - Page 12 Danger of explosion from an inappropriate installation site in explosive atmospheres The device is not designed for use in potentially explosive zones. The device must not be installed and operated in potentially explosive atmospheres. Operating instructions BMK-20i | Heinz Soyer Bolzenschweißtechnik...
- Page 13 Fire hazard from hot welding spatter Welding spatter or hot workpieces produced during the welding process can result in fire hazard. Do not store combustible or highly inflammable materials in the welding area. Operating instructions BMK-20i | Heinz Soyer Bolzenschweißtechnik...
-
Page 14: Safety Instructions For The Working Method
Do not look directly into the flash. The gun carries out lifting movements during the welding process. Do not hold the gun tight in the area of moving parts. Operating instructions BMK-20i | Heinz Soyer Bolzenschweißtechnik... -
Page 15: Personal Protective Equipment
Welding spatters occur during the welding process. Wear appropriate, non-combustible, heat-resistant safety footwear. Hearing protection Depending on the welding device and the welding application, relatively loud welding noises may occur. Wear appropriate hearing protection. Operating instructions BMK-20i | Heinz Soyer Bolzenschweißtechnik... -
Page 16: Intended Use Of The Stud Welding Device
M3 to M16 as well as many different weld fasteners made of steel ® and stainless steel can be welded according to the DIN EN ISO 13918 and SOYER standards. The maximum diameter and type of weldable studs can be limited by the performance capacity of the stud welding device on which the gun is operated. -
Page 17: Incorrect Use
If welding personnel have to be qualified for certification of welding, the DIN EN ISO 14555 and DIN EN ISO 14732 standards are to be observed. Operating instructions BMK-20i | Heinz Soyer Bolzenschweißtechnik... -
Page 18: Transport
In general: Work on live elements may only be performed by authorised electricians. This work must be performed in line with the applicable technical rules for electrotechnical devices. All devices of Soyer Bolzenschweißtechnik GmbH must only be opened by ® ®... -
Page 19: Description Of The Bmk-20I Stud Welding Device
BMK-20i stud welding device, pins and threaded studs from M3 to ® ® M16 or Ø 2 - 16 mm (M16 preferred with SOYER HZ-1 weld studs & SRM Technology made of steel and stainless steel can be welded. ®... -
Page 20: Stud Welding With Srm Technology
Following inert gas mixtures are recommended: 82% argon and 18% CO (standard inert gas) (preferably with Ø ≥ 12 mm) 90% argon and 10% CO 85% argon and 15% CO Operating instructions BMK-20i | Heinz Soyer Bolzenschweißtechnik... -
Page 21: Drawn Arc Stud Welding Technology Using Inert Gas
Functional principle The stud touches the The stud is lifted from the The stud immerses in the workpiece. workpiece. The arc is welding pool. The material ignited. solidifies and the stud is solidly welded. Operating instructions BMK-20i | Heinz Soyer Bolzenschweißtechnik... -
Page 22: Drawn Arc Stud Welding Technology With Ceramic Ferrules
The stud is lifted from the The stud immerses in the workpiece. workpiece. The arc is welding pool. The material ignited. solidifies and the stud is solidly welded. IMPORTANT Protect ceramic ferrules from moisture and humidity. Operating instructions BMK-20i | Heinz Soyer Bolzenschweißtechnik... -
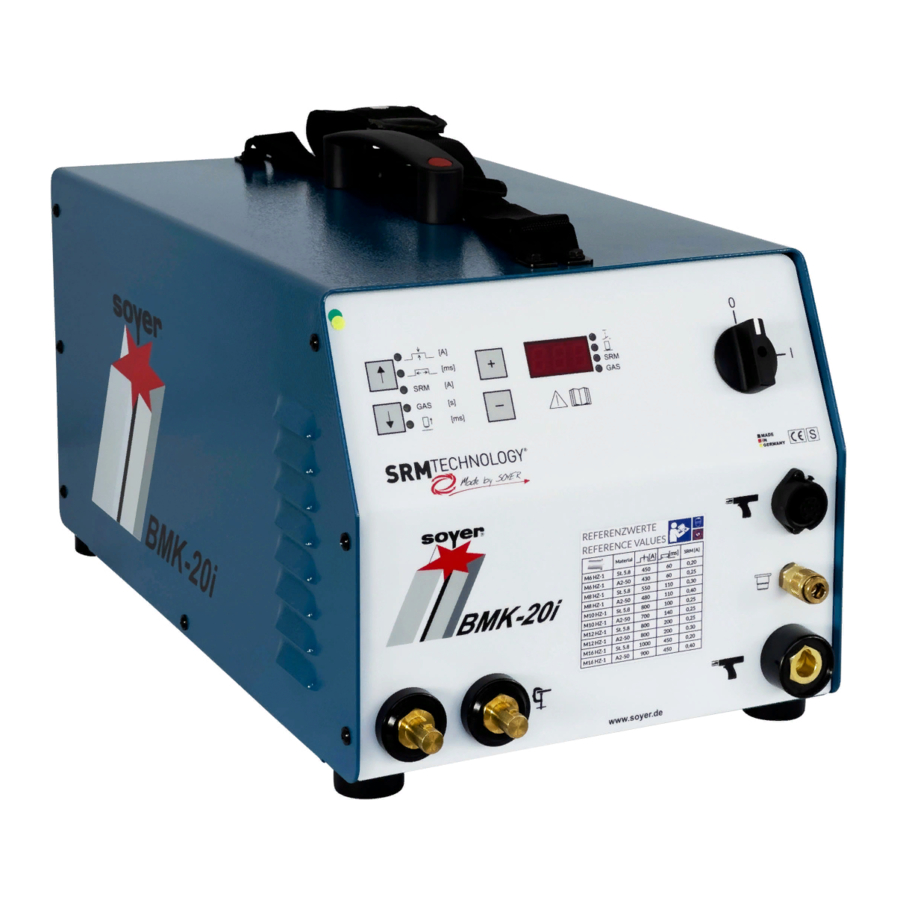
Page 23: Overview Of The Controls And Connecting Elements
Mains switch for turning the device ON / OFF Control cable connection of the gun Inert gas connection of the gun, coupling socket KD ¼ Welding cable connection of the gun Table for setting values Connection of the earth cable Operating instructions BMK-20i | Heinz Soyer Bolzenschweißtechnik... - Page 24 Figure 2: Overview of the back of the device Item Designation Fuse element with fuse 1 AT Mains supply cable Gas connection KS-1/4 (maximum permissible amount of gas: 12 l/min) Type plate Operating instructions BMK-20i | Heinz Soyer Bolzenschweißtechnik...
-
Page 25: Display And Setting Area
• Release button of the gun is pressed • Gun is placed on the workpiece and ready for welding • SRM ® is active • Gas preflow is active The LED next to the active operating state lights up. Operating instructions BMK-20i | Heinz Soyer Bolzenschweißtechnik... -
Page 26: Technical Data Of The Bmk-20I Stud Welding Device
IP 23 Inert gas connection max. 12 l/min Dimensions approx. 320 x 310 x 610 mm (w x h x d) Weight approx. approx. 25 kg (with cable) Colour Blue Subject to technical changes Operating instructions BMK-20i | Heinz Soyer Bolzenschweißtechnik... -
Page 27: Permitted Welding Guns
Hazards for the operator may occur when a wrong welding gun is used. Only use welding guns permitted by Soyer GmbH. The use of other guns or guns from another manufacturer invalidate the declarations of conformity and warranties of Soyer GmbH. -
Page 28: Cleaning The Stud Welding System
Make sure that no detergents get into the device. Do not use aggressive detergents for cleaning the device. The frequency of cleaning depends on the operating conditions of the stud welding device. Operating instructions BMK-20i | Heinz Soyer Bolzenschweißtechnik... -
Page 29: Description Of Stud Chuck
When using studs with a length > 45 mm, the stop screw must be shortened. If the setting screw is too long, the stud chuck cannot be fully inserted into the welding gun or the lift test during welding cannot be carried out properly. Operating instructions BMK-20i | Heinz Soyer Bolzenschweißtechnik... - Page 30 If the stud protrusion is more than 10 mm, the required transverse magnetic field is deflected sideways which can lead to ® uncontrolled SRM welding. Step 5: Fix the end screw with the locknut. The adjustment is complete. Operating instructions BMK-20i | Heinz Soyer Bolzenschweißtechnik...
-
Page 31: Drawn Arc Stud Chucks
Different stud diameters require different stud chucks. Check after installation that the stud chuck is tightly screwed. There is a risk of scorching during the welding process when the stud chuck is screwed too loosely. Operating instructions BMK-20i | Heinz Soyer Bolzenschweißtechnik... -
Page 32: Description Of The Ph-3N Srm Stud Welding Gun
To do so, please refer to chapter "11.1.5 Setting the lift height (drop time) in the "Setup" mode" on page 67. The lift height is set using the adjustment wheel (e) on the gun. Operating instructions BMK-20i | Heinz Soyer Bolzenschweißtechnik... -
Page 33: Technical Data Of The Ph-3N Srm Stud Welding Gun
• BMK-8i, BMK-8i ACCU • BMK-10i • BMK-12i • BMK-20i • BMK-16i (*) Weight 1.3 kg without cable Subject to technical changes (*) with adapter plug, see chapter "6.5 Permitted welding guns" on page 27. Operating instructions BMK-20i | Heinz Soyer Bolzenschweißtechnik... -
Page 34: Installing The Srm Stud Chuck In The Ph-3N Srm Welding Gun
If there is still a stud chuck in the gun, remove it. Step 6: Slide the stud chuck up to the stop into the spring piston of the gun. Step 7: Hand-tighten the union nut. Operating instructions BMK-20i | Heinz Soyer Bolzenschweißtechnik... - Page 35 If necessary, correct the settings of the stud chuck by shifting the support. 1 - 1.5 mm Step 9: Fasten the support with the inert gas shroud to the gun. The adjustment is complete. Operating instructions BMK-20i | Heinz Soyer Bolzenschweißtechnik...
-
Page 36: Cleaning The Welding Gun
Welding spatter and slag can have sharp edges. Wear protective gloves when cleaning. To prevent impurities from welding spatter and slag and to simplify cleaning, ® we recommend using SOYER release spray (order number M01464). Operating instructions BMK-20i | Heinz Soyer Bolzenschweißtechnik... -
Page 37: Description Of The Ph-2L And Ph-4L Stud Welding Guns
The lift height can be determined via the drop time using the stud welding device. See chapter “11.1.5 Setting the lift height (drop time) in the "Setup" mode” on page 67. The lift height is set using the adjustment wheel (f) on the gun. Operating instructions BMK-20i | Heinz Soyer Bolzenschweißtechnik... -
Page 38: Technical Data Of The Ph-2L Stud Welding Gun
• BMK-20i (*) Weight 7.2 kg with cable Subject to technical changes (*) Depending on the type of equipment, adapter plugs may be required. See also chapter “6.5 Permitted welding guns“ on page 27. Operating instructions BMK-20i | Heinz Soyer Bolzenschweißtechnik... -
Page 39: Adjusting The Speed Of Immersion (Damping) For Ph-2L
Studs with a diameter of up to 12 mm do not require any damping. ® ® You do not need damping when stud welding with SOYER SRM Technology A damped immersion speed helps to avoid excessive spatter formation when welding studs of more than 10 mm in diameter. -
Page 40: Description Of The Ph-4L Stud Welding Gun
The lift height can be determined via the drop time using the stud welding device. See chapter “11.1.5 Setting the lift height (drop time) in the "Setup" mode” on page 67. The lift height is set using the adjustment wheel (f) on the gun. Operating instructions BMK-20i | Heinz Soyer Bolzenschweißtechnik... -
Page 41: Technical Data Of The Ph-4L Stud Welding Gun
• BMK-20i (*) Weight 7.2 kg with cable Subject to technical changes (*) Depending on the type of equipment, adapter plugs may be required. See also chapter “6.5 Permitted welding guns“ on page 27. Operating instructions BMK-20i | Heinz Soyer Bolzenschweißtechnik... -
Page 42: Adjusting The Speed Of Immersion (Damping) For Ph-4L
Studs with a diameter of up to 12 mm do not require any damping. ® ® You do not need damping when stud welding with SOYER SRM Technology Adjusting the damping of the PH-4L stud welding gun Switch off the stud welding device when the gun is connected to it. -
Page 43: Ph-2L And Ph-4L Stud Welding Guns With Srm Technology
SRM support. support # F06576/FA If you are unsure about optional equipment/accessories, please contact your responsible field service or contact us directly at export@soyer.de. support / Notes on assembly and disassembly ® The plug-in connection (a) for the SRM coil is secured by a union nut. - Page 44 To this end, turn the setting screw (a) to the left until stop. Figure shows PH-4L (PH-2L is similar) Damping can only be adjusted when the welding gun is not positioned on the workpiece (spring housing is in rest position). Operating instructions BMK-20i | Heinz Soyer Bolzenschweißtechnik...
-
Page 45: How To Retrofit The Ph-2L And Ph-4L Stud Welding Guns To Srm Technology
If there is still a stud chuck in the gun, remove it. Step 6: Select a suitable stud chuck according to the stud dimension. Slide the stud chuck up to the stop into the adapter sleeve. Step 7: Hand-tighten the union nut. Operating instructions BMK-20i | Heinz Soyer Bolzenschweißtechnik... - Page 46 1 - 1.5 mm from the inert gas shroud. If necessary, correct the setting of the stud chuck by shifting the support. Step 9: Fasten the support with the inert gas shroud to the gun. The adjustment is complete. Operating instructions BMK-20i | Heinz Soyer Bolzenschweißtechnik...
-
Page 47: Ph-2L And Ph-4L Stud Welding Guns With Drawn Arc & Inert Gas
Depending on the scope of delivery, your stud welding gun is already equipped with a support for inert gas. Support # F04681/FA If you are unsure about optional equipment/accessories, please contact your responsible field service or contact us directly at export@soyer.de. Operating instructions BMK-20i | Heinz Soyer Bolzenschweißtechnik... -
Page 48: How To Retrofit The Ph-2L And Ph-4L Stud Welding Guns To Drawn Arc Welding With Inert Gas
Screw on the stud chuck. Step 5: The stud chuck must be tightly screwed. When screwed connection is not tight enough, there is a risk of scorching during the welding process. Operating instructions BMK-20i | Heinz Soyer Bolzenschweißtechnik... - Page 49 3 mm from the inert gas shroud. If necessary, correct the setting of the stud chuck by shifting the support. Step 7: Fasten the support by means of the Allen screws of the gun. The adjustment is complete. Operating instructions BMK-20i | Heinz Soyer Bolzenschweißtechnik...
-
Page 50: Ph-2L And Ph-4L Stud Welding Guns With Drawn Arc & Ceramic Ferrule
PH-2L and PH-4L support for ceramic ferrules If you are unsure about optional equipment/accessories, please contact your responsible field service or contact us directly at export@soyer.de. Ensure a minimum stud length when welding with ceramic ferrules. Minimum stud length = Height of ceramic ferrule + 15 mm, e.g. ceramic ferrule for MR10 weld stud = 10 mm high + 15 mm = minimum stud length of 25 mm. -
Page 51: How To Retrofit The Ph-2L And Ph-4L Stud Welding Guns To Drawn Arc Welding With Ceramic Ferrule
Insert the ferrule grip into a suitable foot plate. Fasten the ferrule grip by means of the Allen screws of the foot plate. Step 4: Mount both support rods. The preparation is complete. Operating instructions BMK-20i | Heinz Soyer Bolzenschweißtechnik... - Page 52 Screw on the stud chuck. Step 5: The stud chuck must be tightly screwed. When screwed connection is not tight enough, there is a risk of scorching during the welding process. Operating instructions BMK-20i | Heinz Soyer Bolzenschweißtechnik...
- Page 53 2. Align the foot plate so that the stud is centred in the ceramic ferrule and does not touch the ceramic ferrule. 3. Then tighten both fastening screws of the foot plate. The adjustment is complete. Operating instructions BMK-20i | Heinz Soyer Bolzenschweißtechnik...
-
Page 54: Cleaning The Welding Gun
Welding spatter and slag can have sharp edges. Wear protective gloves when cleaning. To prevent impurities from welding spatter and slag and to simplify cleaning, ® we recommend using SOYER release spray (order number M01464). Operating instructions BMK-20i | Heinz Soyer Bolzenschweißtechnik... -
Page 55: Setup And Connection
Danger from welding vapours Vapours that are dangerous to health may occur, depending on the material of the workpiece and/or the welding stud. If necessary, ensure that the welding fumes are suitably extracted. Operating instructions BMK-20i | Heinz Soyer Bolzenschweißtechnik... -
Page 56: Connection Of The Stud Welding Device And The Stud Welding Guns
Insert both earth cables into the sockets and turn the plug to the right up to the stop. Then connect both earth cables to the workpiece (ensure conductive connection). Operating instructions BMK-20i | Heinz Soyer Bolzenschweißtechnik... -
Page 57: Connecting The Stud Welding Gun
The gas connection on the back of the device is used for supplying gas to the stud welding device via a pressure reducer (pressure reduction valve not included in the scope of delivery). The maximum permissible operating value for the inert gas amount is 12 l/min. Operating instructions BMK-20i | Heinz Soyer Bolzenschweißtechnik... - Page 58 Valve for regulating the gas flow rate (maximum permissible gas quantity: 12 l/min) The following inert gas mixtures are recommended: 82% argon and 18% CO (preferred) 90% argon and 10% CO 85% argon and 15% CO Operating instructions BMK-20i | Heinz Soyer Bolzenschweißtechnik...
- Page 59 See chapter “11.1.4 Setting the gas preflow time (gas test)“ on page Step 5: Connect the inert gas hose of the gun to the stud welding device. The gas supply is established. Operating instructions BMK-20i | Heinz Soyer Bolzenschweißtechnik...
- Page 60 Safeguard the gas supply against unauthorised access. The following inert gas mixtures are recommended: 82% argon and 18% CO (preferred) 90% argon and 10% CO 85% argon and 15% CO Operating instructions BMK-20i | Heinz Soyer Bolzenschweißtechnik...
-
Page 61: Settings
The parameters to be set on the stud welding device also depend, among other things, on the following factors: • Material of the workpiece • Thickness of the workpiece • Material of the welding stud • Diameter of the welding stud Operating instructions BMK-20i | Heinz Soyer Bolzenschweißtechnik... -
Page 62: Support Tables For Device Settings
The values were determined on a sheet with a thickness of 5 mm. Applied gas: 82%AR 18%CO . Gas flow rate: 7-10 l/min Abbreviations and definitions HZ-1: SOYER ® universal studs with centring tip Operating instructions BMK-20i | Heinz Soyer Bolzenschweißtechnik... - Page 63 Gas preflow time = 1 s Drop time ~ 10-12 ms The values were determined on a sheet with a thickness of 5 mm. Applied gas: 82%AR 18%CO . Gas flow rate: 7-10 l/min Operating instructions BMK-20i | Heinz Soyer Bolzenschweißtechnik...
-
Page 64: Setting The Welding Current And The Welding Time
The LED lights up if the selection is correct. Step 5: Use the +/- keys to set the required value for the welding time on the display. The welding time has been set. Operating instructions BMK-20i | Heinz Soyer Bolzenschweißtechnik... -
Page 65: Setting/Deactivating The Srm Current
0 - 1.5 A (displayed in A) in 50 mA- steps (0.05 A). ® If the setting is "0", SRM is deactivated. ® The SRM current has been set. Operating instructions BMK-20i | Heinz Soyer Bolzenschweißtechnik... -
Page 66: Setting The Gas Preflow Time (Gas Test)
The LED lights up if the selection is correct. Step 3: Use the +/- keys to set the required value (1-5 s) for the gas preflow time on the display. The gas preflow time has been set. Operating instructions BMK-20i | Heinz Soyer Bolzenschweißtechnik... -
Page 67: Setting The Lift Height (Drop Time) In The "Setup" Mode
Step 2: Fit the gun with a welding stud. Use the ↑↓ arrow keys to select the Step 3: position for the lift test. The LED lights up if the selection is correct. Operating instructions BMK-20i | Heinz Soyer Bolzenschweißtechnik... - Page 68 Notes on "Setup" mode The setup process can be repeated as often as required. However, to avoid the magnetic coil overheating, maintain a waiting time of approx. one second between two test strokes. Operating instructions BMK-20i | Heinz Soyer Bolzenschweißtechnik...
-
Page 69: Welding Operation
Insert the appropriate stud chuck and a welding stud (see chapter “7 Description of stud chuck” on page 29). Step 3: ® Only use SOYER welding studs. Check the welding parameters (see chapter “11 Settings” on page 61). Step 4: Operating instructions BMK-20i | Heinz Soyer Bolzenschweißtechnik... - Page 70 During the welding process, hold the gun still and only remove it vertically from the welded stud after completing the welding process. By doing so, widening or damaging the stud chuck is avoided. The welding process is finished. Operating instructions BMK-20i | Heinz Soyer Bolzenschweißtechnik...
-
Page 71: Notes On Checking The Quality Of The Weld
Poor weld joint, e.g. due to a blow effect or a welding gun that was shaken or applied at a slant. The stud flange is not fully welded and has visible imperfections. Undercuts are visible. Operating instructions BMK-20i | Heinz Soyer Bolzenschweißtechnik... -
Page 72: Switching Off The Device
If the stud welding device is not used for a longer period of time, we recommend disconnecting it completely from the grid. Carefully unplug the mains connecting cable to disconnect the stud welding device from the power supply. Operating instructions BMK-20i | Heinz Soyer Bolzenschweißtechnik... -
Page 73: Welding Defects And Their Causes
12.4 Welding defects and their causes The most common weld defects, their possible causes and how to troubleshoot them are described in the following. If a problem cannot be solved, please contact Heinz Soyer Bolzenschweißtechnik GmbH. Faults Possible cause and troubleshooting ... - Page 74 Lift is too large. current is not ignited. Set the lift in accordance with the operating manual for your welding gun. Gas pressure is too high. Set the gas pressure to the specified value. Operating instructions BMK-20i | Heinz Soyer Bolzenschweißtechnik...
- Page 75 Main current duration set too long. formation, stud flange almost melted Re-adjust the time for the main current duration according to the away. table. Welding current set too high. Re-adjust the welding current. Operating instructions BMK-20i | Heinz Soyer Bolzenschweißtechnik...
- Page 76 Grind off the surface. Faulty mains supply. Check the mains supply fuses. Fuse in the device is defective. Contact customer service. Scorched stud thread Stud chuck is worn out. Replace the stud chuck. Operating instructions BMK-20i | Heinz Soyer Bolzenschweißtechnik...
-
Page 77: Maintenance And Repair
13 Maintenance and repair Maintenance and repair of the stud welding device and the stud welding guns may only be performed by Heinz Soyer Bolzenschweißtechnik GmbH or authorised specialists. 14 Service If servicing is required, please contact: Heinz Soyer Bolzenschweißtechnik GmbH Inninger Straße 14... -
Page 78: Spare And Conversion Parts
KR 8 – KR 10 Ferrule grip F03769 Ferrule grip KR 12 F03770 KR 16 – KR 22 Ferrule grip F03771 Conical socket (n) M01440 Countersunk head M6 x 25 mm M01439 screw (n) Operating instructions BMK-20i | Heinz Soyer Bolzenschweißtechnik... -
Page 79: Warranty Conditions
When using welding studs from external manufacturers, we do not assume any warranty for proper function of the stud welding system and the quality of the welding joint. Operating instructions BMK-20i | Heinz Soyer Bolzenschweißtechnik... - Page 80 Heinz Soyer Bolzenschweißtechnik GmbH Inninger Straße 14 82237 Wörthsee Tel.: 0049-8153-885-0 Mail: info@soyer.de www.soyer.de...
Need help?
Do you have a question about the SRM EcoWeld BMK-20i and is the answer not in the manual?
Questions and answers