Table of Contents
Advertisement
Quick Links
Advertisement
Table of Contents

Subscribe to Our Youtube Channel
Related Manuals for Insportline IN 21965 Verticon Profi


Summary of Contents for Insportline IN 21965 Verticon Profi
- Page 1 USER MANUAL – EN IN 21965 Verticon inSPORTline Profi...
-
Page 2: Table Of Contents
CONTENTS SAFETY INSTRUCTIONS ........................3 PRODUCT DESCRIPTION ........................4 ASSEMBLY ............................. 5 CONSOLE ............................. 11 USE ............................... 11 MAINTENANCE ............................ 12 DIAGRAM .............................. 13 PARTS LIST ............................14 ENVIRONMENT PROTECTION ......................16 TERMS AND CONDITIONS OF WARRANTY, WARRANTY CLAIMS ..........16... -
Page 3: Safety Instructions
SAFETY INSTRUCTIONS • Read the manual carefully before first use and assembly and keep it for future reference. • Only assemble the device on a flat and clean surface so as not to affect its functionality. • Clean the device regularly. Metal parts can easily rust. •... -
Page 4: Product Description
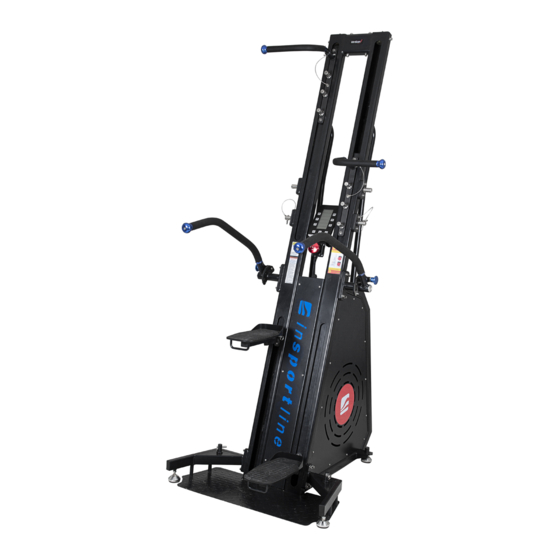
PRODUCT DESCRIPTION Handles Console Resistance adjustment Handles Pedals Support beam Leveling feet Transport wheels Handle adjustment... -
Page 5: Assembly
ASSEMBLY • Make sure you have enough space before assembly. • Place all parts in an empty area and remove all packaging material. • Make sure you follow all instructions carefully. • After assembly check that all bolts are tighten. •... - Page 6 Step 1 Attach the leveling feet (71) to the right and left support beams (5 and 14), and then attach the right and left support beams (5 and 14) to the main frame with the 4x bolts (109) and 4x washers (108). Level the device with the leveling feet.
- Page 7 Step 2 Attach the right and left handles (3 and 13) to the main frame with plates (2 and 12), 4x bolts (109) and 4x washers (108). Tighten the handles so that they do not move.
- Page 8 Step 3 Attach the handles (6 and 15) to the main frame with 2x pins (72). Attach the pedals (7) with 2x pins (72).
- Page 9 Step 4 Connect the console cables (20) to the main frame cables. Attach the console (20) using the 4x bolts (115).
- Page 10 Step 5 Make sure that all parts are functional, and all bolts are properly tightened.
-
Page 11: Console
CONSOLE Console is powered by 4x batteries. Console has one display with 6x buttons. 1. TIME / CALORIES – You can setup countdown of time or burned calories. 2. INTERVAL / DISTANCE – You can setup time values of interval training and distance countdown. -
Page 12: Maintenance
adjustable handles and let your arms, shoulders, chest and back engage in your workout. If your shoulders hurt while exercising, place your hands on the firm handles. Make sure you keep your head straight and look ahead and avoid straining your neck while exercising. If you want to increase the intensity of the exercise, lift your legs higher or increase the frequency. -
Page 13: Diagram
DIAGRAM... -
Page 14: Parts List
PARTS LIST Name Qty. Name Qty. Main frame Rope bean Right handlebar bracket Pulley 105 Right handlebar Top plate Magnet Right support beam Sensor holder Right handlebar Sensor Leveling feet One-way pulley bolt Right rail TZ-7022-0128B Console bracket TZ-7022-0128A Cogs for chain Reluctance adjustment seat Chain cover Magnetic block... - Page 15 Gasket Ф10 Plug Bolt Nut M10x9 Stopping block Allen bolt M5x15 Letter mark Allen bolt M8x15 Gasket Ф10xФ5.5Ф1.0t Letter mark Aluminium plate Bolt M5x10 Small sprocket Allen bolt M10x120 Chain Allen bolt M10x12 Resistance regulator cover Bolt M4x8 Collision gasket Allen bolt M5x8 TZ-7022-S32 Allen bolt M12x60...
-
Page 16: Environment Protection
Washer Ф3 Stainless case Allen bolt M8x40 ENVIRONMENT PROTECTION After the product lifespan expired or if the possible repairing is uneconomic, dispose it according to the local laws and environmentally friendly in the nearest scrapyard. By proper disposal you will protect the environment and natural sources. Moreover, you can help protect human health. - Page 17 26847264 VAT ID: CZ26847264 Phone: +420 556 300 970 E-mail: eshop@insportline.cz reklamace@insportline.cz servis@insportline.cz Web: www.inSPORTline.cz inSPORTline s.r.o. Headquaters, warranty & service center: Električná 6471, Trenčín 911 01, SK CRN: 36311723 VAT ID: SK2020177082 Phone: +421(0)326 526 701 E-mail: objednavky@insportline.sk reklamacie@insportline.sk servis@insportline.sk...
Need help?
Do you have a question about the IN 21965 Verticon Profi and is the answer not in the manual?
Questions and answers