Table of Contents
Advertisement
Quick Links
Advertisement
Table of Contents

Related Manuals for Ronix 8902


Summary of Contents for Ronix 8902
- Page 1 BRUSHLESS CIRCULAR SAW 8902...
-
Page 3: Specification
Bore Diameter 20mm Weight 2.7KG Accessories 1pc spanner THIS PRODUCT DOES NOT INCLUDE BATTERIES OR CHARGER USABLE BATTERIES FOR 8902 Ronix Model No. Product 8990 20V battery pack, 2.0Ah Li-ion battery 8991 20V battery pack, 4.0Ah Li-ion battery USABLE CHARGERS FOR 8902 Ronix Model No. -
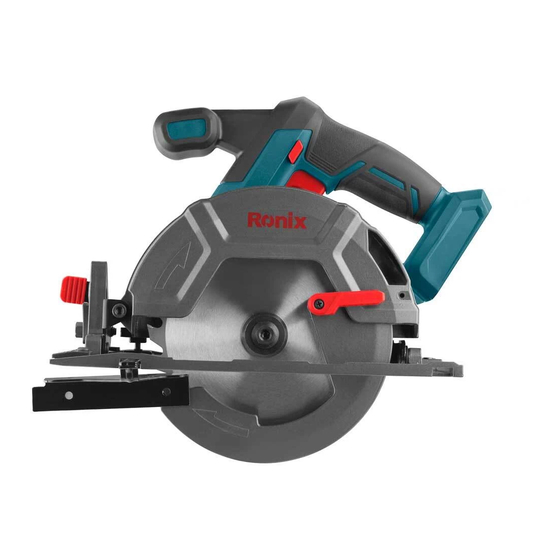
Page 4: Part List
PART LIST Lock-off button for Auxiliary Handle on/off switch Battery Handle on/off switch Protective Guard Cutting blade Base movable Guard plate GENERAL POWER TOOL SAFETY RULES - Read all safety warnings and all instructions. Failure to follow the warnings and instructions may result in electric shock, fire and/or serious injury. -
Page 5: Electrical Safety
presence of flammable liquids, gases or dust. Power tools create sparks which may ignite the dust or fumes. -Keep children and bystanders away while operating a power tool. Distractions can cause you to lose control. ELECTRICAL SAFETY - Power tool plugs must match the outlet. Never modify the plug in any way. - Page 6 reduce personal injuries. - Prevent unintentional starting. Ensure the switch is in the off-position before connecting to power source and/ or battery pack, picking up or carrying the tool. Carrying power tools with your finger on the switch or energizing power tools that have the switch on invites accidents. - Remove any adjusting key or wrench before turning the power tool on.
-
Page 7: Cutting Procedures
SERVICE - Have your power tool serviced by a qualified repair person using only identical replacement parts. This will ensure that the safety of the power tool is maintained. - Follow instruction for lubricating and changing accessories. - Keep handles dry, clean and free from oil and grease. CORDLESS CIRCULAR SAW SAFETY WARNINGS CUTTING PROCEDURES 1) DANGER: Keep hands away from cutting area and the blade. - Page 8 use. Many accidents are caused by poorly maintained power tools. - Keep cutting tools sharp and clean. Properly maintained cutting tools with sharp cutting edges are less likely to bind and are easier to control. - Use the power tool, accessories and tool bits etc. in accordance with these instructions, taking into account the working conditions and the work to be performed.
-
Page 9: Kickback Causes And Related Warnings
performance and safety of operation. KICKBACK CAUSES AND RELATED WARNINGS − kickback is a sudden reaction to a pinched, bound or misaligned saw blade, causing an uncontrolled saw to lift up and out of the workpiece toward the operator. − when the blade is pinched or bound tightly by the kerf closing down, the blade stalls and the motor reaction drives the unit rapidly back toward the operator. -
Page 10: Lower Guard Function
blades produce narrow kerf causing excessive friction, blade binding and kickback. 14) Blade depth and bevel adjusting locking levers must be tight and secure before making cut. If blade adjustment shifts while cutting, it may cause binding and kickback. 15) Use extra caution when sawing into existing walls or other blind areas. - Page 11 and depths of cut. 19) Check the operation of the lower guard spring. If the guard and the spring are not operating properly, they must be serviced before use. Lower guard may operate sluggishly due to damaged parts, gummy deposits, or a build-up of debris.
- Page 12 DO NOT TRY TO HOLD SHORT PIECES BY HAND! 28) Before setting the tool down after completing a cut, be sure that the Indicator lamps Remaining capacity lower guard has closed and the blade has come to a complete stop. Lighted 29) Never attempt to saw with the circular saw held upside down in a % to...
- Page 13 blade or guard operation which could result in serious personal injury. 34) Keep blade sharp and clean. Gum and wood pitch hardened onblades slows saw and increases potential for kickback. Keep blade clean by first removing it from tool, then cleaning it with gum and pitch remover, hot water or kerosene.
- Page 14 4) If electrolyte gets into your eyes, rinse them out with clear water and seek medical attention right away. It may result in loss of your eyesight. 5) Do not short the battery cartridge: (1) Do not touch the terminals with any conductive material. (2) Avoid storing battery cartridge in a container with other metal objects such as nails, coins, etc.
-
Page 15: Functional Description
FUNCTIONAL DESCRIPTION CAUTION: Always be sure that the tool is switched off and thebattery cartridge is removed before adjusting orchecking function on the tool.Installing or removing battery cartridge. Indicator lamps Remaining CAUTION: capacity Lighted Always switch off the tool before installing orremoving of the battery cartridge. % to 100% Hold the tool and the battery cartridge firmly when installing or removing... - Page 16 in easily, it is not being inserted correctly. NOTE: When the battery cartridge is not removed easily, push it from the opposite side of the button and slide it. INDICATING THE REMAINING BATTERY CAPACITY Press the check button on the battery cartridge to indicate the remaining Remaining capacity battery capacity.
- Page 17 To prevent the switch trigger from being accidentallypulled, a lock-off lever is provided. To start the tool,press the lock-off lever and pull the switch trigger.Release the switch trigger to stop. WARNING! For your safety, this tool is equipped with lock-off lever which prevents the tool from unintended starting.
- Page 18 Indicator lamps Remaining capacity For straight cuts, align the 0° position on the front of the base with your ighted cutting line. For 45° bevel cuts, align the 45° position with it. The position % to 100% of the top guide is adjustable. 35% to 75% 5% to 35% CAUTION:...
- Page 19 Indicator lamps Remaining capacity CAUTION: Lighted % to 100% Be sure the blade is installed with teeth pointing up at the front of the tool. Use only the T M G wrench to install or remove the blade. 35% to 75% 5% to 35% To remove the blade, press the shaft lock so that the blade cannot revolve and use the wrench to loosen the hex bolt clockwise.
- Page 20 Mount the inner flange with its recessed side facing outward onto the mounting shaft and then place saw blade, outer flange and hex bolt. BE SURE TO TIGHTEN THE HEX BOLT COUNTERCLOCKWISE SECURELY. CAUTION: Be sure to move the tool forward in a straight line gently. Forcing or twisting the tool will result in overheating the motor and dangerous kickback, possibly causing severe injury.
-
Page 21: Maintenance
serious injury. Release switch, wait for blade to stop and then withdraw tool. Realign tool on new cut line, and start cut again. Attempt to avoid positioning which exposes operator to chips and wood dust being ejected from saw. Use eye protection to help avoid injury. Rip fence (Guide rule) (optional accessory) The handy rip fence allows you to do extra-accurate straight cuts. - Page 22 cut (vertical and 45° cut) This adjustment has been made at the factory. But if it is off, adjust the adjusting screws with a hex wrench while inspecting 0° or 45° the blade with the base using a triangular rule or square rule, etc. Use the 45° stopper for adjusting 45°...
-
Page 23: Optional Accessories
OPTIONAL ACCESSORIES CAUTION: These accessories or attachments are recommended for use with your T M G tool specified in this manual. The use of any other accessories or attachments might present a risk of injury to persons. Only use acces- sory or attachment for its stated purpose.
Need help?
Do you have a question about the 8902 and is the answer not in the manual?
Questions and answers