Table of Contents
Advertisement
Quick Links
Advertisement
Table of Contents

Related Manuals for Ronix 5604


Summary of Contents for Ronix 5604
- Page 1 ELECTRIC TABLE SAW 5604...
-
Page 3: Technical Specification
TECHNICAL SPECIFICATION 5604 Model Power 2000W Voltage 220-240V Frequency 50-60Hz No Load Speed 4800RPM Disc Diamiter 250mm Tilt Range 0° To 45° φ250xφ30x2.8mm Saw Blade Size 0°: 72mm Max Cutting Capacity 45°: 50mm Main Table Size 546x643mm Sliding Extension Table... -
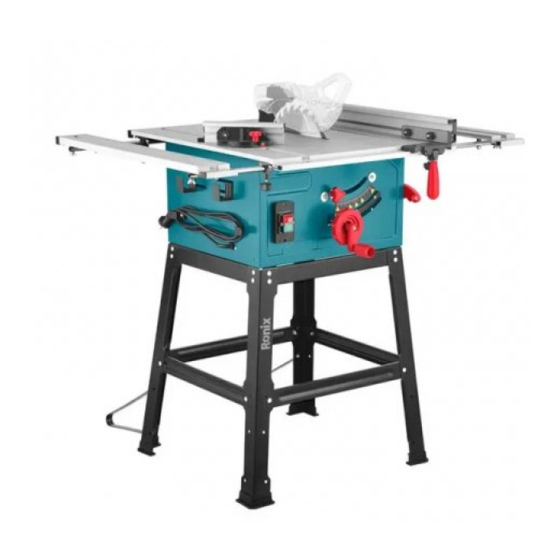
Page 4: Part List
PART LIST Side table lock Blade guard seat Fence/Rip fence Blade Cross cutting fence Side table extension Blade Table insert plate guard Plastic hook Push stick Cable winding Bevel angle lock hook Bevel angle Adjustment wheel ON/OFF Depth of cut handle Switch Table saw stand Stand rubber foot... -
Page 5: General Power Tool Safety Warnings
Read the instruction manual. Dangerous voltage. Caution! -Laser radiation. Do not look into beam Cutting danger. Product conforms to RoHs requirements General warning. Waste electrical products should not be Disposed of with household waste. Please recycle where facilities exist. Check with your Local Authority or retailer for recycling advice. -
Page 6: Work Area Safety
warnings and instructions may result in electric shock, fire, and or serious injury. - Save all warnings and instructions for future reference. - The term “power tool” in the warnings refers to your mains-operated (corded) power tools or battery-operated (cordless) power tools. WORK AREA SAFETY - Keep the work area clean and well-lit. -
Page 7: Personal Safety
- If operating a power tool in a damp location is unavoidable, use a residual current device (RCD) protected supply. The use of an RCD reduces the risk of electric shock. - Use of power supply via an RCD is always recommended. PERSONAL SAFETY - Stay alert, watch what you are doing, and use common sense when operating a power tool. - Page 8 application. The correct power tool will do the job better and safer at the rate for which it was designed. - Don’t use the power tool if the switch doesn’t turn on and off. Any power tool that cannot be controlled with the switch is dangerous and must be repaired.
- Page 9 GUARDING RELATED WARNINGS - Keep guards in place. Guards must be in working order and properly mounted. A guard that is loose, damaged, or not functioning correctly must be repaired or replaced. - Always use a saw blade guard, and riving knife for every through-cutting operation.
- Page 10 blade. A moment of inattention or a slip could direct your hand toward the saw blade and result in serious personal injury. - Feed the workpiece into the saw blade or cutter only against the direction of rotation. Feeding the workpiece in the same direction that the saw blade is rotating above the table may result in the workpiece and your hand, being pulled into the saw blade.
-
Page 11: Kickback Causes And Related Warnings
The material may become trapped between the fence or inside the saw blade guard and the saw blade pulling your fingers into the saw blade. Turn the saw off and wait until the saw blade stops before removing the material. - Use an auxiliary fence in contact with the tabletop when ripping workpieces less than 2mm thick. - Page 12 - Use extra caution when cutting a workpiece that is twisted, knotted, warped, or does not have a straight edge to guide it with a meter gauge or along the fence. A warped, knotted, or twisted workpiece is unstable and causes misalignment of the kerf with the saw blade, binding, and kickback.
-
Page 13: Intended Use
- Always use saw blades with the correct size and shape (diamond versus round) of arbor holes. Saw blades that do not match the mounting hardware of the saw will run off-center, causing a loss of control. - Never use damaged or incorrect saw blade mounting means such as flanges, saw blade washers, bolts, or nuts. -
Page 14: Before Starting The Equipment
- Important! When using the equipment, a few safety precautions must be observed to avoid injuries and damage. Please read the complete operating instructions and safety regulations with due care. - Keep this manual in a safe place, so that the information is available at all times. - Page 15 Foot A-upper A-under B-Upper B-Under Screw USER MANUAL...
-
Page 16: Stand Assembly
STAND ASSEMBLY A-upper B-upper Foot A-under B-under Foot A-upper A-under Foot ELECTRIC TABLE SAW... - Page 17 B-under B-under A-under A-under USER MANUAL...
- Page 18 EXTENSION TABLE ASSEMBLY STOP LOCK ACCESSORY ASSEMBLY AND USING ELECTRIC TABLE SAW...
- Page 19 01 x1 06 x1 0-45° 08 x1 SAW BLADE ADJUSTING 14 x1 USER MANUAL...
-
Page 20: Power Switch On/Off
90° 0-45° POWER SWITCH ON/OFF 17 x1 VACUUM CONNECTION 22 x1 ELECTRIC TABLE SAW... -
Page 21: Laser Assembly
SAW BLADE REPLACING LASER ASSEMBLY The laser enables you to make precision cuts with your table saw. The laser light is generated by a laser diode powered by batteries. The laser light is enlarged to form a line and is emitted through the laser USER MANUAL... -
Page 22: Operation
emission aperture. You can then use the line as an optical marker of the sawing line for precision cuts. Follow the safety instructions. - The laser beam can be blocked by deposits of dust and chips caused by sawing dust. You should therefore remove these particles from the laser emission aperture before you use the laser. -
Page 23: Cutting Narrow Workpieces
CROSS-CUTTING Cross-cutting requires the use of the miter gauge to position and guide the work. Place the work against the miter gauge and advance both the miter gauge and work toward the saw blade. The miter gauge may be used in either table T-slot, however, most operators prefer the left T-slot for average work. - Page 24 fence. Never, stand in the line of the saw cut when ripping. Hold the work with both hands and push it along the fence and into the saw blade. When this is done the work will either stay on the table, tilt up slightly and be caught by the rear end of the guard, or slide off the table to the floor.
Need help?
Do you have a question about the 5604 and is the answer not in the manual?
Questions and answers