Table of Contents
Advertisement
Quick Links
Advertisement
Table of Contents

Related Manuals for Ronix 5601


Summary of Contents for Ronix 5601
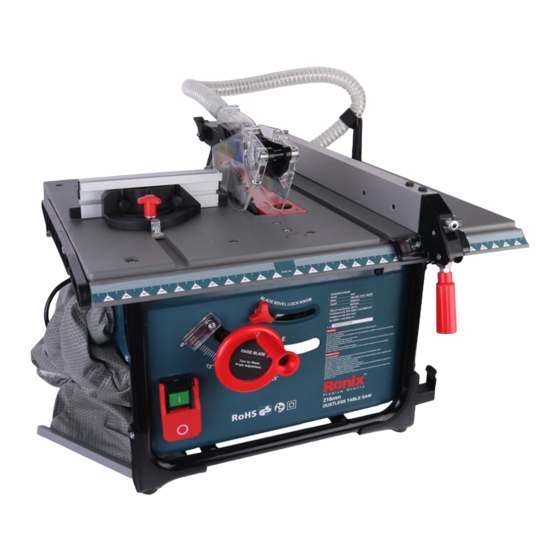
- Page 1 DUST COLLECTION TABLE SAW 5601...
-
Page 2: Specifications
SPECIFICATIONS Model 5601 Power 2000W Voltage 220V Frequency 50Hz No-load Speed 5000RPM Blade size 216x2.4mmx60T Disc diameter 216mm 90° : 60mm Max Cutting Capacity 45° : 40mm Weight 22Kg USER MANUAL... -
Page 3: Parts List
PARTS LIST 1-Main Switch 11-Suction Pipe 2-Overcurrent Protector 12-Cutting Plate 3-Handle Wheel 13-Circular Saw 216 mm 4-Lock Lever 14-Blade Guard 5-Graduation Ruler 15-Cross Cutting Fence 6-Cross Cutting Fence Holder 16-Dust Bag 7-Rip Fence Seat 17-Riving Knife 8-Extended Table 18-Blade Guard Seat 9-Rip Fence 19-Blade and Wrench Seat 10-Suction Pipe Holder... -
Page 4: Intended Use
INTENDED USE The table saw is a bench top saw, in which tilting the saw blade, the angle of the cutting plane can change. Wood and plastic and similar materials, in dimensions as in the instructions for use are capped. Only saw blades approved by the manufacturer, as specified in the instructions for use, may be used. -
Page 5: Electrical Safety
which may ignite the dust or fumes. c) Keep children and bystanders away while operating a power tool. distractions can cause you to lose control. ELECTRICAL SAFETY a) Power tool plugs must match the outlet. Never modify the plug in any way. - Page 6 operating power tools may result in serious personal injury. b) Use personal protective equipment. Always wear eye protection. Protective equipment such as a dust mask, non-skid safety shoes, hard hat or hearing protection used for appropriate conditions will reduce personal injuries. c) Prevent unintentional starting.
- Page 7 measures reduce the risk of starting the power tool accidentally. d) Store idle power tools out of the reach of children and do not allow persons unfamiliar with the power tool or these instructions to operate the power tool. power tools are dangerous in the hands of untrained users.
- Page 8 completely through the thickness of the workpiece, the guard and other safety devices help reduce the risk of injury. c) Immediately reattach the guarding system after completing an operation (such as rabbeting, dadoing or resawing cuts) which requires removal of the guard, riving knife. The guard, riving knife help to reduce the risk of injury.
- Page 9 do not use the rip fence as a length stop when cross cutting with the mitre gauge. Guiding the workpiece with the rip fence and the mitre gauge at the same time increases the likelihood of saw blade binding and kickback. d) When ripping, always apply the workpiece feeding force between the fence and the saw blade.
-
Page 10: Kickback Causes And Related Warnings
saw off and wait until the saw blade stops before removing material. l) Use an auxiliary fence in contact with the table top when ripping workpieces less than 2 mm thick. A thin workpiece may wedge under the rip fence and create a kickback. KICKBACK CAUSES AND RELATED WARNINGS a) Never stand directly in line with the saw blade. - Page 11 or along the fence. A warped, knotted, or twisted workpiece is unstable and causes misalignment of the kerf with the saw blade, binding and kickback. i) Never cut more than one workpiece, stacked vertically or horizontally. The saw blade could pick up one or more pieces and cause kickback. j) When restarting the saw with the saw blade in the workpiece, center the saw blade in the kerf so that the saw teeth are not engaged in the material.
- Page 12 round) of arbour holes. Saw blades that do not match the mounting hardware of the saw will run off-centre, causing loss of control. h) Never use damaged or incorrect saw blade mounting means such as flanges, saw blade washers, bolts or nuts. These mounting means were specially designed for your saw, for safe operation and optimum performance.
-
Page 13: Saw Blade Height Adjustment
SAW BLADE HEIGHT ADJUSTMENT Loosen the angle lock knob, turn the lift handle counterclockwise to raise the saw blade, and turn the lift handle clockwise to lower the saw blade. Angle Lock Knob INSTALL THE DISPENSING KNIFE Unlick the cutting plate (Fig.1) by pointing it with the arrow in the direction of the back arrow and remove the lower cover (Fig.2) and set it aside. - Page 14 AFTER THE DISPENSING knife 1 is mounted on the mounting seat, press it up and down (Fig.1) and locking handle (Fig.2). Note: the arc groove on the dividing knife cooperates with the arc groove on the fixing seat during installation. Positioning Dispensing Knife Locking Handle (Fig.2)
-
Page 15: Installing The Suction Pipe
Fixing Pin Locking Pin Protecting Shield PROTECTING SHIELD CONVERSION (ON LINE CUTTING) Remove the set screw with a screwdriver, flip the front protection cover up, and lock the set screw to 90 degrees. The front protecting shield is switched to this state to facilitate the saw blade to be cut. Set Screw INSTALLING THE SUCTION PIPE Connect the long vacuum hose to the shield and T fitting. -
Page 16: Installing The Dust Bag
Long Vacuum Hose T Fitting INSTALLING THE DUST BAG Install the dust bag on the dust bag connector (Note: the installation is in place, it may leak wood dust when fully installed in place). Dust Bag Connector REPLACE THE SAW BLADE Note: Raise the blade to the highest cutting position when replacing the saw blade Clampt the inner flange with an open-end wrench, loosen the saw blade nut with a socket wrench, and then remove the saw blade nut... - Page 17 Note: The spindle has a normal right-hand thread and is fixed when rotated clockwise After the saw blade is secured, adjust the dispensing knife and install the protecting shield. Open-End Wrench Wrench Blade Nut Outer Flange Saw Blade Inner Flange ADJUST THE BLADE ANGLE - This table saw supports 45 to 90 cutting and has an angle indicator on the front of the machine.
- Page 18 - Adjust the position of the parallel guides, lift the handle, slide the guide along the deck, and then press the handle to fix it. NOTE: In order to ensure that the guide ruler and the saw blade are parallel, the guide rule must be firmly locked to prevent backlash.
-
Page 19: Cleaning Tips
ATTENTION: To maintain product SAFETY and RELIABILITY, repairs, carbon brush inspection and replacement, any other maintenance or adjustment should be performed by RONIX SERVICE Authorized or RONIX SERVICE Centers, always using RONIX SERVICE replacement parts. DUST COLLECTION TABLE SAW...
Need help?
Do you have a question about the 5601 and is the answer not in the manual?
Questions and answers