Table of Contents
Advertisement
Advertisement
Table of Contents

Related Manuals for Eighteeth AirPex


Summary of Contents for Eighteeth AirPex
- Page 1 AirPex Apex locator USER MANUAL Changzhou Sifary Medical Technology Co.,Ltd.
-
Page 3: Table Of Contents
Content 1. Scope of AirPex ............4 Parts Identification............4 Components and Accessories ........5 Options (sold separately) ..........5 2. Symbols used in the User Manual ....... 6 3. Before Use ..............8 Intended Use ..............8 Contraindications ............8 4. -
Page 4: Scope Of Airpex
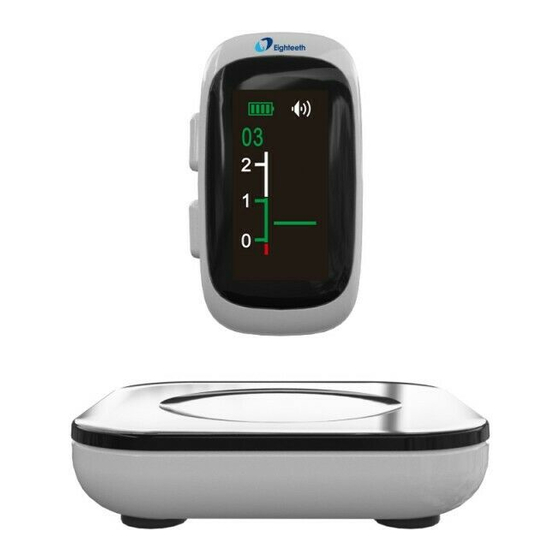
Scope of AirPex 1. Scope of AirPex Parts Identification 1. Charge Base 2. APEX Locator 3. Lip Hook 4. Touch Probe 5. File Clip 6. Extension Cord 7. Adapter 8. Tester 9. Clip Page 4 / 41... -
Page 5: Components And Accessories
Scope of AirPex Components and Accessories APEX Locator(1pcs) Charge Base (1pcs) Adapter (1pcs) Part No. 6151002 Part No. 6151001 Part No.6516001 Lip Hook (2pcs) Touch Probe (1pcs) File Clip (2pcs) Part No. 6072002 Part No. 6101001 Part No. 6151003 Extension Cord (2pcs) -
Page 6: Symbols Used In The User Manual
Symbols used in the User Manual 2. Symbols used in the User Manual If the instructions are not followed properly, operation may lead to hazards for the product or WARNING the user/patient. Additional information, explanation of operation and performance. Serial number Catalogue number Manufacturer Date of manufacture... - Page 7 Symbols used in the User Manual Store in a dry place Can be autoclaved up to a maximum temperature of 134° Celsius Authorized Representative in the European Community Temperature limitation Relative humidity 106kPa Atmospheric pressure 70kPa Manufacturer’s LOGO Refer to instruction manual/booklet Page 7 / 41...
-
Page 8: Before Use
Before Use Before Use Intended Use AirPex is intended for measuring canal length. This device must only be used in hospital environments, clinics or dental offices by qualified dental personnel and not used in the oxygen-rich environment. Contraindications This device must not be used in cases where a patient has been fitted... - Page 9 (including peripherals such as antenna cables and external antennas) should be used no closer than 30 cm (12 inches) to any part of the AirPex, including cables specified by the manufacturer. Otherwise, degradation of the performance of this equipment could result.
-
Page 10: Installing The Airpex
Installing the AirPex 4.Installing the AirPex Connecting file clip, lip hook and extension cord Please use the original file clip and lip hook that manufactured Connect file clip, extension cord by Sifary. Because the size of the and lip hook to APEX locator as unoriginal file clip and lip hook shown in the picture. -
Page 11: Connecting Charge Base
Installing the AirPex Put the APEX locator in the Connecting charge groove in the middle of the charge base base. The power LED on charge base will light up. And the Plug the USB of adapter into the interface of APEX locator will light charge base, and plug the other up to show that is charging. -
Page 12: Use Interface
Use Interface 5.Use Interface Turn Power On/Off Press to turn on. Long press more than 2 seconds, or no operation for 3 minutes to turn off. Volume control During standby state, shot press to cycle the volume through the minor to the maximum. Setting the reference point During standby state, press to set the... -
Page 13: Operation
Operation 6.Operation Charge Display present remaining amount of the battery. Less than 15% remains, please charge. If the power if less than 15%, the device must be recharged within 30 days, otherwise the battery will be damaged. Page 13 / 41... - Page 14 Operation Charging indication appears on the screen, and flashes slowly, when battery is fully charged or in a state near full charge, the flash will stop. Fully charged will take about 4-5 hours, depending residual battery power and battery state. It can be recharged 300-500 times, depending operating...
-
Page 15: Function Checking Of Apex Locator
Function checking of APEX locator After turning on, insert the tester into the APEX locator. Clamp the groove of tester with file clip. The measuring bar on the screen flashes at point 02, 03 or 04. Recommend to test the APEX locator with tester once a week. - Page 16 Operation Confirm the device with short touch file clip and lip hook before. Confirm that the tester is not installed on the APEX locator. Then connect the file clip, lip hook and extension cord according to chapter 5.1. Finally, touch the lip hook with exposed metal position on file clip, the measurement on the...
-
Page 17: Operation And Not Suitable Condition
Operation Operation and not suitable condition Press the back cover of the file clip to make the hook of the file clip stick out. And hook the metal handle of the root canal file. Release the pressure and use the elasticity of the file clip to complete the connection between the file clip and the root canal file. - Page 18 Operation Hook the lips to the patient's lips. Ensure contact with the lips fully. Then the root canal file is slowly inserted into the unblocked root canal. If the patient is fitted with a metal crown or other conductive devices, the root canal file clip and the metal part of the file clip should not be in contact with it, so as to avoid causing wrong measurement results.
- Page 19 Operation value of the reference range is 2, indicating that the distance from the tip of the tooth root is about 2mm at this time. At the same time, Fig.1 the APEX locator emits a "di" alarm sound at a long interval.
- Page 20 Operation 1.0 mm is usually taken from the measured value, which is the Minor/Physiological apical foramen prepared for root canal. The value of the reference distance is only an Fig.3 estimated value, not a clinical basis. The measured value does not represent the distance, only the trend of gradual entry.
- Page 21 Operation Root canal with a large apical foramen The root canal cannot be accurately measured because of the lesion or incomplete development of the apical foramen. The results may show that the length measured is shorter than the actual one. Root canal blood overflow from the opening If blood spills from the root opening and contacts the gums, it will cause leakage of electricity, which...
- Page 22 Operation Broken crown If the crown is broken, a segment of the gingival tissue enters the lumen, and the contact between the gingival tissue and the root file causes electrical leakage, which cannot be accurately measured. In this case, the appropriate material should be used to isolate the gingival tissue.
- Page 23 Operation Crown or metal prosthesis that touches gingival tissue Accurate measurement cannot be obtained if the file touches a mental prosthesis that is touching gingival tissue. In this case, widen the opening at the top of the crown so that the file will not touch the mental prosthesis before taking a measurement.
- Page 24 Operation Blocked canal The meter will not run if the canal is blocked. Opening the canal all the way to the apical construction to measure Extremely dry canal If the canal is extremely dry, the meter may not work until it is quite close to the apex.
- Page 25 Operation The X-ray photo shows that the actual apex of the root canal is not the same as the anatomic end. In fact, the apical foramen is located at the coronal end. in this case, X-ray may indicate that the file needle has not reached the apical foramen, even if it has actually reached the apical foramen.
-
Page 26: Maintenance
7.Maintenance Autoclavable Components File clip Lip hook Touch probe Extension cord File clip and lip hook must be pre-cleaned and sterilized before every use. Pre-cleaning: Use a soft brush or moist cloth to remove visible contaminations, then wipe all the surfaces with a cloth lightly moistened with Ethanol for disinfection (Ethanol 70 to 80vol%) at least 1 min, repeat for 5 times. - Page 27 Maintenance Sterilization: Steam sterilization at 134° C at least 6 minutes . Minimum drying time after sterilization: 10 minutes. Storage: Keep the components in sterilization packaging in a dry and clean environment. Comply with your national guidelines, standards and requirements for cleaning, disinfection and sterilization.
- Page 28 Maintenance Disinfection components APEX locator Charge Base Adapter Tester Clip Wipe all the surfaces with a cloth lightly moistened with Ethanol for Disinfection (Ethanol 70 to 80 vol%) at least 2min, repeat for 5 times. Do not use anything except Ethanol for Disinfection (Ethanol 70 to 80 vol%).
-
Page 29: Troubleshooting
Troubleshooting 8.Troubleshooting When trouble is found, check the following points before contacting your distributor. If none of these are applicable or the trouble is not remedied even after action has been taken, the product may have failed. Contact your distributor. Problem Cause Solution... -
Page 30: Technical Data
Technical Data 9.Technical Data Manufacturer Changzhou Sifary Medical Technology Co.,Ltd Model AirPex Dimensions 13cm x 11cm x 8cm±1cm (Outer box) Weight 0.35kg±10% Lithium ion battery: 3.7V, 120mAh, ±10% Power supply Charger power AC 100-240 V, ±10% supply Charger power output 50/60Hz, ±10%... - Page 31 Technical Data Applied part Operation Continuous operation mode Use: in enclosed spaces Ambient temperature: 5° C ~ 40 ° C Operating Relative humidity: <80% conditions Operating altitude < 3000m above sea level Atmospheric pressure: 70kPa-106kPa Transport and Ambient temperature: -20 ° C ~ +55 ° C storage Relative humidity: 20% ~ 80 % conditions...
-
Page 32: Emc Tables
Guidance and manufacturer’s declaration – electromagnetic emissions The AirPex is intended for use in the electromagnetic environment specified below. The customer or the user of the AirPex should assure that it is used in such an environment. Electromagnetic environment -... - Page 33 Guidance and manufacturer’s declaration – electromagnetic immunity The AirPex is intended for use in the electromagnetic environment specified below. The customer or the user of the AirPex should assure that it is used in such an environment. Immunity test IEC 60601...
- Page 34 EMC Tables Voltage dips Mains power quality IEC 61000-4-11 should be that of a 0% UT; 0.5 0% UT; 0.5 typical commercial cycle cycle or hospital at 0° , 45° , 0° , 45° , environment. If the 90° , 135°...
- Page 35 EMC Tables Guidance and manufacturer’s declaration – electromagnetic immunity The AirPex is intended for use in the electromagnetic environment specified below. The customer or the user of the AirPex should assure that it is used in such an environment. Electromagnetic...
- Page 36 The AirPex has been tested with the immunity test level in the below table and meet the related requirements of IEC 60601-1-2:2014. The customer and/or user should help keep a minimum distance between RF wireless communications equipments and the AirPex as recommended below.
- Page 37 EMC Tables modulation 18Hz GMRS 430- ± 5 kHz deviation 1 kHz sine Pulse 704- Band modulation 217Hz 800/90, TETRA 800, Pulse 800- iDEN modulation 820, 18Hz CDMA 850, Band 5 1720 1800; 1845 CDMA 1900; Pulse 1700- 1900; modulation 1990 DECT;...
- Page 38 5800 217Hz 5785 Use of accessories and cables other than those specified or provided by the manufacturer of AirPex could result in increased electromagnetic emissions or decreased electromagnetic immunity of AirPex and result in improper operation. Cable information: Cable Name...
- Page 39 EMC Tables Use of AirPex adjacent to or stacked with other equipment should be avoided because it could result in improper operation. If such use is necessary, AirPex and the other equipment should be observed to verify that they are operating normally.
-
Page 40: Statement
Statement 11.Statement Service Life The service life of AirPex series products is 3 years. Maintenance MANUFACTURE will provide circuit diagrams, component part lists, descriptions, calibration instructions assist SERVICE PERSONNEL in parts repair. Disposal The package should be recycled. Metal parts of the device are disposed as scrap metal. - Page 41 Add: NO.99, Qingyang Road, Xuejia County, Xinbei District, Changzhou City, 213000 Jiangsu, China Tel: +86-0519-85962691 Fax: +86-0519-85962691 Email: ivy@sifary.com Web: www.eighteeth.com Llins Service & Consulting GmbH Tel: +49 175 4870819 Add: Obere Seegasse 34/2, 69124, Heidelberg, Germany Email:Llins.Service@gmail.com Version: S01 IFU-6335101 Issued: 2019.12.02...
Need help?
Do you have a question about the AirPex and is the answer not in the manual?
Questions and answers